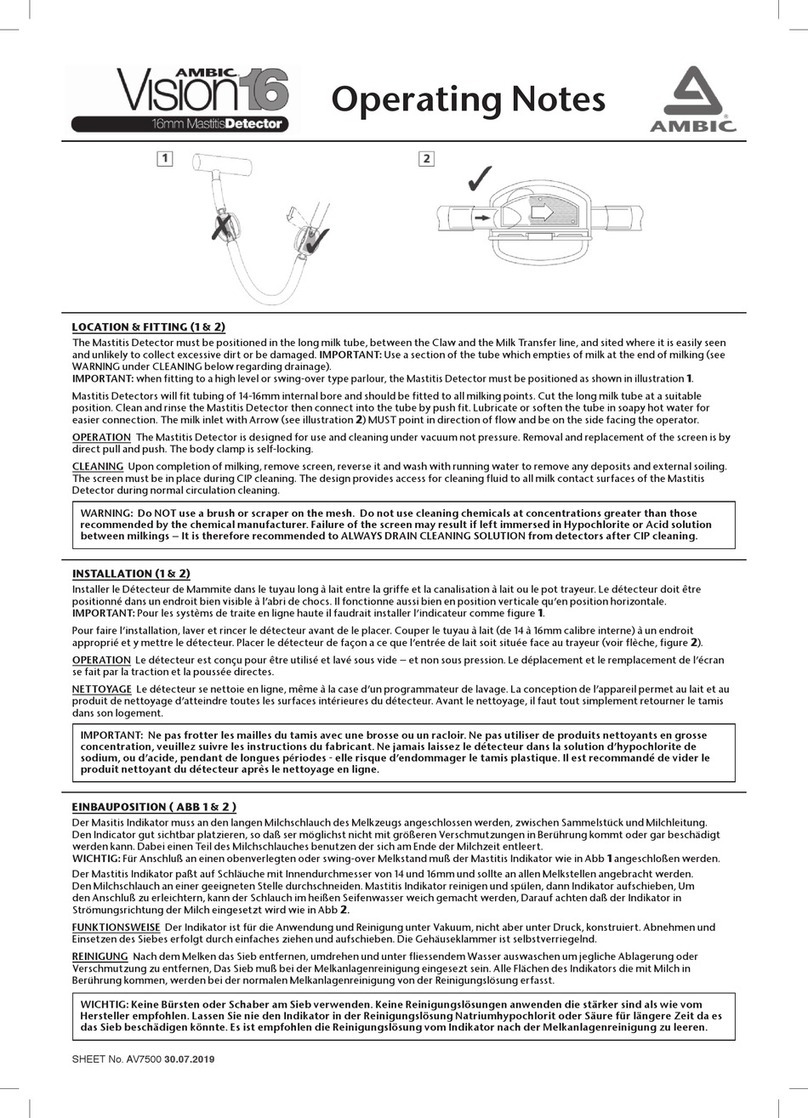
LOCATION & FITTING (1 & 2)
The Mastitis Detector must be positioned in the long milk tube, between the Claw and the Milk Transfer line, and sited where it is easily seen and
unlikely to collect excessive dirt or to be damaged. IMPORTANT: Use a section of the tube which empties of milk at the end of milking (see WARNING
under CLEANING below regarding drainage).
IMPORTANT: when fitting to a high level or swing-over type parlour, the Mastitis Detector must be positioned as shown in illustration 1.
Mastitis Detectors will fit tubing of 12 - 14mm internal bore and should be fitted to all milking points. Cut the long milk tube at a suitable position. Clean
and rinse the Mastitis Detector then connect into the tube by push fit. Lubricate or soften the tube in soapy hot water for easier connection. The milk
Inlet with Arrow (see illustration 2) MUST point in direction of flow and be on the side facing the operator.
OPERATION The Mastitis Detector is designed for use and cleaning under vacuum not pressure. Removal and replacement of the screen is by direct
pull and push. The body clamp is self-locking.
CLEANING Upon completion of milking, remove screen, reverse it and wash with running water to remove any deposits and external soiling.
The screen must be in place during CIP cleaning. The design provides access for cleaning fluid to all milk contact surfaces of the Mastitis Detector
during normal circulation cleaning.
WARNING: Do NOT use a brush or scraper on the mesh. Do not use cleaning chemicals at concentrations greater than those
recommended by the chemical manufacturer. Failure of the screen may result if left immersed in Hypochlorite or Acid solution between
milkings –it is therefore recommended to ALWAYS DRAIN CLEANING SOLUTION from detectors after CIP cleaning.
INSTALLATION (1 & 2)
Installer le Détecteur de Mammite dans le tuyau long à lait entre la griffe et la canalisation à lait ou le pot trayeur. Le détecteur doit être positionné dans
un endroit bien visible à l'abri des chocs. Il fonctionne aussi bien en position verticale qu’en position horizontale.
IMPORTANT: Pour les systèmes de traite en ligne haute il faudrait installer l’indicateur comme figure 1.
Pour faire l’installation, laver et rincer le détecteur avant de le placer. Couper le tuyau à lait (de 12 à 14mm calibre interne) à un endroit approprié et y
mettre le détecteur. Placer le détecteur de façon à ce que l'entrée de lait soit située face au trayeur. (voir flèche, figure 2).
OPERATION Le détecteur est conçu pour être utilisé et lavé sous vide –et non sous pression. Le déplacement et le remplacement de l'écran se fait
par la traction et la poussée directes.
NETTOYAGE Le détecteur se nettoie en ligne, même à la case d’un programmateur de lavage. La conception de l’appareil permet au lait et au
produit de nettoyage d'atteindre toutes les surfaces intérieures du détecteur. Avant le nettoyage, il faut tout simplement retourner le tamis dans son
logement.
IMPORTANT : Ne pas frotter les mailles du tamis avec une brosse ou un racloir. Ne pas utiliser de produits nettoyants en grosse
concentration, veuillez suivre les instructions du fabricant. Ne jamais laissez le détecteur dans la solution d'hypochlorite de sodium, ou
d’acide, pendant de longues périodes - elle risque d’endommager le tamis plastique. Il est recommandé de vider le produit nettoyant du
détecteur après le nettoyage en ligne.
EINBAUPOSITION (Abb 1 & 2)
Der Mastitis Indikator muss an den langen Milchschlauch des Melkzeugs angeschlossen werden, zwischen Sammelstück und Milchleitung. Den
Indikator gut sichtbar platzieren, so daß er möglichst nicht mit größeren Verschmutzungen in Berührung kommt oder gar beschädigt werden kann.
Dabei einen Teil des Milchschlauches benutzen der sich am Ende der Milchzeit entleert.
WICHTIG: Für Anschluß an einen obenverlegten oder swing-over Melkstand muß der Mastitis Indikator wie in Abb 1 angeschloßen werden.
Der Masititis Indikator paßt auf Schläuche mit Innendurchmesser von 12 und 14 mm und sollte an allen Melkstellen angebracht werden.
Den Milchschlauch an einer geeigneten Stelle durchschneiden. Mastitis Indikator reinigen und spülen, dann Indikator aufschieben. Um den Anschluß
zu erleichtern, kann der Schlauch im heißen Seifenwasser weich gemacht werden. Darauf achten daß der Indikator in Strömungsrichtung der Milch
eingesetzt wird wie in Abb 2.
FUNKTIONSWEISE Der Indikator ist für die Anwendung und Reinigung unter Vakuum, nicht aber unter Druck, konstruiert. Abnehmen und
Einsetzen des Siebes erfolgt durch einfaches ziehen und aufschieben. Die Gehäuseklammer ist selbstverriegelnd.
REINIGUNG
Nach dem Melken das Sieb entfernen, umdrehen und unter fliessendem Wasser auswaschen um jegliche Ablagerung oder Verschmutzung zu
entfernen. Das Sieb muß bei der Melkanlagenreinigung eingesezt sein. Alle Flächen des Indikators die mit Milch in Berührung kommen, werden bei der
normalen Melkanlagenreinigung von der Reinigungslösung erfasst.
WICHTIG : Keine Bürsten oder Schaber am Sieb verwenden. Keine Reinigungslösungen anwenden die stärker sind als wie vom
Hersteller empfohlen. Lassen Sie nie den Indikator in der Reinigungslösung Natriumhypochlorit oder Säure für längere Zeit da es das
Sieb beschädigen könnte. Es ist empfohlen die Reinigungslösung vom Indikator nach der Melkanlagenreinigung zu leeren.


