Amcor 1 User manual

Owner’s Instructions CLEAR AIRE 1, Air Purifier
Bedienungsanleitung CLEAR AIRE 1, Luftreiniger
Mode d’emploi CLEAR AIRE 1, Purificateur d’Air
Gebruiksaanwijzing CLEAR AIRE 1, Luchtreiniger N
D
F

FIG. 1 FIG.
FIG. 3 FIG. 4
FIG. 6
FIG. 5
2
C
D

Stage 5: Ionization
This stage is of utmost importance as it restores the
natural balance of the air. After the air is purified, it is
further cleaned and ionized at the air outlet using
AMCOR’s patented carbon filament process.
* Ionization substantially reduces the amount of
indoor bacteria in the air.
* Ionization can frequently help asthma and allergy
sufferers.
* Ionization may help relieve weatherrelated maladies
such as headaches, nausea and physical
aches.
* Ionization may help lower tension, producing
sounder sleep.
CLEANED AND IONIZED MOVING AIR
STAGES 1-3 ARE CONTAINED IN A SINGLE, EASY TO
CLEAN CASSETTE.
B
C
How the air purifier works
POLLUTED AIR, WITH POSITIVELY CHARGED IONS
Stage 1: Electrostatic Dust-holding Capacity Filter
Friction caused by air passing through the first honey-
comb filter creates an electrostatic charge that captures
and retains pollutants, dust and dirt.
Stage 2: Open Pore Polyurethane Foam
The foam is very permeable and has an extremely
high dust-holding capacity.
Stage 3: A second honeycomb filter also captures and
retains pollutants, dust and dirt.
Stage 4: Scent Emitter
The user may add a pleasant scent to the air with the
scent emitter option. The system is environmentally
friendly since it uses a blower to disperse the scent
instead of dispersing harmful fluorocarbons. The scent
comes in replaceable capsules which are easily inserted.
The scents are pleasant, unobtrusive and barely
suggestive.
A
Phase 5: Ionisierung
Diese Phase ist äußerst wichtig; denn jetzt wird das
natürliche Gleichgewicht der Luft wiederhergestellt.
Nachdem die Luft gereinigt worden ist, wird sie
nochmals gefiltert und beim Ausströmen anodisiert,
und zwar mittels AMCORs Karbon-Faser-Element,
worauf AMCOR ein Patent hat.
* Ionisierung vermindert tatsächlich die im Raum
schwebenden Bakterien.
* Ionisierung kann in bestimmten Fällen Asthma- und
Allergiebeschwerden lindern.
* Ionisierung hat eine positive Auswirkung auf
Beschwerden, die auf Wetterverhältnisse
zurückzuführen sind, wie Kopfschmerzen, Übelkeit
und sonstige körperliche Beschwerden.
* Ionisierung hilft, Spannungen zu lösen und kann zu
einer besseren Nachtruhe beitragen.
GEREINIGTE UND IONISIERTE LUFTSTRÖMUNG
DIE DREI FILTER (PHASE 1 BIS 3) BEFINDEN SICH ALLE
ZUSAMMEN IN EINER PRAKTISCHEN FILTERKASSETTE.
DIESE KASSETTE IST EINFACH AUSZUWECHSELN.
VERSCHMUTZTE LUFT, MIT POSITIV GELADENEN
IONEN
Phase 1: Staubfilter mit elektrostatischer Wirkung.
Die Luft, die durch den ersten Wabenfilter strömt,
verursacht elektrische Reibung. Die dabei entstehende
elektrostatische Ladung fängt Verschmutzungen, Staub
und Rauch auf und hält diese fest.
Phase 2: Luftdurchlässiger Polyurethanschaum
Der Schaumstoff ist luftdurchlässig und hat eine
extrem hohe Kapazität, den Staub festzuhalten.
Phase 3: Ein zweiter wabenförmiger Staubfilter
mit elektrostatischer Wirkung.
Phase 4: Duftspender
Mit dem Duftspender können Sie einen angenehmen
Duft verbreiten. Dieses System ist umweltfreundlich,
weil der Duft durch einen Ventilator im Raum verbreitet
wird und nicht durch schädliches Fluorkarbonat.
Der Duftspender wird in praktischen Kapseln geliefert,
die problemlos eingefügt werden können.
D
3
E
B
C
A

13
4
5
2
A
B
C
4

Phase 5 Ionisation
Cette phase est d’une grande importance, parce
qu’elle rétablit l’équilibre de l’air. Après épuration, l’air
est
ensuite filtré et chargé en ions négatifs à la sortie de
l’appareil grâce au filament de carbone breveté
d’AMCOR.
* L’ionisation réduit effectivement le nombre de
bactéries dans l’air.
* L’ionisation peut, en certains cas, soulager les
personnes qui souffrent d’asthme et d’allergies.
* L’ionisation peut avoir un effet positif dans le cas de
troubles relatives aux conditions atmosphé-
riques et au climat, comme mal
de tête, troubles physiques et
nausée.
* L’ionisation peut contribuer à réduire le stress et à
améliorer le repos nocturne.
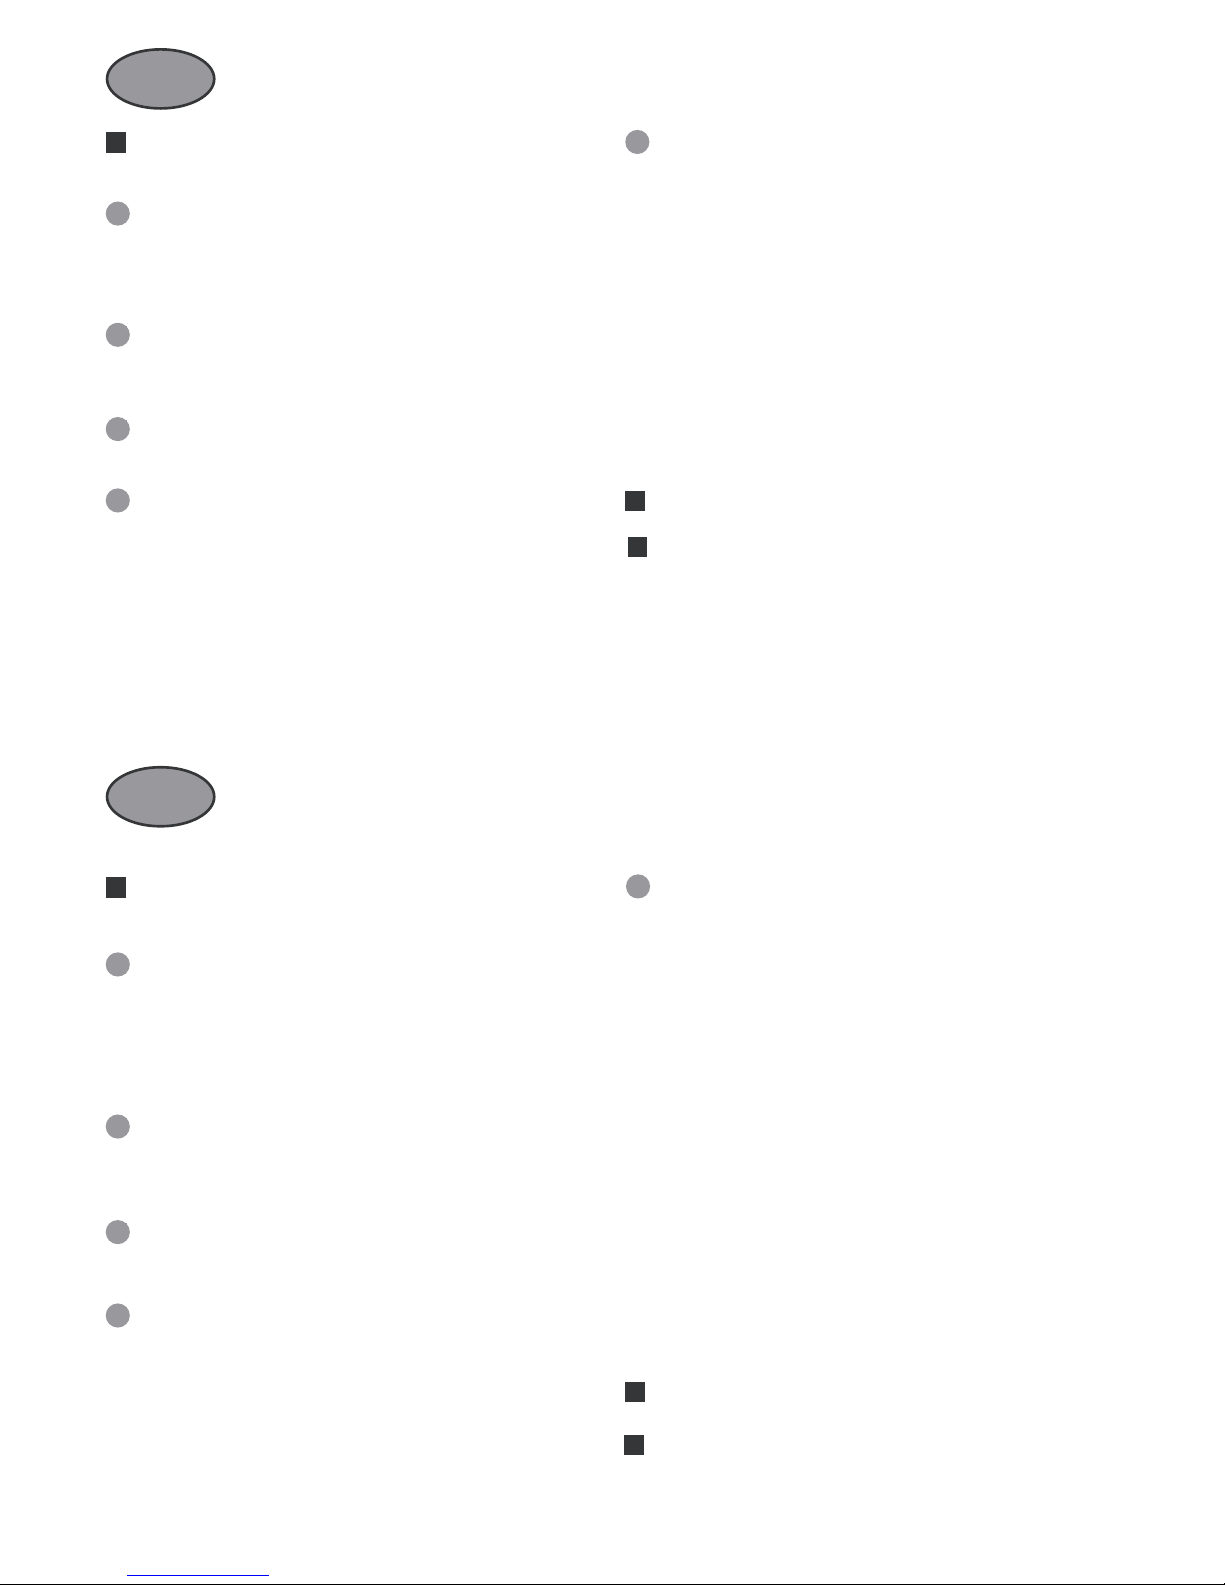
AIR EPURE ET IONISE (sortant de l’appareil)
LES TROIS FILTRES (PHASE 1 A 3 INCLUS) ONT
ETE MIS ENSEMBLE DANS UNE SEULE CASSETTE
AIR POLLUE, AVEC DES IONS ELECTROPOSITIFS
Phase 1: Dépoussiéreur avec fonctionnement élec-
trostatique. L’air passant devant le premier filtre,
provoque un frottement électrique. La charge
électrostatique ainsi produite “saisit” et retien
particules polluantes, poussières, fumée, etc.
Phase 2: Mousse polyuréthane perméable.
La mousse laisse passer l’air et elle a une capacité de
dépoussiérage extrêmement élevée.
Phase 3: Un deuxième dépoussiéreur
avec fonctionnement électrostatique.
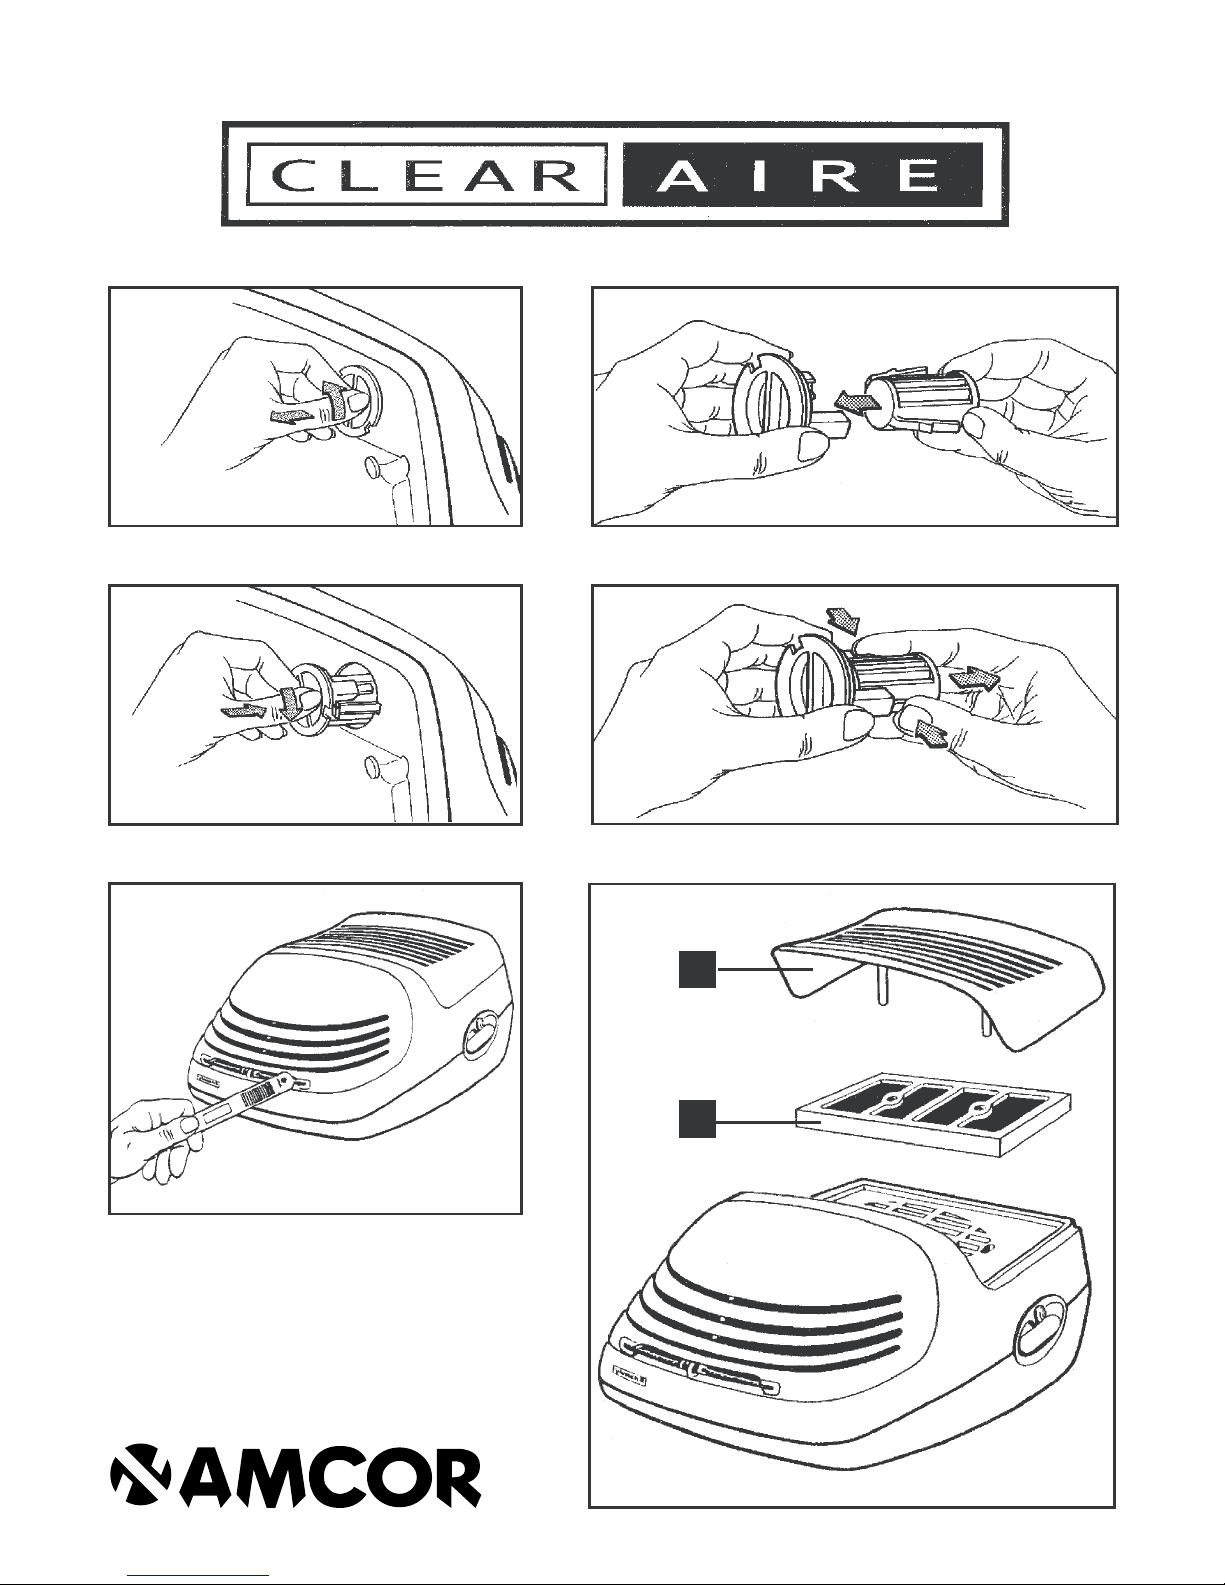
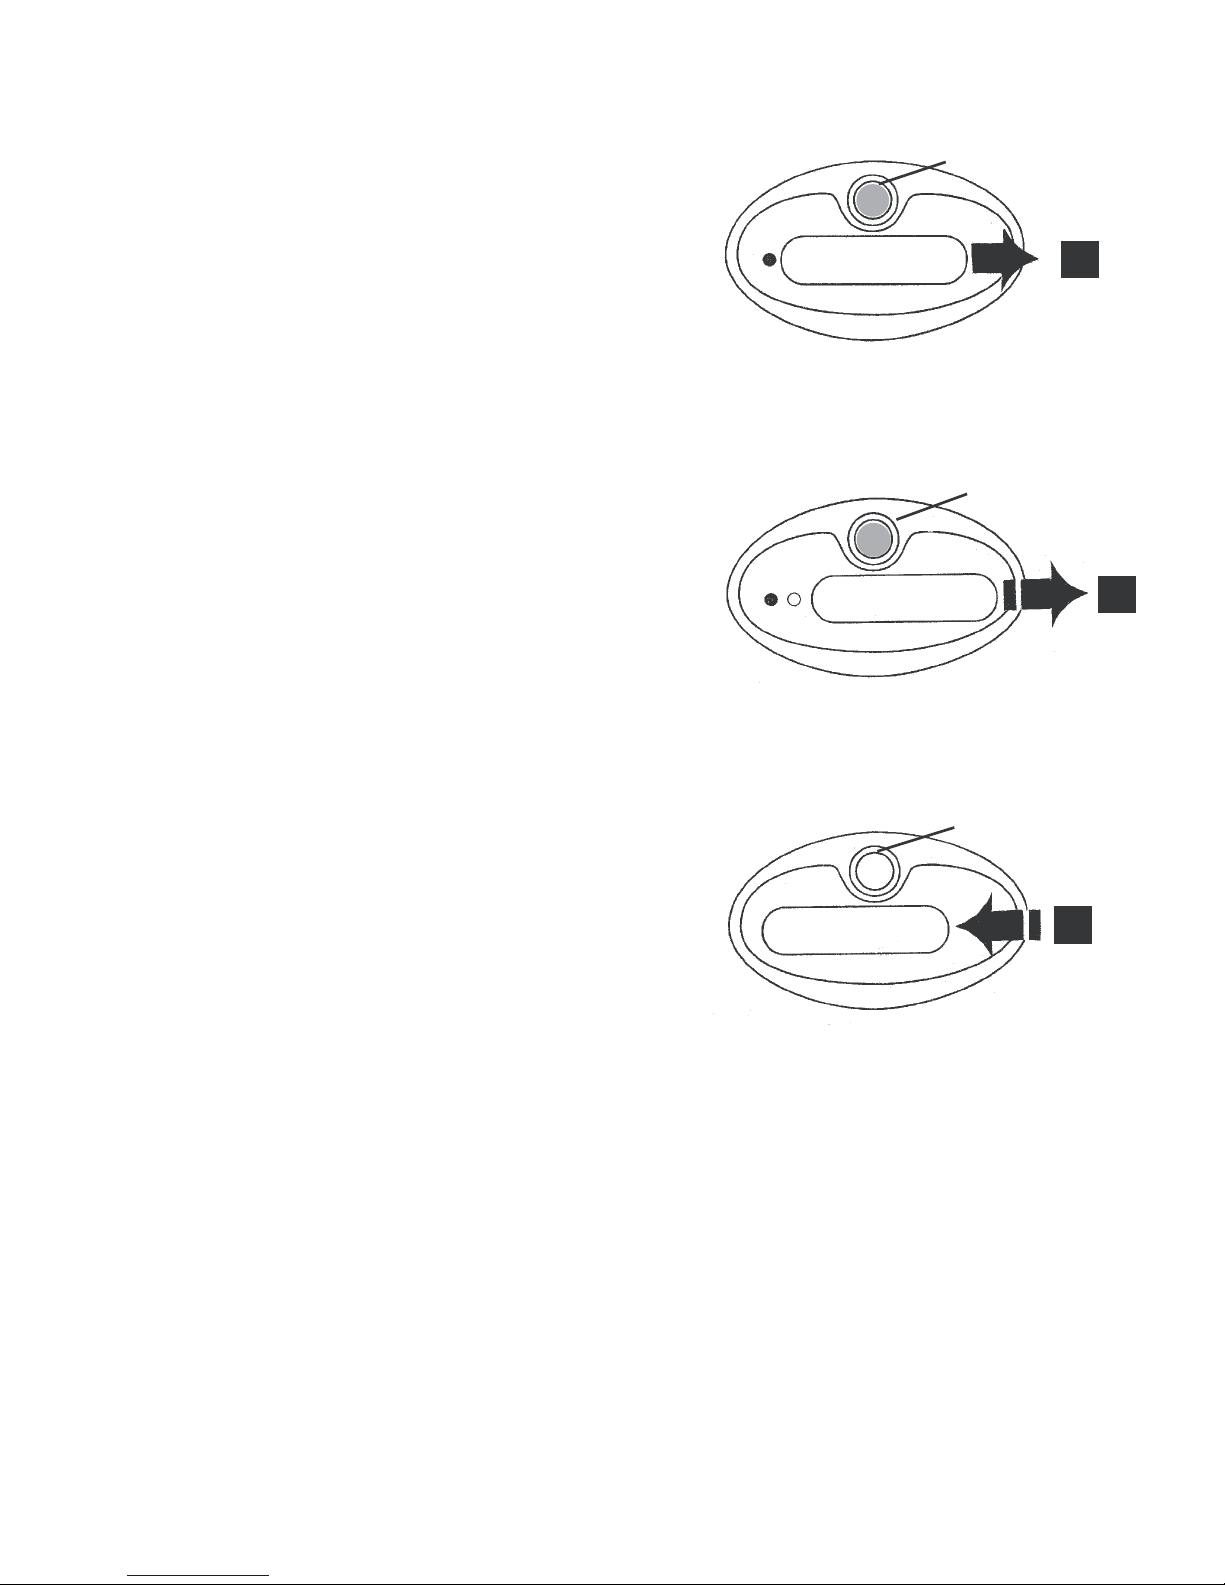
Phase 4: Un diffuseur de parfum
En utilisant le diffuseur de parfum, vous pouvez faire
répandre une odeur agréable. Le système est non
polluant, parce que le parfum d’ ambiance est
répandu dans la pièce au moyen d’un ventilateur,
au lieu du carbonate fluoré nuisible. Le diffuseur de
parfum est livré en capsules pratiques, faciles à placer.
F
5
A
C
Fase 5 Ionisatie
Deze fase is van groot belang omdat het de natuur-
lijke balans van de lucht herstelt. Nadat de lucht is gezui-
verd, wordt het verder gefilterd en geanodiseerd in de
luchtuitvoer door middel van AMCOR’s gepatenteerde
koolstofvezelkoord.
* Ionisatie vermindert daadwerkelijk het aantal
bacteriën in de lucht binnenshuis.
* Ionisatie kan in bepaalde gevallen verlichting geven
aan mensen, die lijden aan astma en aller-
gieën.
* Ionisatie kan positief werken bij klachten, die te
maken hebben met weersomstandigheden en het
klimaat, zoals hoofdpijn, lichamelijke klachten en
misselijkheid.
* Ionisatie kan spanning helpen verminderen en kan
bijdragen tot een betere nachtrust.
GEZUIVERDE EN GEÏONISEERDE, NIET STATISCHE,
BEWEGENDE LUCHT
DE DRIE FILTERS (FASE 1 T/M 3) ZIJN SAMENGE-
BRACHT IN ÉÉN HANDIGE FILTERCASSETTE.
B
C
VERONTREINIGDE LUCHT,
MET POSITIEF GELADEN IONEN
Fase 1: Stofopvangfilter met elektrostatische
werking. De lucht, die het eerste honingraat-filter
passeert, veroorzaakt elektrische wrijving. De elektro-
statische lading, die daarbij wordt opgewekt, “vangt”
en houdt verontreiniging, stof en rook vast.
Fase 2: Opengewerkt Polyuretaanschuim
Het schuim is luchtdoorlatend en heeft een
extreem hoog stofvasthoudende capaciteit.
Fase 3: Een tweede honingraat-stofopvangfilter
met elektrostatische werking.
Fase 4: Luchtverfrisser
Door gebruik te maken van de luchtverfrisser
wordt een aangename geur verspreid. Het systeem
is milieuvriendelijk, omdat de geur met een ventilator
in het vertrek wordt verspreid in plaats van door
schadelijk fluorcarbonaat. De luchtverfrisser wordt in
handige capsules geleverd, die gemakkelijk zijn te
plaatsen.
A

CLEAR AIRE 1
Air purifier with the AMCOR exclusive
high-tech pure carbon ion generator
A word to CLEAR AIRE 1 owners:
This manual has been prepared to acquaint you with the proper installation, operation
and maintenance of your CLEAR AIRE 1. We urge you to read this publication carefully and
to follow the recommendations to help assure the most enjoyable and trouble-free
operation of your AMCOR unit.
When it comes to service, remember that AMCOR knows its product best. Please do not
attempt to open, repair and/or clean any of the internal parts of the CLEAR AIRE 1
yourself. This could result in the loss of warranty.
We would like to take this opportunity to thank you for choosing an AMCOR product
and to assure you of our continuing interest in your comfort, pleasure and satisfaction.
Read instructions carefully before operating.
Chapter 1
ELECTRICAL SAFETY
* The CLEAR AIRE 1 is safe. It is approved by many safety institutions around the world.
However, as with other electrical appliance, use it with care.
* Do not clean the CLEAR AIRE 1 by spraying it or immersing it in water.
* Do not insert any object into the opening of the CLEAR AIRE 1.
* Disconnect the product from the mains before cleaning the unit or any of its
components.
* A slight sensation may be felt if the carbon filament ionizing element (the carbon cord
on the front air outlet) is touched. This is normal and presents no danger.
This sensation may also be felt if you touch a person or a large metal object while your
other hand is on the unit.
* WHEN NOT IN USE, STORE OUT OF THE REACH OF CHILDREN!
*WARNING:
Any service, other than regular cleaning or filter replacement, should be performed by
an authorized service representative. Failure to do so could result in loss of warranty.
Never operate this appliance if it has a damaged cable or plug. Do not jam the
cable or lead it over sharp edges.
Damaged cords or plugs can be life-threatening. They must be replaced only by
an approved customer service department or similarly qualified personnel.
6

Caution
In order to prevent dirt build-up, it is recommended to keep the unit at least 1.5 ft.
(45 cm) from any non-washable surface. The air outlet should face away from the wall.
The principle upon which the ionizer works is ionization. The process of ionization
accelerates the fallout of pollutants from the air. These pollutants may adhere to
surrounding surfaces, causing a dark smudge. Therefore, placement of the unit away
from all non-washable surfaces is a must!
Chapter 2 • A. INSTALLATION • B. OPERATION • C. CLEANING
Attention: Before deciding on a location for your CLEAR AIRE 1 AIR PURIFIER, carefully
read all the operating instructions as well as the following information.
The CLEAR AIRE 1 ensures a minimum of 1000 negative air ions per cubic
centimeter in an area of 18 ft. (6 m) x 12 ft. (4 m) = 220 sq.ft. (24 sq.m).
Effective range: up to 18 ft. (6 m).
A. Installation of the CLEAR AIRE 1
a) Never place this unit in close proximity to (at least 3-4 ft. away from) electronic
devices that contain electronic circuits, or are damaged by electrical fields.
Examples are: video tapes, audio tapes, floppy disks, computers, wrist watches,
touch lamps, radios, stereos, telephones, VCRs, etc.
b) Never place this unit on metal shelving or on any electrical devices.
c) The CLEAR AIRE 1 may be placed on a nightstand, table or desk with its air outlet
facing the user. In order to allow for proper air flow and to reduce particle build-up,
always keep your unit at least 1.5 ft. (45 cm) from any wall. The air outlet should
always face away from the wall.
B. Instructions for use of the CLEAR AIRE 1
The CLEAR AIRE 1 may be operated all day or night. The air velocity can be regulated
either by the blower’s two-speed switch or by moving the CLEAR AIRE 1 towards or away
from the user.
B.1 Checking the operation of the CLEAR AIRE 1
When the light goes on, your air purifier is in operation (see control switch
diagram, page 8).
7

Before operating your unit:
B.2 Using the scent release function
(optional)
Your air purifier can also disperse a
pleasant scent. To do so, a scent release
capsule may be purchased from your
dealer or ordered directly from us. One
scent release capsule is provided with
the unit. These scents are pleasant,
unobtrusive and barely suggestive.
The capsules are made of Polyiff®.
Polyiff®is produced by IFF, the world’s
largest manufacturer of flavorings
and fragrances.
To use the scent release function:
The capsule is installed on the right
side of the lower enclosure on the front
of your appliance (see fig. 1, page 2)
To install, SWITCH OFF the unit.
Remove the capsule from its protective
wrapping. Open the capsule cap by
turning it in the direction opposite to that
indicated by the arrow on the cap
(see fig. 1, page 2). Insert the capsule in the
cap until the tabs catch the cap (see fig. 2,
page 2). Insert the complete cap (with the
capsule inside it) into the air purifier and
turn the cap in the direction of the arrow
(see fig. 3, page 2). Your air purifier will now
release a pleasant fragrance during operation.
To replace the capsule, SWITCH OFF the unit.
First remove the cap from the air purifier by
turning it in the direction opposite to that
indicated by the arrow (see fig. 1, page 2).
Press the tabs together and remove the used
capsule (see fig. 4, page 2).
Replace the used capsule with a new one
(see fig. 3, page 2).
Control switch
BLOWER AT HIGH SPEED
Position • IONIZER IS ON
(middle position)
FOR POWERFUL AIR PURIFICATION
BLOWER AT LOW SPEED
Position •
•
•IONIZER IS ON
(extreme right)
FOR QUIET OPERATION
UNIT IS OFF
(extreme left)
light (on)
light (off)
light (on)
1
2
3
8

To deactivate the scent release function:
Remove the capsule and store in a glass jar with a tight lid (if the capsule is
still active). Store the empty cap inside the lower enclosure.
B.3 The AMCOR ionoscope, an ion detector (see fig. 5, page 2)
What is an ionoscope?
The ionoscope is a device that detects the negative ions emitted from the ion
generator. It proves visually to the user that the ion generator is functioning.
How to use the ionoscope
After switching on the unit, hold the ionoscope with your thumb on the area
marked “thumb position”.
Touch the ionizing element (the carbon cord on the front of the air outlet) with the
bare metal strip on the underside of the ionoscope. The neon bulb on the tester will
begin to blink.
When you turn off the ionizer or move the ionoscope away, the ionoscope’s neon
bulb will stop blinking. This shows that no more negative ions are being genera-
ted into the air.
Note:
Do not worry if the light on the ionoscope continues to blink after the appliance is
turned off. This just means that negative ions recently emitted by the unit are still in
the vicinity.
C. Routine service and cleaning
Regular maintenance of the unit will maintain its effectiveness.
Before cleaning this unit, unplug it from the electrical outlet!
C.1 Cleaning the filter
a. Lift the filter cover (see fig. 6 , page 2) using the recesses on the sides of the
appliance,then remove the filter cassette (see fig.6 , page 2). Clean the filter by
dusting and then washing it in a mild detergent solution.
DRY THE FILTER CASSETTE COMPLETELY BEFORE RE-INSTALLATION!
b. Install the dry filter cassette on top of the appliance.
Push the filter cassette forward until it is properly seated. The filter cassette is
symmetrical. Do not worry which way you place it.
c. Replace the filter cover, making sure to insert the two pins on the filter cover
through the holes in the cassette into the upper enclosure
(see fig. 6, page 2).
Frequency of cleaning
It is recommended to clean the filter every 2 weeks.
9

C.2 Enclosure cleaning
Clean the outside of the unit at least once a week with a damp paper towel
moistened with a common household detergent. Use a soft brush to clean
(lengthwise) the carbon filament on the front of the outlet grill. Make sure not
to damage the carbon filament during the cleaning process.
C.3 Cleaning the area around the unit
Wipe the area around the unit once a week with a wet paper towel. This will
prevent unmanageable debris from collecting.
PLUG WIRING INSTRUCTIONS, AND FUSE INFORMATION: (U.K. only)
A. If the attached plug is unsuitable, cut it off and throw it away.
NEVER insert the severed plug into an electrical socket or outlet.
B. Never use the plug without the fuse cover fitted in place.
C. If the cover is lost you can purchase a replacement from PENCON.
D. The replacement fuse is 3 Amps and should conform and approved to BS1362.
E. Check the wiring instructions and diagram while refitting a plug.
The wire which is coloured blue must be connected to the neutral terminal
which is marked with the letter N. The wire which is coloured brown must be
connected to the terminal which is marked with the letter L.
Neither wire of the supply lead is to be connected to the earth terminal of a
threepin plug.
10
Technical data on page 24.
Subject to alteration without notice.

CLEAR AIRE 1
Luftreiniger mit außerordentlicher Wirkung dank des exklusiven,
von AMCOR patentierten Ionen-Generators aus Kohlenstoffaser.
An den Käufer und Benutzer des CLEAR AIRE’s:
Wir freuen uns, daß Sie sich für unser AMCOR-Produkt entschieden haben. Wir haben
den Apparat so konstruiert, daß er Ihnen jahrelang Freude bereiten wird. Diese
Gebrauchsanweisung soll Sie über die richtige Benutzung, die Wirkung und Wartung
Ihres CLEAR AIRE’s informieren. Lesen Sie bitte die Gebrauchsanweisung sorgfältig und
handeln Sie nach unseren Vorschlägen, nur so ist eine optimale und störungsfreie
Wirkung Ihres AMCOR Apparates gewährleistet. Sollte doch einmal ein Schaden
auftreten, dann sollten Sie bedenken, daß AMCOR ihre Apparate am besten kennt.
Versuchen Sie darum nicht, selbst den Apparat zu öffnen und zu reparieren, oder
irgendein Ersatzteil auszuwechseln oder zu reparieren. Das kann zu Fehlern führen
und zum Erlöschen Ihrer Garantieansprüche.
Lesen Sie bitte die Gebrauchsanweisung sorgfältig und vollständig, bevor Sie
den CLEAR AIRE in Betrieb nehmen.
Kapitel 1
ALLGEMEINE GEBRAUCHSANWEISUNG UND SICHERHEIT
Einige wichtige Punkte:
*CLEAR AIRE ist ein sicheres Gerät. Es wurde von vielen internationalen
Sicherheitsinstituten geprüft. Wie alle anderen elektrischen Geräte, muß auch dieses
sorgfältig behandelt werden.
*Bei der Reinigung niemals das Gerät mit Wasser bespritzen oder in Wasser eintauchen.
*Stecken Sie keine Gegenstände durch die Gitter des CLEAR AIRE’s.
*Ziehen Sie immer den Stecker aus der Steckdose, bevor Sie das Gerät oder einen Teil des
Gerätes reinigen.
*Es kann passieren, daß Sie einen leichten Schlag fühlen, wenn Sie den Ionen-Generator
(das Karbon-Faser-Element am vorderen Luftgitter) berühren. Dieser Schlag wird durch
statische Elektrizität verursacht und ist vollkommen ungefährlich. Sie können diesen
kleinen Schlag auch dann fühlen, wenn Sie eine Person oder einen Metallgegen-
stand in der Nähe des Luftreinigers anfassen.
*STELLEN SIE DAS GERÄT AUS SICHERHEITSGRÜNDEN IMMER AUSSER REICHWEITE VON
KINDERN AUF!
*WARNUNG: Lassen Sie eventuelle Reparaturen -abgesehen von der regelmäßigen
Reinigung oder dem Auswechseln des Filters- immer von einem anerkannten
Servicemonteur oder von Ihrem AMCOR-Händler ausführen, es könnten sonst Ihre
Garantieansprüche verfallen.
Das Gerät niemals mit beschädigtem Kabel oder Stecker einschalten. Das Kabel
nicht einklemmen oder über scharfe Kanten leiten.
Beschädigte Netzkabel stellen eine Gefahr dar und müssen vom Kundendienst
oder von ähnlich qualifizierten Personen ausgetauscht werden.
11

Warnung
Die starke Wirkung des Gerätes zieht die in der Luft schwebende Verschmutzung wie
ein Magnet an. Der angesaugte Schmutz aus der Luft kann sich in der Umgebung des
Gerätes ablagern, darum sollte das Gerät auf keinen Fall in der Nähe nicht
abwaschbarer Oberflächen aufgestellt werden. Wischen Sie die Umgebung des
CLEAR AIRE’s einmal pro Woche ab. Mehr Einzelheiten über Aufstellung und Reinigung
finden Sie im Kapitel 2 - A und C dieser Gebrauchsanweisung.
Kapitel 2 • A. AUFSTELLUNG • B. WIRKUNG • C. WARTUNG
Lesen Sie bitte die Instruktionen sorgfältig und vollständig, bevor Sie eine Entscheidung
über die Aufstellung Ihres CLEAR AIRE-Luftreinigers treffen. Der CLEAR AIRE bringt auf
einem Raum von 6x4 m mindestens 1000 negative Ionen pro cm3in die Luft.
Der effektive Wirkungsbereich des Gerätes beträgt ca. 6 m.
A. Aufstellung des CLEAR AIRE’s 1
A.1 Eines der Prinzipien, auf denen die Wirkung Ihres Luftreinigers beruht ist
Ionisierung. Dieser physikalische Prozeß verschnellt die Säuberung der Luft.
Der CLEAR AIRE zieht (wie ein Magnet) die in der Luft schwebende Verschmutzung
an. Dieser Schmutz kann sich in der Umgebung des Gerätes ablagern und einen
hartnäckigen Beschlag verursachen.
a) Stellen Sie Ihren Luftreiniger ausschließlich auf und in die Nähe von abwischbaren
Oberflächen.
b) Der CLEAR AIRE 1 kann auf Nachtschränkchen, Tisch oder Büro gestellt werden,
wobei der Luftauslaß auf den Benutzer gerichtet werden muß. Das Gerät muß
mindestens 50 cm von der Wand entfernt aufgestellt werden, damit die Luft
richtig strömen kann und die Schmutzablagerung gering bleibt. Also, den
Luftauslaß NIEMALS zur Wand hin richten.
c) Wischen Sie die Umgebung rundum den CLEAR AIRE einmal die Woche gut ab;
hartnäckige Schmutzablagerungen, die schwierig zu entfernen sind, werden
dadurch vermieden.
A.2 Stellen Sie das Gerät niemals in die Nähe elektrischer Apparatur mit Elektronik, oder
Apparate, die durch elektronische Magnetfelder beschädigt werden können, z.B.
Video- und Tonbänder, Disketten, Computer, Armbanduhren, Radios,
Stereoapparatur, Video- und Kassettenrecorder, Telefone usw.
A.3 Stellen Sie das Gerät, wegen der statischen Elektrizität, niemals auf Metallgestelle
oder auf elektronische Apparatur.
12

B. Die Wirkung Ihres CLEAR AIRE’s 1
Gebrauchsanweisung für den CLEAR AIRE 1
Der CLEAR AIRE kann ohne weiteres Tag und Nacht laufen. Das Gerät ist für Dauerge-
brauch konstruiert. Die Luftgeschwindigkeit läßt sich mit zwei Schalterstufen des
Ventilators regeln; aber auch durch die Aufstellung: in Ihre Nähe oder
etwas weiter weg. Auch bei hoher Ventilatorstufe bleibt der Stromverbrauch ge-
ring.
B.1 Einschalten des CLEAR AIRE’s
Prüfen Sie, ob die Netzspannung mit
der Spannungsangabe auf Ihrem
Gerät übereinstimmt. Ist das der Fall,
können Sie den Stecker in die
Steckdose stecken und das Gerät
einschalten (Schalterstand “Ein”).
Der Schiebeschalter hat drei
Schaltstufen:
1) Aus
2) Stark
3) Schwach
Funktionskontrolle: Kont- rol-
lampe brennt
wenn der Luftreiniger eingeschaltet ist
(siehe Abbildungen Bedienungsschalter).
B.2 Der Gebrauch des Duftspenders
(nach Wahl)
Ihr Luftreiniger kann auf Wunsch
einen angenehmen, jedoch nicht
aufdringlichen, Duft verbreiten.
Hersteller der Polyiff®-Kapseln ist IFF,
marktführender Produzent von
Duft- und Geschmacksstoffen.
Ein Duftspender wird gratis mitgeliefert. Neue Duftspender können Sie bei Ihrem
Händler kaufen.
Platz des Duftspenders im Gerät.
Die Kapsel wird in den Kapselbehälter an der Unterseite (vorne) Ihres Gerätes
eingelegt (Abb. 1, Seite 2). Schalten Sie jedoch vorher das Gerät aus und ziehen Sie
den Stecker aus der Steckdose. Nehmen Sie die Kapsel aus der Schutzverpackung.
Öffnen Sie den Verschluß des Kapselbehälters, indem Sie ihn gegen die Pfeilrichtung,
oben auf dem Verschluß, drehen (Abb. 1, Seite 2). Stecken Sie die Kapsel in den
Verschluß und drehen Sie diesen solange, bis sich die kleinen Zacken des Verschlußes
in die Kapsel klemmen (Abb. 2, Seite 2). Stecken Sie nun den Verschluß mit Kapsel in
den Duftspender und drehen Sie den Verschluß in Pfeilrichtung (Abb. 3, Seite 2).
Bedienungsschalter
VENTILATOR AUF SCHWACHER STUFE
Schalterstellung • oIONISATOR IST
EINGESCHALTET
(äußerst rechts)
KAUM HÖRBARE LUFTREINIGUNG.
VENTILATOR AUF STARKER STUFE
Schalterstellung • IONISATOR IST
EINGESCHALTET
(Mitte)
STARKE LUFTREINIGUNG.
Schalterstellung: IONISATOR
IST AUSGESCHALTET
(äußerst links)
Kontrollampe (ein)
Kontrollampe (aus)
Kontrollampe (ein)
1
2
3
13

Ihr Duftspender wird jetzt -wenn das Gerät wieder eingeschaltet ist- einen
angenehmen Duft verbreiten.
Soll die Kapsel ausgetauscht werden, dann muß das Gerät zunächst ausgeschaltet
werden. Sie drehen den Verschluß des Kapselbehälters gegen die Pfeilrichtung ab.
Drücken Sie dann die kleinen Zacken zusammen und entfernen Sie die gebrauchte
Kapsel (Abb. 4, Seite 2). Ersetzen Sie jetzt die gebrauchte Kapsel durch eine neue
(Abb. 3, Seite 2).
Abstellen des Duftspenders
Entfernen Sie die Kapsel und bewahren Sie diese in einem Glas mit gut
verschließbarem Deckel (falls die Kapsel noch Duft verbreitet). Der leere
Kapselbehälter wird dann wieder auf seinen Platz zurückgesetzt, an der
Unterseite des Gerätes.
B.3 Das AMCOR-Ionenskop, ein Ionendetektor (siehe Abb. 5, Seite 2)
Mit dem Ionenskop können Sie die negativen Ionen auf dem Karbon-Faser-Element
aufspüren. Damit kann anschaulich bewiesen werden, daß die Ionenproduktion
aktiv ist.
So benutzen Sie das Ionenskop
Nach dem der Luftreiniger eingeschaltet worden ist, halten Sie das Ionenskop mit
dem Daumen auf der “thumb”-Stellung fest. Legen Sie nun den Metallstreifen des
Ionenskops gegen das Ionisierungselement (das Karbon-Faser-Element an der
Vorderseite des Luftauslasses).
Jetzt flackert das Kontrollämpchen am Ionenskop auf.
Bemerkung:
Es ist möglich, daß das Lämpchen am Ionenskop noch kurz weiter flackert, nachdem
der Luftreiniger bereits ausgeschaltet ist. Das bedeutet, daß sich dann kurz zuvor
ausgestrahlte negative Ionen noch in der Luft befinden.
C. Wartung und Reinigung Ihres CLEAR AIRE’s 1
Regelmäßige Pflege fördert eine optimale Wirkung. Vor der Reinigung Gerät
ausschalten und durch Ziehen des Netzsteckers stromlos machen.
C.1 Die Reinigung des Filters.
a. Filterhaube (siehe Abb. 6 , Seite 2) an den seitlichen Aussparungen des Gerätes
anheben. Filterkassette (siehe Abb. 6 , Seite 2) entfernen. Filter zuerst abstauben
und danach in einer Feinwasmittellauge waschen (keine ätzenden Reinungsmittel
verwenden). Die Filterkassette muß vollkommen trocken sein, bevor sie wieder in
das Gerät zurück gesetzt wird.
b. Filterkassette wieder in das dafür bestimmte Fach auf dem Gerät zurücksetzen.
Die Kassette ist symmetrisch. Es ist also egal, wie Sie die Kassette einlegen.
c. Filterhaube wieder aufsetzen. Achten Sie darauf, daß die beiden Stifte in die
Kassettenlöcher oben am Gehäuse fallen (siehe Abb. 6, Seite 2).
Wie oft soll der Filter gereinigt werden?
14

Nach Möglichkeit sollte der Filter alle zwei Wochen gereinigt werden.
C.2 Die Pflege des Gerätes.
Die zugänglichen Gehäuseteile des Luftreinigers mindestens einmal pro Woche mit
einem weichen, feuchten Tuch und einem nicht ätzenden Reinigungsmittel reinigen.
Für die Reinigung des Karbon-Faser-Elements an der Vorderseite des Luftgitters eine
weiche Bürste gebrauchen und damit vorsichtig in Längsrichtung bürsten.
Achten Sie darauf, daß die Faser nicht beschädigt wird.
C.3 Die Reinigung der Umgebung rundum das Gerät.
Es ist zu empfehlen, die Umgebung rundum das Gerät mindestens einmal pro
Woche mit einem feuchten, weichen Tuch abzuwischen.
So kann vermieden werden, daß sich hartnäckiger Schmutz ansetzt.
Technische Daten siehe Seite 24.
Technische Änderungen jederzeit vorbehalten.
15

CLEAR AIRE 1
Un Purificateur d’air au fonctionnement extraordinaire, grâce au
générateur d’ions par l’intermédiaire du filament de carbone, pro-
cédé exclusif, patenté par AMCOR.
Ceci concerne l’acheteur et l’utilisateur du CLEAR AIRE:
Nous sommes heureux que vous avez choisi notre produit d’AMCOR. Nous avons
fabriqué cet appareil pour vous donner du plaisir des années durant. Ce mode d’emploi
a été fait pour vous renseigner sur le bon usage, sur le fonctionnement et sur l’entretien
de votre CLEAR AIRE. En lisant le mode d’emploi attentivement et en suivant les
recommandations, vous pouvez être sûr du fonctionnement optimal et exempt de
pannes de votre appareil d’AMCOR. Au cas où il faut tout de même faire appel à un
dépanneur, faites-le auprès d’AMCOR, car ils connaissent le mieux leurs appareils.
N’essayez pas d’ouvrir ou de réparer l’appareil vous-même ni de remplacer ou de réparer
une partie de l’appareil. Cela peut causer des dégâts et entraîner l’annulation
de la garantie.
Avant d’utiliser le CLEAR AIRE, lisez ce mode d’emploi attentivement.
Chapitre 1
MODE D’EMPLOI GENERAL ET DE SECURITE
Quelques points importants:
*Le CLEAR AIRE est un appareil sûr. Il a obtenu l’approbation d’un grand nombre
d’instituts de contrôle de par le monde. Tout comme n’importe quel autre appareil
électrique, vous devez, cependant, l’utiliser avec soin.
*Ne nettoyez pas le CLEAR AIRE en l’arrosant avec de l’eau ou en le trempant dans de
l’eau.
*N’introduisez aucun objet dans les grilles du CLEAR AIRE.
*Débranchez toujours la prise avant de nettoyer l’appareil ou une partie de l’appareil.
*Il est possible que vous ressentiez un choc léger quand vous touchez le générateur
d’ions (le filament de carbone sur la grille devant). Ce choc peut être causé par
l’électricité statique et il est complètement inoffensif. Vous pouvez également sentir ce
choc si vous touchez une personne ou un objet métallique près du purificateur d’air.
*PLACEZ L’APPAREIL, PAR MESURE DE SECURITE, TOUJOURS HORS DE PORTEE
D’ENFANTS.
*AVERTISSEMENT: faites exécuter des réparations éventuelles - outre l’entretien régulier
ou le remplacement du filtre - toujours par un monteur de service agréé ou par votre
fournisseur d’AMCOR, sinon, cela peut annuler la garantie.
Ne jamais brancher cet appareil si le cordon ou la fiche sont endommagés.
Evitez de poser le cordon sur des arêtes vives et ne le pincez pas. Tout fil
électrique abîmé peut avoir des conséquences mortelles. Il doit être remplacé
par un technicien SAV compétent, afin d’éviter tout risque de blessure.
Avertissement
Par suite du fonctionnement fort de l’appareil, la pollution flottant dans l’air est
attirée comme un aimant. Afin de prévenir un dépôt tenace autour de votre appareil, il
est absolument nécessaire de placer l’appareil à une bonne distance de toutes les
surfaces non lavables. Nettoyez soigneusement les surfaces autour du CLEAR AIRE une
fois par semaine. Pour un complément d’information, suivez les instructions
d’installation et de nettoyage plus loin dans ce mode d’emploi (Chapitre 2 - A et C).
16

Chapitre 2
• A. INSTALLATION • B. FONCTIONNEMENT • C. ENTRETIEN
Lisez d’abord les instructions soigneusement, avant de décider quel est le meilleur
endroit pour installer votre CLEAR AIRE. Le CLEAR AIRE apporte au moins 1000 ions
électronégatifs par centrimètre cube (cm3) dans l’air sur une surface de 6x4 m.
Le fonctionnement effectif va jusqu’à environ 6 m de l’appareil.
A. Installation du CLEAR AIRE 1
A.1 L’un des principes sur lequel repose le fonctionnement de votre purificateur d’air est
l’ionisation. Ce procès physique neutralise la pollution de l’air. Le CLEAR AIRE attire
(comme un aimant) les particules polluantes flottant dans l’air. Ces particules
peuvent s’attacher comme un dépôt tenace aux surfaces autour de l’appareil.
a) Installez votre purificateur d’air exclusivement sur, et tout près, de surfaces
LAVABLES.
b) Le CLEAR AIRE 1 peut être placé sur une table de nuit, sur une table ou sur un
bureau, la sortie d’air étant orienté vers l’utilisateur. Afin de réaliser le bon
courant d’air et de réduire la possibilité d’un dépôt polluant, installez toujours
votre appareil à une distance d’au moins 50 cm du mur. N’orientez JAMAIS la
sortie d’air sur un mur.
c) Nettoyez les surfaces autour du CLEAR AIRE toutes les semaines, cela prévient la
formation d’un dépôt tenace, difficile à enlever.
A.2 N’installez jamais cet appareil à proximité (à une distance de 1-11/2m au minimum)
d’appareils électroniques, avec circuits électroniques, ou qui peuvent être
endommagés par des champs électroniques. Par exemple: cassettes vidéos, bandes
sonores, disques souples, ordinateurs, montres-bracelets, radios, installations
stéréophoniques, magnétoscopes, lecteurs de cassettes, téléphones etc.
A.3 Ne placez jamais cet appareil sur des rayonnages métalliques ou sur de
l’appareillage électronique, étant donnée l’électricité statique.
B. Le fonctionnement de votre CLEAR AIRE 1
Indications pour l’utilisation du CLEAR AIRE 1
Le CLEAR AIRE peut sans aucun problème être allumé tous les jours.
L’appareil est conçu de telle façon qu’il peut fonctionner sans arrêt. La vitesse d’air peut
être réglée au moyen de l’interrupteur deux positions du ventilateur, ou bien en
rapprochant ou en éloignant le CLEAR AIRE de vous. La consommation électrique est
faible, même quand le ventilateur fonctionne sur position élevée.
B.1 Le branchement du CLEAR AIRE 1
Contrôlez si votre appareil a la bonne tension du réseau. Si cela est le cas, vous
pouvez brancher la prise et mettre l’interrupteur de commande sur “marche”.
L’interrupteur de commande est un interrupteur unitaire et il a trois positions:
1) arrêt
2) position élevée
3) position basse
17

Le contrôle du fonctionnement:
Le témoin lumineux est allumé quand le
purificateur est en marche (voir figures
de l’interrupteur de commande).
B.2 L’utilisation du diffuseur de parfum
(au choix)
Si vous le désirez, votre purificateur d’air
peut répandre une odeur agréable, non
pénétrante. Les capsules sont fabriquées
de Polyiff®et sont produites par l’IFF, le
plus grand producteur de colorants et
d’aromatisants. Un diffuseur de parfum
gratuit est livré avec l’appareil.
Vous pouvez acheter les nouveaux
diffuseurs de parfum chez votre
fournisseur.
L’installation du diffuseur de parfum
dans l’appareil
La capsule peut être placée dans le porte-
capsule, au dessous (devant) de votre
appareil (voir figure 1, page 2). Avant
d’installer la capsule, vous débranchez
l’appareil. Retirez la capsule de l’emballage
de protection. Ouvrez le bouchon du
porte-capsule en le tournant dans le sens
contraire à la flèche sur le bouchon
(voir figure 1, page 2). Mettez la capsule dans
le bouchon et tournez celui-ci jusqu’à ce que
les petits dents du bouchon serrent la capsule
(voir figure 2, page 2).
Mettez le bouchon avec la capsule dans le
purificateur d’air et tournez le bouchon dans
le sens de la flèche (voir figure 3, page 2).
Maintenant, votre purificateur répandra -si
l’appareil est branché- une odeur agréable.
Si vous voulez remplacer la capsule, vous
débranchez l’appareil. D’abord, vous
enlevez le bouchon du porte-capsule en le tournant dans le sens contraire à la
flèche sur le bouchon. Comprimez les petits dents et retirez la capsule utilisée
(voir figure 4, page 2). Remplacez la capsule utilisée par une nouvelle capsule
(voir figure 3, page 2).
La mise hors service du purificateur d’air
Retirez la capsule et gardez-la dans un pot en verre avec un couvercle qui s’ajuste
(si la capsule répand encore de l’odeur). Vous remettez le porte-capsule vide à
l’endroit destiné au dessous de l’appareil.
Interrupteur de commande
Ventilateur à position élevée
Position • IONISEUR EST ALLUME
(position moyenne)
POUR UNE FORTE EPURATION D’AIR
Ventilateur à position basse
Position •
•
•IONISEUR EST
ALLUME (extrême droite)
POUR UNE EPURATION D’AIR
EXTREMEMENT SILENCIEUSE
Position: IONISEUR EST
DEBRANCHE (extrême gauche)
Voyant lumineux de
contrôle (marche)
Voyant lumineux de
contrôle (arrêt)
Voyant lumineux de
contrôle (marche)
1
2
3
18

B.3 L’ionoscope d’AMCOR, un détecteur d’ions (voir figure 5, page 2)
Au moyen de l’ionoscope, vous pouvez détecter les ions électronégatifs auprès du
filament de carbone. Ceci est une preuve visuelle de la production d’ions.
Vous utilisez l’ionoscope comme suit
Après avoir branché le purificateur d’air, vous tenez l’ionoscope avec le pouce sur la
partie marquée par les mots “thumb-position” (position du pouce). Tenez la
bandelette métallique contre l’élément d’ionisation (le filament de carbone au
devant de la sortie d’air). Le voyant lumineux de l’ionoscope commencera à clignoter.
Remarque:
Il est possible que le voyant lumineux de l’ionoscope clignote encore un moment
après l’arrêt du purificateur d’air. Cela signifie alors que, peu avant, les ions
électronégatifs flottaient encore dans l’air.
C. Nettoyage et entretien de votre CLEAR AIRE 1
L’entretien régulier favorise le fonctionnement efficace de votre purificateur d’air.
Débranchez toujours la prise avant de nettoyer le purificateur d’air.
C.1 Le nettoyage du filtre
a. Levez le capot du filtre (voir figure 6 , page 2) aux évidements sur les côtés de
l’appareil. Enlevez la cassette de filtre (voir figure 6 , page 2). Nettoyez le filtre,
d’abord en l’époussetant et ensuite en le nettoyant dans une solution de lessive
douce (n’utilisez pas de produits d’entretien corrosifs).
La cassette du filtre doit être tout à fait sèche avant d’être replacée.
b. Placez la cassette du filtre dans le compartiment qui lui est destiné.
Elle est symmétrique. Vous pouvez la placez comme vous voulez.
c. Replacez le capot du filtre. Faites attention à ce que vous introduisiez les deux
petites chevilles dans les trous dans la cassette dans l’espace enserré le plus élevé
(voir figure 6, page 2).
La fréquence du nettoyage
Il est recommandé de nettoyer le filtre toutes les deux semaines.
C.2 Le nettoyage de l’appareil
Nettoyez l’extérieur du purificateur d’air au moins une fois par semaine avec un
chiffon doux, humidifié par un produit d’entretien non-corrosif. Utilisez une petite
brosse douce pour le nettoyage (dans le sens de la longueur) du filament de
carbone au devant de la grille à souffler. Faites attention de ne pas abîmer le
filament de carbone.
C.3 Le nettoyage des surfaces autour de l’appareil
Il est recommandé de nettoyer les surfaces autour de l’appareil au moins une fois
par semaine avec un chiffon doux et humide. Ainsi, vous éviterez l’accumulation
de particules polluantes et la formation d’un dépôt tenace.
Données techniques voir page 25.
Modifications réservées.
19

CLEAR AIRE 1
Luchtreiniger met sublieme werking dankzij de exclusieve, door
AMCOR gepatenteerde, koolstofvezel ionen-generator.
Aan de koper en gebruiker van de CLEAR AIRE:
Wij vinden het prettig dat u ons AMCOR produkt hebt uitgekozen. Wij hebben dit
apparaat gefabriceerd met de bedoeling dat u er jarenlang plezier aan zult beleven. Deze
gebruiksaanwijzing is gemaakt om u op de hoogte te brengen van het juiste gebruik, de
werking en het onderhoud van uw CLEAR AIRE. Door de gebruiksaanwijzing zorgvuldig
door te nemen en de aanbevelingen op te volgen, bent u verzekerd van de meest opti-
male en storingsvrije werking van uw AMCOR apparaat. Wanneer er toch service verleend
moet worden, moet u bedenken dat AMCOR haar apparaten het beste kent. Probeer
daarom niet zelf het apparaat te openen en te herstellen of enig onderdeel ervan te ver-
vangen of te repareren. Dit kan leiden tot fouten en het vervallen van de garantie.
Leest u alvorens de CLEAR AIRE in gebruik te nemen aandachtig deze gebruiksaanwijzing
door.
Hoofdstuk 1
GEBRUIKSAANWIJZING ALGEMEEN EN VEILIGHEID
Enkele belangrijke punten:
* De CLEAR AIRE is een veilig apparaat. Het is goedgekeurd door een groot aantal
keuringsinstituten overal ter wereld. Net als ieder ander elektrisch apparaat dient u
het evenwel zorgvuldig te gebruiken.
* Reinig de CLEAR AIRE niet door het apparaat met water te besproeien of in water
onder te dompelen.
* Steek geen enkel voorwerp in de roosters van de CLEAR AIRE.
* Haal altijd eerst de stekker uit het stopcontact voordat u het apparaat of een onderdeel
ervan wilt reinigen.
* De mogelijkheid bestaat dat u een lichte schok voelt als u de ionen-generator (het
koolstofvezelkoord op het uitlaatrooster aan de voorzijde) aanraakt. De schok wordt
veroorzaakt door statische elektriciteit en is volkomen ongevaarlijk. Deze schok kunt u
ook voelen als u iemand of een metalen voorwerp aanraakt in de buurt van de
luchtreiniger.
* PLAATS HET APPARAAT UIT VEILIGHEIDSOVERWEGINGEN ALTIJD BUITEN BEREIK VAN
KINDEREN.
* WAARSCHUWING: Laat eventuele reparaties -buiten het regelmatige onderhoud of
het vervangen van het filter- altijd uitvoeren door een erkend servicemonteur of
uw AMCOR leverancier, anders kan dit leiden tot het vervallen van de garan-
tie.
Gebruik het apparaat NOOIT met een beschadigd snoer of stekker.
Klem het snoer nooit af en laat het nooit over scherpe kanten lopen.
Een beschadigd snoer of stekker kan levensgevaarlijk zijn. Om ieder risico te ver-
mijden dient het uitsluitend te worden vervangen door de klantenservice
of door een vakkundig servicemonteur.
Waarschuwing
Door de sterke werking van het apparaat wordt in de lucht zwevende verontreiniging als
een magneet aangetrokken. Om een hardnekkige aanslag rondom uw apparaat te voor-
komen, is plaatsing op afstand van alle niet-wasbare oppervlakken absoluut noodzake-
lijk. Reinig eens per week zorgvuldig rondom de CLEAR AIRE. Zie voor meer informatie de
20
This manual suits for next models
1
Table of contents
Languages:
Other Amcor Air Cleaner manuals

Amcor
Amcor AM-90 User manual

Amcor
Amcor AM-80 User manual

Amcor
Amcor UltrClean AM-70 Ficus User manual

Amcor
Amcor AM-45 User manual

Amcor
Amcor AM-70 User manual

Amcor
Amcor AIR PROCESSOR 2000 User manual

Amcor
Amcor AM-70 User manual

Amcor
Amcor AM-12 User manual

Amcor
Amcor AM-15 User manual

Amcor
Amcor AM-40 User manual