American Bath Factory Sistine Stone Neo Corner-Hnf User manual

Congratulations on the purchase of your new shower system.
This guide will give you the instructions on the installation of your new shower.
Natural Travertine Stone Appearance
All of our stone products are custom made and hand-crafted to look and feel like authentic
travertine. As you may know, travertine is a form of limestone that has been under pressure for
thousands of years. The product of long-ago hot and cold springs and waterfalls, travertine is a
beautifully banded and colored stone with a unique character. Among its most appealing
characteristics are the interesting craters and depressions, created by streams of water that
flowed through the stone.We have taken great care in reproducing the appearance of genuine
travertine stone, giving you a beautiful and authentic shower.
Installation time may vary depending on your experience, complexity of shower,
and “Pre Installation Preparation Work” which may include: plumbing relocation,
drain location and bathroom demolition.
Prior to demolition, scheduling a contractor or building your shower, double check that you
have all the parts from the factory. Some applications may require a licensed plumber or
contractor. Do not use any product spec sheets to begin installation before receiving product.
These spec sheets are for reference only. Use actual product measurements only.
The diagrams throughout this guide illustrate a 36” x 36” shower. Depending on the size of the
shower purchased, actual parts may vary in size from the diagrams shown.
Our goal is to help you achieve a quick and successful shower installation.
See the clock in each section for estimated installation time.
Missing or damaged hardware and tiles should be reported within 24 hours
of receiving this shipment - If you need assistance call 1.800.454.2284,
7:15 am - 4:00 pm PST, Monday thru Friday.
Neo Threshold Shower System Installation Guide for Liner Style & Accent Liner Style Showers
G_00828-HNF-7.29.14 Rev A
NEO CORNER - HNF
TM

1TOOLS AND SUPPLIES YOU WILL NEED TO INSTALL YOUR SHOWER
PENCIL & MARKER
HAMMER
DRILL WITH 3/16” & 5/8” DRILL BITS
LEVEL
CAULKING GUN
PHILLIPS HEAD SCREWDRIVER
or PHILLIPS DRILL BIT
4” HAND-HELD MAKITA GRINDER
MEASURING TAPE
SPONGE
GROUT FLOAT & BUCKET
1/8” PLASTIC TILE SPACERS
SHEET ROCK SCREWS
WOOD SHIMS
1/4” CEMENT BOARDS
HOLE & 4” TILE BLADES
(Diamond Tip Blades recommended)
GROUT (See page 9)
60 GRIT SANDPAPER
CLEAN DROP CLOTH
PLASTIC SHEETING
3” SCREWS
CIRCULAR SAW
BRACES TO SECURE WALL PANELS
SILICONE FOR CAULKING GUN
(See silicone recommendations Page 7)
2CHECK YOUR SHIPMENT AGAINST APPROPRIATE PACKING LIST
Make sure you have received all the items necessary for the installation. This will also familiarize you with all the
parts and hardware you will need to install your shower. Package contents are dependent upon which package you
ordered: Basic or Supreme. To ensure that no damage has occurred to your shower during shipping or dry fitting, it is
important to check your shower parts for damage prior to installation in your home.
BASIC PACKAGE PACKING LIST
THRESHOLDS
TLC TRC TLB TRB
TLT TRT
WALLS & LINERS
PAN
IT 2T
IB 2B
IL 2L DRAIN
SUPREME PACKAGE PACKING LIST (Includes Basic Package plus these items)
GLASS (3) GLASS HEADERS DOOR SEALS DOOR SWEEPS
DOOR HANDLE HINGES
(You will have either 2 or 3 pieces depending on the size of your shower)
2
ILT 2LT

3
OPTIONAL ITEMS
3PRE-INSTALLATION TEAR DOWN
FAUCETS SHAMPOO BOX
SHOWER BENCH
TIME REQUIRED
8-16 HRS
This shower system is designed to be installed on a bare floor. It is necessary for any existing shower to be completely removed.
Tear out and remove all old material to expose the 2 x 4 wall studs. Clean up the shower area, removing all dust and old material from the area.
4DRY-FITTING THE PAN TIME REQUIRED
½ to 1 HR
3/4” overhang when using triple studs, no overhang when using
double studs (double studs required, triple studs recommended for
extra strength.
11” for shampoo shelf
triple studs
3/4” overhang
11”
minimum gap
required for the
shampoo shelf
diagram 2
Studs may need slight trimming to
allow pan to set flush.
1/4” cement board
2 x 4 stud
metal flange
pan
diagram 1
floor of pan
silicone bead
It is easier to check alignment of studs and pan without the drain installed into the pan. Place the pan in the planned position. Check to see that the spacing
between the pan and 2 x 4 studs are flush. Some shims may be required to plumb walls with the pan. By screwing in the 1/4” cement board the metal flange
will pull fast to the studs, and will secure the metal pan in place. (diagram 1)
With the pan in position, check to make sure the 2” drain pipe is in the center of the pan drain hole. (diagram 2) Use the drain collar #5 by itself; remove the
rubber seal, nut and gaskets from the drain assembly. (diagram 3, next page) Push the drain collar #5 into the drain hole between the pan and the 2” pipe.
With the drain collar pushed flush to the pan surface, the 2” drain pipe should not extend past the inside threads of the drain collar #5.

52 x 4 STUDS ALIGNMENT & POSITIONING TIME REQUIRED
½ to 1 HR
Using the pan and 1B and 2B wall panels, you will be able to check to make sure your 2 x 4 studs are in the needed position and supported adequately.
You will see in (diagram 2) extra 2 x 4 studs are added to the door and glass side thresholds for extra strength. You may need to make adjustments for your
faucet or optional shampoo shelf. When you place the bottom sections of the wall 1B or 2B into the shower pan, you can also calculate the needed width and
height of areas to keep free of 2 x 4 studs. (See installation instructions included with the faucet or shampoo shelf)
6INSTALLING DRAIN TIME REQUIRED
½ to 1 HR
#1 trim plate
#2 drain tool
#3 brass pressure ring
#4 rubber seal
#5 drain collar
pan
#6 rubber gasket
#7 teflon slide ring
#8 drain lock nut
apply silicone
around drain collar
sides and under lip
floor hole with
2” drain pipe
diagram 3
1. Remove the shower pan to a safe location to water test.
2. Apply a generous bead of silicone around the shower pan drain hole and around the outside of
the drain collar #5, insert the drain collar #5 into the drain hole.
3. Apply a generous bead of silicone around the drain collar #5 from the underside of the pan.
4. Install the rubber gasket #6 over the drain collar #5, to the underside of the pan, next install the
teflon slide ring #7.
5. Screw on the drain lock nut #8 and hand tighten. Turn drain lock nut #8 approximately 1/4
turn with the wrench to ensure a water-tight fit. Check for a good seal. DO NOT OVERTIGHTEN.
6. Wipe off excess silicone and allow silicone to dry. Follow the manufacturer’s directions for
application and drying time.
SEE SILICONE RECOMMENDATIONS PAGE 7
4

7SETTING PAN TIME REQUIRED
½ HR
apply silicone diagram 4
1. Apply adhesive to floor (diagram 4)
2. Carefully lift the shower pan and set into place. Make sure the ABS pipe is still centered.
3. Push and secure the rubber seal #4 onto the 2” ABS pipe.
4. Thread on the brass pressure ring #3 around the drain pipe with the provided tool #2.
Remove the tool after the brass pressure ring is installed.
5. Test and snap the decorative diamond trim plate #1 into position. (Remove the decorative trim
plate and store in secure area until installation is complete, drain will be grouted when shower is
grouted).
6. After installing pan, cover with cardboard or drop cloth to protect pan from scuffs.
High quality thinset may be used on uneven floors
Recommended silicone adhesive on page 7
5
8CEMENT BOARD INSTALLATION TIME REQUIRED
1-2 HRS
Use 1/4” thick cement board as your shower backer. Using this backer will comply with almost all city codes. A cement-based product like Wonderboard or
Hardibacker may also be used if it meets your local codes. Some codes require a vapor barrier to be installed as well. We recommend a water/vapor barrier of
6 mil. plastic be installed before installing the cement board. To do this, staple plastic so that it hangs 1” above the floor. Roofing nails may be used to attach
the cement board instead of screws, this prevents the plastic from wrapping around the screws.
diagram 5
1. IMPORTANT: Use your cement board as an indicator of squareness. The cement board comes in
square sheets. If you see gaps or areas where the cement board is not fitting flush, fix
the problem by removing the cement board and shimming the board until it’s square and
flush. If the seams of the cement board are not flush and square, your wall panels will not
be square and flush. (diagram 5)
2. Place the cement board against the studs and rest it on the top of the shower pan, back
flange. Attach the cement board to the studs with screws or nails.
set cement board on top of pan here.
For best cutting results for wall panels and cement
board, use a Makita grinder with a 4” tile blade.

9SIDE THRESHOLD PLUMB LINE TIME REQUIRED
½ HR
6
plumb line
(draw both sides)
diagram 6
To help with the wall installation, use a level and draw a plumb line from the inside of the floor
threshold up to the top of the shower. Do this on both sides. This line will be where the side threshold
and the wall panels meet, this will give you a visual reference point when dry-fitting your wall panels.
WALL PANEL/LINER INSTALLATION TIME REQUIRED
3-4 HR
A - Inspecting Wall Panels/Liners
Inspecting panels at this point will give you confidence that the wall panels are straight and square from the factory. When installing wall panels, you may need to
make adjustments to the panels to accommodate for unevenness of your existing walls. During the inspection process and/or dry-fitting process, if you have any
concerns about the alignment or fit of the wall panels, please call 1-800-454-2284 for customer service, and we will gladly assist you with your installation.
1. Find a large empty area to layout and inspect all panels.
2. Align all panels and liners to check for straightness. Make sure grout lines are straight and square
to each other.
3. Sistine Stone wall panels are made to be flexible. (Warning - Store on a flat area.) If wall panels
have been stored improperly or seemingly have become extensively bowed, they can be easily
flattened before installation (See trouble shooting section on last page for details).
B - Test Alignment by Dry-fitting Wall Panels/Liners
1. Place your first bottom panel 2B into position. (diagram 7). Rest 2B panel onto the pan floor;
use spacers between the floor and the panel to make the top of the panel level.
2. Place the second bottom panel 1B into position, push the two panels together. Make sure the
grout lines are aligned, use spacers to make the top of the panel level. Inspect the spacing
between the wall panels and the side threshold plumb line.
3. Depending on your cement board alignment, some sanding of the wall panel edges may be
required for a tight fit.
4. Place liners 1L and 2L in position check for level and length.
5. Holding the upper panels and liner in place with screws and blocks or another person, place 2L
into position. Check the length and overlap alignment. Some fitting may be required.
6. Place 2T into position. (diagram 8)
7. Place 1T into position. Depending on your faucet selection, you may need to mark and cut out
holes for your faucet to fit through before you can place the panel into position. Remember
“measure twice, cut once”, you can cut our walls with most cutting tools. (See installation
video at www.americanbathfactory.com). Now you can check for level, grout line alignment and
spacing between walls and plumb line.
8. Check that 1LT & 2LT (top liners) fit properly on top.
diagram 8
2T
2L
1L
10
1B 2B
2B
diagram 7
2LT

7
SILICONE RECOMMENDATIONS
We recommend using GE Silicone II Window and Door 100% Silicone throughout this installation as well as for your wall panel silicone.
During our tests we have found that using this silicone gives the best results. Use this silicone whenever the installation guide refers to the use of “silicone”.
Depending on the size and threshold type of your shower, you will need from 10 - 20, 9.8 oz. tubes of silicone to complete your shower installation.
DO NOT USE any Mastic, Mortar based Thin Sets or “Liquid Nails”. These will not cure properly between the two non-porous surfaces of the shower.
The use of a Water Barrier will also adversly affect the bond between the wall panels and the cement board.
Warranty coverage only extends to the brand and type of silicone we recommend and applied
per the manufacturer’s directions and recommendations.
Recommendations for applying GE Silicone II Window and Door 100% Silicone to Wall Panels
1. Apply a 1/4” thick continuous bead of silicone along the perimeter if the wall panel, 1/2” in from the edge.
2. Use a zig-zag pattern to cover the rest of the backside of the wall panels, leaving 3”- 4” between each 1/4” bead.(diagram 9)
3. Also apply silicone to the cement board. Apply in the same manner as steps 1 & 2.
It is very important to ensure complete coverage of silicone to achieve the best bond. The steps listed above are only recommendations and are meant to
supplement the specific manufacturer’s directions.You may need to brace the wall panels in place while the silicone dries. Refer to the manufacturer’s
recommendations for coverage of the silicone to determine the proper amount you will need for the project based on your shower size.
Depending on the size and threshold type of your shower, you will need from 10 - 20, 9.8 oz. tubes of silicone to complete your shower installation.
Tips for bracing Wall Panels
If you use the recommended silicone, and apply it correctly, the wall panels will stick to the walls without any bracing required. If the studs or cement board
surfaces are not perfectly even or square, the edges of the wall panels may not stay flush. If this happens, we recommend using a brace to hold the wall panels in
place until the silicone dries. Your bathroom layout and shower style will determine the method you use to brace the wall panels.
1. Always protect the wall panel tiles and shower pan floor from damage. Make sure the braces will not scratch the wall tiles. Use a piece of plywood or
a 2 x 4 to distribute the force across the largest surface area.
2. Brace the wall panels using a horizontal brace from one wall to the opposite wall.(diagram 10) Measure and cut a 2 x 4 or use an expandable curtain rod
or telescoping painter’s pole. Cut the 2 x 4 larger, so it has to be pushed into position or use shims to apply pressure on the wall panels.
3. Brace the wall panel from the shower pan threshold to the wall panel. Measure and cut a 2 x 4 to fit between the shower pan threshold and the wall panel.
Apply weight downward on the wall panel side or place a 2 x 4 vertically between the ceiling and the top of the brace. Push down on the angle brace and
Measure and cut a 2 x 4 screw it to the vertical 2 x 4 that is pushing on the ceiling. (diagram 11)
4. Leave the braces in place until the silicone has completely dried. Refer to silicone manufacturer recommendations for drying time.
diagram 9 diagram 10 diagram 11
1/2” 3 - 4”
Preliminary Information for Wall Installation

WALL PANEL/LINER INSTALLATION (continued) TIME REQUIRED
3-4 HR
10
1T
C - Installing Panels
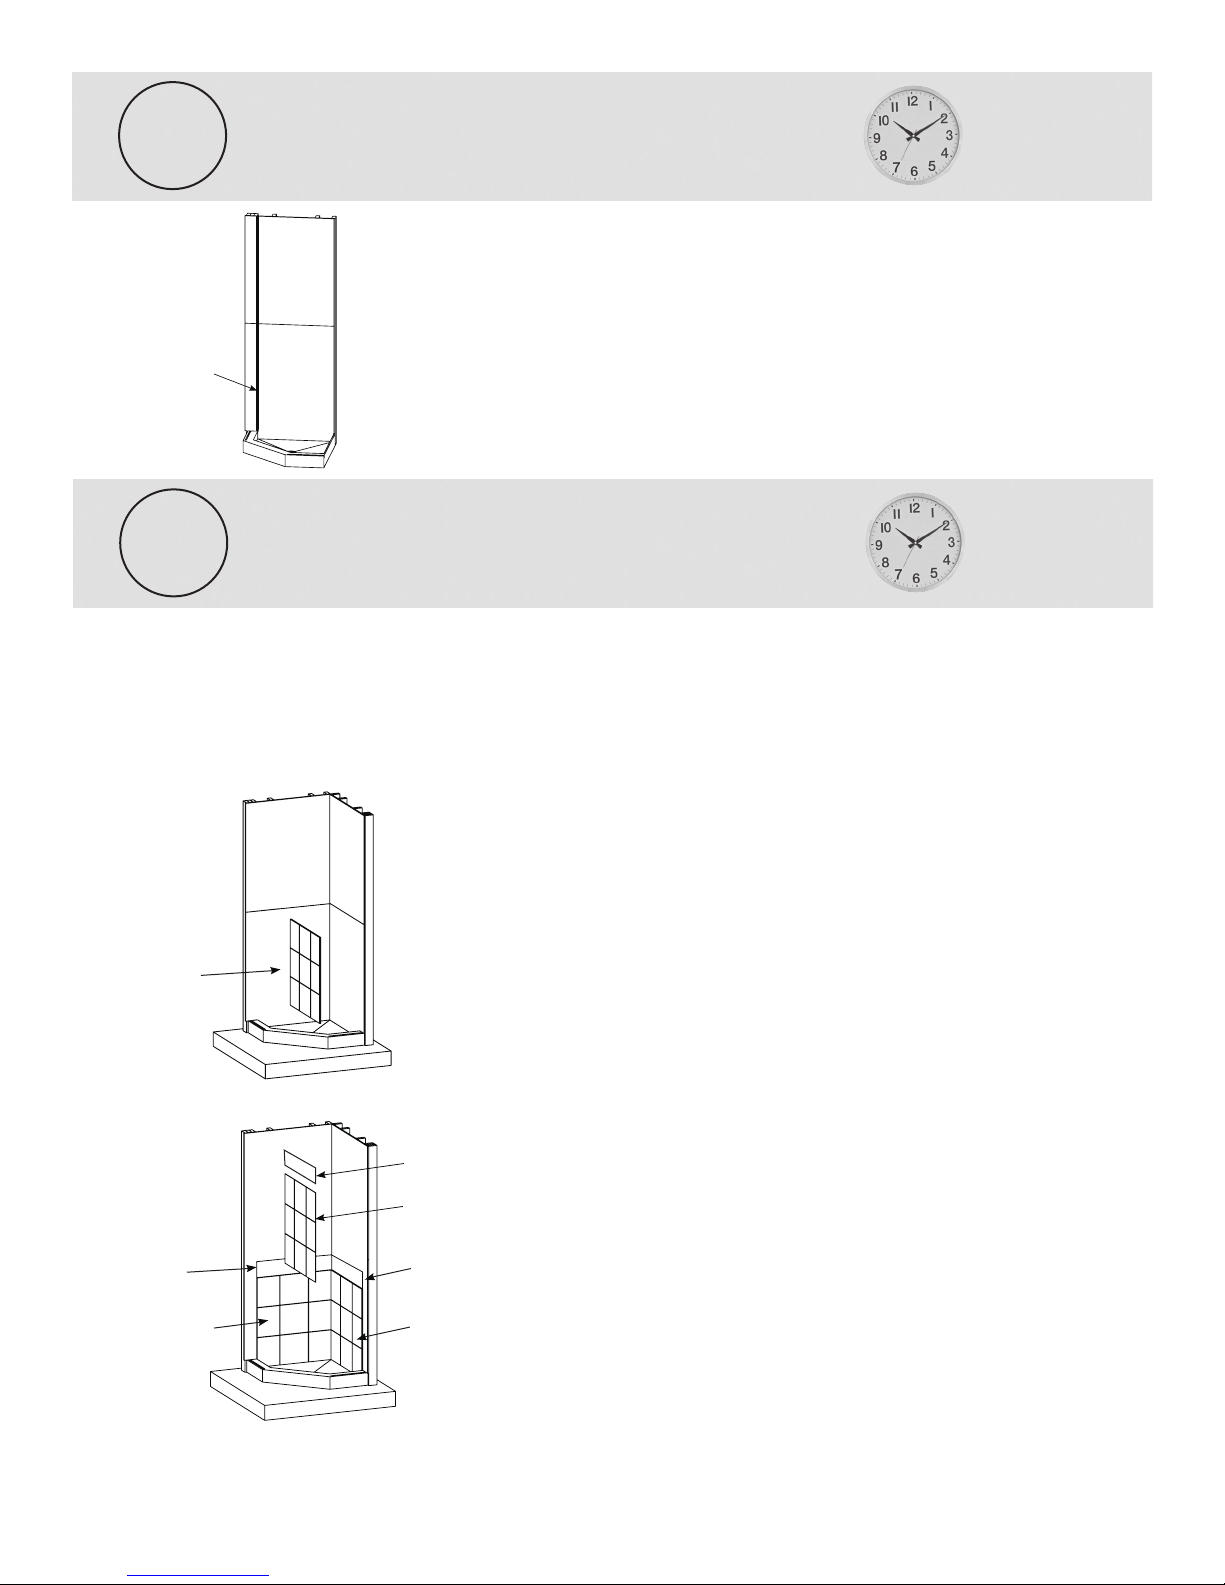
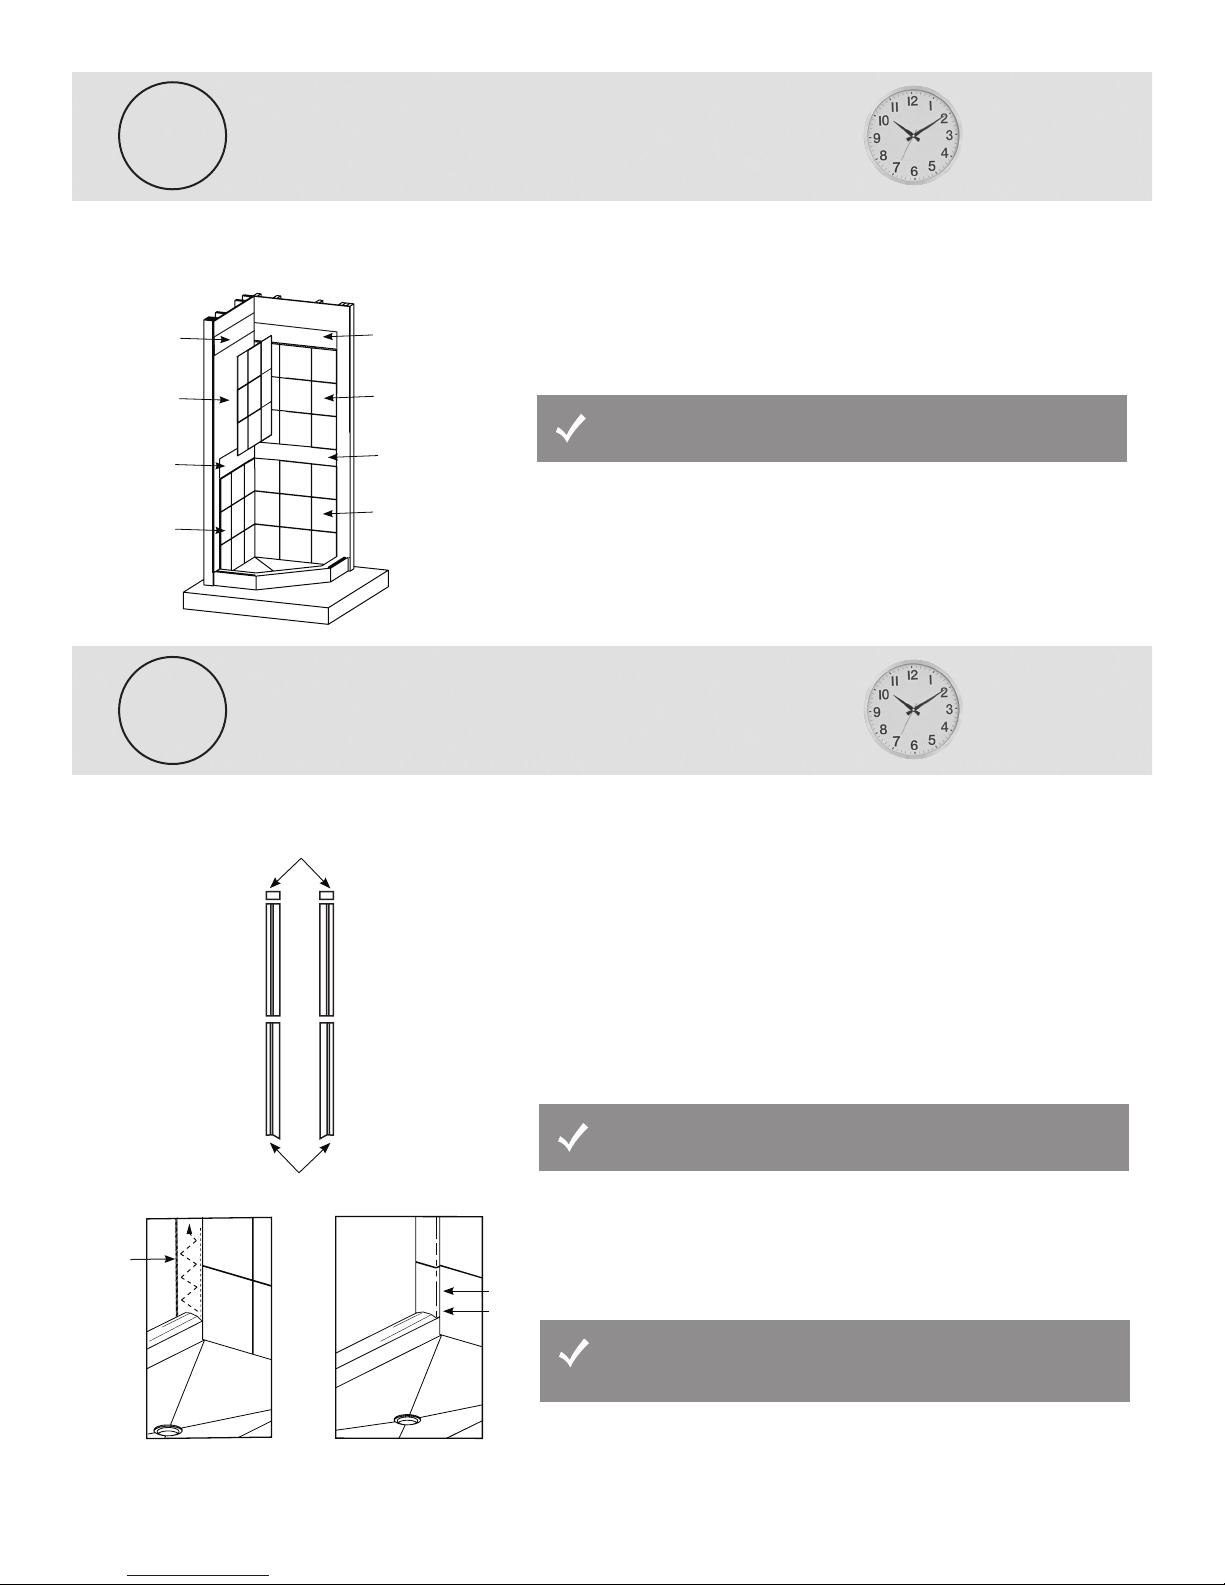
8. Sand the backside surface of the wall panels with 60 grit sandpaper. This will increase the bond
to the silicone. Remove all dust and dirt with a clean dry cloth.
9. Start with panel 2B, apply a generous amount of silicone to the cement board and to the back
side of the wall panel. Refer to “Silicone Recommendations” on previous page for applying
silicone. Also refer to the manufacturer’s recommendations for application and drying time.
10. Press the wall firmly into position. Be sure to use spacers between the bottom panel and the
shower pan to ensure panel is level. (diagram 12)
11. Install the remaining panels in the following order: 1B, 1L, 2B, 2L, 1T, 1LT, 2T & 2LT.
Match the space between the panels with the rest of the grout lines on the panel.
Use spacers if necessary to make the walls square and straight.
diagram 12
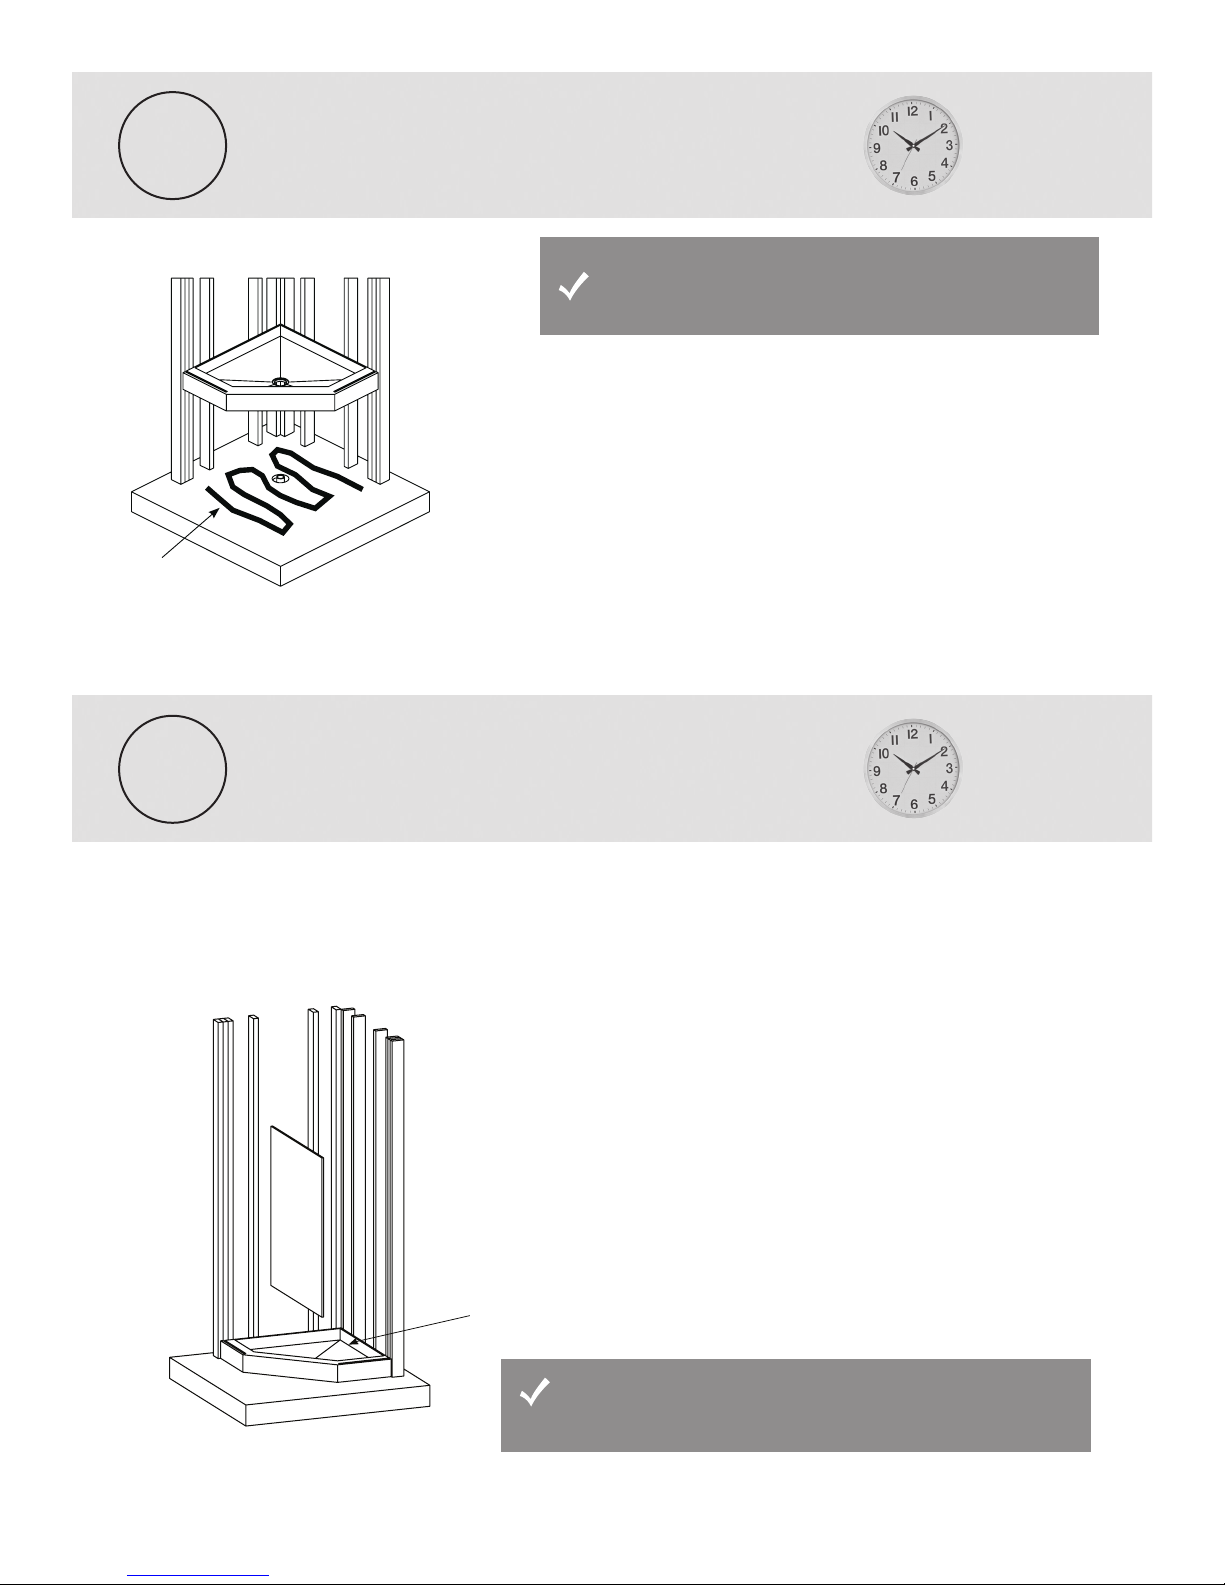
THRESHOLD TRIM TIME REQUIRED
1/2 - 1 HR
11
8
The threshold trim pieces complete the look of your new shower system. If you purchased a Basic
Package which does not come with glass, your threshold pieces will be solid, without a channel. If
you purchased a Supreme Package which comes with glass, the threshold pieces will have a channel
for the glass panels. No matter what package you ordered there are 2 special cap trim pieces and 2
special notched bottom left and right pieces.
1. Locate all the trim pieces and align them on the floor. (diagram 13)
2. Apply silicone, using a zig-zag pattern, to the cement board along the panel’s edge, approximately
4 inches out: to the far outside of the shower pan. (diagram 14)
Do not install the small cap trim pieces if your package includes glass. These trim pieces are to be
installed after the glass and door have been installed. If you did not purchase a package
with glass, you can install the cap trim pieces now.
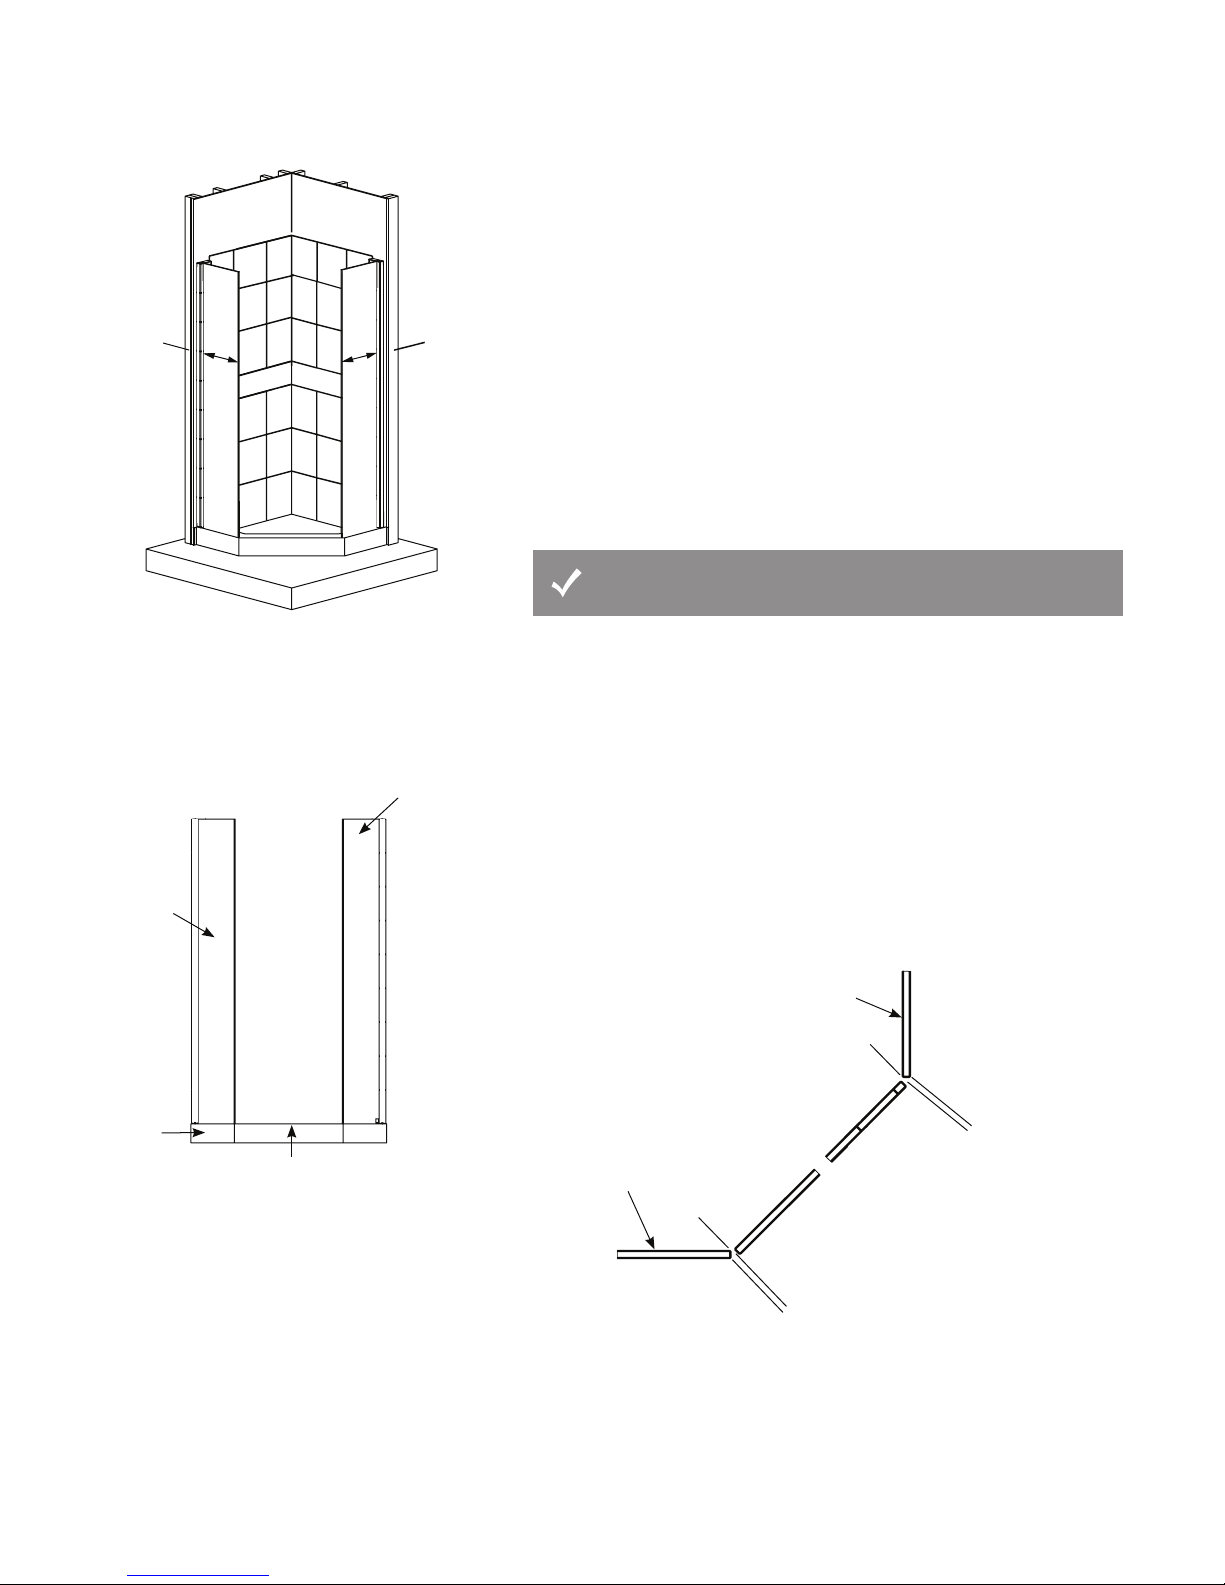
3. Starting with the special bottom threshold piece, place the threshold into position making sure to
align the threshold with the vertical plumb line previously drawn on the cement
board. Apply pressure to the trim piece to bond it to the cement board. The trim piece should be
flush with the inside of the shower pan threshold. (diagram 15) Make sure to align the glass
channels in the thresholds with the glass channels in the shower pan. (if glass unit)
4. Place the remaining trim pieces into position. Make sure to use a level and the plumb line
previously drawn on the cement board to align the trim pieces vertically.
Wall thresholds should be flush on the inside and
outside of the pan
See manufacturer’s recommendations for drying time
cap trim pieces
TLC TRC
TLT TRT
TLB TRB
diagram 13
special notched bottom pieces
diagram 14 diagram 15
1B
1L
2T
2L
2B
Braces may be required to keep walls flush
cement
board
2LT
1LT

9
OPTIONAL SHAMPOO SHELF INSTALLATION TIME REQUIRED
1/2 - 1 HR
12
4. On the 2 tiles the Shampoo Shelf will be replacing, mark 1”
from the outside of the grout line, the cut-out area will be
10” x 22”. Cut out the hole for the Shelf. The smaller the
hole the better.
5. Dry-fit the Shampoo Shelf for alignment of grout lines.
6. Silicone in-place with a generous bead around the back of the
lip, wipe off excess silicone with tissue.
1. The Shampoo Shelf was designed to match your tile size.
(2) 12” x 12” tiles, the cut-out hole size is 10 x 22”.
2. There is a 1” lip or frame around the Shampoo Shelf, this will
be the water sealed area for the Shampoo Shelf.
3. The best way to cut the hole is with a small 5” round
diamond blade, and with a jigsaw to cut the corners.
See detailed instructions enclosed with Shampoo Shelf
GLASS DOOR & PANEL INSTALLATION (if ordered)
13
diagram 17
Note: Two people are required for this installation. Take careful measurements before
cutting or drilling products.
A - Handle Installation
1. Set the glass door in a position to enable the assembly of the handle. (diagram 16)
2. Loosen the set screws so you can separate the handles.
3. Unscrew the long bolt from the handle. Keep all rubber pieces attached to the screw.
4. Remove the first set of flat, clear washers from the bolt.
5. Start with the top hole on the glass door. Place the long bolt through the hole in the door
(keeping the remaining rubber pieces on the bolt). On the other side of the glass place the flat
washers onto the threaded portion of the bolt.
6. Take one side of the handle and screw the long bolt into the end. Just start the bolt until a few
threads catch. Keep loose.
7. Put the second bolt through the lower hole. Place the flat washer onto the bolt. Screw the bolt
into the bottom handle.
8. Align the handle on the door and carefully tighteb the long bolts. Do not over tighten.
9. Place the opposite handle over the long bolts and tighten the set screws to secure the handle.
B - Hinge Installation
1. Locate the top hinge and remove the side plate by loosening the two screws. (diagram 17)
2. Place the hinge into the top cutout on the door so the screws will be facing into the shower
and install the side plate. Tighten the screws until the hinge is secure. Make sure the hinge is
centered in the cutout and that the screws are facing into the shower.
Be careful not to rest the edges of the door on hard
surfaces. Tempered glass is very strong and impact
resistant but its weakest point is impact on the edges.
diagram 16
clear washer
clear spacer clear washer
set screw
shower
inside
shower
outside
hinge pin side plate
screws
door

C - Glass Panel Installation
1. Carefully lift the glass panels and set them into the side and pan channels. Make sure the glass
panels are stable. (diagram 18) The glass channels in the shower pan and wall thresholds will
hold the glass in place while dry-fitting the panels and door.
2. The distance between the glass panels should be 1/4” from the outside edges of the glass
to the inside edge of the glass. (diagram 19) Also, each panel should be the same distance
from each wall threshold. Take all measurements from the outside edges of the glass.
3. Measure the positioning of the glass panels to endure they are in the correct position. Make
sure the glass is level across the top and also the vertical edges are square and straight to each
other. Measure diagonally to check for straightness. Make any necessary adjustments.
(diagram 20)
Glass is tempered and cannot be cut
diagram 18
X X
diagram 19
glass panel
glass panel
shower pan
top of shower pan
threshold
note: measurements taken from outside edges of glass.
diagram 20
inside of shower
outside of shower
glass panel
glass panel
1/4” Gap
1/4” Gap
10

diagram 21
diagram 22
glass channel
side section side section
center section
hinge pin
hole
hinge pin
hole
4. Locate the header pieces and lay them out in the correct orientation on the floor. Depending on
the size of the shower there will be either 2 or 3 pieces. If your shower is not a square than one
piece will be longer than the other.Place the long piece on the longer side and the short piece on
the short side. (diagram 21)
5. Set the header center section onto the glass panels.
6. Make sure the glass panels are still positioned correctly inside channels. Adjust the panels if
necessary. (diagram 22)
7. Dry fit the header side pieces and make sure the ends meet with the wall threshold caps
(not installed) and the glass panels fit in the channels correctly. (diagram 22) Depending
on how square the walls are, you may need to sand the edges of the side pieces to make them
fit properly. Leave a small gap between the center and side pieces to make a grout joint
that matches your preference.
8. After everything is lined up correctly, remove the header pieces.
D - Dry Fit Door/Header
The door can pivot with the hinges on the left or right side depending on your preference. We will
illustrate an installation with the hinges on the right side.
1. Have one person place the door in its open position by allowing the bottom hinge pin to slide
into the hole in the pan threshold. Make sure the bottom hinge has the spacer on the pin.
(diagram 23)
Be sure to keep the door in a vertical position. If the door is not kept
vertical, damage to the hinge, glass, or pan may occur.
2. Next, have the other person place the header center section into position. Align the hole in the
header center section with the hinge pin and align the glass channels with the glass panels.
(diagram 23)
3. Push the header center section all the way down onto the glass panels and then position the
door in its closed position.
4. Check for clearance between the door and glass panels and top and bottom of door.
(see next page, diagram 24) There should be minimum of 3/16” between the door and
panels.if you need to, push the panels into the wall thresholds to increase your gap.
diagram 23
11

diagram 24
diagram 27
1/4” gap
3/8”
door to pan
threshold
clearance
shower pan
top of shower pan threshold
glass panels
to bottom
of door
to inside
of shower
E - Install Glass Door & Header
1. The glass panels and header pieces are secured with silicone.
2. Apply a 1/4” thick bead of silicone into the bottom of the glass channels in the pan and in the
wall thresholds.
3. Re-install the glass panel in the same way you did before. Do this for the other panel as well.
4. Refer back to all of the previous steps and diagrams to make sure the glass panels are in the
proper position. Apply a 1/4” thick bead of silicone into the bottom channel of the header.
5. Apply a 1/4” thick bead into the bottom channel of the header center piece.
6. Have someone help set door into position, don’t forget to install the washer into hinge pin
7. Set header into position, don’t forget to install washer on hinge pin. Check alignment and
spacing.
8. Locate the wall threshold trim caps and install them using the same procedure for installing the
wall threshold trim pieces. (diagram 25)
9. Locate the header side pieces and apply a 1/4” bead of silicone to the top of the glass
channels. Place them into position and push them all the way down onto the glass panels.
Be sure to align them to the header center section. (diagram 26)
10. Allow the silicone to dry before continuing with the installation. Make sure the glass remains in
the proper position. Leave the door in the closed position and use braces to support the glass
until the silicone dries. Refer to the manufacturer’s instructions for silicone drying time.
F - Door Seal Installation
We have provided door seals for water sensitive areas such as wood floors. If glass panels and door
are installed correctly with the proper spacing, outside water spillage will be minimal and the side
seals won’t be necessary. The door sweep (diagram 27) is what keeps the door closed. Adjust tension
as needed. If you would like to use these side seals, follow the steps below.
1. Locate the plastic H shaped seals. One goes on the glass panel on the door strike side
the other goes on the door on the hinge side. Measure and cut the seals to length.
2. Starting from the top, push the seal onto the glass, slowly working your way down.
3. When you grout the rest of the shower, be sure to grout the extra hinge hole in the pan and the
extra hinge hole in the stone header. Also, grout between the glass and the pan, the glass and
the wall thresholds, and the glass and the stone header. As well as between the joints between
the stone header center section and side pieces.
diagram 25
diagram 26
threshold trim cap
caps
door sweep
12

GROUT
14
Your American Bath Factory shower has a non-porous tile surface, which makes it easy to clean. Grout used must contain an ACRYLIC ADDITIVE to
ensure proper bonding to the tiles.
1. Linen Tile & Grout Caulking is available at www.americanbathfactory.com. For Natural Sistine Stone use Snow White Product No. 15302,
for Medium Sistine Stone use Linen Product No. 15303.
2. Follow the grout directions for specific application instructions, a water-based non-sanded grout is recommended.
3. If you desire a powdered grout, use an acrylic additive to ensure bonding.
Note: Grout is not covered by ABF Warranty.
SHOWER SYSTEM TROUBLESHOOTING
DO NOT CLEAN SISTINE STONE WITH PAINT THINNER, ACETONE, LACQUER THINNER, M.E.K. , SCRUBBING BUBBLES
or other chemicals that attack the structural integrity of Resin Based Stone. Use of these chemicals will destroy the surface of the stone and void your
warranty. Soapy water, ammonia based cleaners or cleaners like “Formula 409 Natural Stone Cleaner” will remove most dirt and residue from all
types of finishes. For stubborn stains you may use a non-abrasive Scotchbrite pad. “Lightly” scrub the stained area in a circular motion to avoid dis-
coloration. The stone is naturally waterproof and will not absorb spills or soil, simply wipe away with a damp sponge. Periodic cleaning with a sponge
and warm, soapy water will remove any build up of dust or grime.
CARE & MAINTENANCE OF YOUR SHOWER SYSTEM
Correcting Bowed Wall Panels Sistine Stone Wall Panels are made to be flexible and may have a slight bow. This condition is normal and the
panels will flatten when properly installed. If the panels have been stored improperly or have become excessively bowed, follow instructions below.
Using a heat gun or propane torch, heat the backside of the panel in the most bowed area. Hold the torch a few inches away and move the torch back
and forth over the area. After the panel becomes malleable, lay panel on a flat surface and apply weight until cool and flat.
(wall thresholds work well, refer to Installation Guide Packing List).
Cracked Tile As with any tile project, a tile can become damaged. We have supplied extra tiles in your package if this happens. Simply cut out the
damaged tile, silicone a replacement tile in place, and grout.
Cracked Wall Panel Seam If your wall panel developes a crack in a grout line, simply grout over the cracked seam when it is installed. The grout
will correct the problem, you will not be able to tell the crack was ever there.
13

13395 Estelle Street, Corona, California 92879 Phone 800.454.2284 Fax 951.734.1480
Visit us at www.americanbathfactory.com
NOTES
Table of contents
Other American Bath Factory Other manuals

American Bath Factory
American Bath Factory Sistine Stone Corner User manual

American Bath Factory
American Bath Factory Sistine Stone Sliding User manual

American Bath Factory
American Bath Factory Sistine Stone Neo Angle User manual

American Bath Factory
American Bath Factory Sistine Stone Alcove User manual
Popular Other manuals by other brands

Masterlock
Masterlock L1200 Instructions for use

Aero-motive
Aero-motive 11219 installation instructions

Iron logic
Iron logic Matrix III EH user manual

Steelcraft
Steelcraft 70490 installation instructions

Aqua Medic
Aqua Medic Calciumreactor KR 400 Operation manual

Aqua Medic
Aqua Medic Magnifica 100 CF Operation manual