American Bath Factory Sistine Stone Sliding User manual

ALCOVE - SLIDING
Alcove Shower System Installation Guide for Liner Style & Accent Liner Style Showers
Congratulations on the purchase of your new shower system.
This guide will give you the instructions on the installation of your new shower.
Natural Travertine Stone Appearance
All of our stone products are custom made and hand-crafted to look and feel like authentic
travertine. As you may know, travertine is a form of limestone that has been under pressure for
thousands of years. The product of long-ago hot and cold springs and waterfalls, travertine is a
beautifully banded and colored stone with a unique character. Among its most appealing
characteristics are the interesting craters and depressions, created by streams of water that
owed through the stone.We have taken great care in reproducing the appearance of genuine
travertine stone, giving you a beautiful and authentic shower.
Installation time may vary depending on your experience, complexity of shower,
and “Pre Installation Preparation Work” which may include: plumbing relocation,
drain location and bathroom demolition.
Prior to demolition, scheduling a contractor or building your shower, double check that you
have all the parts from the factory. Some applications may require a licensed plumber or
contractor. Do not use any product spec sheets to begin installation before receiving product.
These spec sheets are for reference only. Use actual product measurements only.
The diagrams throughout this guide illustrate a 36”x 36” shower. Depending on the size of the
shower purchased, actual parts may vary in size from the diagrams shown.
Our goal is to help you achieve a quick and successful shower installation.
See the clock in each section for estimated installation time.
Missing or damaged hardware and tiles should be reported within 24 hours
of receiving this shipment - If you need assistance call 1.800.454.2284,
Monday thru Friday, 7:15am - 4:00pm, Friday (PST)
G_00912-S-80S-7.17 Rev C
TM

1CHECK YOUR SHIPMENT AGAINST APPROPRIATE PACKING LIST
Make sure you have received all the items necessary for the installation. This will also familiarize you with all the
parts and hardware you will need to install your shower. Package contents are dependent upon which package you
ordered.
2
SLIDING GLASS DOOR
Glass Door (Reversible)
Fixed Glass Panel (Reversible)
Door Handle
Matching Drain Assembly
Door Slide Bracket
Shower Door Wheels (Pre-Installed on Door)
Door Bumper (2)
G1
G2
G3
G7
G1G2
G3
G7
G11
G12
G13
G11
G12
G13
WT2
WB2
WT1 WT3
WB1
WB3
L2
CP CD
P
TP
L1 L3
TP
SISTINE STONE PAN SET
Metal Leak-Free Reinforced Pan
Threshold for Glass
SISTINE STONE WALL PANELS
Back Wall Panel Top & Bottom
Left Wall Panel Top & Bottom
Right Wall Panels Top & Bottom
Mosaic or Stone Liner Back
Mosaic or Stone Liners Right & Left Side
Side Casing for Glass Door (3) & Cap
Side Casing for Glass Panel (3) & Cap
P
TP
WT1
WT3
L2
L1
CD
CP
WT2 WB2
WB1
WB3
L3
G13

3
OPTIONAL ITEMS
2PRE-INSTALLATION TEAR DOWN
FAUCETS
SHAMPOO BOX
SHOWER BENCH
TIME REQUIRED
8-16 HRS
This shower system is designed to be installed on a bare floor. It is necessary for any existing shower to be completely removed.
Tear out and remove all old material to expose the 2 x 4 wall studs. Clean up the shower area, removing all dust and old material from the area.
3DRY-FITTING THE PAN TIME REQUIRED
½ to 1 HR
It is easier to check alignment of studs and pan without the drain installed into the pan. Place the pan in the planned position. Check to see that the
spacing between the pan and 2 x 4 studs are flush. Some shims may be required to plumb walls with the pan. By screwing in the 1/2” cement board the
metal flange will pull fast to the studs, and will secure the metal pan in place. (diagram 1)
With the pan in position, check to make sure the 2” drain pipe is in the center of the pan drain hole. (diagram 2) Use the drain collar #5 by itself; remove the
rubber seal, nut and gaskets from the drain assembly. (diagram 3, next page) Push the drain collar #5 into the drain hole between the pan and the 2” pipe.
With the drain collar pushed flush to the pan surface, the 2” drain pipe should not extend past the inside threads of the drain collar #5.
diagram 2
11” for shampoo shelf
minimum gap
required for
shampoo shelf
11”
triple studs
3/4” overhang when using triple studs, no overhang when using double studs
(double studs required, triple studs recommended for extra-strength)
1/2” cement board
2 x 4 stud
metal flange
pan
diagram 1
floor of pan
silicone bead
P
P

42 x 4 STUDS ALIGNMENT & POSITIONING TIME REQUIRED
½ to 1 HR
Using the pan and wall panels, you will be able to check to make sure your 2 x 4 studs are in the needed position and supported adequately. You will see in
(diagram 2) extra 2 x 4 studs are added to the door and glass side thresholds for extra strength. You may need to make adjustments for your faucet or optional
shampoo shelf. When you place the bottom sections of the wall into the shower pan, you can also calculate the needed width and height of areas to keep free
of 2 x 4 studs. (See installation instructions included with the faucet or shampoo shelf)
5INSTALLING DRAIN TIME REQUIRED
½ to 1 HR
1. Locate the drain assembly to install into the pan .
2. Apply a generous bead of 100% RTV silicone around the shower pan drain hole and around the
outside of the drain collar #5, insert the drain collar #5 into the drain hole.
3. Apply a generous bead of 100% RTV silicone around the drain collar #5 from the underside of
the pan.
4. Install the rubber gasket #6 over the drain collar #5, to the underside of the pan, next install the
slide ring #7.
5. Screw on the drain lock nut #8 and hand tighten. Turn drain lock nut #8 approximately 1/4
turn with the wrench to ensure a water-tight fit. Check for a good seal. DO NOT OVERTIGHTEN.
6. Wipe off excess 100% RTV silicone and allow to dry. Follow the manufacturer’s directions for
application and drying time.
4
#1 trim plate
#2 drain tool
#3 pressure ring
#4 rubber seal
#5 drain collar
pan
#6 rubber gasket
#7 slide ring
#8 drain lock nut
apply silicone
around drain collar
sides and under lip
floor hole with
2” drain pipe
diagram 3
G7
G7 P

apply 100%
RTV silicone
6TIME REQUIRED
½ HR
6
7CEMENT BOARD INSTALLATION TIME REQUIRED
1-2 HRS
We recommend the use of 1/2” thick cement board as your shower backer. This is a common backer for stone and tile. Using this backer will help comply with
almost all city codes. A cement-based product like Wonderboard or Hardibacker may also be used if it meets your local codes. Some codes require a vapor
barrier to be installed as well. We recommend a water/vapor barrier of 6 mil. plastic be installed before installing the cement board. To do this, staple plastic
so that it hangs 1” above the floor. Roofing nails may be used to attach the cement board instead of screws, this prevents the plastic from wrapping around the
screws.
SETTING PAN
1. IMPORTANT: Use your cement board as an indicator of squareness. The cement board comes in
square sheets. If you see gaps or areas where the cement board is not fitting flush, fix
the problem by removing the cement board and shimming the board until it’s square and
flush. If the seams of the cement board are not flush and square, your wall panels will not
be square and flush.
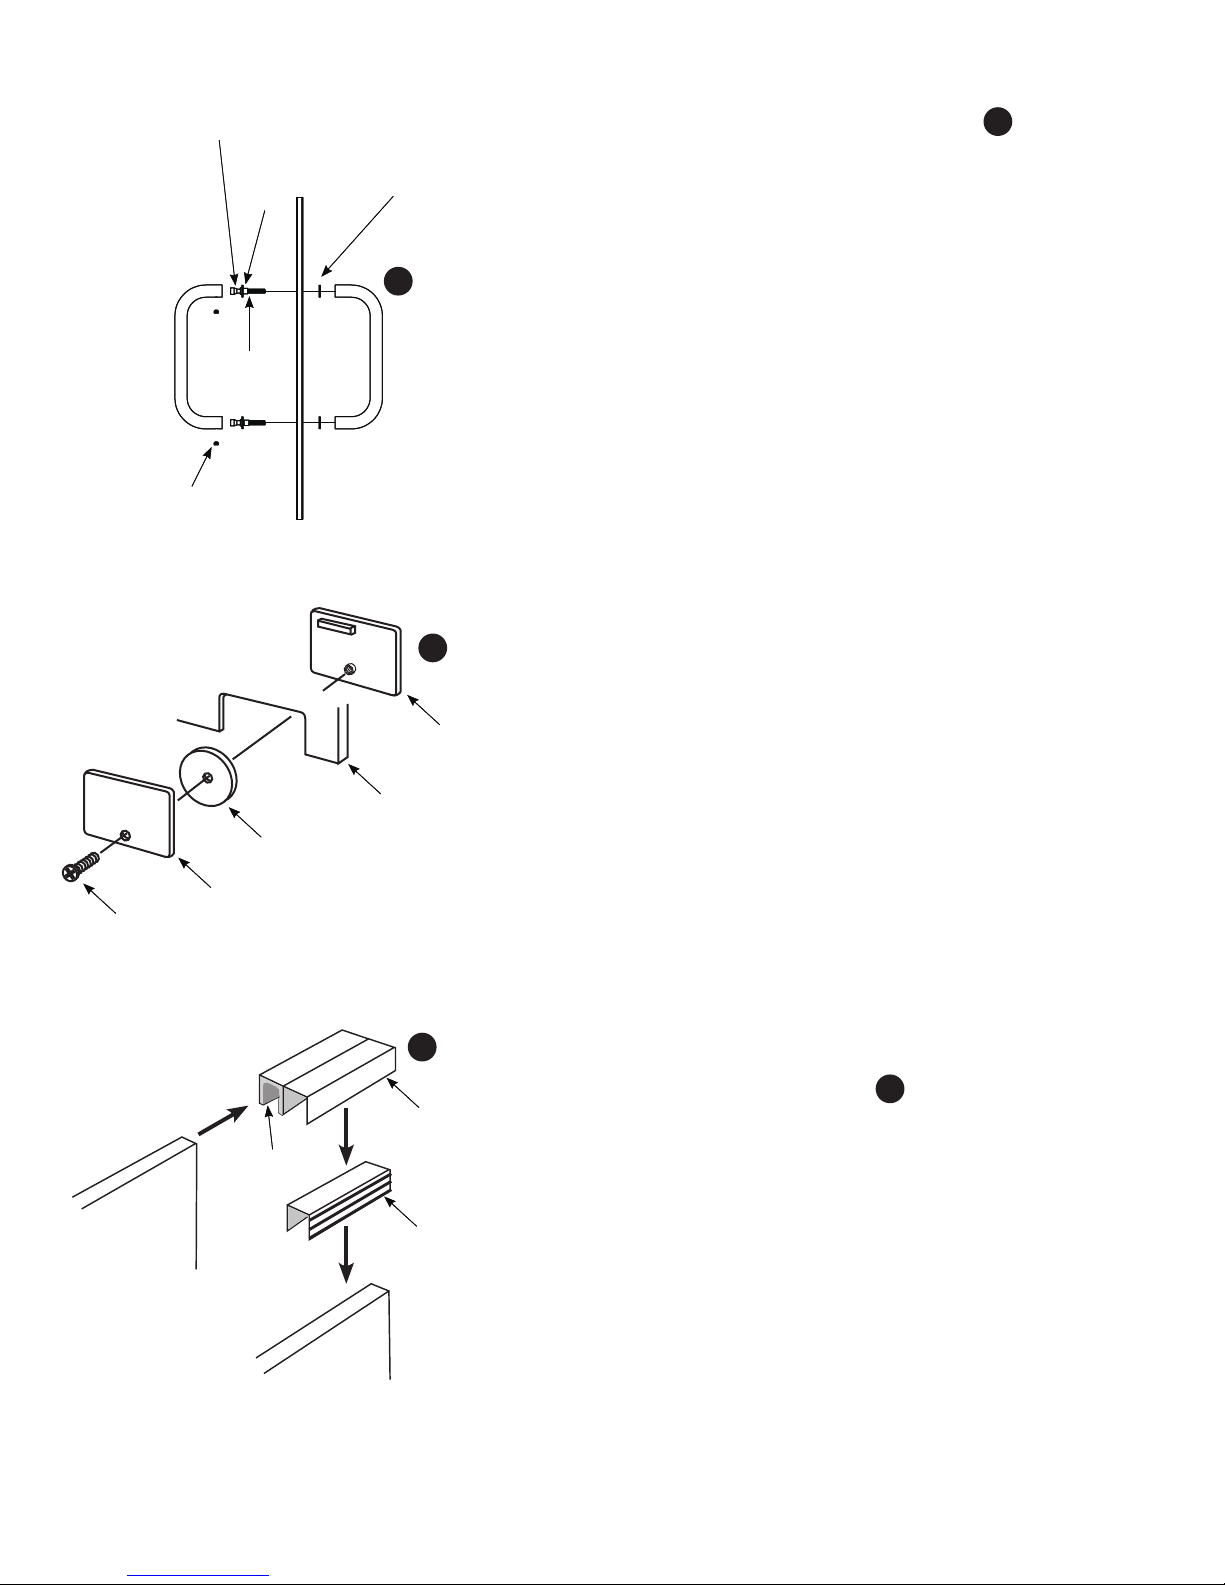
2. Cut a notch in cement board to fit around threshold. Sanding or shimmimg the 2 x 4’s at the
top rim of the pan may be required to flush the cement board. (diagram 8)
2. Place a bead of 100% RTV silicone on the front INSIDE face of the shower pan flange. The bead
should be in a zig-zag pattern.
3. Place the cement board against the studs and rest it inside the shower pan against the back
flange. Attach the cement board to the studs with screws or nails. Do not screw or nail into
the shower pan flange.
4. Continue installing the remaining cement boards.
For best cutting results for wall panels and cement board, use a Makita grinder with a 4” tile blade.
notch
diagram 8
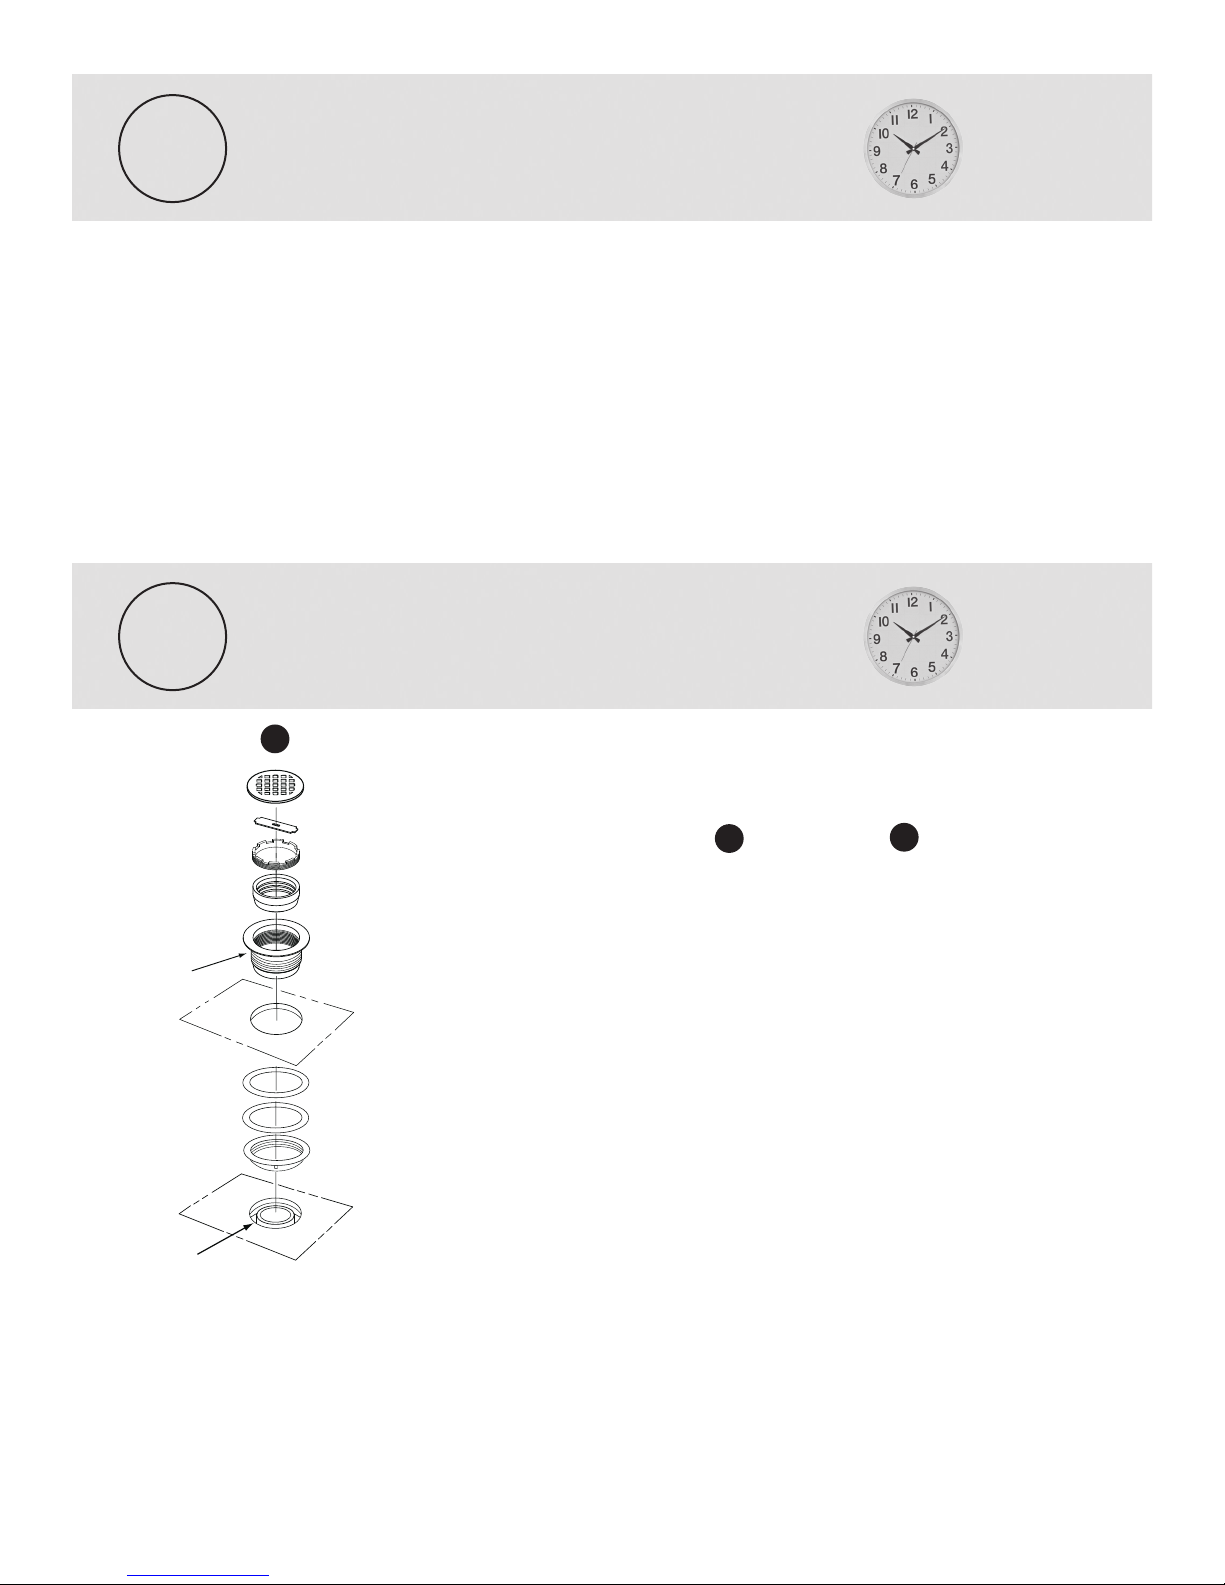
1. Now that the drain is installed into the pan dry fit the pan and drain for alignment, check to
make sure the 2” drain pipe is in the center of the pan drain hole. (diagram 2) Use the drain
collar #5 by itself; remove the rubber seal, nut and gaskets from the drain assembly.
(diagram 3, previous page) Push the drain collar #5 into the drain hole between the pan
and the 2” pipe. With the drain collar pushed flush to the pan surface, the 2” drain pipe should
not extend past the inside threads of the drain collar #5.
2. Make sure the pan and drain fit level to the floor (the pan can be secured to the floor by nailing
the pan flange to the studs, this can only be done after step 3 is completed)
3. Remove pan and apply 100% RTV Silicone to the floor (diagram 7)
4. Carefully lift the shower pan and set into place. Make sure the ABS pipe is still centered.
5. Push and secure the rubber seal #4 onto the 2” ABS pipe.
6. Thread on the brass pressure ring #3 around the drain pipe with the provided tool #2.
Remove the tool after the brass pressure ring is installed.
7. Test and snap the decorative diamond trim plate #1 into position. (Remove the decorative trim
plate and store in secure area until installation is complete, drain will be grouted when shower is
grouted).
8. After installing pan, cover with cardboard or drop cloth to protect pan from scuffs.
diagram 7

B - Wall Threshold Trim
1. Locate the door side thresholds side thresholds and the panel channel side
thresholds and the top trim.
2. To help with the door side thresholds and the panel channel side threshold
installation (diagram 11), use a level and draw a plumb line from the inside of the pan threshold
up to the top of the shower. Do this on both sides.
This line will be where the side rails and the wall tiles meet, this will give you a visual reference
point when dry-fitting your wall tiles.
3. Apply 100% RTV silicone, using a circular pattern, to the cement board along the plumb line,
approximately 4 inches wide, to the edge of the shower pan. (diagram 12)
4. Place the first side threshold into position, making sure to align the side rail with the vertical
plumb line previously drawn on the cement board. Apply pressure to the side threshold to bond
it to the cement board. The side threshold will flush with the inside of the shower pan threshold
and have a small gap where the pan threshold slopes. (diagram 13)
5. Place the remaining side thresholds into position, 3 to each side. Make sure to use a level and
the plumb line previously drawn on the cement board to align the side thresholds vertically.
7
PAN & WALL THRESHOLD TRIM TIME REQUIRED
1/2 - 1 HR
8
diagram 13
diagram 9
diagram 10
metal pan
pan rails
silicone
TP
P
pan rail TP metal pan Ppan rail TP
diagram 11
panel channel side thresholds (3)
(includes top trim and plug)
W7
diagram 12
cement
board
silicone
circles
W6
W7
top trim top trim
A - Pan Threshold
1. Locate the left pan rail and the right pan rail (diagram 9)
2. Dry fit onto the front of the metal pan
3. Remove and place 100% RTV silicone on bottom of rails and in bottom channels, re-install.
(diagram 10)
P
TP
TP
plug
W6 W7
door side thresholds (3)
(includes top trim)
W6

8
WALL PANEL/LINER INSTALLATION TIME REQUIRED
3-4 HR
9
A - Inspecting Wall Panels/Liners
Inspecting panels at this point will give you confidence that the wall panels are straight and square from the factory. When installing wall panels, you may need to make adjust-
ments to the panels to accommodate for unevenness of your existing walls. During the inspection process and/or dry-fitting process, if you have any concerns about the alignment
or fit of the wall panels, please call 1-800-454-2284 for customer service, and we will gladly assist you with your installation.
1. Find a large empty area to layout and inspect all panels.
2. Align all panels and liners to check for straightness. Make sure grout lines are straight and
square to each other.
3. Sistine Stone wall panels are made to be flexible and may have a slight bow. This condition
is normal and wall panels will flatten out when properly installed. If wall panels have been
stored improperly or have become excessivly bowed, they can be easily
flattened before installation (See trouble shooting section on last page for details).
B - Dry-fit Wall Panels/Liners
1. Place your first bottom back panel into position. (diagram 12). Rest panel
onto the pan floor; use spacers between the floor and the panel to make the top of the
panel level.
2. Place the back liner into position. Make sure the grout lines are aligned, use spacers
to make the top level. Inspect the spacing between the wall panels and the side
threshold plumb line.
3. Place the top panel into position, push the two panels together. Make sure the
grout lines are aligned, use spacers to make the top of the panel level. Inspect the spacing
between the wall panels and the side threshold plumb line.
4. Depending on your cement board alignment, some sanding of the wall panel edges may be
required for a tight fit.
5. Holding the upper panels and liner in place with another persons help,
check the length and overlap alignment. Some fitting may be required.
6. Place one of the bottom side panels in position check for level and length.
7. Place the side liner into position. (diagram 13)
8. Place one of the top side panels into position.
9. Repeat steps 6 through 8 for other side of shower
10. Depending on your faucet selection, you may need to mark and cut out holes for your
faucet to fit through before you can place the panel into position. Remember “measure
twice, cut once”, you can cut our walls with most cutting tools.
(See installation video at www.americanbathfactory.com). Now you can check for
levelness and grout line alignment and spacing between walls and plumb line.
diagram 12
diagram 13
WB2
WB2 WB2
L2
WT2
WB1
L1
WT1
L1
L2
WT2
WB2
WB1

9
WALL PANEL/LINER INSTALLATION (continued) TIME REQUIRED
3-4 HR
9
OPTIONAL SHAMPOO SHELF INSTALLATION TIME REQUIRED
1/2 - 1 HR
10
4. On the 2 tiles the Shampoo Shelf will be replacing, mark 1”
from the outside of the grout line, the cut-out area will be
10” x 22”. Cut out the hole for the Shelf. The smaller the
hole the better.
5. Dry-fit the Shampoo Shelf for alignment of grout lines.
6. Using 100% RTV Silicone in-place with a generous bead
around the back of the lip, wipe off excess silicone with
tissue.
1. The Shampoo Shelf was designed to match your tile size.
(2) 12” x 24” tiles, the cut-out hole size is 10 x 22”.
2. There is a 1” lip or frame around the Shampoo Shelf, this will
be the water sealed area for the Shampoo Shelf.
3. The best way to cut the hole is with a small 5” round
diamond blade, and with a jigsaw to cut the corners.
See detailed instructions enclosed with Shampoo Shelf
C - Installing Panels
9. Remove all dust and dirt with a clean dry cloth. This will increase the bond to the 100% RTV
silicone.
10. Start with the bottom panel apply a generous amount of 100% RTV silicone to the
cement board and to the back side of the wall panel. Also refer to the manufacturer’s
recommendations for application and drying time.
11. Press the wall firmly into position. Be sure to use spacers between the bottom panel and the
shower pan to ensure panel is level. (diagram 16)
12. Install the panels in the same order as you dry-fitted the panels.
Braces may be required to keep walls flush
WB2
diagram 16
WB3
L3
WT3
L2
WB2
WB1
L1
WT1
WT2

10
SLIDING GLASS DOOR INSTALLATION
11 TIME REQUIRED
1/2 - 1 HR
Our glass is tempered to make for a very strong door, the tempering gives maximum strength from impact on the surface, unfortunately this make the glass
very vulnerable to breakage from impacts to the bottom and top edges of the glass panel. Do not rest the top or bottom of glass panels on hard floor or objects,
always keep corner pads on glass while handling. Place foam or a soft material under the glass panel when unpacking and setting aside
CONTENTS SLIDING GLASS DOOR FIXED GLASS PANEL
DOOR SLIDE BRACKET
SILICONE
diagram 17
sliding glass door
sliding glass door
door handle
door handle
wheels
RIGHT DOOR
LEFT DOOR
door
bumper
fixed glass
panel
door
slide
bracket
door
slide
bracket
cement
board
wall threshold
DOOR BUMPERS
A - Fixed Panel Installation
1. Locate the Fixed Glass Panel , Door Slide Bracket , and Clear 100% RTV Silicone.
2. You have already determined the position of the Sliding Glass Door, left or right. (diagram 17)
3. Dry fit the Fixed Glass Panel in place. Place the fixed glass pane linto the channel of the wall
threshold, there is no channel for the pan top rail, 100% RTV silicone will hold the glass to the
pan top rail.
4. Now that you have dry-fitted your panel, remove panel and silicone in place.Place a small
bead of 100% RTV Silicone in the channel of the wall threshold and pan top rail. Using 100%
RTV Silicone where the Fixed Glass Panels will rest, don’t silicone past where the Fixed Panel
ends. Push the Fixed Glass Panels into their resting position and clamp in place until the 100%
RTV silicone is dry. Wipe off any excess 100% RTV silicone with tissue paper.
Be careful not to rest the edges of the door on hard
surfaces. Tempered glass is very strong and impact
resistant but its weakest point is impact on the edges.
door
bumper
door
bumper
door
bumper
fixed glass
panel
SHOWER DOOR WHEELS
DOOR HANDLE
G3
G1 G2
G12
G11
G13
G2 G11

wheel
inside bracket
outside bracket
shower door
bolt
11
diagram 18
clear washer
clear
spacer
clear washer
shower
inside
shower
outside
B - Handle Installation
1. Set the glass door in a position to enable the assembly of the handle (diagram 18)
2. A left door will have the Door Handle on the left, a right door will have the Door Handle
on the right.
3. Loosen the set screws so you can separate the handles.
4. Unscrew the long bolt from the handle. Keep all rubber pieces attached to the screw.
5. Remove the first set of flat, clear washers from the bolt.
6. Start with the top hole on the glass door. Place the long bolt through the hole in the door
(keeping the remaining rubber pieces on the bolt). On the other side of the glass place the flat
washers onto the threaded portion of the bolt.
7. Take one side of the handle and screw the long bolt into the end. Just start the bolt until a few
threads catch. Keep loose.
8. Put the second bolt through the lower hole. Place the flat washer onto the bolt. Screw the bolt
into the bottom handle.
9. Align the handle on the door and carefully tighten the long bolts. Do not over tighten.
10. Place the opposite handle over the long bolts and tighten the set screws to secure the handle.
screw
set screw
diagram 20
Sliding
Glass
Door
Fixed
Glass
Panel
top slide bracket
clear rubber insert
slide
diagram 19
C - Sliding Glass Door Installation
1. Locate the shower door wheels (Pre-installed on door)
2. To install the wheels on the sliding glass door, unscrew the bolt from the inside bracket.
Place the outside bracket on the outside of the door, and place the inside bracket and wheel into
the cutout section of the shower door (diagram 19) Push the bolt through the inside bracket
until it screws into the outside bracket. Repeat for the remaining wheels.
3. After 30 minutes to an hour the 100% RTV silicone on the fixed glass panel should be secure
enough to finish the door assembly. (do not use excessive force on the door until the 100%
RTV silicone is fully dried). Have the top slide bracket handy and ready to install. Carefully place
the Door into position, with the wheels resting in to the pan threshold channels facing into the
shower.
4. To secure the sliding door to the door slide bracket (diagram 20) Take the clear rubber
insert of top bracket and put a pea drop of 100% RTV silicone inside of channel then place on
the top end of the Fixed Glass Panel. Next lower the bracket over the clear rubber insert at
the same time making sure the glass is going into the guide channel, push down leaving a 1/8”
gap between top of the Sliding Glass Door and the slide. (pushing the slide bracket down to far
will create to much friction for the door to move easily).
5. To install the two rubber door stops, place a drop of 100% RTV silicone onto the rubber stops,
and position on the left and right wall thresholds, in the center of where the door will stop.
G3
G3
G12
G11
G11

13405 Estelle Street, Corona, California 92879 Phone 800.454.2284 Fax 951.734.1480
Visit us at www.americanbathfactory.com
GROUT
12
SHOWER SYSTEM TROUBLESHOOTING
DO NOT CLEAN SISTINE STONE WITH PAINT THINNER, ACETONE, LACQUER THINNER, M.E.K., SCRUBBING BUBBLES or
other chemicals that attack the structural integrity of Resin Based Stone. Use of these chemicals will destroy the surface of the stone and void your
warranty. Soapy water, ammonia based cleaners & Comet will remove most dirt and residue from all types of finishes. For stubborn stains you may
use a non-abrasive Scotchbrite pad. “Lightly” scrub the stained area in a circular motion to avoid discoloration. The stone is naturally waterproof and
will not absorb spills or soil, simply wipe away with a damp sponge. Periodic cleaning with a sponge and warm, soapy water will remove any build
up of dust or grime.
CARE & MAINTENANCE OF YOUR SHOWER SYSTEM
Correcting Bowed Wall Panels Sistine Stone Wall Panels are made to be flexible and may have a slight bow. This condition is normal and the
panels will flatten when properly installed. If the panels have been stored improperly or have become excessively bowed, follow instructions below.
Using a heat gun or propane torch, heat the backside of the panel in the most bowed area. Hold the torch a few inches away and move the torch back
and forth over the area. After the panel becomes malleable, lay panel on a flat surface and apply weight until cool and flat.
(wall thresholds work well, refer to Installation Guide Packing List).
Cracked Tile As with any tile project, a tile can become damaged. Simply cut out the damaged tile, silicone a replacement tile in place, and grout.
Cracked Wall Panel Seam If your wall panel developes a crack in a grout line, simply grout over the cracked seam when it is installed. The grout
will correct the problem, you will not be able to tell the crack was ever there.
Scratches & Blemishes Can be removed by wet-sanding the tile surface. Make sure tile surface and sandpaper are wet, and sand tiles until scratches
and blemishes are removed.
Your American Bath Factory shower has a non-porous tile surface, which makes it easy to clean. Grout used must contain an ACRYLIC ADDITIVE to ensure
proper bonding to the tiles. We suggest you add grout to every grout line and seam in the shower.
1. Recommended grout: Custom Building Products, Polyblend #122 Linen, Non-Sanded Ceramic Tile Caulk, Model # PC12210N and
Snow White #11 Model # PC1110N. Available at your local hardware or tile store.
2. Follow the grout directions for specific application instructions, a water-based non-sanded grout is recommended.
3. If you desire a powdered grout, use an acrylic additive to ensure bonding.
Note: Grout is not covered by ABF Warranty.
This manual suits for next models
1
Table of contents
Other American Bath Factory Other manuals

American Bath Factory
American Bath Factory Sistine Stone Corner User manual

American Bath Factory
American Bath Factory Sistine Stone Neo Corner-Hnf User manual

American Bath Factory
American Bath Factory Sistine Stone Alcove User manual

American Bath Factory
American Bath Factory Sistine Stone Neo Angle User manual