LAMPE À CHANGEMENT DE COULEUR
AVEC DÉTECTION DE MOUVEMENT
LS3101RGB-N1 Manuel du propriétaire
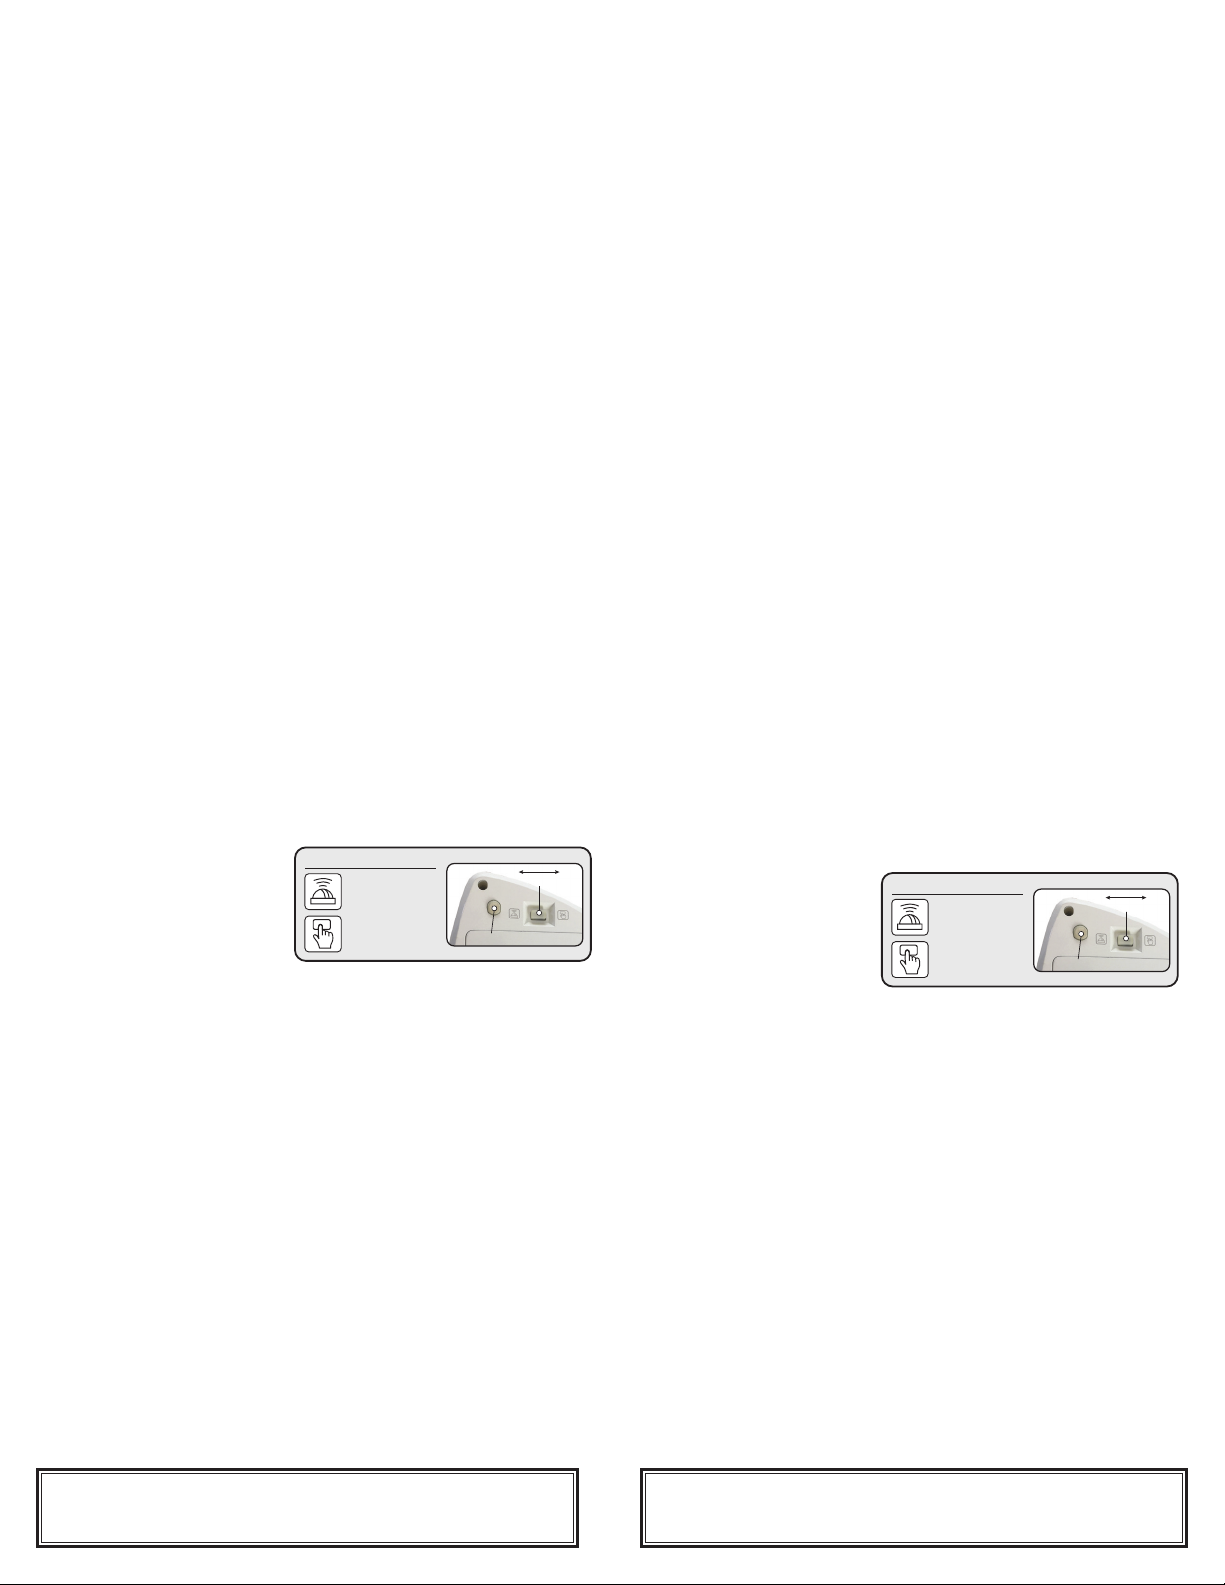
Emplacement des commandes
1. Efeurerpouractiver/atténuer/activerlescouleurs/désactiver
2. Commutateuràbascule/sélecteuràefeurement
3. Commutateurdemodedansunboîtierrésistantàl’eau
4. Capteur IRP (infrarouge passif)
5. Couvercle du compartiment des 3 piles AA
Utilisation intérieure / extérieure
CettelampeestclasséeIP44poursarésistanceàl’eau.Elleestconçuepourêtreutiliséeàl’intérieurou
àl’extérieurdansdesconditionsd’utilisationnormales.Ellen’estPASconçuepourêtreimmergéedans
l’eau ou tout autre liquide. NE PAS exposer la lampe à une chaleur excessive au-dessus de 40 °C (105
°F) ni à moins de -1 °C (30 °F).
Installation des piles
Utiliser un tournevis Philips n° 1 ou n° 2 (non fourni) et retirer le couvercle du compartiment des piles (5).
Insérer3pilesAAdanslecompartimentenprêtantattentionàladirection/polaritédechaquepile.
Replacer le couvercle et resserrer la vis.
N’utiliserquedespilesneuves.Nepasmélangerdespilesanciennesetdesnouvelles.
Lorsque les lumières faiblissent ou que le capteur ne fonctionne plus correctement, il est temps
d’installer de nouvelles piles.
Recycler/éliminerlespilesusagéesdelabonnemanière,conformémentauxréglementations
locales.
Utiliser la lampe de deux manières différentes
Ilyaunchoixdedeuxmodesd’utilisation.Lemodeefeurementpermetàl’utilisateurdesélectionner
unelumièreblancheoudecouleur(rouge,vertetbleu).Lemodeactivéparlemouvement
fonctionne uniquement en blanc.
Choix du mode
Ilyaunsélecteurdemode(3)situéaubasdel’appareil.L’interrupteurestenfermédansunmanchon
résistantàl’eaupourprotégerl’appareilcontrelesdysfonctionnementslorsqu’ilestutiliséàl’extérieur.
Pourutiliserlalampeenmodeefeurementaveclacouleur,déplacerlecommutateurverslaDROITE
(ICÔNE).Pourutiliserlalampeenmodedétectiondemouvement,déplacerlecommutateurversla
GAUCHE (ICÔNE).
En mode activé par le mouvement
Cettelampeestéquipéed’uncapteurIRP(infrarougepassif)(4)capablededétecterles
mouvementsdansdesconditionsdecrépusculejusqu’àl’aubejusqu’à3m(10pi).Lorsquelemode
activéparlemouvementestsélectionné,unelumièreblanchelumineuses’allumelorsquelecapteur
détecteunmouvementdansunrayonde3m(10pi).Lalumièrerestealluméejusqu’àcequ’aucun
mouvementnesoitplusdétecté,puiss’éteint30secondesaprèslederniermouvementreconnu.La
détectiondemouvementnefonctionnepascorrectementsilecapteurestobstruéoualtéré.
En mode efeurement
Desefeurementssurlehautdel’appareil(1),activentunsélecteurcommutateur/sélecteurà
efeurementaubasdel’appareil(2)etchangentlacouleurdelalumière.Lesélecteuràefeurement
estconçupourréagiràunepressionminimale.Appuyerfortementoufrappersurledessusdela
lampen’estpasnécessaireetniraparendommagerl’appareil.Lesélecteuràefeurementdoitêtre
encontactaveclasurfacepourfonctionner.LesélecteuràefeurementnefonctionneraPASsur
unesurfaceinégale(commel’osier,lesableoulasaleté).Ilestpossibledecliquermanuellementsurle
commutateurpourchangerlacouleurdelalumièresilalampeestutiliséesurunesurfacesurlaquelle
lafonctionàefeurementnefonctionnepas.
Pour sélectionner la couleur de la lumière :
EfeurerpourduBLANCLUMINEUX
EfeurerpourduBLANCATTÉNUÉ
EfeurerpourduROUGE
EfeurerpourduVERT
EfeurerpourduBLEU
EfeurerpourÉTEINDRE
Précautions relatives aux piles :
1. Utiliseruniquementdespilesdutypeetdelataillespéciés.
2. Toujoursacheterdespilesdetailleetdetypeappropriésenfonctiondel’utilisationsouhaitée.
3. Respecterlapolaritécommeindiquédanslecompartimentàpileslorsdeleurinstallation.
Touteinversiondelapolaritérisqued’endommagerledispositif.
4. Nepasmélangerpilesalcalines,pilesstandard(carbonezinc)etpilesrechargeables(nickel
cadmium).
5. Remplacertouteslespilesenmêmetemps.Nepasmélangerdespilesanciennesetdes
nouvelles.
6. Nettoyer les contacts des piles ainsi que les contacts du dispositif avant l’installation des piles.
7. Ne pas jeter les piles dans le feu.
8. Enleverlespilessiellessontépuisées,ousileproduitnedoitpasêtreutilisépendantunepéri-
odeprolongée.
Déclaration de la FCC
Cet appareil est conforme à la Partie 15 de la Federal Communication Commission (FCC). Son
fonctionnementestsujetauxdeuxconditionssuivantes:(1)Cetappareilnedoitcauseraucuneinterférence
nuisible,et(2)cetappareildoitacceptertouteinterférencereçue,ycompriscellequipourraitcauserun
fonctionnementindésirable.
REMARQUE : Cetéquipementaétémisàl’essaietdéclaréconformeauxlimitesprévuespourunappareil
numériquedeclasseB,conformémentàlapartie15durèglementdelaFCC.Ceslimitessontdestinées
àoffriruneprotectionraisonnablecontrelesinterférencesnuisiblesdansuneinstallationrésidentielle.Cet
équipementproduit,utiliseetpeutémettredel’énergieradiofréquenceet,s’iln’estpasinstalléetutilisé
conformémentauxdirectives,peutcauseruneinterférencepréjudiciableauxcommunicationsradio.
Toutefois,iln’yaaucunegarantiequ’aucuneinterférenceneseproduiradansuneinstallationparticulière.Si
cetéquipementcauseuneinterférencenuisibleàlaréceptiondelaradiooudelatélévision,cequipeutêtre
établienéteignantpuisenrallumantl’équipement,l’utilisateurestinvitéàtenterderemédieràl’interférence
par l’une des mesures suivantes :
•Réorienteroudéplacerl’antennederéception.
•Augmenterladistanceentrel’équipementetlerécepteur.
•Brancherl’équipementsuruneprised’uncircuitdifférentdeceluisurlequellerécepteurestbranché.
•Consulterlerevendeurouuntechnicienderadio/télévisionexpérimentépourobtenirdel’aide.
AVERTISSEMENT : Toutchangementoutoutemodicationsansl’accordexprèsdelapartieresponsabledela
conformitépourraitannulerl’autorisationaccordéeàl’utilisateurdeseservirduproduit.
LÁMPARA CON CAMBIO DE COLOR Y
DETECCIÓN DE MOVIMIENTO
Manual del propietario LS3101RGB-N1
Ubicación de los controles
1. Pulsar para encender/atenuar/color/apagar
2. Interruptor basculante/pulsador selector
3. Selector de modo en una carcasa impermeable
4. Sensor infrarrojo pasivo (PIR)
5. Puerta del compartimiento para 3 baterías AA
Para uso en interiores y exteriores
EstalámparaestáclasicadacomoResistentealaguaIP44.Hasidodiseñadaparausoeninterioresy
exterioresbajocondicionesdeoperaciónnormales.NOhasidodiseñadaparasumergirlaenaguani
en ningún otro líquido. NO exponga la lámpara a un calor excesivo por encima de 105°F (40°C) o frío
excesivo por debajo de 30°F (-1°C).
Para instalar las baterías
Utilice un destornillador Philips núm. 1 o núm. 2 (no incluido) y quite la puerta del compartimiento de
las baterías (5). Inserte 3 baterías AA nuevas en el compartimiento, prestando atención a la dirección/
polaridad de cada batería.
Reinstale la puerta y apriete el tornillo.
Utilice únicamente baterías nuevas. No combine baterías nuevas y usadas.
Cuando las luces se atenúen o el sensor ya no funcione correctamente, será necesario instalar baterías
nuevas.
Por favor, recicle o deseche las baterías usadas de la manera correcta de acuerdo con los
reglamentos locales.
Opere la lámpara de dos maneras diferentes
Se puede elegir entre dos modos de funcionamiento. El modo Pulsar (Tap) le permitirá al usuario
seleccionar luz blanca O de color (roja, verde o azul). El modo Activada por movimiento sólo
funcionará en color blanco.
Para elegir el modo
Hay un interruptor-selector de modo (3) ubicado en la parte inferior de la unidad. El interruptor está
encerrado en una manga resistente al agua para proteger la unidad contra un mal funcionamiento
cuando se utiliza en exteriores. Para operar la lámpara en modo pulsar con color, mueva el interruptor
hacia la DERECHA (ICONO). Para operar la lámpara en modo Activada por movimiento, mueva el
interruptor hacia la IZQUIERDA (ICONO).
En modo Activada por movimiento
Esta lámpara está equipada con un sensor infrarrojo pasivo (PIR) (4) que puede detectar movimiento
bajo condiciones entre el anochecer y el amanecer hasta una distancia de 10 pies (3 m). Cuando
se elige el modo Activada por movimiento, se activará una luz BLANCA BRILLANTE cuando el sensor
detecta movimiento dentro de una distancia de 10 pies (3 m). La luz permanecerá encendida hasta
queyanosedetecteningúnmovimientoyluegoseapagaráalcabode30segundosdespuésdel
último movimiento detectado. La detección de movimiento no funcionará correctamente si el sensor
está bloqueado o alterado.
En modo Pulsar
Al pulsar ligeramente la parte superior de la unidad (1), se activará un interruptor basculante/pulsador
selectorenlaparteinferior(2)ycambiaráelcolordelaluz.Elpulsadorselectorhasidodiseñadopara
reaccionar a un mínimo de presión. No es necesario presionar fuertemente ni golpear en la parte
superiordelalámpara,yaqueestodañaráeventualmentelaunidad.Elpulsadorselectordeberá
estarencontactoconlasupercieparaquepuedafuncionar.ElpulsadorselectorNOfuncionará
enunasupercieirregular(talcomomimbre,arenaotierra).Ustedpuedeaccionarmanualmente
elbasculadorparacambiarelcolordelaluzsiestáusandolalámparaenunasuperciedondela
función pulsar no funciona.
Para seleccionar el color de la luz:
Pulsar para BLANCO BRILLANTE
Pulsar para BLANCO ATENUADO
Pulsar para ROJO
Pulsar para VERDE
Pulsar para AZUL
Pulsar para APAGAR
Precauciones referentes a las baterías:
1. Utiliceúnicamenteeltamañoyeltipodebateríaespecicados.
2. Siempreadquieraeltamañoygradodebateríacorrectosquemásseadecúeasusnecesidades.
3. Asegúrese de observar la polaridad correcta cuando instale las baterías según se indica en el
compartimiento de las baterías.
Lasbateríasinvertidaspodríanocasionarledañosaldispositivo.
4. No combine diferentes tipos de baterías: alcalinas, estándar (zinc-carbono) o recargables
(níquel-cadmio).
5. Reemplace todas las baterías de un juego al mismo tiempo. No combine baterías nuevas y usadas.
6. Limpieloscontactosdelasbateríasytambiénlosdeldispositivoantesdeinstalarlasbaterías.
7. No deseche las baterías en el fuego.
8. Extraiga las baterías si están gastadas o si no se va a utilizar el producto por un período de
tiempo prolongado.
Declaración de la FCC
Este dispositivo cumple con la Sección 15 de las Normas de la FCC. Su funcionamiento está sujeto a las
siguientesdoscondiciones:(1)Estedispositivonodebecausarinterferenciadañina,y(2)estedispositivodebe
aceptartodainterferenciarecibida,incluidaaquéllaquepuedecausarunfuncionamientonodeseado.
AVISO: Este equipo ha sido probado, y se consideró que cumple con los límites de los aparatos digitales de
ClaseB,deacuerdoconlasespecicacionesdelaParte15delasNormasdelaFCC.Elobjetivodeestoslímites
es ofrecer una protección razonable contra interferencias nocivas en una instalación residencial. Este equipo
genera, utiliza y puede radiar energía de radiofrecuencia y, si no se instala y utiliza de acuerdo con estas
instrucciones, puede generar interferencia perjudicial para las radiocomunicaciones.
Sin embargo, no se garantiza que no se producirá interferencia en una instalación en particular. Si su
equipo causa interferencia nociva en la recepción de radio o televisión, que puede averiguar apagando y
encendiendo el equipo, intente corregirla mediante alguna o varias de las siguientes maneras:
• Vuelva a orientar o cambie de lugar la antena receptora.
• Aumente la separación entre el equipo y el receptor.
•Conecteesteequipoauntomacorrienteenuncircuitodiferentealqueestéconectadoelreceptor.
•Consultealdistribuidoroauntécnicoexperimentadoderadioytelevisiónparasolicitarasistencia.
ADVERTENCIA:Lasmodicacionesnoaprobadasporlaparteresponsableparaelcumplimientopodríananular
la autoridad del usuario para utilizar este producto.
Garantie limitée
Dans des conditions normales d’utilisation, AmerTac fournit à l’acheteur original de ce produit une garantie
expresse limitée d’un an qui est indiquée dans la Garantie limitée énoncée intégralement sur www.
amertac.com/warranties.Lagarantielimitéeremplacetouteslesautresgarantiesexpressesouimplicites,
sousréservedesexceptionsexplicitéesdanslaGarantielimitéesurlesiteWeb.
Garantía limitada
En condiciones y uso normales, AmerTac otorga al comprador original de este producto una garantía
expresa limitada de un año que se describe con todo detalle en www.amertac.com/warranties. La
garantía limitada se otorga en lugar de todas las demás garantías o responsabilidades expresas o implícitas,
sujeto a las excepciones que se explican con todo detalle en la garantía limitada en el sitio web.
Activéparmouvement
(Lumière blanche
seulement)
Effleurement du dessus pour
fairedéfilerlescouleurs
(blanche, rouge, verte,
bleue)
2 modes de commande
Mode commutateur
Commutateur à bascule
Activada por movimiento
(Luz blanca únicamente)
Pulsar en la parte superior
paraciclaratravésdelos
colores
(Blanco, rojo, verde, azul)
2 Modos de control
Interruptor de modo
Interruptor basculante


