Amica AWDI914GJ User manual

WASHER DRYERS
Please carefully read these Operating Instructions before using the appliance!
OPERATING INSTRUCTIONS
IO 01257
(05.2016)
AWDI914GJ

2
In accordance with European Directive 2012/19/UE and Polish legislation regarding
used electrical and electronic goods, this appliance is marked with the symbol of the
crossed-out waste container.
This marking indicates that the appliance must not be disposed of together with other
household waste after it has been used.
The user is obliged to hand it over to waste collection centre collecting used electrical
and electronic goods. The collectors, including local collection points, shops and local
authority departments provide recycling schemes. Proper handling of used electrical and
electronic goods helps avoid environmental and health hazards resulting from the presence of danger-
ous components and the inappropriate storage and processing of such goods.
CONTENTS
Basic Information..................................................................................................................3
Notes on safety...............................................................................................................4
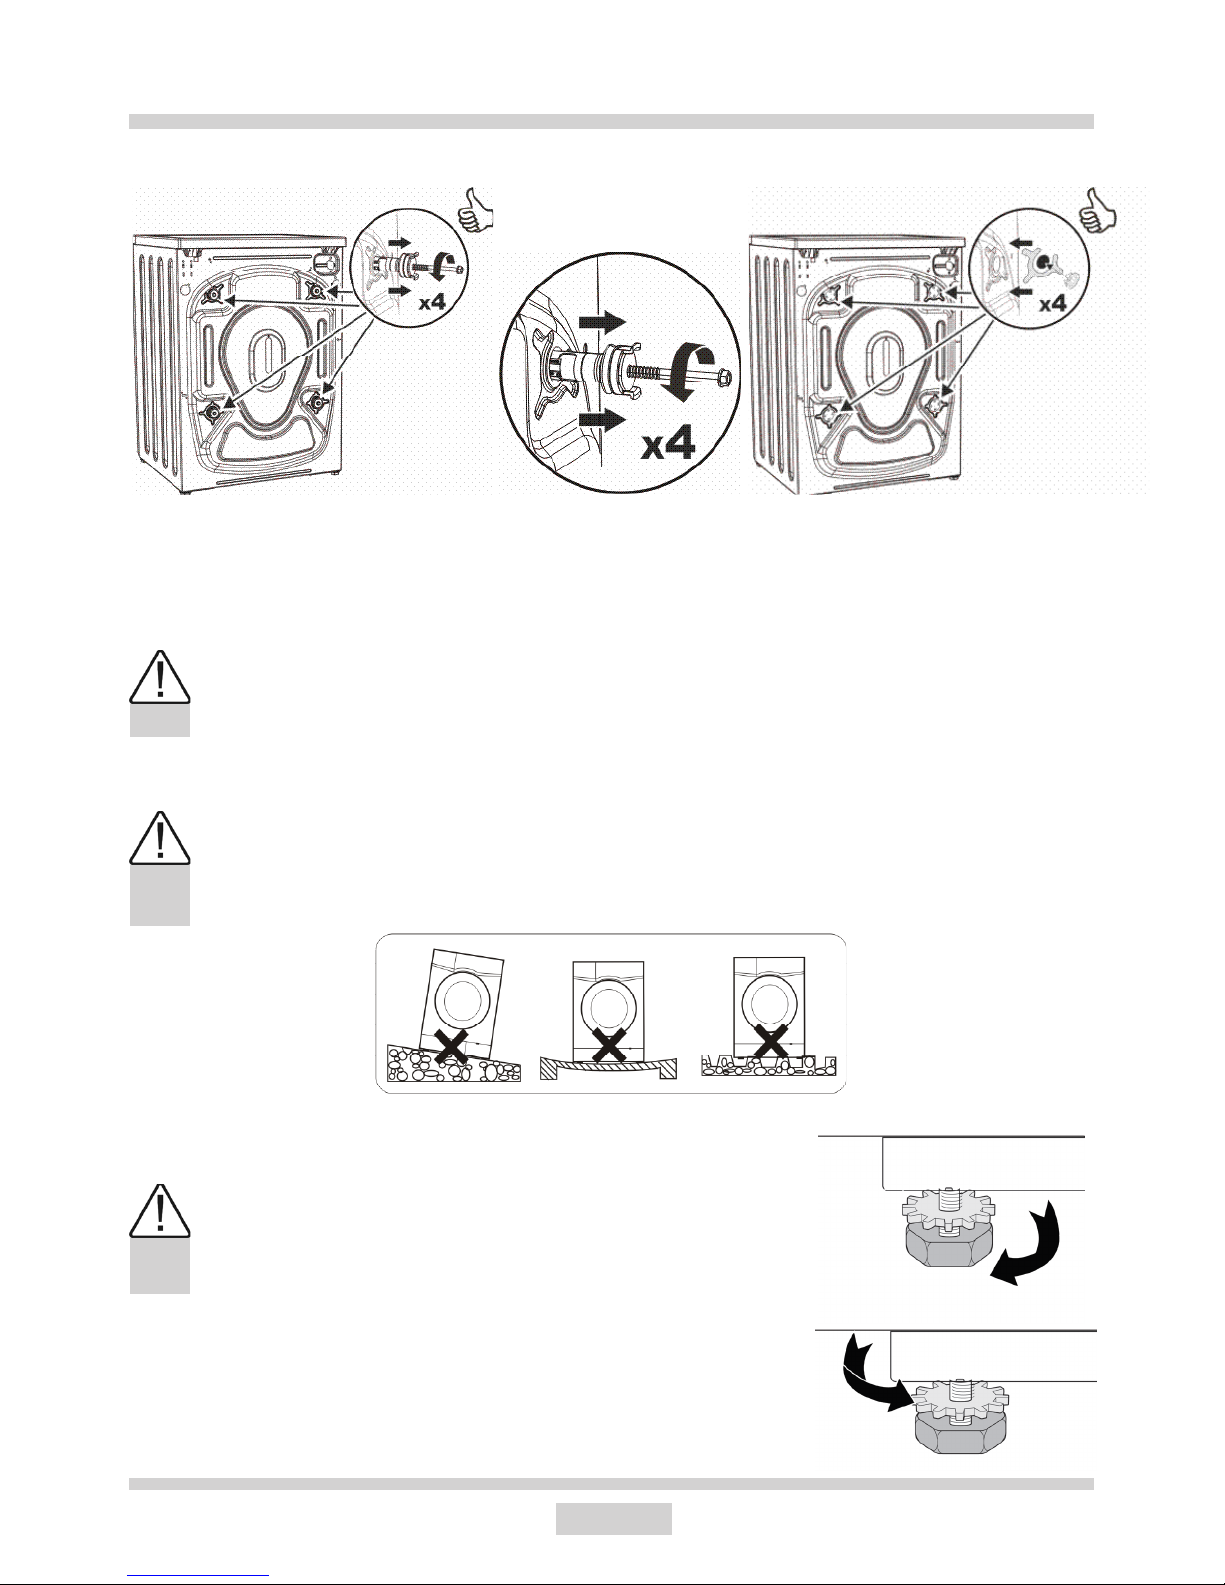
Install the appliance........................................................................................................8
Understanding the symbols on clothes labels...............................................................10
Display and control panel.........................................................................................11
Additional functions..........................................................................................21
Special programmes............................................................................................29
Using the appliance................................................................................................30
Table of programmes.........................................................................................34
Selecting sub-programmes..................................................................................................35
Troubleshooting..............................................................................................40
Maintenance and Cleaning.......................................................................................42
Practical tips on washing.........................................................................................46
Specification......................................................................................................49
Service and Warranty..................................................................................................49
Product fiche.........................................................................................................50

3
BASIC INFORMATION
Dear customer,
From today, washing will be easier than ever before. Your Amica washer-dryer is exception-
ally easy to use and extremely efcient. After reading these Operating Instructions, operating
the appliance will be easy.
Before being packaged and leaving the manufacturer, the appliance was thoroughly checked
with regard to safety and functionality. After these tests some moisture or water may remain
in the appliance.
Before using the appliance, please read these Operating Instructions carefully
Following the directions in this manual will ensure proper operation and safe use of the ap-
pliance.
It is important to keep these Operating Instructions and store them in a safe place so that
they can be consulted at any time.
Follow these instructions carefully in order to avoid possible accidents.
Important!
This washer-dryer is intended for domestic use only to wash and dry textiles and
clothes designed to be machine washed in a detergent bath.
Before plugging the washer-dryer into the mains, remove the safety packaging and ensure
the machine is level.
The manufacturer reserves the right to introduce changes which do not affect the operation
of the appliance.
Use
lCarefully read the instructions below before using the appliance.
lNever use the appliance outdoors or anywhere the temperature may fall below freezing.
l The appliance should not be operated by children or anyone who has not read the in-
structions.
Important! Temperatures below 0°C can damage the appliance!
In the event of the appliance being stored or transported in sub-zero temperatures, it should
be left to acclimatise in a temperature above zero for 8 hours before being used.
Manufacturer’s Declaration
The manufacturer hereby declares that this product meets the requirements of the follow-
ing European directives:
lLow Voltage Directive 2014/35/EC,
lElectromagnetic Compatibility (EMC) Directive 2014/30/EC,
and has been marked with the symbol and issued with a declaration of compliance
made available to market regulators.

4
NOTES ON SAFETY
lDetergents
lLoad
Washing
lControl
Panel
Use only those detergents and additives which
are designed for automatic washing machines,
especially when using the COTTON
programme.
Do not use any agents containing solvents, as
these may damage certain parts of the appli-
ance, or cause them to emit poisonous gases.
There is also a risk of ignition and explosion.
Ensure no unwanted objects are placed inside
the appliance. Completely empty all pockets in
clothing to be washed and fasten buttons and
zips. Place small, loose objects in a washing
bag, or inside a pillow case, as they may be
destroyed or else damage the drum or internal
tank. Do not exceed the recommended maxi-
mum load of washing.
Protect the control panel from
water spillage.
Do not put washed clothes on
top of the appliance!

5
NOTES ON SAFETY
lTransport
lData plate
Unplug the appliance before preparing it for
transport. Do not transport the washer-dryer
if drum locking bolts are not in place. See the
chapter INSTALL THE APPLIANCE. Keep the
appliance in upright position when transported.
Data plate indicating basic information about
the washer-dryer is located at the top part of
the rear casing.

6
Do not dry clothes that have not been
washed.
l Do not dry chemically washed garments
or clothing, where stains were removed by
chemicals.
l Do not dry clothes soiled with substances
such as cooking oil, crude oil, acetone, alco-
hol, petrol, kerosene, stain removers, turpen-
tine, wax.
l Before loading the clothes into the dryer,
remove such contamination in hot water, us-
ing a large amount of washing detergent.
l Do not dry articles made of rubber foam,
latex, water-resistant fabrics, raincoats, rub-
ber mats, thermally formed products, clothing
or pillows padded with foam rubber, as they
may melt and damage other items or even
damage the appliance. Please carefully read
these operating instruction before installing
the appliance. Damage caused by improper
connections or use of the appliance is not
covered by the warranty.
NOTE: There is a cooling phase at the end
of the drying cycle. Therefore, do not turn off
the appliance before the end of the drying
cycle. Otherwise, quickly remove and hang
clothes to cool.
lDry
NOTES ON SAFETY

7
NOTES ON SAFETY
Checking stability
Once the appliance is in position and levelled, it must be
checked to ensure it rests rmly on all four legs.
In order to check this, press down each corner of the appli-
ance in turn to see if it moves. Safe, long-term and reliable
operation of the appliance depends on it being correctly
positioned and level.
Important! Level the appliance,
remove the drum locking bolts and wait 3 hours
before using the appliance for the rst time.
Important! Incorrect levelling,
especially instability, may cause the to
move around during operation.
This appliance can be used by children aged 8 years and
older or by persons with physical, mental or sensory handi-
caps, or by those who are inexperienced or unfamiliar with
the appliance, provided they are supervised or have been
instructed how to safely use the appliance and are familiar
with risks associated with the use of the appliance.
Ensure that children do not play with the appliance.
Cleaning and maintenance of the appliance should not be
performed by children unless they are 8 years or older and
are supervised by a competent person.
Children of less than 3 years should be kept away unless
continuously supervised.
DISPOSAL OF THE APPLIANCE
To ensure safety, the washing machine must be rendered
unsuitable for use once its useful life comes to an end.
First unplug it and then cut off the power lead. Scrap the
appliance in line with local waste disposal legislation.

8
INSTALL THE APPLIANCE
I. Remove the transport protection (keep the locking bolts for future use, e.g. when
moving house).
l Unscrew the 4 locking bolts with
a spanner.
l Remove the rubber and plastic
transport brackets from the sockets
along with the washers and bolts.
The locking bolts MUST be removed before the appliance is used!
l Stop up the holes with the stoppers
enclosed in the accessories bag.
-- Do not place the appliance on a carpet!
-- The oor surface should not be either concave or sloping!
- - A t t e n t i o n s h o u l d b e p a i d t o t h e s h a p e o f t h e s u r f a c e o f t h e o o r , s o t h a t t h e
entire weight of the appliance rests on its legs (not its body)!
II. Positioning and levelling the appliance
lPlace the appliance on a solid, even surface.
lLevel the machine by adjusting the legs.
After positioning and levelling the appliance,
check that it is stable by pressing down each
corner and ensuring it does not move!
You can adjust the balance of your machine by the adjustable
foot.
lLoosen the plastic adjustment nut.
lAdjust the feet upward and downward by rotating them.
lTighten the plastic adjustment nut after balance is achieved.

9
The drain hose is at the back of the
machine. Fix the drain hose so that it
does not move while the appliance is
in operation (use the elbow as shown
below). Do not place the hose too deep
into the outlet pipe!
III. Connecting the water supply
IV. Water drain
A supply hose with seals is inside the drum of the dryer-washer.
lThe appliance's mains connection (electrical wall socket) should be in a visible
and accessible place!
lOnly plug the appliance into a properly installed socket with an earth pin!
l Do not connect to an adaptor or an extension cord!
l In the event of the power lead being damaged, it must be replaced by an author-
ised technician.
l The electrical system to which the appliance is to be connected must be pro-
tected with a 10 A fuse.
INSTALL THE APPLIANCE
Water pressure min 0.1 MPa (1 bar), max 1 MPa (10 bar).
Supply the machine with cold water
l after connecting, make sure the hose is not twisted
l after connecting the hose and the valve, check they are sealed tight
l regularly check the condition of the supply hose.
Use the new hoses sup-
plied with the machine.
Do not re-use hoses.
V. Connecting to power supply
max 100 cm
min 60 cm

10
UNDERSTANDING THE SYMBOLS ON CLOTHES LABELS

11
DISPLAY AND CONTROL PANEL
1. Programme selector knob
2. Display
3. Adjustment and additional function buttons
4. START/PAUSE button
5. Child Lock
12
■■
3
4
5

12
DISPLAY AND CONTROL PANEL
To make the rst settings of your washer-dryer:
● Plug in your machine.
● Open the water tap.
● Turn the programme knob.
Language selection setting
●The rst thing that will be displayed on the main screen is the language selection setting.
● Go to the language you wish the use with the [ √ ] symbol button.
● You can exit the language selection screen without making a selection with the [ X ]
symbol button.
● Go to the language you wish the use with the [ < ] [ > ] symbol buttons.
● Approve your language selection with the [ √ ] symbol button.

13
DISPLAY AND CONTROL PANEL
● When you want to change your language selection again, you can make the language
selection by going into the language selection page and using the [ < ] [ > ] symbol buttons.
● Touch the [ √ ] button to save the language you selected.
● You will be asked to conrm the language selection on screen.
● Touch the [ √ ] button to approve the selection.
● If you believe you have selected the wrong language, touch the [ X ] button and re-make
the language selection.
● When you approve the language change, the language you have selected will be active.

14
DISPLAY AND CONTROL PANEL
Eco Time Setting (Economic time interval)
● The electrical energy consumption cost changes during the day according to the time
intervals set by electricity providers. You can learn these intervals from electricity providers
and set your eco time running hours, and have your machine run between these hours you
determined.
Note: Your mains electricity must be connected to a counter with a smart-counter feature
to be able to provide this energy saving.
● Touch the [ √ ] symbol button to make this adjustment.
● If you want to do it later, touch the [ X ] symbol button.
● You can adjust the Eco Time interval by touching the buttons of symbols [ < ] [ > ] see
next pages to activate the Eco Time interval additional function.
● Approve your selection by touching the [ √ ] symbol button.

15
DISPLAY AND CONTROL PANEL
Current time setting
● We advise that you set the correct time at the point of installation.
● Your machine will ask your approval for setting the current time.
Go to the setting menu by touching the [ √ ] symbol button. [ X ] symbol button allows you
to exit without setting.
Note: You must set the current time correctly. Otherwise, operation of other related func-
tions will be affected.
Note: Recorded time information will be reset if you keep your machine unplugged for lon-
ger than 15 days. In such a case your machine will ask you again for the time setting when
you next turn it on.
● Please make the current hour and minute settings by touching the [ > >] symbol buttons.
● After setting the current time, approve by pressing the [ √ ] symbol button.

16
● Your machine will automatically go to the main screen of the programme you have selec-
ted. Go to the appliance settings menu by touching the button of symbol on this screen.
Sound Adjustment
● You can make the sound adjustment of your appliance by pressing the [ < ] [ > ] symbol
buttons.
symbol denotes that the warning sounds of your appliance is on.
symbol denotes that the warning sounds of your appliance are off.
DISPLAY AND CONTROL PANEL

17
Screen brightness setting
● You can adjust the screen brightness of your appliance by touching the [ < ] [ > ] symbols.
● Adjust the screen contract of your appliance by touching the symbol button.
Screen contrast setting
● You can adjust the screen contrast your appliance by touching the [ < ] [ > ] symbol
buttons.
● You can go to the ‘revert to factory settings’ screen by touching the symbol.
Revert to factory settings
If you want to revert your appliance to the factory default settings:
● Touch the symbol.
● You will be asked on screen if you want to reset to Factory Settings.
DISPLAY AND CONTROL PANEL

18
● Touch the [ √ ] symbol to approve the selection.
● If you want to cancel the selection touch the [ X ] symbol.
●You can return to the main screen by touching the button.
Program selection
● The programme name and features will be shown on the screen.
● You can make the temperature adjustment ( , 20°, 30°, 40°, 60°, 90°) by touching the
symbol button.
● You can make the spinning adjustment ( , 400, 600, 800, 1000, 1200, 1400) by
touching the symbol buttons.
Note: After setting the spin speed, if you select a drying programme, your machine shall
set the spin speed automatically to enhance drying performance.
If you want your laundry dried at the end of washing
● You can select the drying setting you wish to use by touching the symbol button.
Cupboard dry
● Recommended for laundry that you will put in the cupboard directly.
● If you want to select the cupboard dry feature, touch the symbol button until you see
the symbol on the screen.
DISPLAY AND CONTROL PANEL

19
Note: If the symbol does not appear on the screen when you want to select the cup-
board dry function, it means this drying feature is not used in the washing programme you
selected.
Hanger dry
● Recommended for laundry that requires hanger drying.
● If you want to select the hanger dry feature, touch the symbol button until you see the
symbol on the screen.
Note: If the symbol does not appear on the screen when you want to select the
hanger dry feature, it means that the washing programme you selected does not use this
drying feature.
DISPLAY AND CONTROL PANEL

20
Iron dry
● Recommended for laundry that you will iron before use.
● If you want to select the iron dry feature, touch the symbol button until you see the
symbol on the screen.
Note: If the symbol does not appear on the screen when you want to select the iron
dry feature, it means that the washing programme you selected does not use this drying
feature.
Drying with duration
If you want to use a time-set drying programme;
● Touch the symbol on the screen.
● Drying selections will be displayed on your machine screen as 30, 60 and 120 minutes.
Note: If one of the symbols are not displayed on the screen when you wish to select the
duration drying feature, it means this drying feature cannot be used in the programme
you selected or the load amount in the machine is not appropriate for that duration of
drying.
DISPLAY AND CONTROL PANEL
Table of contents
Other Amica Washer Dryer manuals
Popular Washer Dryer manuals by other brands

Indesit
Indesit IWB 6123 Instructions for use

Whirlpool
Whirlpool WFC8090GX Use and care guide and installation instructions

Ariston
Ariston Margherita AL 108 D Instructions for installation and use

Smeg
Smeg WDI14C7-2 instruction manual

EdgeStar
EdgeStar CWD1510S owner's manual

Splendide
Splendide WD2000S Training guide

Electrolux
Electrolux EWW1142ADSA user manual

Frigidaire
Frigidaire 134897500B installation instructions

Siemens
Siemens WD15H542EU Instruction manual and installation instructions

John Lewis
John Lewis JLBIWD1405 user manual

Bosch
Bosch WVH28424GB Instruction manual and installation instructions

GE
GE GUAN275 owner's manual