Amish Country Gazebos Wood Gazebo-in-a-Box User manual

Wood
Gazebo-in-a-Box
Assembly Instructions
©2017
www.AmishGazebos.com
1-800-700-1777


Amish Country Gazebos
340 Hostetter Rd
Manheim, PA 17545
Customer Service Department Hours:
Monday – Friday 8:00 am – 4:00 pm and
some Saturdays 10:00 am – 3:00 pm
(Eastern Standard Time)
1-800-700-1777 Ext. 4
www.AmishGazebos.com


Measuring Tape Utility Knife Clamps
Rubber Mallet Hammer Drill 8' Ladder
1
Amish Crafted Gazebos
WOOD Gazebo Assembly Manual
Please make sure the area where your gazebo is being installed is flat and level. If it is not level,
the roof rafters and the fascia boards may not fit as nicely as they will when your site is level.
This manual, detailing 16 straightforward steps for installing your gazebo, should be kept by your side during the
assembly process of your gazebo kit.
Most homeowners stain or paint their Amish Crafted Gazebo. Due to the precise fit of many components we suggest that
you stain or paint your gazebo after it is assembled.
This manual is designed to give you the necessary guidance throughout each step of your gazebo assembly.
If you have questions regarding the content of your kit or installation of your gazebo, please contact our
Customer Service Department at 1-800-700-1777 Ext 4.
Hours of operation are Monday - Friday 8:30 am - 5:00 pm and some Saturdays 10:00 am - 3:00 pm (Eastern
Standard Time)
STEP 1. Gather the following tools to use for assembly of
your gazebo:
1
Step 1. Gather your tools ......................................................................................................... (Page 1)
Step 2. Floor dimensions table and site preparation information........................................... (Page 2)
Step 3. Sort your gazebo parts................................................................................................. (Page 3)
Step 4. Install your deck (optional) ....................................................................................... (Page 4-5)
Step 5. Assemble the 7 individual wall panels and 1 door panel ............................................ (Page 6)
Step 6. Attach the 7 wall panels and 1 door panel to each other ........................................... (Page 7)
Step 7. Install the 8 roof rafters............................................................................................... (Page 8)
Step 8. Install the 8 fascia boards............................................................................................ (Page 9)
Step 9. Install the plywood roof panels ................................................................................. (Page 10)
Step 10. “Square” the gazebo and “toe-nail” the posts to your deck .................................... (Page 11)
Step 11. Installing the optional electrical package............................................................. (Page 12-13)
Step 12. Apply the shingles to your gazebo roof................................................................ (Page 14-15)
Step 13. Apply the ridge cap shingles................................................................................. (Page 16-17)
Step 14. Shingle and install the cupola............................................................................... (Page 18-19)
Step 15. Installing the screen package (optional).................................................................... (Page 20)
Step 16. Install the benches (optional) .................................................................................... (Page 21)

2
2
CRUSHED STONE
1. Dig out 3”– 6” of ground.
2. Plant concrete blocks at each octagonal
point and in the center (9 blocks total).
3. The top of the blocks will be the
highest point of your foundation. All
blocks must be level with each other.
4. Place 3”– 4” of crushed stone around
the blocks and throughout the
foundation. Make sure non of the crushed
stone are higher than the blocks
3” to 6” depth
CONCRETE PAD
1. Dig out 4”– 5” of ground so it is
level all throughout its lowest point.
2. Temporarily plant wood forms
around the perimeter of your
gazebo foundation area.
3. Dig a 12”x12” continuous footing
around the perimeter of the pad.
4. Use rebar as needed.
5. Pour concrete throughout the base,
making sure all points of the top
are level.
Indicate the location of your gazebo foundation by doing the following:
1. Cut 8 boards at a 22.5˚ angle. Each should be the
length of dimension ‘C’ at their longest point.
2. Place the boards around the perimeter of the
site to be prepared for your gazebo.
Verify that the boards are positioned in an
octagonal shape by using dimensions ‘A’ and ‘B’.
3. Spray paint along the outside of the boards to
indicate the precise perimeter of your gazebo floor
and then remove the boards.
*Note: If you choose the concrete pad option, refer to the instructions in the bottom right
corner of this page.
Depth varies depending upon
soil conditions
12” x 12” continuous footing
4”– 5”
concrete pad
Note: The top of your concrete pad
should be 1” above grade
CONCRETE PYLONS
1. Dig 12” diameter holes at each octagonal
point and in the center (9 holes total).
2. Beginning at the ground’s highest point,
plant a 12” diameter Quick-Form tube.
3. Securely plant the remainder of the tubes
making sure the top of each is level with
the top of the first tube that you planted
in the ground.
4. Use rebar as needed.
5. Fill each tube with concrete and allow it
to cure before placing your gazebo deck.
6. Use metal L brackets to secure the gazebo
deck to the pylons.
FLOOR DIMENSIONS TABLE
Carefully consider the recommendations listed below prior to choosing the ideal foundation for your gazebo.
8 ft. 97 3/16"89 13/16"37 3/16"
10 ft. 12515/16" 1165/16" 483
/16"
12 ft. 144 1/8" 133 1/4" 55 3/16"
Size A B
*C
These dimensions are ideal to use for your
foundation, whether you have a gazebo floor
or not.
12”x12” cement blocks 2” thick
Stretch a string around the
perimeter according to the
chart above. Place the blocks
against the string.
12” diameter concrete tubes
Stretch a string around the
perimeter according to the
chart above. Place the concrete
pylons against the string.
*When you cut the form
boards for your concrete pad,
make sure the short points of
each board are cut to the “C”
dimension. This will ensure
that your concrete pad is made
precisely to the dimensions
shown above.
Step 2. Site Preparation
It is most important to have a solid, at and level foundation for your gazebo.
CRUSHED STONE (to be used with a floor)
1. Dig out 3”– 6” of ground.
2. Plant concrete blocks at each octagonal point and in
the center (9 blocks total).
3. The top of the blocks will be the highest point of your foundation.
All blocks must be level with each other.
4. Place 3”– 4” of crushed stone around the blocks and throughout
the foundation. Make sure none of the crushed stone are higher
than the blocks.
3” to 6” depth
CONCRETE PAD (to be used with or without a floor)
1. Dig out 4”– 5” of ground so it is level all through
out its lowest point.
2. Temporarily plant wood forms around the perimeter
of your gazebo foundation area.
3. Dig a 12”x12” continuous footing around the
perimeter of the pad.
4. Use rebar as needed.
5. Pour concrete throughout the base, making sure
all points of the top are level.
12” x 12” continuous footing
4”– 5”
concrete pad
Note: The top of your concrete pad
should be 1” above grade
12”x12” cement blocks 2” thick
Stretch a string around the
perimeter according to the chart
above. Place the blocks against
the string.
*When you cut the form boards
for your concrete pad, make sure
the short points of each board are
cut to the “C” dimension. This
will ensure that your concrete
pad is made precisely to the
dimensions shown above.
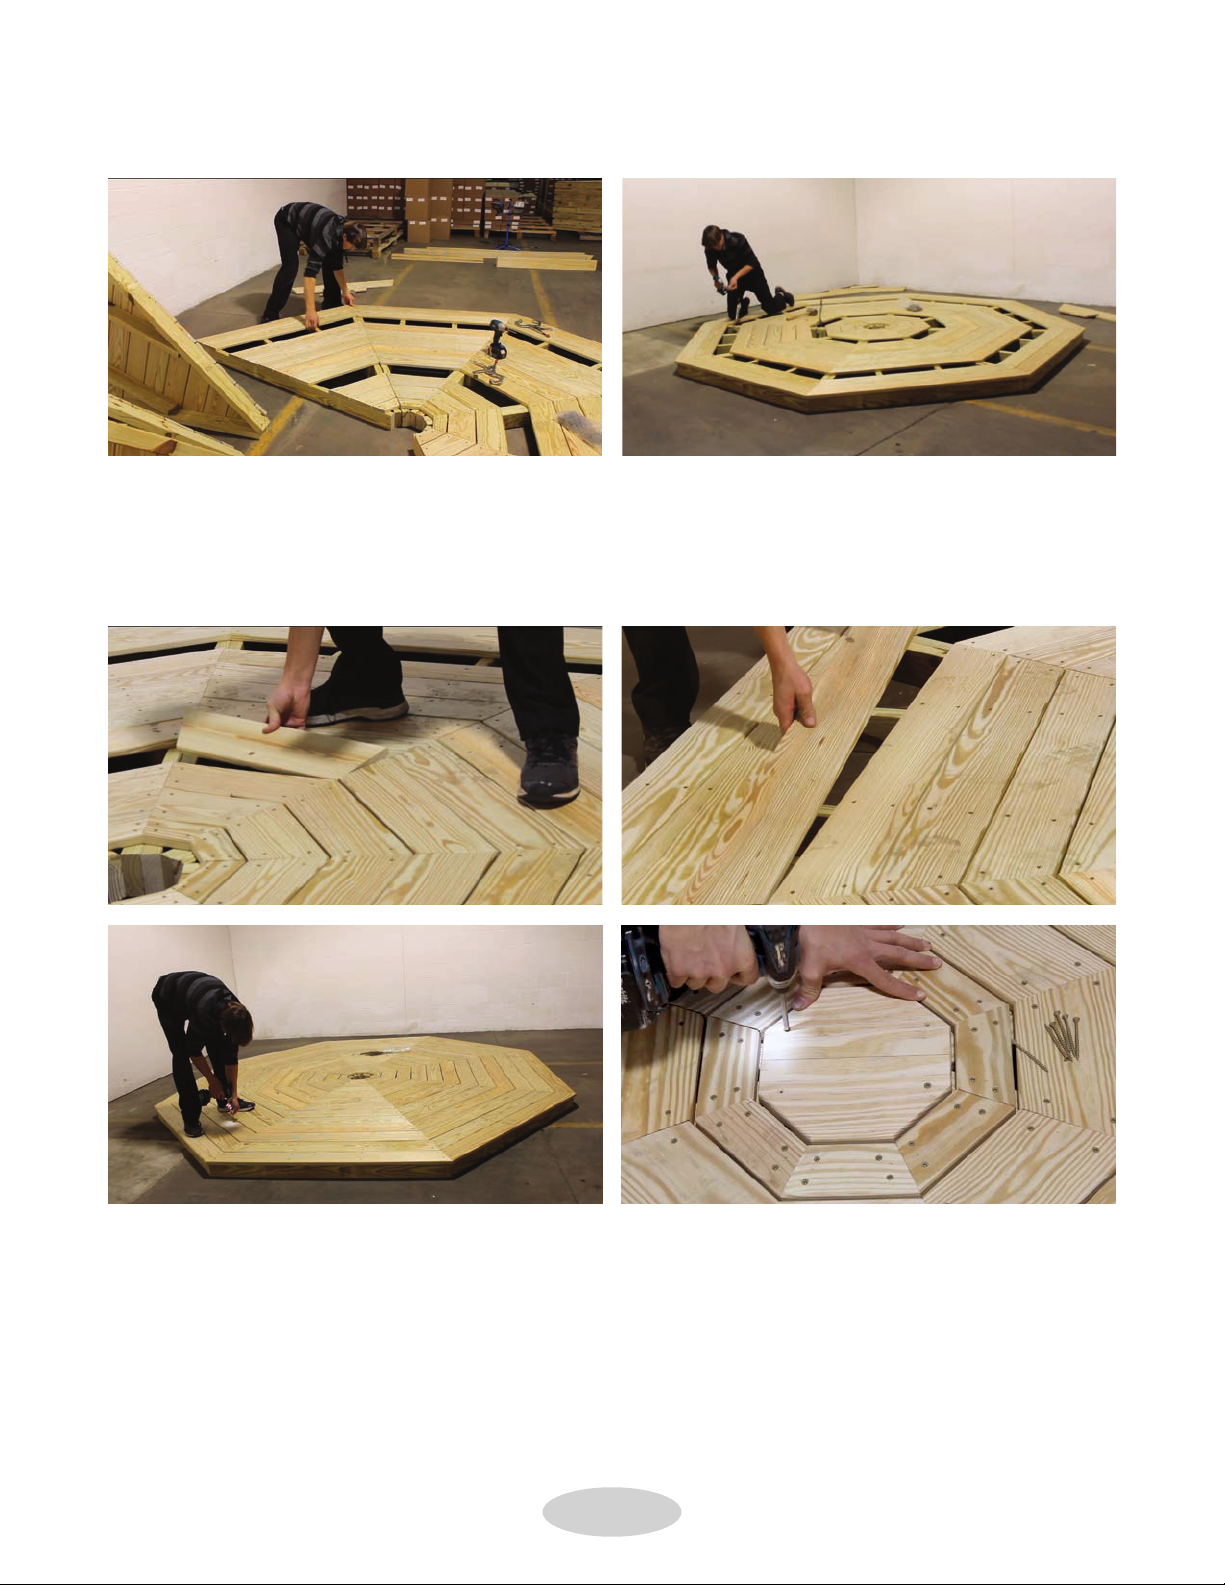
Our kits with floors are designed to have all the floor joists in contact with crushed stone or concrete.
If you are installing on a deck or elevated surface please contact your designer, as each situation is site specific.

3
8’ Gazebo Kit 10’ Gazebo Kit 12’ Gazebo Kit
l2” screws 1 bag 1 bag 1 bag
l2½” screws 1 bag 1 bag 1 bag
l¾” roofing nails 1 bag 1 bag 1 bag
l right wall panel posts 7 pieces 7 pieces 7 pieces
lleft wall panel posts 7 pieces 7 pieces 7 pieces
lright door panel post 1 piece 1 piece 1 piece
lleft door panel post 1 piece 1 piece 1 piece
l ceiling center block 1 piece 1 piece 1 piece
l2x4 roof rafters 8 pieces 8 pieces 8 pieces
l fascia boards 8 pieces 8 pieces 8 pieces
lupper rail header boards 8 pieces 8 pieces 8 pieces
lleft hand braces 8 pieces 8 pieces 8 pieces
lright hand braces 8 pieces 8 pieces 8 pieces
l2x3 handrail plates 14 pieces 14 pieces 14 pieces
l1x3 balusters 35 pieces 49 pieces 56 pieces
llarge plywood roof panels 0 pieces 8 pieces 8 pieces
lmedium plywood roof panels 8 pieces 8 pieces 8 pieces
lsmall plywood roof panels 8 pieces 8 pieces 8 pieces
lshingles 4 packs 6 packs 7 packs
lcupola 1 each 1 each 1 each
STEP 3. Sort all of your gazebo parts as listed below:
(Match the quantity of parts to the corresponding size of your gazebo)
3
7 left wall panel posts 8 fascia boards
8 left braces 8 right braces
balusters
8 upper rail header boards
2x3 handrail plates (7 top, 7 bottom)
7 right wall panel posts
1 left door panel posts
1 right door panel posts
ceiling center block (rafter joiner)
8 roof rafters
plywood
roof panels
cupola
(we send cupola
already together)

4Step 4. Install your deck (optional)
If you ordered a floor with your gazebo, you will have received 8 triangular shaped floor panels.
1. Place each of the eight triangular shaped floor
panels, next to each other, on your foundation.
2. Place each floor panel on its side and
tap the underside of these floorboards to
remove them from the floor panel.
3. Then remove and discard the small nails from each floor board.
4. After aligning your floor panels, use clamps to tightly
secure them together.
5. Now fasten
the floor panels
together using
2½” screws.
Place one screw
on each side of
the floor joist at
each opening.
4
Note: Each floor panel has two boards that are
temporarily fastened with small nails.

7. After the entire floor is fastened together, put down the sixteen floorboards that were removed
earlier and the octagonal shaped floor center piece then fasten them in place using 2½” screws.
6. Repeat step five until all floor panels are complete.
5

5Step 5. Assemble the 7 individual wall panels and 1 door panel
2. Insert each of the balusters into
one handrail plate. 3. Follow the same procedure to
attach the other handrail plate
and balusters together.
1. Each baluster should be inserted
sideways into the appropriate
cutout and tapped horizontally into
place with your rubber mallet. Tap
the top of each baluster to securely
seat it down into the cutout in the
handrail plate.
6.
Assemble
all seven
individual
wall
panels.
7. In each of the 7 wall panels, connect the top and bottom handrail plates
to the center baluster(s) by driving 2" screws into the pre-drilled holes.
Keep 29 ¼" spacing between the plates.
Hint:
If you have
the optional
screen
package,
DO NOT
install the
angled
braces in
the door
section.
5. Use two 2½” screws at each
connecting point except for the
high end of the diagonal brace
which requires only one 2½”
screw in the pre-drilled hole.
4. Next, arrange the handrail section,
posts, braces and upper rail as shown
below.
6
Use 2½” screws to assemble each individual wall panel.
Begin by inserting each of the handrail balusters into the handrail top and bottom plates.
Note: The long point of each
post must face toward the
inside of your gazebo so the
roof rafters fit properly.
Note: For 12’ gazebos there
will be 2 screws used. With
an 8’ or 10’ gazebo there
will only be 1 screw used.
Finished
Handrail

6Step 6. Attach the 7 wall panels and 1 door panel to each other
1. Begin by clamping two wall panels together, also be sure
to evenly line up the posts at the top and bottom.
2. Secure the posts using 2½" screws in pre-drilled holes.
3. Follow the same procedure to assemble the remaining
wall panels, including the doorway panel.
Note: To avoid having screws visible in the doorway, attach the doorway panel by driving
screws through the pre-drilled holes in the handrail section and into the doorway post.
7

7Step 7. Install the 8 roof rafters
2. Repeat this process with a
second rafter that is placed
directly across from the first rafter.
3. Now lift these 2 rafters and ceiling
block into place.
Secure the position of the rafters by
placing the notched portion of the
rafter over the post top.
1. Flush the top of the rafter with
the top of the ceiling center block
and attach the two together by
driving one 2½” screw through
the rafter.
4. Install the third and fourth rafters at a 90˚ angle from
the first two rafters.
5. Now install the remaining four rafters.
7. Lastly, drive one 2½” screw through one side of the post
top and into the lower portion of each rafter.
6. Using step ladder, reach to the roof peak and drive
a 2½” screw through pre-drilled holes on each rafter
top and into the ceiling center block.
8
Gather the ceiling center block and 1 rafter.

8
1. Manually place two 2” screws in each of the four
pre-drilled holes of one fascia board.
2. Then position the highest point of the tapered cut
evenly with the highest point of two rafters.
4. Neatly align the vertical joints of each fascia board
and repeat this assembly process for all eight boards.
Note: You may need to back out the
screws a little bit before you attach the
next board. You can then retighten them
all when all the boards are on.
3. Next, center the fascia board on the two rafters
then drive the screws into the rafters.
Step 8. Install the 8 fascia boards
9
Gather the 8 fascia boards.
Each board has two pre-drilled holes on both ends and a tapered cut along the top edge.

9Step 9. Install the plywood roof panels
1. Begin with the largest plywood panel first.
Note: Align the bottom
edge of the plywood with
the outside edge of your
fascia board.
Hint: Start a 2" screw
in each corner along the
bottom and 3" from bottom
edge and ½" from side.
Note: Only one screw is
required per section to connect
the plywood to the fascia board.
2. Attach each bottom corner of the
plywood to a rafter with 2” screws
(1 screw into the left rafter and
1 screw into the right rafter).
3. Next, go to the center of the
plywood panel where it meets the
fascia board. Pull the fascia board out
slightly to properly align it, then drive
one 2” screw through the plywood
and into the fascia board.
5. Fasten each of these large plywood
panels to the rafters with 2” screws
spaced at 12”-16” on center.
10
Now your plywood roof panels can be attached to the roof rafters using the 2” screws.
Be sure to place the best side of the plywood down since this will be the ceiling of your gazebo.
4. Continue by installing each of the
eight large plywood panels around
the lower roof perimeter.
6. Then climb up onto the roof and
fasten the remaining plywood panels
into place.

10
1. To confirm this, measure diagonally from inside of one post
to the inside of the opposite post.
This needs to be done at four points to include all eight posts.
Make sure the distance between each post is the same to
within ¼”.
Step 10. “Square” the gazebo and “toe-nail” the posts to
your deck
Note: If you are attaching your posts to a wood deck, you can use 2½” screws (provided) for this step.
If you are attaching your posts to concrete, you will need to purchase concrete screws
to secure your post bottoms to your foundation.
2. The vertical seams in the middle of each post should be
positioned directly over the floorboard seam.
3. Now you are ready to secure
each post into place with two
fasteners.
Begin by pre-drilling two holes,
at an angle, near the bottom of
each post (one pre-drilled hole
on the inside right and one pre-
drilled hole on the outside right).
Then drive two screws per post,
at an angle, through the post
bottom and into your foundation.
11
You need to make certain that your gazebo is ‘square’ or truly octagonal in shape.

11Step 11. Installing the optional electrical package
3. Then drill a 7/16” hole, straight
out, completely through the center
of the post.
Note: If you ordered the optional screen package, make this mark on the screen retainer, and drill the
7/16” hole, straight out, completely through the center of the screen retainer and post.
Note: If you have the optional benches, and you want the electrical package to be on the same post
as a bench support, you will need to cut 17” off the bottom of the electrical package trim strip,
making sure you do not cut the wiring. Then drill a 7/16” hole, straight out, completely through the
center of the post, approximately 2” above the top side of the bench support.
4. Also, drill a 7/16” hole, straight up, and completely through
the center of the rafter, where this post and rafter meet,
(on the inside of the gazebo).
5. Then, run the wires of the electrical package trim strip
through these holes, (The long wire at the top goes through
the rafter and the short wire goes through the lower hole)
and attach the trim strip to the inside of the post (centered)
with (10) 2” screws, through the pre-drilled holes.
(electrical package instructions continued on next page)
12
Note: If you ordered the optional screen package, install the screens and retainer
strips before you install the electrical package.
Note: If you ordered the optional benches, install them before the electrical package.
1. Choose the post on which to install the electrical package.
2. Measure 7 ½” up from the
bottom of the post (on the inside
of the gazebo) and make a mark.
The electrical package trim strip has approximately 2’ of wiring on the bottom end and approximately
9’ of wiring on the top end.
Note: (If you installed the optional screen package,
attach the electrical package trim strip to the screen
retainer).

(electrical package instructions continued)
7. Attach the other electrical boxes to the trim strip on the
inside, with 1” pan-head screws. Install the switch above
the duplex receptacle. (Make sure you do not hit the wiring
when you are fastening the electrical boxes).
8. After you have run the wire up through
the center of the rafter, lay the wire on
top of the rafter, on the plywood roof
panel joint, following the top of the
rafter, all the way to the peak of the roof.
9. Measure down from the peak of the plywood roof,
approximately 2 ½”, and drill a 7/16” hole in the
plywood roof panel, where the rafters meet the ceiling
center block. The hole should be right beside the ceiling
center block and between two rafters. Run the wire
down through this hole, into the gazebo. (The ridge caps
will cover the wiring on the plywood.)
10. Now you can attach the fan or light to the ceiling center block, and
finish the electrical connections.
13
6. Attach the electrical junction box to the outside of the post,
(where the short wire comes out) with (2) 1” pan-head
screws. After you have finished all your other electrical
connections, you can connect your source of electricity,
inside this box.
Note: Make sure you do not puncture the wire when
you attach the ridge caps.
Note: When securing the cupola, make sure the screws
do not puncture this wire.

12
14
Step 12. Architectural shingle installation
1. Using your starter shingles
Break the starter shingles in half (horizontally) along the perforated line thru the middle, to make 2 long strips.
2. Installing your starter shingles
With the tar strip facing up, and toward the edge
of your roof, you must extend your shingles out
¾” past the roof edge.
3. Attaching the starter shingles
With four or five 3⁄4” nails placed along a line
parallel to and 2” above the roof edge. Starter
shingles should then be installed around the
entire perimeter of your gazebo roof.
Nail the shingles to the plywood roof panels using the roofing nails that we have
provided, or if you use your own power nailer just make sure the nails do not
protrude through the underside of the plywood.
Ridge Cap ShingleArchitectural ShingleStarter Shingle
Identifying your shingles
¾ Inch

15
Shingle application
4. Place the shingles flush at the bottom with
the starter shingle.
Note: You can also read the
instructions on the shingle package.
Note: Keep the end of each shingle
at least 4” from the end of the
shingle below it.
5. Attach with five 3⁄4” nails at the center
line marked on the shingle. Do not fasten
below the white line or your nail will be
exposed.
8. Follow the same procedure to the remaining 7 sides to complete your roof shingling.
7. Line up the bottom of the next shingle
with the architectural line on the shingle
below.
6. Cut excess shingle off at the corner.
At least 4 inches

1. Turn the shingle over to expose the reverse side. Then use a utility knife to cut each ridge cap piece.
Begin your cut at the manufactured cutout and cut at a slight angle toward the top of the shingle.
13
2. Place the first ridge cap shingle at the bottom edge of your roof ridge so that the black tar area
of the shingle is very near the roof edge. Ridge caps need to be centered over the roof seam.
3. Secure this shingle with one roofing nail on each side approximately 2” up from the roof edge.
Step 13. Apply the ridge cap shingles
16
‘Make’ your ridge cap shingles by cutting a 3-tab shingle into three individual pieces.
Table of contents
Other Amish Country Gazebos Outdoor Furnishing manuals
Popular Outdoor Furnishing manuals by other brands

GLITZHOME
GLITZHOME 2007100009 Assembly instruction

Courtyard Creations
Courtyard Creations RUS498G Assembly instructions

Costway
Costway 42810736 user manual

Oxford Garden
Oxford Garden ESSEX Assembly instructions

Courtyard Creations
Courtyard Creations KTS126P-WM Assembly instructions

Mimosa
Mimosa CORAL BAY DOUBLE SUN LOUNGE Assembly instructions