manuals.online logo
Brands
  1. Home
  2. •
  3. Brands
  4. •
  5. AMTC
  6. •
  7. Dispenser
  8. •
  9. AMTC LIQUIDFLO ASD-400EL User manual

AMTC LIQUIDFLO ASD-400EL User manual

This manual suits for next models

1

Other AMTC Dispenser manuals

AMTC FOAMFLO ASD-500 User manual

AMTC

AMTC FOAMFLO ASD-500 User manual

AMTC HY-GENIE ASD-700 User manual

AMTC

AMTC HY-GENIE ASD-700 User manual

AMTC HY-GENIE ASD-600 User manual

AMTC

AMTC HY-GENIE ASD-600 User manual

AMTC Liquidflo ASD-400 User manual

AMTC

AMTC Liquidflo ASD-400 User manual

Popular Dispenser manuals by other brands

BOWMAN CL003-0111 manual

BOWMAN

BOWMAN CL003-0111 manual

SIKA Power Cure operating instructions

SIKA

SIKA Power Cure operating instructions

Silver King Majestic SK12MAJ Technical manual and replacement parts list

Silver King

Silver King Majestic SK12MAJ Technical manual and replacement parts list

Franke F3Dn Twin Service manual

Franke

Franke F3Dn Twin Service manual

HURAKAN HKN-MT1 manual

HURAKAN

HURAKAN HKN-MT1 manual

STIEBEL ELTRON UltraHot Plus Operation and installation instructions

STIEBEL ELTRON

STIEBEL ELTRON UltraHot Plus Operation and installation instructions

Bobrick B-828 troubleshooting guide

Bobrick

Bobrick B-828 troubleshooting guide

DAN DRYER 282 installation guide

DAN DRYER

DAN DRYER 282 installation guide

Essity Tork 473208 manual

Essity

Essity Tork 473208 manual

CBS SD300BU-88 COMPONENT MAINTENANCE MANUAL WITH ILLUSTRATED PARTS LIST

CBS

CBS SD300BU-88 COMPONENT MAINTENANCE MANUAL WITH ILLUSTRATED PARTS LIST

Sealey MK77 manual

Sealey

Sealey MK77 manual

Fluid Management Accutinter 1600 End user guide

Fluid Management

Fluid Management Accutinter 1600 End user guide

Franke DVS SD99-010 Installation and operating instructions

Franke

Franke DVS SD99-010 Installation and operating instructions

Graco Dispensit 1053-10C operation & maintenance

Graco

Graco Dispensit 1053-10C operation & maintenance

DPR SED02 user manual

DPR

DPR SED02 user manual

ITALTINTO i50 user manual

ITALTINTO

ITALTINTO i50 user manual

Coca-Cola FREESTYLE 9000 user guide

Coca-Cola

Coca-Cola FREESTYLE 9000 user guide

Hewi 805.06.150 Mounting instructions

Hewi

Hewi 805.06.150 Mounting instructions

manuals.online logo
manuals.online logoBrands
  • About & Mission
  • Contact us
  • Privacy Policy
  • Terms and Conditions

Copyright 2025 Manuals.Online. All Rights Reserved.

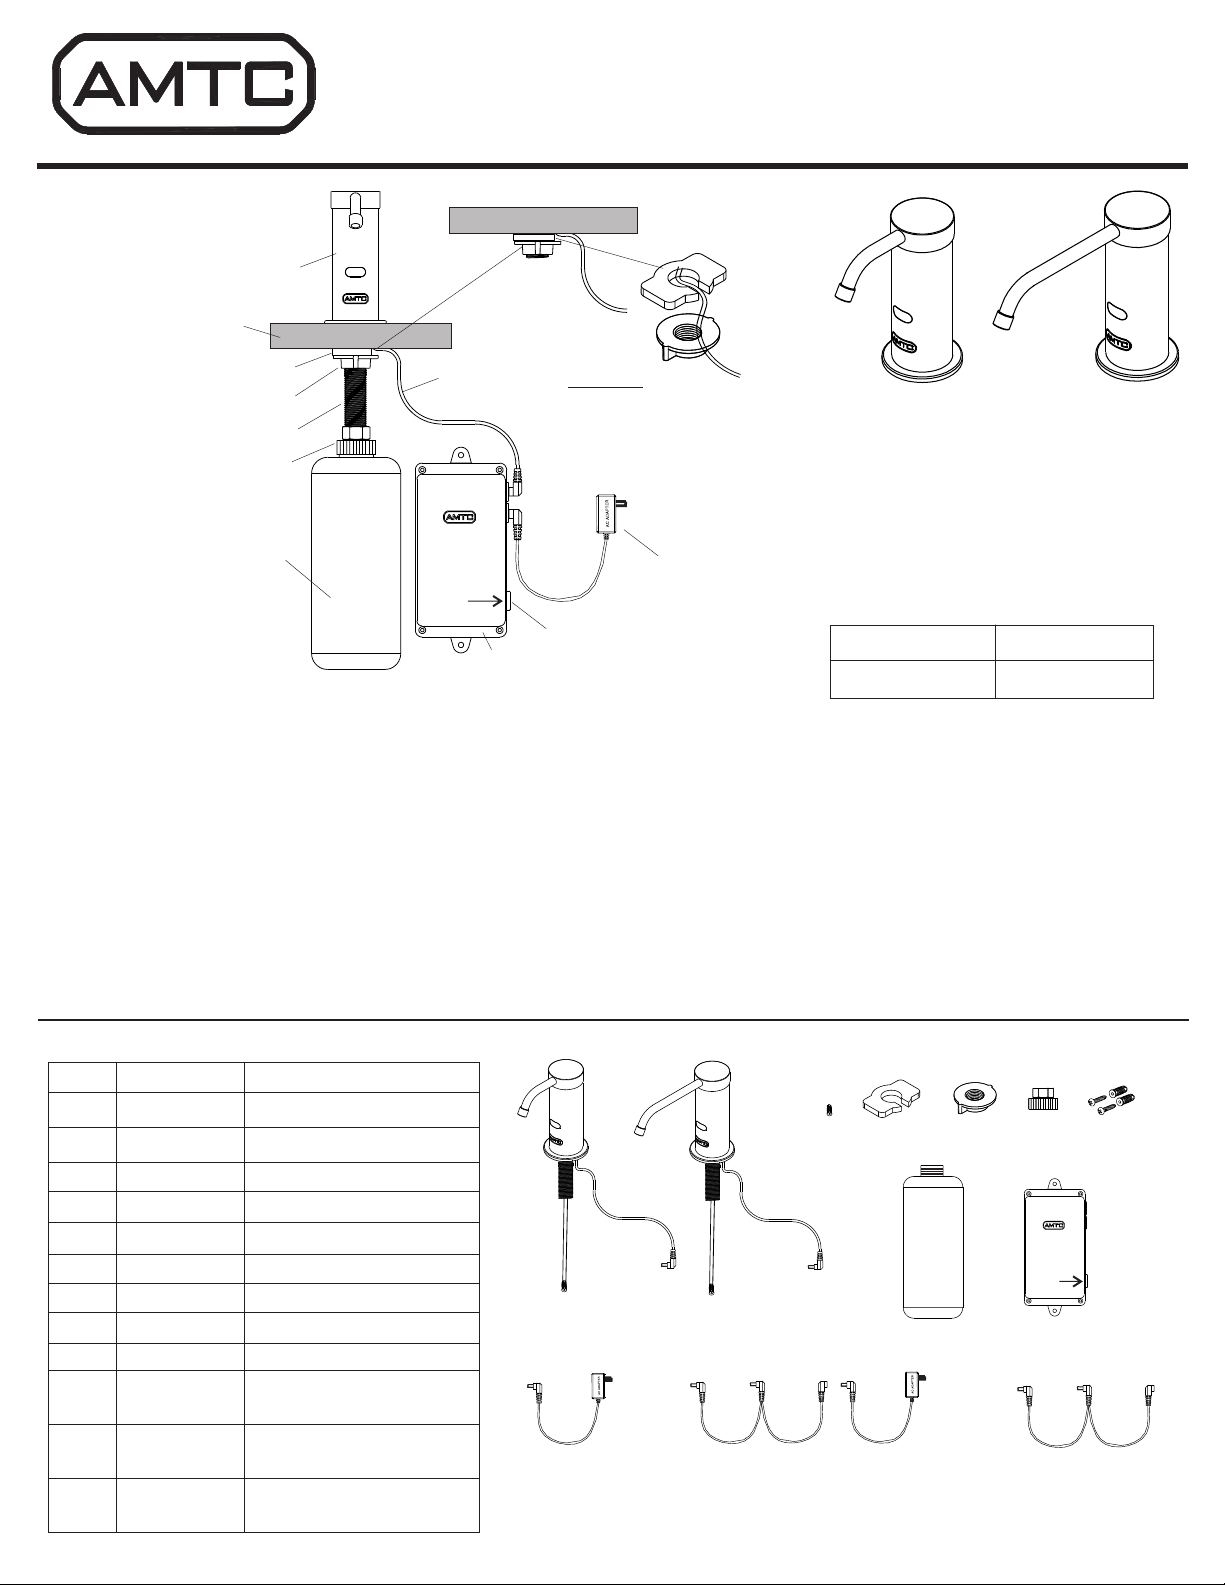
Installation Diagram
™
ASD-400 LIQUIDFLO™
AUTOMATIC LIQUID SOAP DISPENSER
INSTALLATION & OPERATION MANUAL
Installation Instructions (refer to installation diagram above)
Battery Pack
4-D Size
(Batteries Sold Separately)
Reset Button
Liquid Soap Bottle
(800 mL)
Spout
Spacer Sensor Cable
Mounting Bracket
Countertop or Sink
Max. Thickness: 2” (50mm)
AD05
6 Volt AC Power Adapter
(Optional-Sold Separately)
(Optional)
1. If hole is not present drill a 1” (25.4mm) hole on countertop (refer to installation template on page 3).
2. Mount the spout onto the countertop or sink and hand tighten mounting bracket and spacer without damaging sensor cable.
3. Install batteries into battery pack and mount battery pack onto back wall using provided hardware
(battery pack must be installed within 15” (380mm) of spout).
Note: An optional 6 Volt AC power adapter (Part# AD05) can be purchased separately if electrical power is required.
4. Screw soap bottle coupler onto threaded stem and hand tighten.
5. Fill up bottle with liquid soap (Important: Use low viscosity liquid hand soap with no abrasives).
*Viscosity Range: (mPa•s or Cp): 100-3800 / pH Range: 5.0 - 9.0
*Failure to use soap products within the required range of viscosity and pH may result in damage to product and
void warranty.
6. Screw soap bottle onto soap bottle coupler and hand tighten.
7. Connect sensor cable onto battery pack (you will hear pumps and soap will purge for approximately 5 seconds).
8. Soap dispenser is now ready for use.
Soap Bottle Coupler
Threaded Stem
Low Battery Indicator
Low Soap Indicator
Flashing BLUE LED
Flashing RED LED
Liquid soap refill only
(Solo jabon de liquido)
Reset Button
Press and hold for 7 seconds to prime soap
(Aprete y sostenga por 7 segundos para subir el jabon)
www.amtcorporation.com
Attention:
Make sure sensor cable is passed
through the opening of the spacer
to avoid damage.
Page 1 of 3
Parts List
Reset Button
Press and hold for 7 seconds to prime soap
(Aprete y sostenga por 7 segundos para subir el jabon)
www.amtcorporation.com
Liquid soap refill only
(Solo jabon de liquido)
A
C
F
GH
D E
I
(Optional-Sold Separately)
ASD-400 ASD-400EL
A-1
Ref # Description
Part #
A
C
D
E
F
G
HBattery Pack
800ml Soap Bottle
Mounting Screws
Soap Bottle Coupler
Mounting Bracket
Spacer
Spout
ASD-4BP
ASD-4SB
ASD-4MSC
ASD-4SBC
ASD-4MB
ASD-4SPA
ASD-4SPT
IAD05 6-Volt AC Power Adapter
(Optional)
J
AD05-2 6-Volt AC Power Adapter
w/Extension for 2 Devices
K
AD05-2-EXT Extension Only for AC
Power Adapter
A-1 EL Spout (6” Long)
ASD-4SPTEL
B
BSpout Filter Assembly
ASD-4FA
K
(Optional-Sold Separately)
J
(Optional-Sold Separately)
Page 2 of 3
Liquid soap refill only
(Solo jabon de liquido)
Liquid soap refill only
(Solo jabon de liquido) www.amtcorporation.com
Reset Button
Press and hold for 7 seconds to prime soap
(Aprete y sostenga por 7 segundos para subir el jabon)
Liquid soap refill only
(Solo jabon de liquido)
Reset Button
www.amtcorporation.com
Reset Button
Press and hold for 7 seconds to prime soap
(Aprete y sostenga por 7 segundos para subir el jabon)
1. Flashing Red LED Indicates Low Soap 2. Unscrew Liquid Soap Bottle 3. Refill Liquid Soap Bottle
4. Re-install Liquid Soap Bottle 5. Press and Hold Reset Button for 7 Seconds to
Prime New Soap and Reset Flashing Red LED.
Refill Soap When Soap Level is Approx. 3/4” (20mm)
3/8”
(10mm)
www.amtcorporation.com
Reset Button
Press and hold for 7 seconds to prime soap
(Aprete y sostenga por 7 segundos para subir el jabon)
Liquid soap refill only
(Solo jabon de liquido)
Flashing Red LED
3/4”
(20mm)
Max Filling Level is
Approx. 3/8” (10mm)
From Top of Bottle
Troubleshooting:
Flashing BLUE LED
Flashing RED LED
Problem Solution
Batteries are low/drained. Replace all 4 batteries (D-size).
Soap is low or empty. Refill soap bottle and press and hold reset button for 7 seconds to prime new soap and reset LED.
Soap does not come out of spout Spout filter is dirty and won’t pump soap through the spout. Clean or replace spout filter assembly.
Soap Refill Instructions:
Soap dispenses very weak Wrong soap was used and pump is dirty. Refill soap bottle with water and press and hold reset button for 7 seconds to
prime water through the unit. This should be repeated until only water dispenses and soap is completely flushed out.
Once unit is flushed out, refill soap bottle with liquid soap. Prime unit again until soap comes out.
™
*Viscosity Range: (mPa•s or Cp): 100-3800
pH Range: 5.0 - 9.0
*Failure to use soap products within the
required range of viscosity and pH may
result in damage to product and void
warranty.
Important: Use low viscosity liquid hand soap
with no abrasives.
ASD-400 LIQUIDFLO™
AUTOMATIC LIQUID SOAP DISPENSER
INSTALLATION & OPERATION MANUAL
Page 3 of 3
Advanced Modern Technologies Corporation
19800 Nordhoff Place, Chatsworth, CA 91311
Tel: (818) 883-2682 Toll Free: (800) 874-7822 Fax: (818) 883-2620
www.amtcorporation.com
™
Warranty
AMTC WARRANTS THE ASD-400 SOAP DISPENSER TO BE FREE OF DEFECTS IN MATERIAL AND
WORKMANSHIP FOR A PERIOD OF THREE (3) YEARS FROM DATE OF PURCHASE, WHEN PROPERLY
INSTALLED AND UNDER NORMAL USE AND SERVICE. THESE PROVISIONS DO NOT INCLUDE THE
BATTERIES SHIPPED WITH THE PRODUCT. A DEFECTIVE PRODUCT MAY BE RETURNED TO AMTC
OR ITS AUTHORIZED REPRESENTATIVES WITHIN THREE (3) YEARS FROM DATE OF PURCHASE
WITH THE PROPER INVOICE OF PURCHASE. AMTC, AT ITS DISCRETION, WILL REPLACE OR REPAIR
DEFECTIVE PRODUCT AT NO CHARGE. CLAIMS FOR LABOR, TRANSPORTATION, AND ANY OTHER
INCIDENTAL COSTS WILL NOT BE ALLOWED. AMTC WILL NOT BE RESPONSIBLE FOR ANY
CONSIDERABLE DAMAGES OF ANY KIND WHATSOEVER.
FOR TECHNICAL SUPPORT PLEASE CALL TOLL FREE 1-800-874-7822 OR VISIT OUR WEBSITE
AT WWW.AMTCORPORATION.COM.
MAKE SURE TO VISIT OUR WEBSITE PERIODICALLY FOR INFORMATION ON NEW PRODUCTS AND
TO DOWNLOAD ANY IMPORTANT PRODUCT DOCUMENTS THAT YOU MAY NEED IN THE FUTURE.
Installation Template for Model ASD-400 Spout (Not used for Model ASD-400EL)
3-3/4”
(95mm)
REF
Counter Top
Sink
Center Drill Point
1” (25.4mm) Hole
Spout Footprint
1-1/2” (38 mm)
(Scale 1:1)
Minimum To
Edge of Sink
Basin
Dispenser can be installed
on the left or right of the sink
Counter Top
Sink
REV. 03/19
™
ASD-400 LIQUIDFLO™
AUTOMATIC LIQUID SOAP DISPENSER
INSTALLATION & OPERATION MANUAL