manuals.online logo
Brands
  1. Home
  2. •
  3. Brands
  4. •
  5. AMX
  6. •
  7. Controllers
  8. •
  9. AMX AXB-PT10 User manual

AMX AXB-PT10 User manual

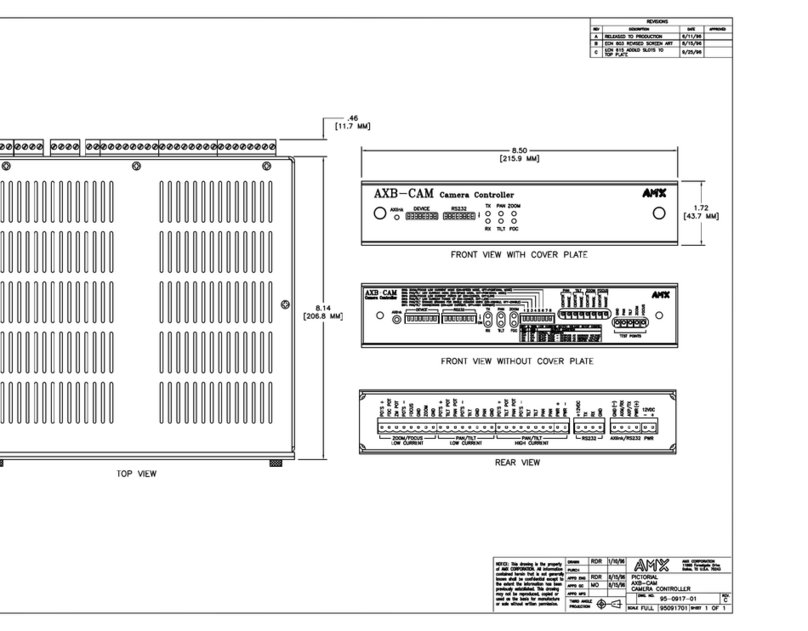
Camera Balancing Guide
AXB-PT10/15 PosiTrack Camera Controllers
PT10/15 Camera/Lens Balancing
The camera/lens assembly should be mounted so the tilt axis is capable of
going through the optical axis of the camera, assuming the optical center-
line is between 1/2" (12.70 mm) and 5" (127.00 mm) above the mounting
plane of the camera lens. The mounting platform (camera cradle) allows the
camera/lens to be mounted with its center of gravity on the tilt axis. The
maximum weight of the camera/lens assemblies on the PT10 is 10 lbs.
(4.54 kg) and on the PT15 is 15 lbs. (6.80 kg). The camera cradle is
mounted to the Tilt Hub (FIG. 1).
To find the center of gravity of the camera/lens/cradle assembly use a pipe
or dowel-rod to balance the assembly, as shown in FIG. 3.
Caution: Do not lift the PT10/15 by the Camera/Lens cradle as this could
damage internal components.
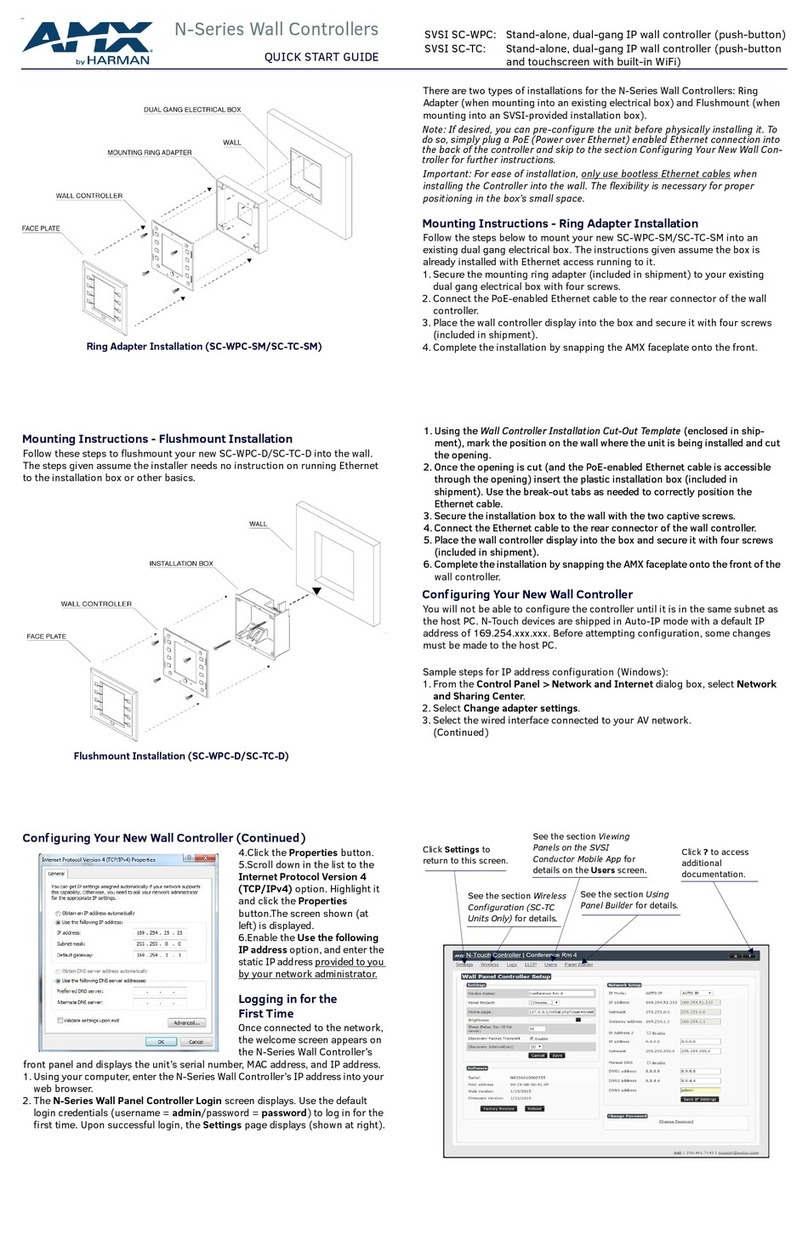
To mount and balance the camera/lens:
1. Separate the camera mount and the cradle support bracket by remov-
ing the two 1/2" screws on the underside of the assembly (see FIG. 2)
using a 3/32" Allen wrench.
2. Install the camera alignment peg to the mount at the position that best
fits the camera/lens.
3. Secure the camera/lens to the mount (at the camera alignment peg)
with the 1/2" screw and 1/10" thick washer supplied
(see FIG. 2).
4. Place the assembly on a balancing beam and while maintaining the
cradle centered on the pipe, slide the camera along the cradle’s
grooves until the camera and cradle remain balanced on the beam
(FIG. 3). Verify balance with a spirit level.
5. Mount the camera as close to the Tilt Hub as possible to obtain a true
center of gravity.
6. Re-attach the camera mount (with camera/lens) to the cradle support
bracket using the two 1/2" screws.
7. Take the entire camera/mount and cradle assembly and align the lens
with the Tilt Hub so that the vertical-axis intersects the center of the
camera’s iris, as shown in FIG. 4.
8. Mark the position of the cradle support bracket on the Tilt Hub (for
later attachment).
9. Remove the camera/lens and mount piece from the support bracket by
unscrewing the two 1/2" screws on the underside of the camera
mount.
10. Secure the support bracket to the Tilt Hub (at the same position
marked for the iris alignment) on the PT10/15 with some or all of the
four 1/2" screws and washers.
11. Secure the camera/mount to the support bracket by using the two 1/2"
screws.
12. Support the weight of the camera cables with a wire tie attached to the
wire tie mount on the lower corner of the face of the PT10/15 (FIG. 5).
Note: The camera/lens cradle can be mounted on either side of the cradle
support bracket.
IMPORTANT! READ THIS DOCUMENT BEFORE MOUNTING CAMERA
Proper balance of the camera mount (with camera/lens/cradle) will result in optimal performance. Follow
these balancing instructions prior to operation. Failure to balance the camera mount can result in poor
performance.
FIG. 1 Tilt Hub dimensions for the PT10/15
FIG. 2 Camera bracket assembly
0.750"
19.05 mm
0.750"
19.05 mm
0.00"
0.00"
Position
markers
Camera
points in this
direction
0.56"
39.62 mm
0.750
"
19.05 mm
0.250"
6.35 mm
0.250"
6.35 mm
0.750"
19.05 mm
Mounting holes (three sets)
Cradle
support
bracket
Camera alignment peg
Camera mount
(
underside view)
Camera\Lens
cradle assembly
(side view)
FIG. 3 Balancing the camera/lens cradle assembly
FIG. 4 Iris alignment with vertical tilt-axis
FIG. 5 Pedestal mount
cradle
(bottom view) balancing beam
Marker
points
Iris Ver t ical
tilt-axis
Cradle support
bracket
Wire
tie-
mount
Camera mount
assembly
Pedestal mount
AMX Corporation reserves the right to alter specifications without notice at any time.
For full warranty information, refer to the AMX Instruction Manual(s) associated with your Product(s).
048-004-2585 2/05 ©2005
AMX Corporation. All rights reserved. The AMX logo is a trademark of AMX Corporation. AMX reserves the right to alter specifications without notice at any time.
3000 RESEARCH DRIVE, RICHARDSON, TX 75082 • 800.222.0913 • 469.624.7153 • fax 469.624.7153 • technical support 800.932.6993 • www.amx.com
93-0630 REV: B

This manual suits for next models

4

Other AMX Controllers manuals

AMX UPC20 Plus Parts list manual

AMX

AMX UPC20 Plus Parts list manual

AMX AXB-TM5 User manual

AMX

AMX AXB-TM5 User manual

AMX NetLinx NI-2000 Operating instructions

AMX

AMX NetLinx NI-2000 Operating instructions

AMX NetLinx Integrated Controller NI-2100 Operating and maintenance manual

AMX

AMX NetLinx Integrated Controller NI-2100 Operating and maintenance manual

AMX NetLinx Integrated Controller NI-4100 User manual

AMX

AMX NetLinx Integrated Controller NI-4100 User manual

AMX NXA-WAPZD1000 Parts list manual

AMX

AMX NXA-WAPZD1000 Parts list manual

AMX NetLinx Integrated Controller NI-700 Operating instructions

AMX

AMX NetLinx Integrated Controller NI-700 Operating instructions

AMX NXA-USBTN User manual

AMX

AMX NXA-USBTN User manual

AMX AXB-REL8 User manual

AMX

AMX AXB-REL8 User manual

AMX RDC-DC/120 Assembly instructions

AMX

AMX RDC-DC/120 Assembly instructions

AMX AXB-PT101530 POSITRACK CAMERA CONTROLLER User manual

AMX

AMX AXB-PT101530 POSITRACK CAMERA CONTROLLER User manual

AMX AXF-MINI User manual

AMX

AMX AXF-MINI User manual

AMX NetLinx Integrated Controller NI-700 User manual

AMX

AMX NetLinx Integrated Controller NI-700 User manual

AMX Axcent3 pro User manual

AMX

AMX Axcent3 pro User manual

AMX FG1090-170 User manual

AMX

AMX FG1090-170 User manual

AMX KCR Guide

AMX

AMX KCR Guide

AMX PTE-300 User manual

AMX

AMX PTE-300 User manual

AMX NXP-PLV Parts list manual

AMX

AMX NXP-PLV Parts list manual

AMX AutoPatch User manual

AMX

AMX AutoPatch User manual

AMX NXC-VOL4 User manual

AMX

AMX NXC-VOL4 User manual

AMX SVSI SC-WPC User manual

AMX

AMX SVSI SC-WPC User manual

AMX AXB-F117 Stealth 1 User manual

AMX

AMX AXB-F117 Stealth 1 User manual

AMX NetLinx Integrated Controller NI-2100 Operating and maintenance manual

AMX

AMX NetLinx Integrated Controller NI-2100 Operating and maintenance manual

AMX Axcent3 pro User manual

AMX

AMX Axcent3 pro User manual

Popular Controllers manuals by other brands

Conrad 190219 instruction manual

Conrad

Conrad 190219 instruction manual

Carlisle BINKS DEVILBISS HAR-600 Service manual

Carlisle

Carlisle BINKS DEVILBISS HAR-600 Service manual

Niko 310-01100 manual

Niko

Niko 310-01100 manual

Monoprice 38166 Quick install guide

Monoprice

Monoprice 38166 Quick install guide

Vortice IRET 6 Instruction booklet

Vortice

Vortice IRET 6 Instruction booklet

Gree CE53-24/F(C) owner's manual

Gree

Gree CE53-24/F(C) owner's manual

Velleman vellight CHLSC4 installation instructions

Velleman

Velleman vellight CHLSC4 installation instructions

Alarm ADC-ACC1-17 quick start guide

Alarm

Alarm ADC-ACC1-17 quick start guide

IAI XSEL-P First step guide

IAI

IAI XSEL-P First step guide

Quest Engineering Cloud Control Base manual

Quest Engineering

Quest Engineering Cloud Control Base manual

Haven K Series quick start guide

Haven

Haven K Series quick start guide

Paragon DTC 1000 Operation & maintenance instructions

Paragon

Paragon DTC 1000 Operation & maintenance instructions

Nibe VST 11 installation instructions

Nibe

Nibe VST 11 installation instructions

Intel 6 SERIES CHIPSET -  UPDATE 01-2011 specification

Intel

Intel 6 SERIES CHIPSET - UPDATE 01-2011 specification

PVI XR10CX manual

PVI

PVI XR10CX manual

Sinclair SWC-05W user manual

Sinclair

Sinclair SWC-05W user manual

Spa-Quip SP400P user guide

Spa-Quip

Spa-Quip SP400P user guide

Aventics Marex ECS Assembly instructions

Aventics

Aventics Marex ECS Assembly instructions

manuals.online logo
manuals.online logoBrands
  • About & Mission
  • Contact us
  • Privacy Policy
  • Terms and Conditions

Copyright 2025 Manuals.Online. All Rights Reserved.