Amylior Stella User manual

Before using this product, please
read this manual carefully
to insure user safety
OWNER’S MANUAL
Rollator
M O B I L I T Y
OM | PDA20608.EN | 1000587 | Rev. 05

2
TABLE OF CONTENTS
General Information .............................................................................................................. 3
Specifications and Intended Use.......................................................................................... 3
Warnings .............................................................................................................................4-5
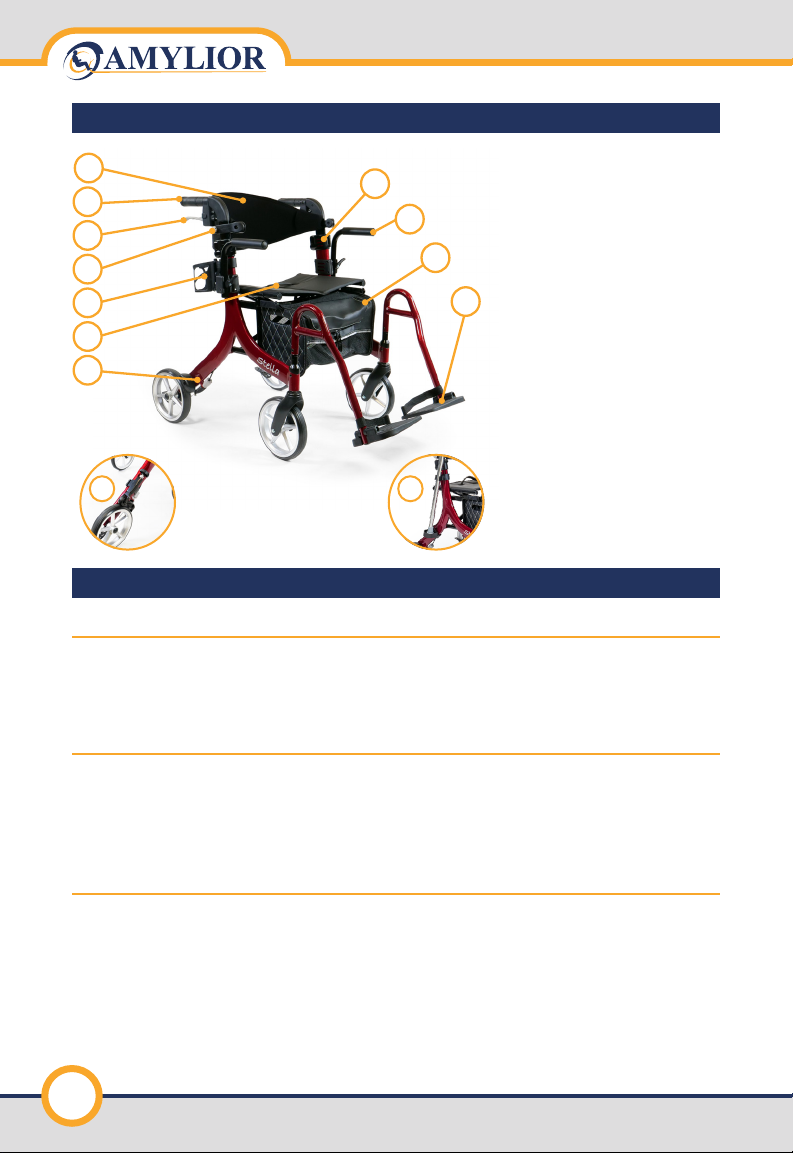
Your Rollator ........................................................................................................................... 6
Cleaning/Maintenance/Reassigning ................................................................................. 6
Unfolding your Rollator ........................................................................................................ 7
Brake Handles ....................................................................................................................... 7
Brake Adjustment ................................................................................................................. 7
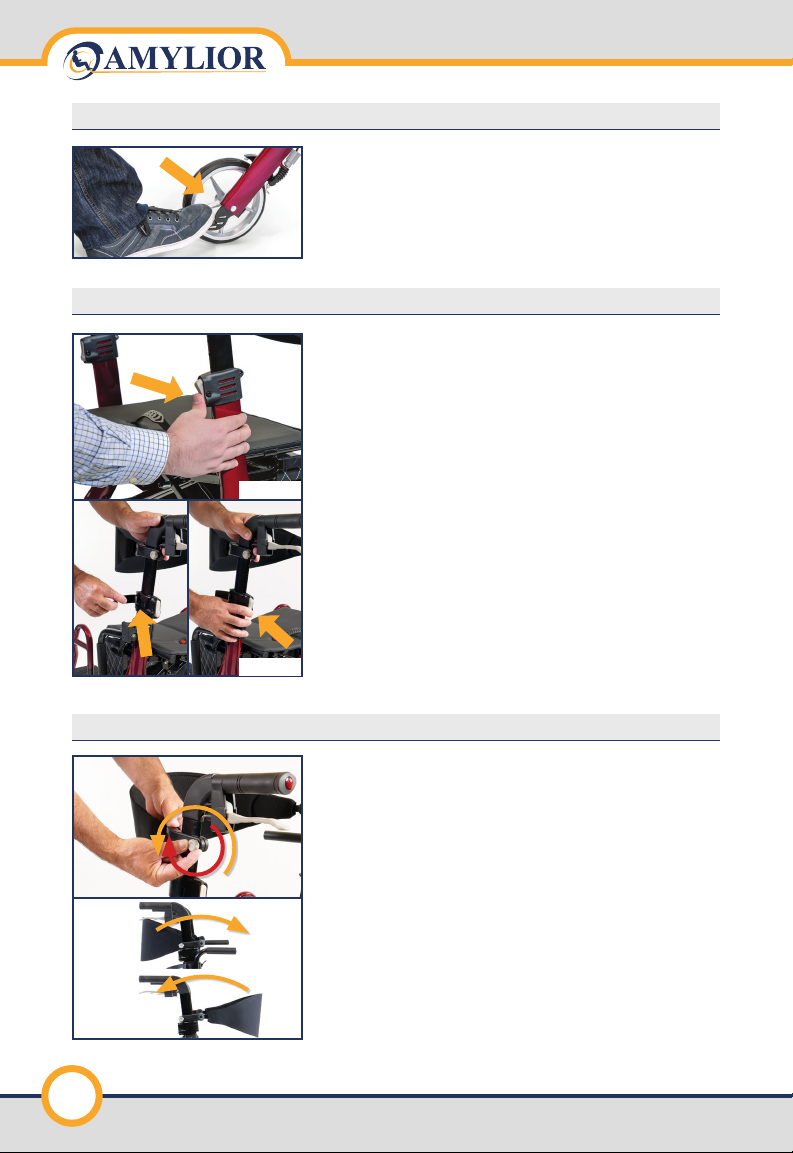
Climbing Small Obstacles .................................................................................................... 8
Handle Height Adjustment ................................................................................................... 8
Back Strap Adjustment .......................................................................................................... 8
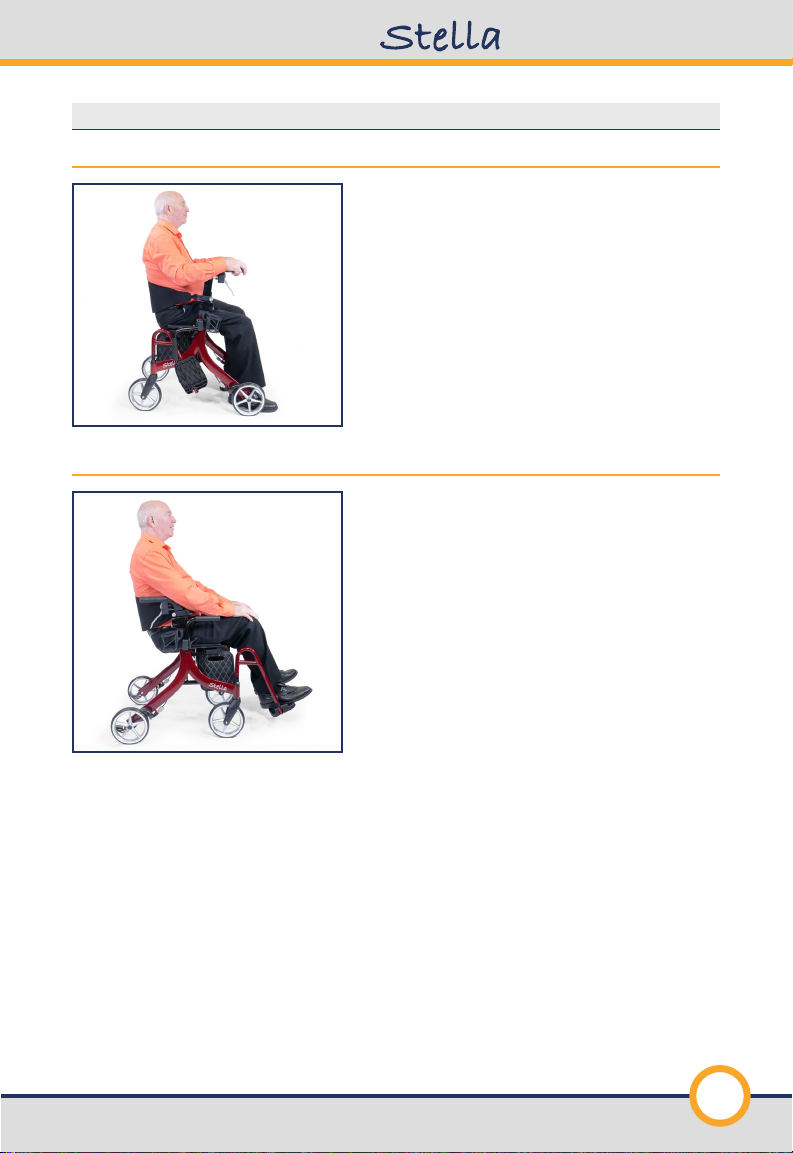
Sitting/Getting Up ................................................................................................................ 9
Folding your Rollator .......................................................................................................... 10
Attaching/Removing the Storage Bag .............................................................................. 10
Cup Holder Installation .......................................................................................................11
Cane Holder Installation .....................................................................................................11
Using the Footrests (Optional equipment)...........................................................................12
Using the Armrests (Optional equipment)...........................................................................12
Slow-Down Brakes Adjustment (Optional equipment) ......................................................12
Technical Specs.....................................................................................................................13
Limited Warranty...................................................................................................................13
Our Mission...........................................................................................................................14
Our Values.............................................................................................................................14
Contact Us.............................................................................................................................14

3
- OWNER’S MANUAL
M O B I L I T Y
GENERAL INFORMATION
The following instructions are an integral part of the delivery of this rollator. The user should
have them readily available at all times. They must be kept with the rollator, should it be
transferred to another user.
The manufacturer reserves the right to make changes relative to the information provided in
these instructions as a result of technical developments and improvements.
This document may not be reprinted, translated and/or duplicated in any form whatsoever,
even in part, unless prior written consent from the manufacturer.
For updates on these instructions, please contact the manufacturer
or visit www.amylior.com.
SPECIFICATIONS AND INTENDED USE
(FOR INDOOR AND OUTDOOR USE)
The STELLA rollator is intended as a walking aid for people with reduced mobility who
weigh up to 300lb (136kg) for the standard model and 400lb (180kg) for
the heavy duty model.
To occasionally use this rollator as a transport chair, the optional footrests and armrests
must be installed.
The rollator should be used only on firm, flat surfaces. It is not intended to be used
for any other purpose such as a climbing aid or to carry heavy loads. Any such use can be
dangerous!

4
WARNINGS: READ CAREFULLY BEFORE USING!
Before sitting on the rollator, make sure the Stella is fully opened and the seat is
completely down.
Before sitting on the rollator, make sure the lumbar support is well positioned
horizontally to prevent falling backwards. Verify that both knobs are fully tightened at
same height.
Before sitting on the rollator, make sure the wheel locks are engaged. In transport chair
mode, before the user transfers into or out of the chair, the attendant must apply both
rear wheel locks and make sure that the front casters are in the forward position. If the
wheels rotate while locked, please take the rollator back to the dealer for adjustment.
When the brakes/locks are released, the wheels should rotate freely.
Do not lean to one side, always keep your weight balanced on the rollator. Leaning
forward, while using the Stella as a transport chair without proper assistance, can cause
tipping.
In rollator mode, before sitting, put your hands on the hand grips and back-up until your
legs touch the seat. In transport chair mode, before sitting, back-up until your legs touch
the storage bag and use armrests to lower yourself down.
When getting up from the rollator in transport chair mode, assistance
is ALWAYS required.
a. Attendant must apply wheel locks by pushing down on the brake handles.
b. First, remove feet from footrests and place them firmly on the ground.
c. Second, use armrests for support before attempting to stand up.
Do not hang bags or other items on hand grips – risk of tipping over!
Changing direction abruptly could make the rollator tip over.

5
- OWNER’S MANUAL
M O B I L I T Y
Use this rollator on hard, flat surfaces only. Avoid use on uneven terrain such as grass,
gravel and sand.
Do not use the rollator to go up or down escalators.
If excess weight is put onto the hand grips, the rollator could tip backwards.
When folding or unfolding the rollator, watch for possible pinch points.
When seated, the brakes should be applied.
Test the brake handles regularly to make sure the rollator brakes work properly.
Avoid exposing the rollator directly to the sun or extreme heat for an extended period of
time as this can cause the rollator’s parts to overheat and burn the user.
This rollator is not intended to be used as a seat or otherwise in a moving vehicle.
Do not lean foward while using as transport chair.
NOTE: You and your attendant should consult a qualified professional for
the correct techniques on ramp negotiations.
WEIGHT CAPACITY: 300 LBS for the standard model and 400 LBS for the
heavy duty model.
IF YOUR ROLLATOR BECOMES DEFECTIVE:
Do not try to repair it yourself, contact your authorized dealer immediately.

6
YOUR ROLLATOR
7
12
13
11
9
8
10
1
2
3
4
6 5
1. Handle height adjustment
2. Armrests (Optional)
3. Removable storage bag
4. Footrests (Optional)
5. Cane holder (not compatible
with armrests)
6. Slow-down brakes (Optional)
7. Brake
8. Folding /unfolding seat strap
9. Cup holder
10. Back strap height adjustment
11. Brake handles
12. Ergonomic handgrips
13. Flip-back oversized back strap
CLEANING/MAINTENANCE/REASSIGNING
Cleaning
Clean and disinfect the rollator regularly. Use mild soapy water with no abrasive additives.
Disinfect the rollator using commercially available products. Never use steam degreasers.
Never use scouring or harmful cleaning agents.
Maintenance
The STELLA rollator requires little maintenance. If the braking function weakens,
wheel movement becomes stiff or you notice any other functional impairment,
please take the rollator to your authorized dealer for servicing. Never use any kind of
lubricant on any parts of the rollator.
Reassigning to a new user
If you pass along your rollator to a new user, please remember to hand over all the
technical documentation needed to ensure safe operation. In accordance with instructions,
the rollator must be inspected, cleaned and returned to pristine condition by an authorized
dealer before assigning to the new user.

7
- OWNER’S MANUAL
M O B I L I T Y
USING AND ADJUSTING YOUR ROLLATOR
1. UNFOLDING YOUR ROLLATOR
Place the rollator in front of you in the direction of
travel and apply the parking brake.
Pull the seat strap to release the locking
mechanism (when available, the red tag indicates
where to pinch and pull), press the left and right
lateral tubes, on either side of the seat, down
together, until the folding locking mechanism clicks
into place.
2. BRAKE HANDLES
FIG. 1
FIG. 2
Pull to brake (FIG.1): Pull the brake handle up
to slow down or stop the rollator.
Push to lock (FIG. 2): Push down on the brake
handle to lock the rollator in its position.
3. BRAKE ADJUSTMENT
FIG. 1 FIG. 2
The brake system fitted on this rollator complies
with the manufacturer’s quality standards. The
brake system has been adjusted to the best
performance settings. To personalize your settings,
follow instructions below.
You may need to adjust the brake system from
time to time as it will wear out with normal use. To
adjust the braking strength, push the screw housing
downward and turn left or right (Figures 1 & 2).

8
4. CLIMBING SMALL OBSTACLES
Pressing your foot down on the extended frame
(curb climbers) makes it easier to lift the front wheels
to negotiate curbs.
5. HANDLE HEIGHT ADJUSTMENT (DEPENDING ON MODELS)
FIG. 1
FIG. 2
Activate the brake to immobilize the rollator.
Model 1 (FIG.1): This adjustment should be done
while standing. Press the gray adjustment button and
move the push handle up/down until you obtain the
required height. As a guide, the wrist should align
with the handgrip. Once positioned, release the gray
button.
Model 2 (FIG.2): This adjustment should be done
while standing. Open the tightening tab, press the
gray adjustment button and move the push handle
up/down until you obtain the required height. As a
guide, the wrist should align with the handgrip. Once
positioned, release the gray button and close the
tightening tab.
6. BACK STRAP ADJUSTMENT
FIG. 1
FIG. 2
Strap height (FIG.1): Unscrew (yellow arrow) the
gray knobs on both sides of the rollator and slide the
back strap up/down on the extruded handle until
the required height. The back strap should be well
positioned on the back in the lumbar area. Once
positioned, tighten the gray knobs (red arrow).
Strap rotation (FIG.2): The flip-back strap allows for
use in either rollator mode or transport chair mode.

9
- OWNER’S MANUAL
M O B I L I T Y
7. SITTING/GETTING UP
7.1 Rollator mode
Before sitting down, make sure the rollator is on
a firm and level surface, the front castors are
fully extended to the outside of the frame (in the
forward position) and the brake handles are
locked (pushed down).
Before getting up, make sure the brakes are still
locked. Place your hands on the handgrips as a
support while rising.
7.2 Transport chair mode
Attendant must be present in this mode. Before
sitting down, the rollator must be on a firm and
level surface and the attendant must:
a) apply wheel locks by pushing down on
brake handles;
b) flip the back strap the opposite direction; and
c) raise the armrests.
(See Section 13. using armrests)
The user must back-up slowly until legs touch the bag and position hands on armrests to sit
down carefully. Footrest must be engaged after the user has sat down.
(See Section 12. using footrests)
Before getting up, make sure the brakes are still locked. First, remove feet from footrests
and place them firmly on the ground. Footrests can be swung away toward the outside.
Second, use armrests for support before attempting to rise.

10
8. FOLDING YOUR ROLLATOR
FIG. 1 FIG. 2
If footrests are installed on the rollator,
flip up footplates and swing away footrests
before folding.
Any content in the storage bag should be
removed to ease the folding process of the
rollator and prevent any damage to items.
Pull the seat strap (when available, the red tag
indicates where to pinch and pull) and pull
upward (FIG.1) until the rollator locks in folded
position (FIG.2).
9. ATTACHING/REMOVING THE STORAGE BAG
FIG. 2
FIG. 1
To remove the storage bag, fold the rollator
slightly (FIG.1) and slide bag out of receptacle,
pulling on both ends (FIG.2).
To replace the bag, reverse above steps.
The SWL (safe working load) is
10 lb (4.5 kg).

11
- OWNER’S MANUAL
M O B I L I T Y
10. CUP HOLDER INSTALLATION
FIG. 1
FIG. 2
Installing the cup holder (reversible left or right)
requires no tools. Simply clip it below the handle on
the opposite side of the cane holder (FIG.1).
Adjust the cup holder direction according to your
preference (FIG.2).
The cup holder SWL (safe working load)
is 3 lb (1.3 kg).
11. CANE HOLDER INSTALLATION (NOT COMPATIBLE WITH ARMRESTS)
FIG. 2
FIG. 1
FIG. 3
Installing the cane holder (reversible left or right)
requires no tools. Simply clip both cane holder’s parts
to the same side.
Clip the upper part underneath the handle (FIG.1).
Clip the bottom part above the brake or above the
front wheel (FIG.2).
For proper cane alignment once clipped, both parts
can be rotated to desired angle (FIG.3).
The cane holder SWL (safe working load)
is 3 lb (1.3 kg)

12
12. USING THE FOOTRESTS
FIG. 1 FIG. 2
To engage: The attendant must pull the footrest
upward, rotate forward until it locks into place
and then flip the footplate down. Repeat on the
other side. (FIG.1)
To swing away: The attendant must pull the
footrest upward, rotate toward the outside and
flip the footplate up. Repeat on the other side.
(FIG.2)
13. USING THE ARMRESTS
FIG. 1 FIG. 2
To engage: The attendant must pull the armrest
up from underneath until a click is heard.
(FIG.1)
To clear away: The attendant must press
release tab and push the armrest down. (FIG.2)
14. SLOWDOWN BRAKES ADJUSTMENT
FIG. 1
For a user with an uncontrolled gait, it is
possible to slow the wheels down with the
slow-down brake system.
To adjust the tension, turn the black knob
clockwise to tighten (slower) or turn counter
clockwise to loosen (faster) the tension.
Perform this adjustment on both sides.
Slow-down brakes might need to be adjusted a
few times on either side to obtain equal tension.

13
- OWNER’S MANUAL
M O B I L I T Y
TECHNICAL SPECS
STELLA 18 STELLA 20 STELLA 23 STELLA HD
Seat height
18’’ (455 mm) 20’’ (510 mm) 23’’ (585 mm) 20’’ (510 mm)
Seat width
17.5’’ (445 mm) 17.5’’ (445 mm) 17.5’’ (445 mm) 19.5’’ (495 mm)
Overall width
24’’ (610 mm) 24’’ (610 mm) 24’’ (610 mm) 26’’ (660 mm)
Handle height
29.5’’ - 34.5’’
(750 mm - 875 mm)
30.5’’ - 35.5’’
(775 mm - 900 mm)
33.5’’ - 38.5’’
(850 mm - 980 mm)
30.5’’ - 35.5’’
(775 mm - 900 mm)
Footrest length
15” - 17.5”
(380 mm - 445 mm)
17” - 19.5”
(430 mm - 495 mm)
20” - 22.5”
(510 mm - 570 mm)
17” - 19.5”
(430 mm - 495 mm)
Overall length
28.5’’ (725 mm) 28.5’’ (725 mm) 28.5’’ (725 mm) 28.5’’ (725 mm)
Weight capacity
300 lb (136 kg) 300 lb (136 kg) 300 lb (136 kg) 400 lb (182 kg)
Weight
14.5 lb (6.6 kg) 14.5 lb (6.6 kg) 15 lb (6.8 kg) 16 lb (7.3 kg)
NOTE - Some metric measurements are rounded to the nearest 5 mm.
LIMITED WARRANTY
Amylior warrants this product to be free of defects in materials and workmanship.
The STELLA rollator has a lifetime warranty on the aluminum frame and cross-braces,
5 years on the brake handles and a 12-month warranty on all other parts. Parts subject to
wear or misuse such as upholstery, handgrips and wheels are excluded from warranty.
If this product is found to be defective, it will be repaired or replaced according to the
manufacturer’s decision. This warranty does not cover freight or labor charges incurred
during the repair or replacement of this product.
Amylior supplies products which respect the highest standards of quality. This product
was assembled according to these standards and inspected carefully before delivery. This
limited warranty represents our confidence in our materials and workmanship.
For service, contact the dealer where you purchased this product.
If for any reason, you are not satisfied, you may contact us directly. If you need to contact
us, you must have the product name, serial number, date of purchase and the dealer name.
DO NOT return any products without prior authorization. This warranty does not cover
problems caused by improper or abusive use by the user.

14
OUR MISSION
Our mission is to improve customer mobility and quality of life by developing a superior
product and offering unbeatable service to meet the specific needs of users.
OUR VALUES
• Humanity is the heart of our company.
We have a deep respect and great compassion for human beings inside and
outside our organisation. We believe in people and we are committed to help.
• Integrity is the foundation of our business.
We are proud to work together openly with honesty, ethics and transparency
through our daily interactions with our customers, colleagues and partners. We
respect employment equity where everyone can contribute their very best.
• Innovation is the essence of our vision.
We are continuously moving forward, learning, improving, challenging the status
quo by encouraging our employees to pursue new ideas that make a difference.
• Excellence is the goal in our performance.
It is the main driver in achieving our objectives. We believe this excellence
highlights our leadership and firm determination to provide the best solution for
each customer.
• Passion is the source of our creativity. We share our motivation and commitment
to energize, engage and inspire others. We all have a common purpose which is
to provide the best customer experience and enjoy doing it.
CONTACT US:
info@amylior.com
www.amylior.com
3190 F.-X.-Tessier
Vaudreuil-Dorion QC
J7V 5V5 Canada
+1 450 424-0288
1 888 453-0311
Table of contents
Other Amylior Mobility Aid manuals
Popular Mobility Aid manuals by other brands

dynarex
dynarex DynaGo quick start guide

Schuchmann
Schuchmann MARCY Instructions for use

Vermeiren
Vermeiren 250 instruction manual

Dolomite
Dolomite MELODY operating instructions

Invacare
Invacare Deluxe Three-Position IH6065 Operation and maintenance manual

Schuchmann
Schuchmann Momo motion Instructions for use