Anacortes Yacht Charters Orcastrate SUN MAJIC User manual

OPERATIONS MANUAL
Orcastrate
44’ Jeanneau,
“SUN MAJIC”
Welcome Aboard!
We are happy that you have chosen Anacortes Yacht Charters and the
vessel Orcastrate for your vacation. We hope you enjoy your cruising
experience in the lovely islands of the Pacific Northwest.
This manual will help you become more familiar with your boat. If you
have any further questions, about the boat or your itinerary, please do
not hesitate to ask the AYC staff.
Remember our vessels are non-smoking boats. But please feel free to
smoke out on deck.
Bon Voyage!
The Anacortes Yacht Charters Staff

Table of Contents
Boat Operation Page
Engine Inspection 3
Start-Up 4
Shutdown 5
Getting Underway 5
Cruising 5
Docking 5
Fueling 5
Boat Electrical
A.C. (Shore) Power 6
D.C. (House) Systems 7
Batteries 8
Sanitation System
Marine Toilet 9
Holding Tank(s) 9
Y-Valve 10
Heating Systems 11
Water Systems
Fresh Water Tanks 12
Fresh Water Pump 12
Hot Water 12
Shower 12
Galley
Propane 13
Refrigeration/ Ice Maker 13
Stove/ Oven 13
Electronics
VHF Radio, Depth Sounder 14
GPS/Plotter
Stereo
Anchoring 15
Sails and Rigging 16
Bar-B-Que 16
Dinghy/ Outboard 17
Other Notes 18
Safety Crabbing
Dead Heads/ Debris

BOAT OPERATION
Engine Inspection
Remember your “WOBBS” every morning. (Water (Coolant), Oil, Bilges (Inspect and
Pump-out), Belts, and Sea Strainer. Check the level of COOLANT in the expansion
tank. Check the level of your engine oil with the dipstick. Your dipstick is located on
the starboard side of the motor. There is access through the removable panel in the
master aft stateroom. Look at the etch mark on the dipstick that indicates proper
levels. DO NOT OVERFILL! Fill only if oil level is below the ½ mark. Check the
general condition of the hoses and belts.
Ensure the RAW WATER THRU-HULL is OPEN! The sea valve is located directly below
the sea strainer just forward of the engine. Check the sea strainer for debris.
If necessary, close the thru-hull, open the strainer lid by unscrewing a single nut on
top, clean out debris, and reassemble. REOPEN the Thru-hull! Check for leaks.

START UP
Orcastrate has a 55hp Yanmar engine with a 3 bladed prop. There is an ignition
panel on starboard off the cockpit. The throttle and transmission single control is at
the wheel pedestal to starboard of the helm. The vessel cruises at 2000 rpms to a
speed of 7 knots. Running your engine much above that will burn a lot more diesel
at the gain of very little boat speed.
The boat has a very small prop walk to port in reverse with not too much noticeable
effect in forward. When in reverse, be careful to keep a firm grip on the wheel. Use
only low rpms in reverse.
To start engine, place transmission in the neutral position (straight up). If the
engine is cold, first preheat it by turning the key to left for about 15 seconds. Then
turn the key to right and advance throttle as needed. After the engine starts, warm it
up for about 5 minutes at about 1000 rpms. Check the port side transom for water
and exhaust as an indication that your thru hull is open, and water is keeping your
engine cool.
Do not hold the start key for more than 15 seconds at a time. If the engine does not
catch the first time, wait about 15 seconds before trying again.
After the engine starts, warm it up at about 1000 rpms for about 5 minutes.
Observe the warning lights at the top of the engine panel.
Note: If a warning light appears, shut down engine and look for problem. Was there
a lack of water exiting with exhaust? Are thru-hulls open and debris cleared from
sea-strainer? If problem keeps occurring, call AYC Service.

Shut Down
Before shutting down, let the engine idle for about 5 minutes to cool. Ensure the
gearshift is in the neutral position and the throttle is idle. Turn off the engines by
pressing and holding the stop button. When the engine stops and the alarm sounds,
turn off the key.
Getting Underway
Disconnect the shore power cord (see AC Power next page). Close portholes,
windows, and hatches. Turn on VHF and electronics. Assign crewmembers to their
tasks. Put one crew member (the “dingiest” member of course!) in charge of the
dinghy if it is under tow. It needs to be kept on a tight leash when in the marina.
Once outside marina, have the crew members bring in fenders and put lines away.
Cruising
Slowly come up to cruising speed of 2000 rpms where you will cruise at approx.
7knots, using only 1gallon of diesel/hour. Using excessive rpms will only give you a
½ knot of speed and will only damage the engine. Speed will vary depending on
weight, load, and weather conditions
Docking
During docking, give clear instructions to the crew on what you will expect of them
i.e., with lines and fenders. Always come into the dock slowly allowing for any wind
or tide. If you have a choice, dock on the port side because as you put the
transmission in reverse, she will pull to port sucking you in closer to the dock.
Have the bow, stern, and spring lines ready. If you are short on crew, lead the lines
to the mid-section of the boat (where it is fattest) where your crew member can
easily step off with one of the lines, secure it, and quickly grab the next one.
As you are approaching the dock, have your crew call out distances to the captain (ie
20 feet, 10 feet, 3 feet etc.). This will help with a successful landing.
If you find you are too far from the dock, DO NOT have your crew jump! Back out
and do it again. Disaster will follow if someone falls in the water.
Fueling Up
You will need to fill it up upon completion of your charter. Your fuel tank holds 58
gallons. You should have a rough idea of the number of gallons you will need to add
to your tank. (i.e. you use 1 gal per hour and have run 18 hours = 18 gal.)
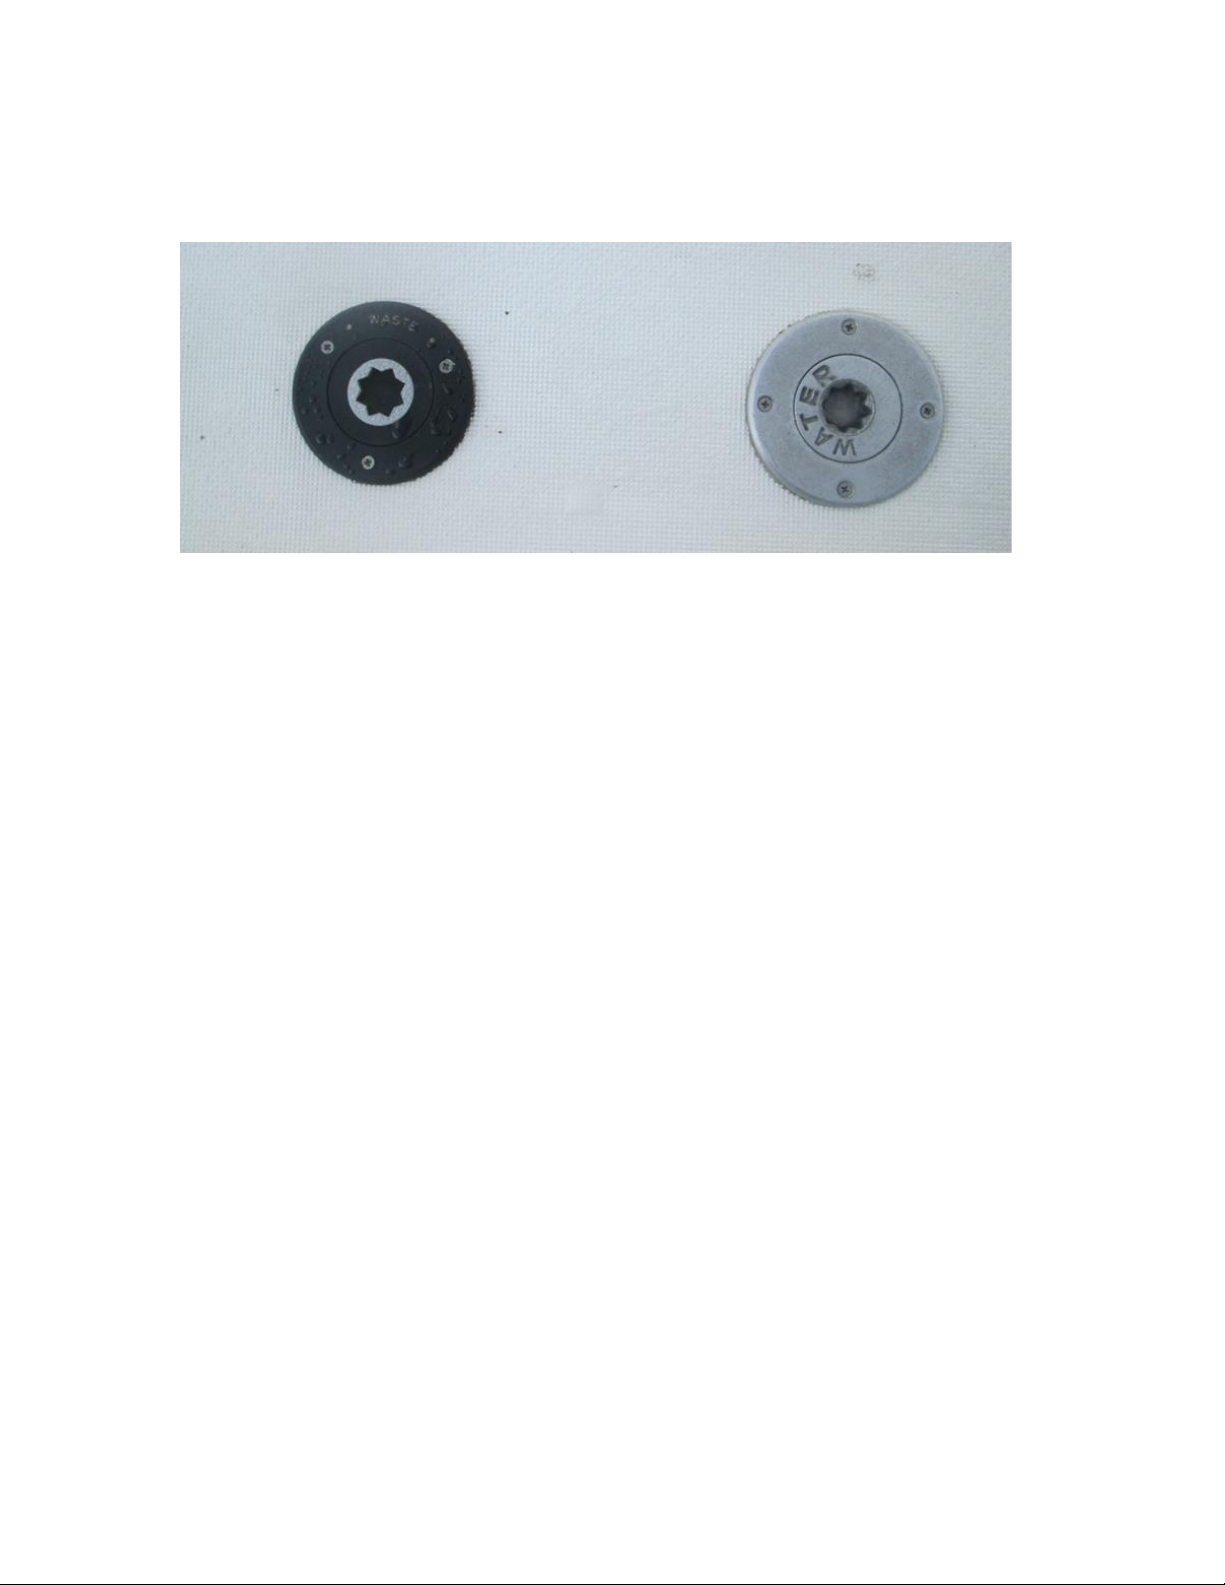
Open the fuel filler cap located portside aft with a winch handle. MAKE SURE YOU
HAVE DIESEL! Make sure it is going into the right deck fill! DOUBLE-CHECK! Before
pumping, have your oil/fuel sorb ready to soak up any spilled fuel. Do not add water
at the same time.
Put the Diesel nozzle into the deck fitting and pump slowly listening to the sound of
the flow. Pumping too fast may not allow excess air to escape, which will lead to
spillage out the vent. As the tank fills, the sound will rise in pitch or gurgle. Pay
attention to the vent that it does not spill fuel into the water. Top off carefully,
catching any spillage with your sorb. Take your time. The last 3 or 4 gallons are
slow.
Check your gauges at the helm with key on. Replace the deck fill caps and clean up
any spatter and wash hands thoroughly.

BOAT ELECTRICAL
The electrical system is divided into two distribution systems: 110 volt or AC and 12
volt or DC. The systems are controlled from the electrical panel located at the
navigation station and the battery switches located under steps to salon in front of
the engine.
When not connected to shore power your batteries provide all of your electrical
power. Therefore, the use of onboard electricity needs to be monitored very
carefully. Turn off electrical devices when they are not being used (lights,
instruments, etc.)
110 Volt or AC (Alternating Current)
Shore Power supports all AC equipment and receptacles on board as well as the
battery charger.
To connect to shore power, plug the power cord into the boat aft port side and then
into the dock receptacle. Check your power rating/plug size of the dock receptacle
(i.e. 30amp, 20 amp etc.) Secure the cord around the shore power electrical
receptacle and off the bow (i.e. wrap around bowline a few times) turn the dock
power breaker on. Your breakers for the 110 volts circuits should be turned off
before connecting or disconnecting from shore power
On the boat, turn the shore circuit breaker on at the electrical panel. Turn on
appropriate breakers for battery charger, refrigeration and water heater. Watch your
voltmeter for load. If the load exceeds the amperage, it will pop the breaker. If this
occurs, wait to turn on one of your systems (i.e. water heater) until the use of power
decreases.

INVERTER operations.
Orcastrate has a 110 volt inverter charger. This means you can use 110 V power as
needed converting 12DC to AC. This may seem like a wonderful plan but understand
it is using your 12v DC at a fantastically fast pace. Use Microwace of other applinaces
sparingly. Keep a close eye on 12v Power available.

House 12-volt System
Two battery banks support your 12 volt system: #1 Engine Start, #2 House battery
all batteries are located in starboard cockpit locker.
Normally you will leave the switches on.
Your 12-volt panel shows all the systems supported by your batteries. Primarily you
will be turning on these breakers for lights, water pressure, electronics, etc. Bilge
pump breaker and toggle will always be left on.
When disconnected from shore power, the 12–volt systems will drain the battery
especially when at anchor. Monitor your batteries very carefully. The DC voltmeter
on the DC panel can be switched between your battery banks to measure battery
voltage. Typically, the bank should read from about 13.0 to 14.5 volts when being
charged.
While at rest, your voltage will drop as indicated in the figures below.
All your batteries are charged while underway by the alternator. The engine and
house batteries are charged by the battery charger while connected to shore power.
Ensure that the charger is on.
Voltage Battery State of Charge
12.65 volts 100% 12.25 volts 50 %
12.47 volts 75 %11.95 volts 25 %
11.70 volts 0 %

SANITATION SYSTEM
Marine Toilet (Jabsco)
It is imperative that every member of the crew be informed on the proper use of a
marine head. The valves, openings, and pumps are small and will clog easily. If the
head gets clogged, it is your responsibility! Always pump the head for small children
so you can be certain of what is being flushed. Note: Never put paper towels,
napkins, sanitary products, household T.P., or food into marine heads. Use only
marine T.P. provided by AYC.
To use toilet, move selector switch to the “wet bowl”position. Pump the handle 3-5
times to wet the bowl. After using the head, pump to remove waste from bowl
(approx. 20 times). Then return the selector back to “dry bowl”position and pump
for a few times until bowl is dry. Your toilet raw water intake is located behind the
access covers if you should need to shut off the water to the toilet.
Should the toilet squeak or be a bit sticky to pump, lubricate with a couple of squirts
of dish soap or salad oil. Put in bowl and pump 2-3 times to get it to pump and
leave overnight. Again, leave in the “dry bowl” position.
Holding Tanks
Your sanitation holding tanks holds 38 gallons per head. Be aware of the rate of
waste production (about 1 gallon/flush). If you overfill your tank, you will break a
hose, clog a vent, or burst the tank which is an indescribable catastrophe! And a
very expensive fix for you. Empty the tank at least every other day to avoid any
problems. Tank watch located at V berth floor base of bed.

The holding tank is emptied in one of two ways:
#1 At the pump-out station, remove the deck waste caps. Insert the pump-out
nozzle into the waste opening. Double-check that you have the right deck opening!
Turn on the pump on the dock and open the valve on the handle of the hose. When
pumping is finished, close the lever on the handle and turn off the pump. Remove
from deck fill.
If there is a freshwater hose on the dock, rinse the tank by adding water for 1-2
minutes. Then re-pump to leave the tank rinsed and clean for the benefit of the next
charterer. This also eliminates any head odors.
#2 The tank’s contents can also be discharged at sea by opening the ball valve
located behind the access covers. Note: Overboard discharge is only allowed in
Canadian waters. It is illegal to discharge overboard within U.S. waters.

HEATING SYSTEMS
System one is a Webasto Hydronic heater. This uses ship diesel to heat water that is
circulated to all living areas by fans once the heater is hot enough. BE careful of
heater exhaust on port Stern quadrant. This will melt or burn anything and poses a
fire hazard if covered. To turn on the toggle to system heat with the switch at Nav
station next to compass. Then turn on the black thermostat to heat and set the temp
as desired. It is a simple and efficient way to heat the interior when not on shore
power. To turn it off, simply turn thermostat to ff and after heater is cool usually 20
minutes, turn off system heat toggle switch.
The 2nd system is the heater craft:
Turn on the breaker at the 12v panel and adjust fans as needed. This uses 12v
power and is only recommended when on shore power.

WATER SYSTEM
Fresh Water Tank/ Pump/ Hot Water Heater
The freshwater tanks hold 125 gallons and are located starboard aft and forward on
port side. Observe the water level by checking the monitor gauges at the electrical
panel. Wastewater from the sinks and showers drains overboard through various
thru hulls usually located under the sinks. To fill the tanks, remove the deck water
fill cap located starboard aft (tank #1) and forward port side (tank #2). Fill the tank
to avoid flushing debris into the tank. Do not fill water and diesel at the same time!
The water pressure pump is located behind the center settee cushion. Activate the
pump by turning on the breaker at the DC panel. If when in use, the pump
continues to run, you are either out of water or have an air lock which can be
corrected by opening a faucet. If you run out of water, shut off pump and turn off
hot water heater on AC panel. You can cause serious damage to the heating
element.
The hot water heater has a 5 gallon capacity. It is heated when the AC breaker is on
while connected to shore power or when the engine is running. Do not use the water
heater if the water level is low. The water heater is located under the settee center
cushion.
Shower
Before taking a shower, make sure the water pressure and shower sump pump
breakers are on. The sumps are not automatic so turn off after showering. Take
short “boat” showers by turning off the water between soaping and rinsing. Please
wipe down the shower stall and floor when finished to keep the shower tidy. Pick up
any accumulation of hair in the drains as it clogs the hoses. Ensure that the faucets
are tightly turned off after each shower to save water.

GALLEY
Propane
The boat is equipped with a pressurized propane system for cooking. The propane
tanks are located at the starboard helm. Open the tank valve. Then turn on the
propane solenoid power switch 12v and the propane breaker on electrical panel.
When lighting the first time, allow a few seconds for the gas to travel from the tank
to the stove. You need to hold in the control valve when lighting until the thermo-
coupler warms up.
To ensure safety, turn off the propane solenoid switch, the propane at the bottle.
Refrigerator
The refrigerator operates on 12 volts. Carefully monitor the use of the refrigerator
when the engine is not charging the 12-volt system as when you are at anchor. AYC
will supplement you with a block of ice. Keep the fridge off at night! Use a cooler,
when possible, for all your drinks to keep the refrigerator door closed as much as
possible.

ELECTRONICS
There is a Standard VHF radio located at the Nav Station. There is also a handheld
VHF radio located in the charger station and the Nav Station. Make sure the breaker
is on at the DC Panel (electronics). Always monitor Channel 16 while underway.
There is a Garmin MFD and Simrad Autopilot / wind Tri data depth sounder located
on the binnacle. To turn on and off the Chart plotter, Auto Pilot and Instruments the
DC breaker at the electronics panels is used. The sounder is reliable in waters less
than 200 feet and at slower speeds. If your reading is blinking, it might be a false
reading due to excessive depths or strong currents! Watch your depth carefully in
cruising unknown waters that might have rocks or obstacles.
There is a stereo located behind the second panel left of the Nav Station.
The Raymarine Radar is inoperable

ANCHORING
Your primary working anchor, a plow, is attached to 150 feet of chain and 100 feet of
line. Use the foot pedals or the remote attached. Be sure to always have your
engines running. Markings every 25 feet.

SAILS AND RIGGING
There is a 120%Jib on a roller furler. The furling line runs on the port side to the
cockpit. To unfurl the headsail:
1 Un-cleat the furling lines
2 Wrap the sheet around the appropriate winch
3 Pull the sheet aft while applying some tension to the furling line
4 cleat when it is fully out or when to point of appropriate reef
To furl the jib, apply slight tension on the jib sheet while pulling in the furling line
until there are 2-3 wraps of the sheet around sail. Jib sheets are led back to the
cockpit to two winches. Adjust fairleads forward in heavy air, aft in light wind.
The Mainsail is fully battened but does not have a stack pack to fold sail.
Jib sheets, reefing lines, halyards, and the traveler are all led back to the cockpit.
There is a boom vang adjustment port black line. There is no spinnaker or whisker
pole on board. Please use the topping lift located at the mast to raise the boom to its
usual position after sailing.
BARBEQUE
The Barbeque and mounting bracket are stored in the starboard cockpit locker
Attach the propane bottle and regulator; usually found in the cockpit table hinged
compartment. Carefully light the unit. This Barbeque cooks fairly hot and fast so
keep a good eye on your food. Please, wipe it down with a rag or paper towel before
storing. Note: Ensure that propane, outboard gas or any other flammables are not
near barbeque.

DINGHY AND OUTBOARD MOTOR
Your 10’ 6” dingy is equipped with a 2.5 air cooled Yamaha engine. If not on the
dinghy it is stored on the rail bracket which has a capacity of 1050 pounds.
After the dinghy is in the water and ready to go (PFDs etc.), open the vent on the
fuel tank and choke the engine once while starting. While there is an extra outboard
fuel tank on board aft. The outboard motor is a 4-cycle engine and runs on gasoline.
There is no need to mix the fuel.
Please take extreme care in beaching your dinghy. Make sure the engine gets tilted
up a safe distance from shore, so the prop does not hit the bottom or shear the pin.
Do not drag the boat on the beach. Please lift it up with your crew. Make sure it is
secured as the tide comes in fast in this area.
When returning to the boat, leave your shore shoes in the cockpit and slip on your
deck shoes or slippers to keep the boat neat and tidy.

OTHER NOTES
Safety should be paramount in your daily cruising. A man overboard drill (person?)
should be discussed and practiced with an unlucky PFD as the victim. (please rinse
and dry afterward before stowing). Remember that your life jackets are stowed in
the Starboard side cockpit locker. A few should always be readily available. Flares
and other safety equipment are located under and behind the nav station seat.
Always have a sharp lookout posted for logs, deadheads, or other flotsam and
jetsam. A log hitting your prop can ruin your vacation. As you are traveling, the
debris does seem to gather along current lines. It is sometimes best to go around
these areas and miss the “mine fields”.
Orcastrate is equipped with an automatic bilge pump that can be activated on the DC
panel. The switch should normally be left in the “Auto” position that can be switched
for a minute or so to “manual” to pump the bilge. If you continually hear the bilge
pump running, check your bilge! You may have a serious problem!
An auxiliary hand-operated bilge pump is located just to port of the helm and is
operated by pulling up on the handle then operating the pump. This is used in an
emergency situation.
Extra oil and coolant is located in the cockpit locker just forward of the helm.
Crabbing is fun but requires the correct license and season. Please be sure not to
crab off the stern as the crab line can easily get tangled in your prop as you swing
with wind or current. You certainly don’t want to be the person who has to dive over
and cut the line out of the propeller.
It is best to use the dinghy to set your crab pot/ring away from the boat. A partially
open can of seafood cat food works well as any other bait and is less messy. Please
clean up any seaweed or crab shells afterwards to keep the boat neat and tidy.
Table of contents
Other Anacortes Yacht Charters Boat manuals

Anacortes Yacht Charters
Anacortes Yacht Charters BLUE MOON User manual

Anacortes Yacht Charters
Anacortes Yacht Charters Meg Ann lll 1998 5788 Bayliner User manual

Anacortes Yacht Charters
Anacortes Yacht Charters Toot Suite User manual

Anacortes Yacht Charters
Anacortes Yacht Charters Surprise User manual

Anacortes Yacht Charters
Anacortes Yacht Charters Adventure User manual

Anacortes Yacht Charters
Anacortes Yacht Charters SCAPA Installation manual

Anacortes Yacht Charters
Anacortes Yacht Charters Adventure User manual

Anacortes Yacht Charters
Anacortes Yacht Charters AEROKNOT User manual