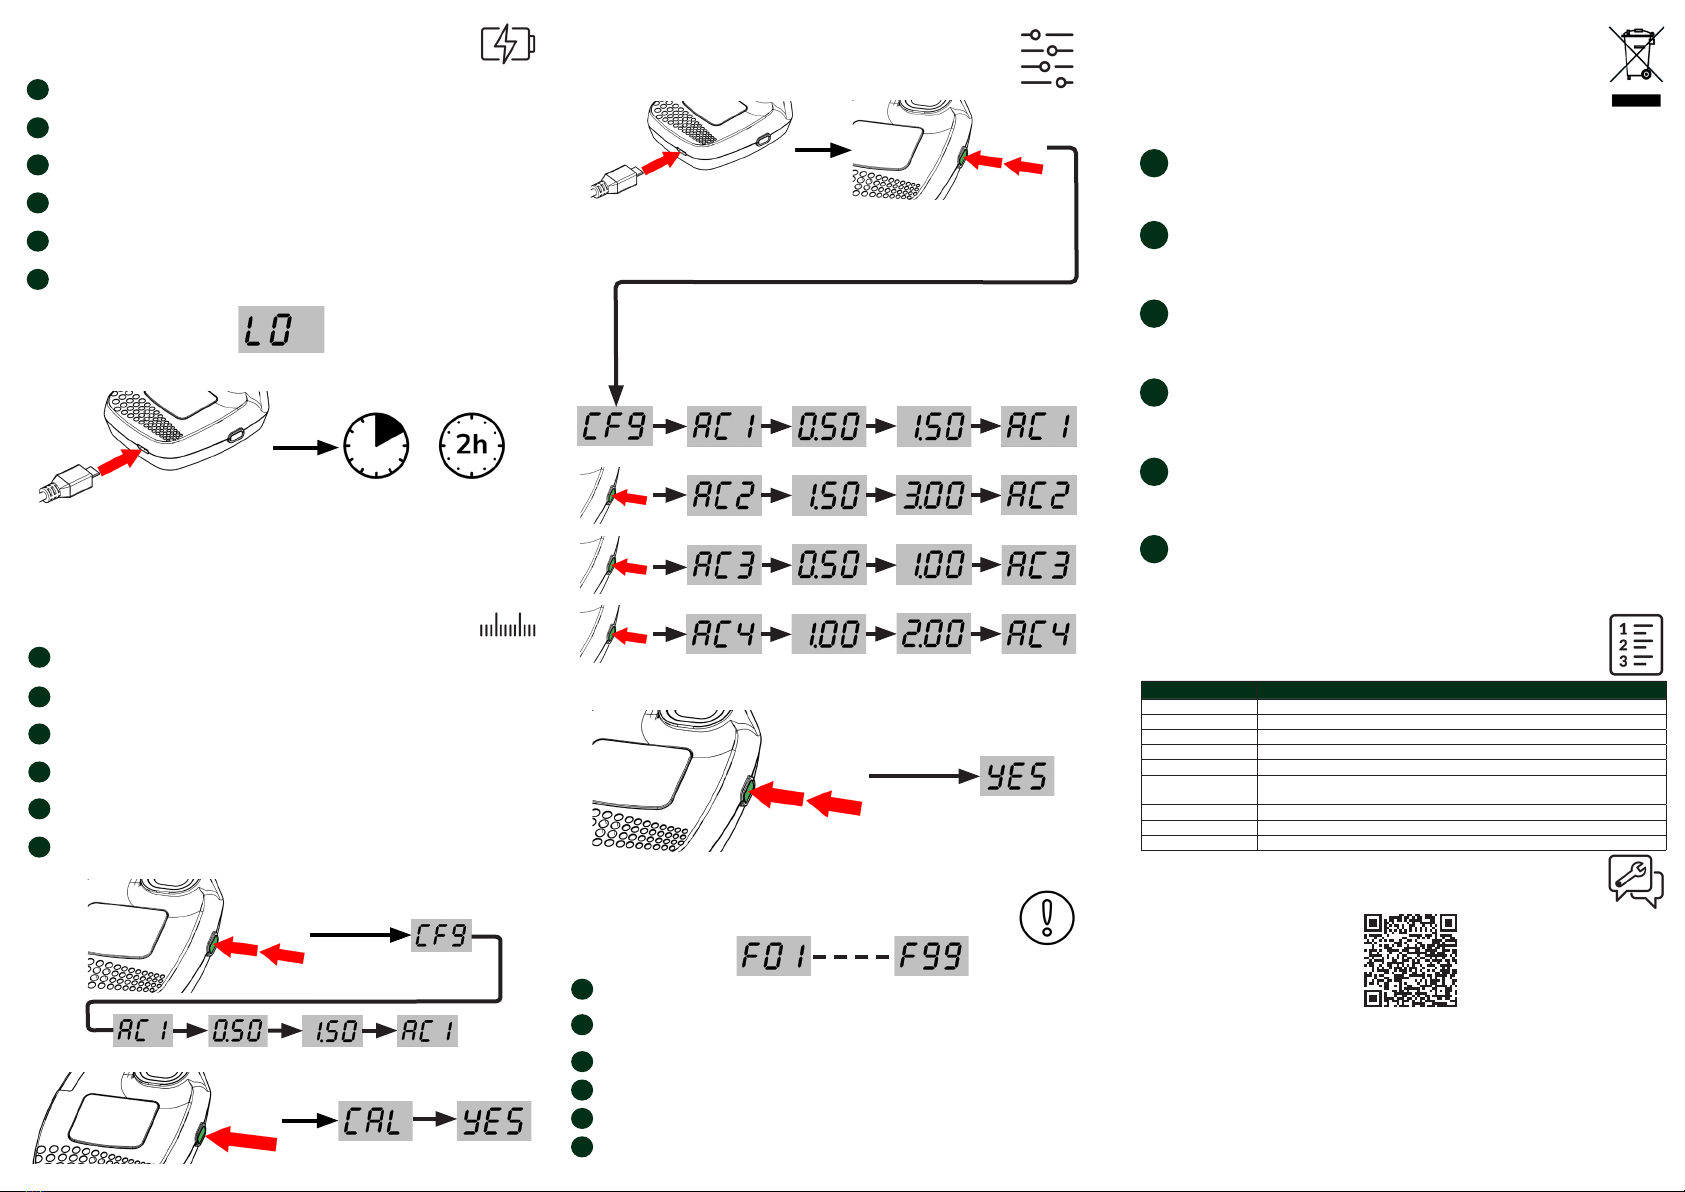
manuals.online logo
Brands
  1. Home
  2. •
  3. Brands
  4. •
  5. ANALOX
  6. •
  7. Gas Detector
  8. •
  9. ANALOX CO2BUDDY User manual

ANALOX CO2BUDDY User manual

CO2BUDDY
Quick Start Guide
Document ref: P0244-8000-04
EN DE FR ES IT NL
Scan the QR code to
register your CO2BUDDY
http://bit.ly/CO2BUDDY
1. Overview
Display
Anzeige

Monitor
Schermo
Beeldscherm
EN
DE
FR
ES
IT
NL
Sounder
Signalhorn
Sirène
Sonda
Sirena
Sounder
EN
DE
FR
ES
IT
NL
Button
Knopf
Bouton
Botó
Pulsante
Knop
EN
DE
FR
ES
IT
NL
Micro USB socket
Micro-USB-Buchse
Prise micro USB
Toma micro USB
Micro presa USB
Micro USB-aansluiting
EN
DE
FR
ES
IT
NL
EN
DE
FR
ES
IT
NL
Status/Alarm indicator
Status/Alarmanzeige
Indicateur de statut/alarme
Indicador de estado/alarma
Indicatore di stato/allarme
Status/alarm-indicator
(Do not obstruct)
(Nicht behindern)
(Ne pas obstruer)
(No obstruya)
(Non ostruire)
(Niet belemmeren)
EN
DE
FR
ES
IT
NL
Belt/pocket clip
Gürtel/Taschenclip
Clip de ceinture/poche
Cinturón/clip de bolsillo
Clip nastro/tascabile
Riem/Pocket clip
EN
DE
FR
ES
IT
NL
Serial number label
Seriennummernetikett
Étiquette de numéro de série
Etiqueta del número de serie
Etichetta numero di serie
Serienummer label
EN
DE
FR
ES
IT
NL
Lanyard connection
Schlüsselband-Befestigungspunkt



Koord bevestigingspunt
EN
DE
FR
ES
IT
NL
2. Turning On
To turn on for the rst time, charge for 2 hours, then perform a quick cal
Vor dem ersten Einschalten Gerät ca. 2h auaden und eine Kurzkalibrierung
durchführen (Siehe Punkt 6)
Pour allumer pour la première fois, chargez pendant 2 heures, puis effectuez un
cal rapide
Para encender por primera vez, cargue durante 2 horas y, a continuación, realice
una cal rápida
Per accendere per la prima volta, caricare per 2 ore, quindi eseguire un cal veloce
Als u de eerste keer wilt inschakelen, laadt u 2 uur op en voert u een snelle CAL
EN
DE
FR
ES
IT
NL
To turn on, press the button on the side of the unit
Zum Einschalten seitliche Taste drücken.
Pour allumer, appuyez sur le bouton sur le côté de l’unité
Para encenderlo, pulse el botón situado en el lateral de la unidad
Per accenderla, premere il pulsante sul lato dell’unità

EN
DE
FR
ES
IT
NL

will vibrate, if the test fails, see section 11
Gerät führt einen Selbsttest durch. Sofern dieser Test fehlschlägt ertönt ein
Alarmsignal, Gerät vibriert und die Anzeige blinkt.
Il effectuera un auto-test, les indicateurs clignoteront, le soudeur gazouillera et l’unité
vibrera, si le test échoue, voir la section 11
Se realizará una autoprueba, los indicadores parpadearán, la sonda chirrá y la unidad
vibrará, si la prueba falla, ver sección 11
Eseguirà un autotest, gli indicatori lampeggeranno, il suo sorvola e l’unità vibrerà, se il
test non riesce, vedi sezione 11
Het zal een zelftest uitvoeren, de indicatoren zullen knipperen, de sirene zal piepen en
het apparaat zal trillen, als de test mislukt, zie rubriek 11
EN
DE
FR
ES
IT
NL
4. Status
OK
5s - OK
Solid - Charging
Fault 2s
TWA 2s
Alarm 1
Alarm 2 0.5s
1s
1s
3. Turning Off
5s
7. Alarm Conguration
8. Fault Codes
Turn off and on, if problem persists, see section 11
Bei einer Fehlermeldung Gerät aus- und einschalten. Sofern der Fehler weiterhin
besteht siehe Abschnitt 11
Éteignez et allumez, si le problème persiste, voir l’article 11
Apague y encienda, si el problema persiste, consulte la sección 11
Disattivare e attivare, se il problema persiste, vedere la sezione 11
In-en uitschakelen, als het probleem aanhoudt, zie rubriek 11
Conguration Alarm 1 Alarm 2 Conguration
EN
DE
FR
ES
IT
NL
11. Service and Support
9. Disposal
WEEE statement
According to WEEE regulation this electronic
product cannot be placed in household waste bins.
Please check local regulations for information on
the disposal of electronic products in your area.


WEEE in the UK through the Environment Agency (2013
Registration number WEE/KE0043SY).
EN
Nach der WEEE-Verordnung kann dieses elekt-
ronische Produkt nicht in Haushaltsabfallbehälter
gebracht werden. Bitte informieren Sie sich über
die Entsorgung von elektronischen Produkten in
Ihrer Nähe.
DE


Umweltbehörde (2013 Registrierungsnummer WEE/
KE0043SY) für die Entsorgung von WEEE in Großbritan-
nien registriert.
Selon la réglementation WEEE, ce produit élec-
tronique ne peut pas être placé dans des poubelles

locales pour obtenir des informations sur l’élimina-
tion des produits électroniques dans votre région.
FR


l’élimination des WEEE au Royaume-Uni par l’intermédi-
aire de l’Agence pour l’environnement (2013 numéro
d’enregistrement WEE/KE0043SY).
Según la normativa WEEE, este producto elec-
trónico no se puede colocar en contenedores de
residuos domésticos. Por favor, consulte las regula-
ciones locales para obtener información sobre la
eliminación de productos electrónicos en su área.
ES


la eliminación de WEEE en el Reino Unido a través de la
Agencia de medio ambiente (2013 número de registro
WEE/KE0043SY).
Secondo la normativa WEEE, questo prodotto
elettronico non può essere collocato nei cestini dei

locali per informazioni sullo smaltimento dei
prodotti elettronici nella propria zona.
IT


lo smaltimento dei WEEE nel Regno Unito attraverso
l’Agenzia per l’ambiente (2013 numero di registrazione
WEE/KE0043SY).
Volgens WEEE-regeling kan dit elektronische

geplaatst. Raadpleeg de lokale regelgeving voor

producten in uw omgeving.
NL



het Milieuagentschap (2013 registratienummer WEE/
KE0043SY).

10. Specications
Specication Value
Display LCD
Range 
Power Minimum of 48 hours of operation with low battery warning
Charging 2 hours at 5V, 300mA
 
Environmental 
Temperature - 0 to 40ºC, 32 to 104ºF
Mounting Pocket, belt or lanyard
Approvals CE, FCC
Alarm indicators Audible, Red Strobe, Vibration
Scan the QR code to

Techncial & Service
Support web page
5. Charging
If the CO2BUDDY battery is low on charge, LO will display on the screen, charge the
device immediately
Bei niedrigem Akkustand wird in der Anzeige des CO2Buddys LO auf dem Bildschirm


immédiatement l’appareil

dispositivo inmediatamente
Se la batteria CO2BUDDY è scarica, LO viene visualizzato sullo schermo, caricare
immediatamente il dispositivo


EN
DE
FR
ES
IT
NL
6. Quick Cal
5s
EN
DE
FR
ES
IT
NL
Calibration should be performed at least quarterly, in a fresh air environment. Allow
15 minutes in the environment prior to calibration

vorher ca. 15 min an der frischen Luft liegen lassen.
Le calibrage doit être effectué au moins tous les trimestres, dans un environnement
d’air frais. Prévoyez 15 minutes dans l’environnement avant l’étalonnage
La calibración debe realizarse al menos trimestralmente, en un ambiente de aire
fresco. Espere 15 minutos en el entorno antes de la calibración
La calibrazione deve essere eseguita almeno trimestralmente, in un ambiente ad aria
aperta. Lasciare 15 minuti nell’ambiente prima della calibrazione

omgeving. Laat 15 minuten in de omgeving voorafgaand aan de kalibratie
Copyright © 2020 Analox Ltd. All Rights Reserved.
Analox Sensor Technology Ltd
UK & RoW contact details:
15 Ellerbeck Court, Stokesley Business Park,
North Yorkshire, TS9 5PT, UK
T: +44 (0)1642 711400 F: +44 (0)1642 713900
W: www.analoxsensortechnology.com
E: [email protected]
US contact details:
15121 Graham Street #B106,
Huntington Beach, California, 92649
T: (714) 891 4478 F: (714) 891 4479
W: www.analoxsensortechnology.com
E: [email protected]

Other ANALOX Gas Detector manuals

ANALOX CO2 BUDDY User manual

ANALOX

ANALOX CO2 BUDDY User manual

ANALOX ADM Aspida User manual

ANALOX

ANALOX ADM Aspida User manual

Popular Gas Detector manuals by other brands

Honeywell 201T user manual

Honeywell

Honeywell 201T user manual

DOD CL96 Technical & service manual

DOD

DOD CL96 Technical & service manual

Satel DG-1 manual

Satel

Satel DG-1 manual

Riken Keiki GX-2009 user guide

Riken Keiki

Riken Keiki GX-2009 user guide

Hansen Technologies HGD-EC-NH3-100 Specifications, Applications, Service Instructions & Parts

Hansen Technologies

Hansen Technologies HGD-EC-NH3-100 Specifications, Applications, Service Instructions & Parts

RKI Instruments 65-2422RK-05 Operator's manual

RKI Instruments

RKI Instruments 65-2422RK-05 Operator's manual

EDS NEPTUNE EGLS installation manual

EDS

EDS NEPTUNE EGLS installation manual

STATUS SCIENTIFIC CONTROLS FGD2 manual

STATUS SCIENTIFIC CONTROLS

STATUS SCIENTIFIC CONTROLS FGD2 manual

Consilium ST350 Quick installation guide

Consilium

Consilium ST350 Quick installation guide

Emerson Dixell XLH210 Installing and operating instructions

Emerson

Emerson Dixell XLH210 Installing and operating instructions

Consilium Salwico GD Technical manual

Consilium

Consilium Salwico GD Technical manual

Teledyne Gasurveyor 700 user manual

Teledyne

Teledyne Gasurveyor 700 user manual

GASTRON GTC-500 Series instruction manual

GASTRON

GASTRON GTC-500 Series instruction manual

LI-COR LI-7815 instruction manual

LI-COR

LI-COR LI-7815 instruction manual

MSA GTYQ-DF-8500 PR user manual

MSA

MSA GTYQ-DF-8500 PR user manual

BEINAT NASE25 manual

BEINAT

BEINAT NASE25 manual

Wise GTX-1010 Series instruction manual

Wise

Wise GTX-1010 Series instruction manual

AP RNO2 manual

AP

AP RNO2 manual

manuals.online logo
manuals.online logoBrands
  • About & Mission
  • Contact us
  • Privacy Policy
  • Terms and Conditions

Copyright 2025 Manuals.Online. All Rights Reserved.