isweek AS8900 User manual

Model:AS8900
MULTI-GAS MONITOR
Version number:AS8900-0-1
O % V O L
2H S P P M
2
L E L % V O L C O P P M

1.
NOTICE BEFORE USE
C
ONTENTS
2.
OPERATION MANUAL
----------------------------- (05)
-----------------------------(05)
---------------------------- (06)
----------------------------------(07)
-----------------------------------(07)
-----------------------------------(08)
Configuration ------------------------------ (08)
------------------------- (09)
-------------------------(10)
--------------------------(11)
------------------------- (12)
---------------------(13)
-------------------- (14)
-----------------------------(16)
-----------(16)
Instrument operation
Gas monitoring mode
Zero calibration mode
Peak value mode
Twa value mode
Stel value mode
mode
Low alarm setting mode
High alarm setting mode
Twa alarm setting mode
Stel alarm setting mode
Security code setting mode
Instrument calibration mode
LEL setting mode-----
Accressory AS8930 sampling pump
-------------------------- (01)
---------------------------------------- (03)
--------------------------- (03)
------------------------(04)
---------------------------------------- (04)
Cautions and warnings
Unit packing
Product specifications
Outlook of the instrument
Introduction
---------------------------------------(17)
------------------------------------------- (18)
-----------------------(18)
-------------------------------------------(18)
Mantainance
Warranty
Manufacturing statements
Encloures
3.
OTHERS

-01-
1.1 CAUTIONS AND WARNINGS
!
!
!
!
!
!
!
!
The user need to read and follow the procedures and
conditions as below to prevent ant failure might be
occurred during operating this instrument.
Insufficent oxygen atmospheres may cause combustile
gas readings be lower then actual corrected readings.
Enriched oxygen atmospheres may cause combustile
gas readings be higher then the actual corrected
readings.
The intruments need to be re-calibrated after the
instrument has been used in an area of silicon vapors
were present.
Please always be kept clean of the sensor opening and
the water barriers of the intrument.
The oxygen readings will be caused temporary
fluctuations while the atmospheric preesure is suddenly
changed.
Please do not charge the battery or serving the unit in
hazardous or enriched atmospheres condition.
The intrument only suggested to be used by operated
and serviced by qualified personnel whom has fully read
and understood the instruction manual completely.
Caution: high offscale readings indicate the
enviroment might be reached to explosive concentration
that is also a danger signal to represent the area is
hazardous.
一、NOTICE BEFORE USE
Other Items
-02-
!
!
!
The instrument is recommended to be calibrated the
sensitivity with a 25%, 50% of full concentration pentane
or methane. Please referring to the zero /calibration
section of this instruction manual.
This insrument is certified to be normal use within the
temperature range of -20 deg. C to 40 deg. C only.
The model of AS8900 must be used only with model
AS8930 external sampling pump. (Excluded)

-03-
AS8900 4 in 1 muilt gases monitor
Operation manual
Carrying brouch
3.7V rechargable lithium battery
Charging adaptor
1PCS
1PCS
1PCS
1PCS
1PCS
1.2 UNIT PACKING
The gift box should be contain the following items
Description Quantity
1.3 PRODUCT SPECIFICATIONS
Sensor specification:
Gas Range Resolution T90
Oxygen (O2)
Combustile (LEL)
Carbon Monoxide (CO)
Hyrogen Sulfide (H2S)
0~30%
0~100%LEL
0~999ppm
0~500ppm
0.1%
0.1%
1ppm
1ppm
10sec
35sec
50sec
30sec
Size: 120.20mm x 64.50mm x 38.30mm
Battery working runtime: 18 hours. And 12 hours work with
AS8930 sampling pump.(work in room temperature and
no alarm conditions.)
Weight: 200g
Temperature and humidity range:
Operating Temperature: -10~ 50℃(except LEL is 0 ~40℃)
Operating Humidity : 15~95 % RH, typical
Battery specification:
Storage Temperature : 0~40℃
Rechargeable lithium-ion battery, 3.7 Volts
Operation
Explanations
-04-
1.4 OUTLOOK OF THE INSTRUEMENT
1.5 INTRODUCTIONS
The AS8900 multi-gas monitor is a portable and handheld
instrument that is capable to use continuously and
simultaneously monitoring 4 gases; Oxygen, Combustile gas,
Carbon Monoxide and Hydrogen Sulfide. Every gas readings
all shows in one LCD display. The unit also provide user to
configure high and low alarm as well as Twa and Stel alarms.
The unit will be audio and visual alarm once the alarm
condition is exceeded.
O % V O L
2H S P P M
2
L E L % V O L C O P P M

-05-
二、OPERATION MANUAL
2.1 INSTRUMENTS OPERATION
1. To turn on the instrument AS8900, please depress and
hold the button for over 1 second, the unit will be
turn on with a beep sound and vibration, then the lcd
will light up all icon and segments. Once the software
countdown for 18 seconds then the unit will enter into
the Gas Monitoring mode.
2. for to turn off the unit, please depress and hold the
button for over 3 seconds, then the unit will be power
off after 3 beep sounds.
3. for to light up or turn off the backlight of the LCD
display, please depress the button.
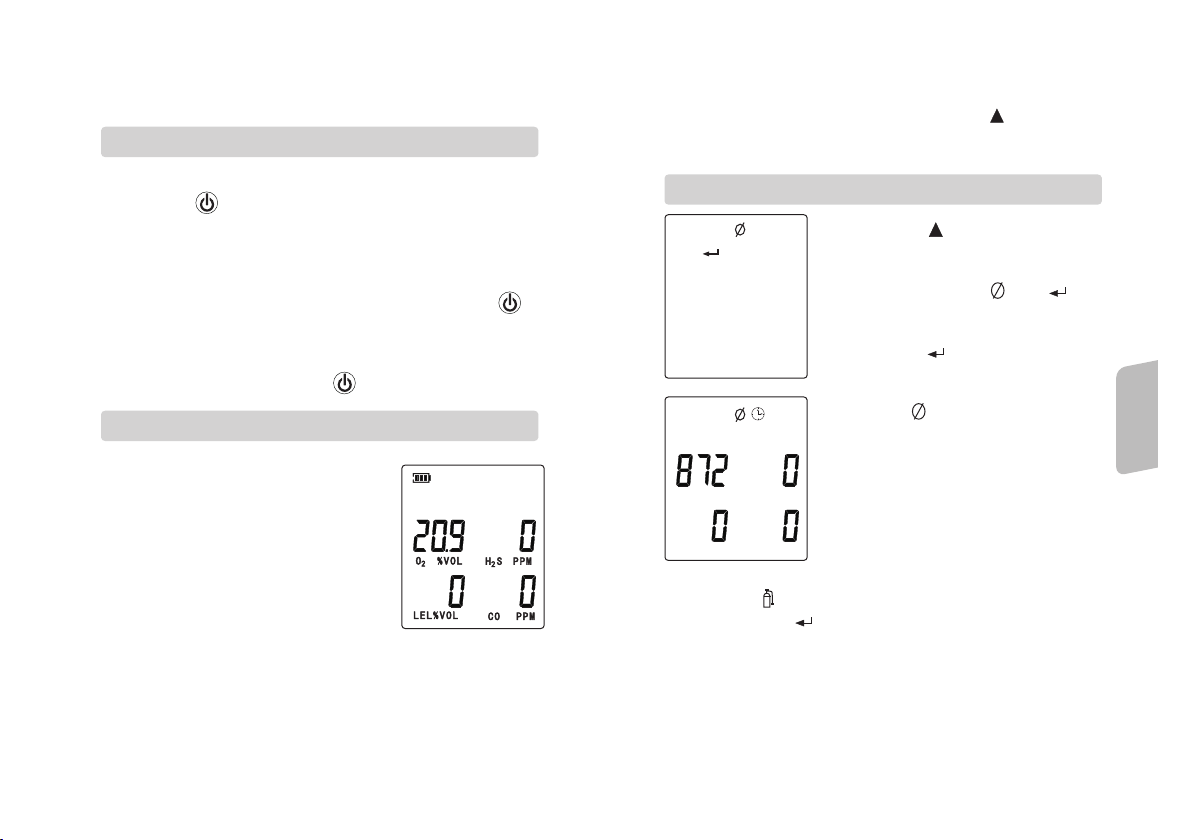
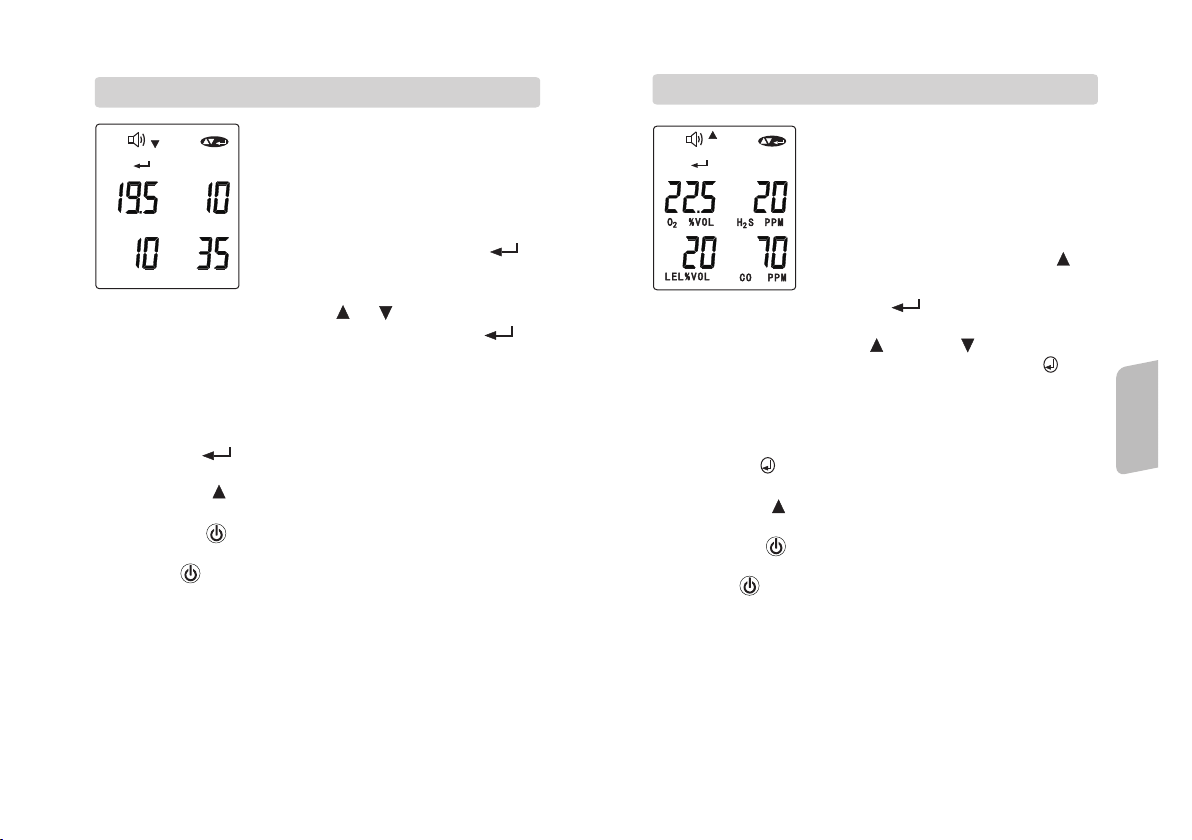
2.2 Gas Monitoring mode
1. once the unit is power on, the
display will show all 4 gas symbol
with readings.
2. then the unit is already started to
continuously monitored and shows
the readings on the LCD display.
Once the gas level is increase, the
corresponding read will be showed
the existing gas concentration.
3. Also the battery life indicator is also display in the left
upper corner, onr the battery lift is decreased, the shaded
showed of the battery icon is alco decreased.
4. Once the gas concentration is exceed the high or low
alarm limit (as well as TWA or STEL) the unit will be
triggered the audio and visual alarm with vibration.
Operation
Explanations
-06-
5. Once the gas concentration is drop below the alarm level,
the unit will go back to normal gas monitoring mode.
6. For to access this mode, please depress button. Then
the unit will enter to Zero/Calibration mode.
2.3 Zero/ calibration mode
1. Depress the button once from the
gas monitoring mode, the unit will be
put in the Zero/ Calibration mode.
2. In this mode the icon and will
be displayed along with the 4 gases
readings.
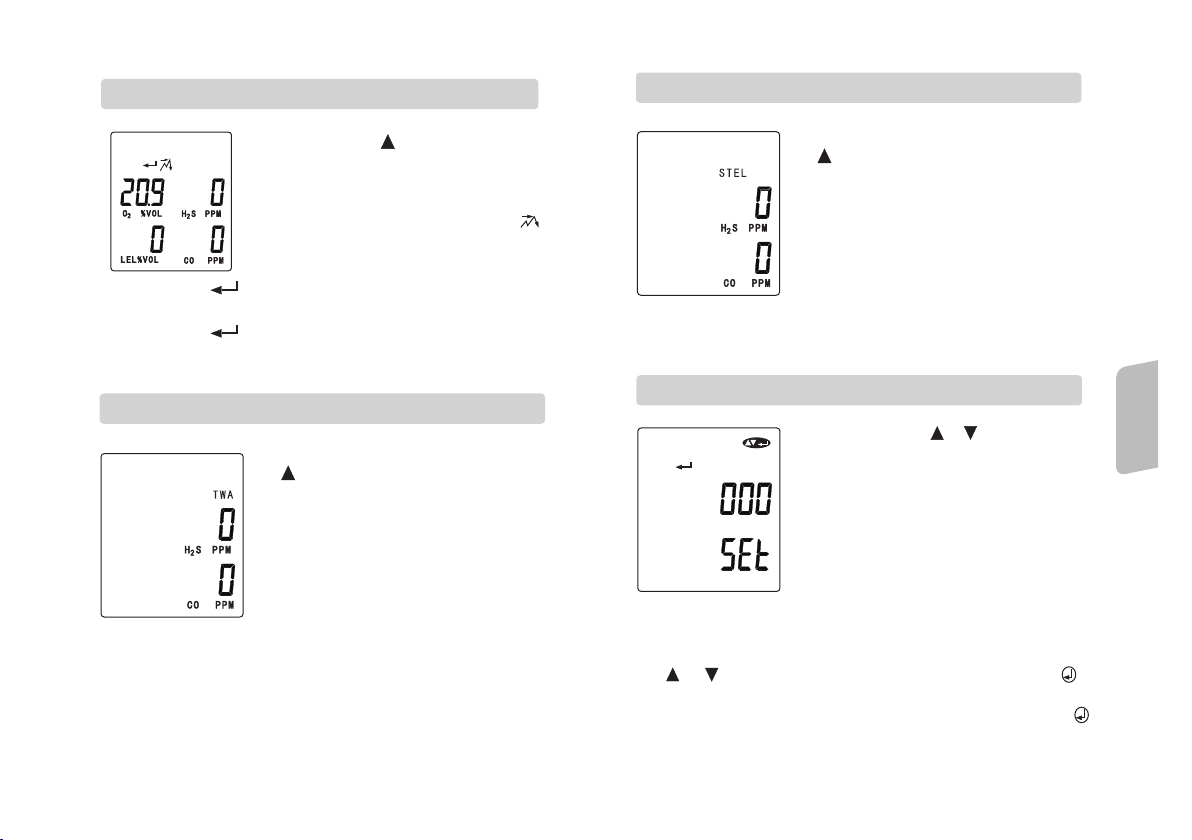
3. Depress the button once more
time,the unit will escape to another
Peak Value mode.
4. If depress button the unit will start
the Zero/ Calibration process. Once
the CO, H2S and LEL sensors have
finished the zeroing process, the
Oxygen sensor will be start to SPAN.
5. During this process the “CLOCK”
icon and full Oxygen span value will
be displayed.
6. Once the process is completed, the display will shows the
SPAN and icon
7. To depress the button, the unit will begin to calibrate
the remaining sensors one by one with same process.
8. the calibration gas are the fixed concentration value, to
calibrate the instrument by using a blended cylinder
containing 25ppm H2S, 100ppm CO, 25% or 50% LEL
Methane or pentane, and 19% Oxygen at 0.5 LPM flow
speed.

-07-
1. To depress the button from Zero
/Calibration mode, the unit will entered
to Peak value setting mode.
2. In this mode, the display will shows all
3 gases peak gas readings and the
lowest readings of oxygen sensor, with
PEAK and ENTER icon are displayed.
2.4 PEAK VALUE SETTING MODE
3. To depress button will reset all peak value of the
current readings of 4 gases.
4. To depress button, then the unit will enter to TWA
value mode.
1. In Gas Monitoring mode, depress the
Button for third times, the unit will
enter to TWA (Time Weight Average)
value mode.
2. In this mode the display will show
TWA icon and only will 2 hazardous
and combustile gas sensor readings
are shown.
3. TWA value are reset while every time
the unit is power off, and the time base
is set for 8 hours.
2.5 TWA VALUE MODE
Operation
Explanations
-08-
1. In Gas Monitoring mode, depress the
Button for fourth times, the unit will
enter to STEL (Short Term Exposure
Limit) value mode.
2. In this mode the display will show
STEL icon and only will 2 hazardous
and combustile gas sensor readings
are shown.
3. TWA value are reset while every time
the unit is power off, and the time base
is set for 15 minutes.
2.6. STEL VALUE MODE
1. To depress the or button
simultaneously during the software
countdown time for 18 seconds will
put this unit into the Configuration
Mode.
2. In this mode, the unit is allow the user
to change the high, low TWA and STEL
alarm level as well as the security code
( if desired)
2.7 CONFIGURATION MODE
3. once the Configuration Mode is Entered, the security code
screen is displayed.
4. the preset code is 123, the first code will flash, then depress
or button for change the first code, then depress
button for second and third code number setting.
5. Once the security code is set and confirmed, depress the
button to escape the unit to other alarm setting mode.
,
\

-09- -10-
1. the high alarm setting mode is the
second configuration screen of the unit.
2. in the mode the display will show
(speaker) (down) (enter) and
(up/down/enter) icon along with the 4
gases high alarm value.
3. if no change is required, press
button to move to nest setting mode.
1. Low alarm setting mode is the first
configuration screen, the display will
show the (speaker) (down) (enter) and
(up/down/enter) icons along with the
four low alarm set readings of the 4
gases.
2. if the change is desired, press
button, the first gas low alarm value
will be flashing.
2.8. LOW ALARM SETTING MODE
3. To adjust the value by depress or button.
4. Once the setting is confirmed and completed, press to
next gas low alarm setting.
5. Continue this setting procedure until 4 gas low alarm value
are set, the display will show (speaker) (down) (enter) and
(up/down/enter) icon along with the 4 new low set alarm
value.
6. Depress the button for re-enter this setting mode again
for further adjusted setting if required.
7. Pressing the button to move the setting to high alarm
setting mode.
8. Depress the button, the unit will back to low alarm
setting mode with no changes will be saved.
9. Depress button for second time, the unit will be back to
the original gas monitoring mode.
2.9. HIGH ALARM SETTING MODE
4. If the changed is needed, press button to have the first
high alarm value will be flashing.
5. To adjust the value by press button or button.
6. Once the setting is confirmed and completed, press
button to next high alarm setting.
7. Continue this setting procedure until 4 gases high alarm value
are set. The display will show (speaker) (down) (enter) and
(up/down/enter) icon along with the 4 new set alarm value.
8. Depress the button for re-enter this setting mode again
for further adjusted setting if required.
9. Dressing the button to move the setting to next TWA
value setting mode.
10. Depressing button , the unit will back to high alarm
setting mode with no changes will be saved.
11. Depress button for second time, the unit will be back to
the original gas monitoring mode.
O %VOL
2H S PPM
2
LEL%VOL C O P P M
,
\,
\
Operation
Explanations

-11-
1. If no change is required, press
button to next STEL alarm setting mode.
2. if the change is desired, press
button, the first gas low alarm value will
be flashing.
3. To adjust the value by depress or
button.
2.10 TWA ALARM VALUE SETTING MODE
4. Once the setting is confirmed and completed, press to
next gas TWA alarm value setting.
5. Continue this setting procedure until 2 gas TWA alarm are set,
the display will show(speaker) (twa) (enter) and(up/down/enter)
icon along with the 2 new TWA alarm value.
6. Pressing the button will re-enter the mode for any further
adjusted value is required.
7. pressing button will move to next STEL alarm value setting
mode.
8. Pressing button will back to original TWA alarm setting
mode, with no changed will be saved.
9. Pressing the button a second time, the unit will be back
to the original gas monitoring mode.
,
\
Operation
Explanations
-12-
1.In this mode the display will show
(speaker)(stel) (enter) and
(up/down/enter) icon with 2 stel alarm
value.
2.If the no changed is required, press
button to move the unit to next
setting screen.
3.If change is needed, press button ,
the first stel alarm value will be flashing.
2.11 STEL ALARM SETTING MODE
4. To adjust the value by or button.
5. Once the setting is finished, press button to next gas
stel alarm value setting.
6. Continue this setting until 2 gas stel alarm value are set, the
display will show (speaker) (stel) (enter) and
(up/down/enter) icons along with 2 new stel alarm value.
7. Pressing the button will re-enter this mode for further
adjusted value is required.
8. Pressing button will move the next setting mode.
9. Pressing button will be back to the original stel alarm
setting mode, with no change will be saved.
10.Pressing the button a second time, the unit will be back
to the original gas monitoring mode.

-13-
1. The next setting is the security code
setting, The display will show (enter)
(up/down/enter) and the manufacturing
preset security 123.
2. If no change is required, press
button to move into other LEL setting
mode.
3. If security code need to be changed,
press button, then the preset code
will be flashing.
2.12 SECURITY CODE SETTING CODE
4. To adjust the first digit, press or button, once
the value is confirmed, press button to set the second
digit.
5. Continue this procedure until three digits are set the display
will show (enter) (up/down/enter) icons along with the new
security code.
6. If further change of security code is required, press
Re-enter this setting mode again.
7. If no change is needed, press button move to next LEL
setting mode.
8. Pressing the button will bring you back to the security
mode again, with no changes on security code is saved.
9. Pressing button second time , the display will be back to
normal gas monitoring mode.
,
\
Operation
Explanations
-14-
1. This is the final setting mode for
zero/calibration mode.
2. The user wants to enter this mode
with correct security code.
3. The unit could be easy to calibrate
by using a cylinder of a standard
gas.
4. To enter in this mode, to press both
button of and in normal gas
monitoring mode, and key in the
correct security code to enter in this
calibration mode.
5. To press button 4 times, then will
enter to this instrument calibration
mode. In this mode the display
shows and icons, press
button again for start the calibration
with the icon cylinder is flashing.
6. Please make sure the unit is
connected with the gas cylinder
firmly before the cylinder icon
flashing for 6 seconds.
7. Then to press the button, the
display will shows cylinder and
clock with the calibrating value.
8. If the calibration is succeeded, the
dispay will shows P icon represent
pass.
2.10 INSTRUMENT CALIBRATION MODE

-15-
9. If it shows F , it means the
calibration is failed, need to
recalibrate again.
10.If no standard gas is used, please
do not enter to this instrument
calibration mode, for the pre-set
value will be easy to be deleted.
Need To Know
Before Use
-16-
* The AS8930 external sampling pump is available to work
with all AS8900 series gas monitor but no exclude in any
unit pack.
* This pump mount into the AS8900 unit by 2 fasten screws.
Please review to the assembly drawing attached.
2.14 ACCESSORY AS8930 SAMPLING PUMP
* LEL is the final configuration setting mode, after press
button, the LEL and the value readings will be flashed.
* Pressing the or button to set new % between 25% and
50%.
* Once the setting is finished, the new setting value will show
on the display, then press button to confirm.
* Pressing the button the unit will back to the normal gas
monitoring mode.
* If press the button, it will back to first setting mode again.
Remarks: LEL is the low explosion level of the combustible
gas in normal air.
2.13 LEL SETTING

-17-
三、OTHERS
The following guideline should be followed to achieve
good maintenance for AS8900 unit.
CLEANING:
* If necessary, wipe the outside surface of the unit, please use
the soft, clean cloth.
* Never use any solvent or cleaning solutions.
* Make sure the rubber buttons are free od dirts.
* to clean the sensor opening, please use the clean, soft cloth
or soft brush.
CHARGING THE BATTERY:
* The lithium-ion battery suggested to be fully charged before
using the AS8900.
* To charge the battery, plug the connecting lead wire of the
battery charger into the charging port located at the bottom
of the unit. This port is protect by a rubber flap, so need to
release the flap before charging.
* The battery should to fully charged in 6 hours.
* Once fully charged, the unit will be good enough to work for
18 hours operation, and work about 12 hours with AS8930
external sampling pump.
* The shaded area of battery indicator shows full once the
battery is fully charged.
* If all shaded area only have one bar is left, the battery need
to be charged at once.
* When the battery is low, the unit might emit a periodic alarm
sound to alert you to charge the unit.
3.1 MAINTENANCE
Need To Know
Before Use
-18-
* AS8900 Multi-gas Monitor is warranted to be free from
defects in material and workmanships for a period of one
year after purchase.
* This warranty not includes the sensor and battery pack
after 6 month purchase period.
Multi-Gas monitor.
* The unit has been designed, manufacturing, tested and
proven under professional quality team.
* The unit should be reliable to use and operate under the
reasonable care and maintenance described in this
instruction manual.
* Thank you for buying and using Smart Sensor AS8900
international environment regulation to settle.
* Smart Sensor has the right to modify or change the design
of the unit, operation manual or product specification prior
without any further notice.
* The used or nonfunctional battery, please follow the
3. 2 WARRANTY
3.3 MANUFACTURING STATEMENTS
3.4. ENCLOSURE

-19-
The effect of oxygen-deficient and oxygen-enriched atmospheres
The concentration
of oxygen(%) Symptoms (atmospheric pressure)
Deadly, 6 minutes(Absolutely airtight environment,
such as hyperbaric oxygen chamber
Deadly, can be cured after 45 minutes treatment.
(Absolutely airtight environment, such as hyperbaric
oxygen chamber)
8 minutes, blood pressure, weak heartbeat,
mouth breathing, quickly stopped breathing
Rich oxygen
Normal
Minimum
Reduce efficiency, and lead to problems of head,
lung and circulation system
Shortness of breath, loss of judgment, purple lips
governance loss, syncope, unconscious, pale,
nausea and vomiting
40 seconds, convulsions, respiratory arrest, death
Headache, nausea within 20 minutes ,death within
1 hour
Harm of carbon monoxide
Content of carbon
monoxide in Air Suction time and showed symptoms of poisoning
Maximum
2~3 hours , a slight headache, dizziness, nausea
2hours, forehead pain, life risk after 3hours
Headache, nausea within 45minutes,death within
2~3hours
The above parameters are for reference only
-20-
The above parameters are for reference only
Commonly used flammable gas explosion limit Table
Name Chemical
formula
The explosion limit in air (V%)
Upper limit LEL Lower limit LEL
Methane
Ethane
Propane
Butane
Gasoline(Liquid)
Kerosene(Liquid)
City gas
liquefied
petroleum gas
Turpentine(Liquid)
Olfactory sensation
The concentration of Hydrogen and symptoms of poisoning
Range
Unit: ppm Unit: mg/m3
mmediately die
Death within 2~15 minutes
Seriously poisoned within 1minute,death
within 0.5~4 hours
Seriously poisoned within 0.5~1hour,death
within 1~4 hours
Poisoning in 6~8 minutes,death within 4~8 hours
Can afford 0.5~1 hour, but sequela
Olfactory nerve paralysis,obvious poisoning
symptoms
Slight symptoms of poisoning within 1~2 hours
Symptoms of poisoning
Other Items
Table of contents
Other isweek Gas Detector manuals