Ananda AND 5167 User manual

USERS GUIDE
AND 5167

- 1 -
Contents
1. User Guide....................................................................... 1
2. Appearance and size ..........................................................2
3. Function Summary............................................................. 3
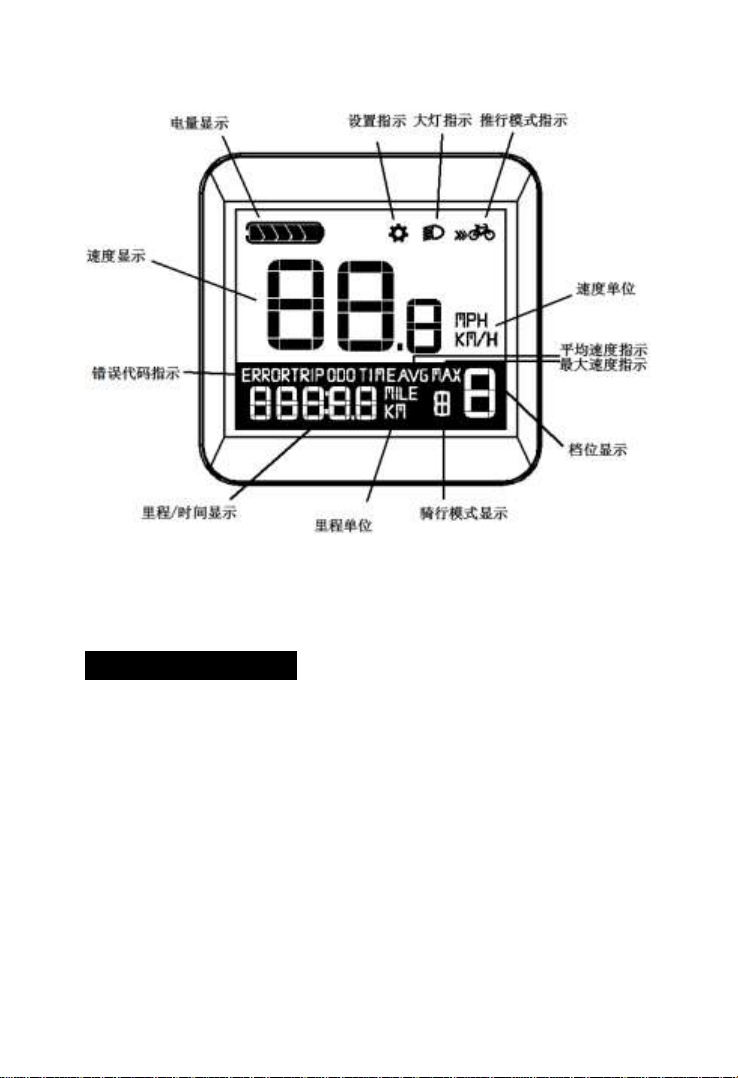
4. Normal Display Area...........................................................4
5. Notes for users....................................................................4
6. Installation Instruction .......................................................4
7. Normal Operation ............................................................... 5
7.1 On/Off................................................................................. 5
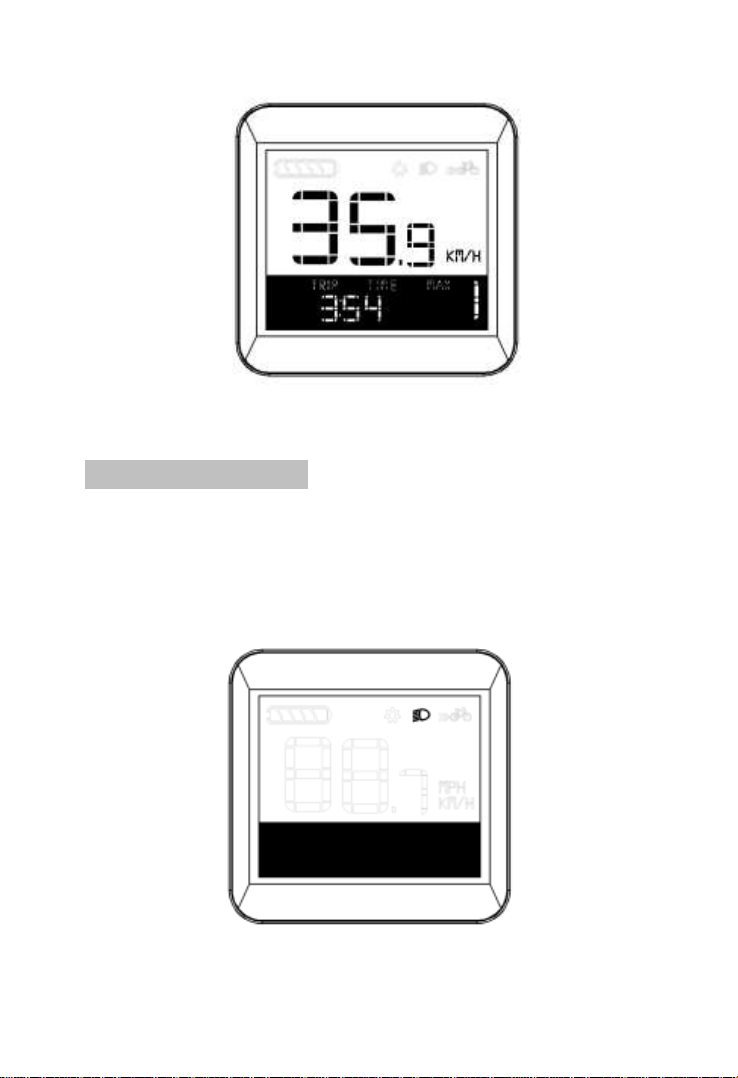
7.2 Speed Display(Real time speed)………………….......5
Mileage display(single time Cumulative mileage )…….….5
7.3 Turn on light....................................................................6
7.4 6km/h walk assistance...................................................7
7.5 PAS level adjustment ..................................7
7.6 Battery indicator.............................................................8
7.7 Riding mode display .....................................................8
7.8 Display light brightness auto adjustment …………... 9
7.9 Error code ………………………………………………9
8. General setting ....................................................................10
8.1 Backlight brightness setting ..........................................11
8.2 Wheel diameter setting ..................................................11
8.3 Speed limit setting ..........................................................12
8.4 Unit setting..................................................................... 13
8.5 Gear range setting..........................................................13
8.6 Gear initial value setting...............................................14
8.7 photosensitive value setting ..........................................15
9. Lead connection diagram....................................................15
10. Display printing code ..........................................................16
11. FAQ.......................................................................................16
12. After sale and Warranty scope..........................................17
13. Version change.....................................................................17

- 1 -
Preface
Dear users,
To ensure better performance of your e-bike, please read
through the And 5167 product introduction carefully before
using it. We will use the brief words to inform you of all the
details(including hardware installation, setting and normal
use of the display)when using our display. Meanwhile, the
introduction will also help you solve possible confusion and
barriers.

- 2 -
2. Appearance and Size
AND 5167 adopts combined method of metal bottom shell
and glass cover plate, Temperature of shell material allows
from -20 C to 60 for normal using to ensure good mechanical
performance.
Dimensional drawing (Unit:mm)

- 3 -
AND7193 button cable is connected to the bottom of
display.In the following statements , button is replaced by
“switch”+button is replaced by word “plus”,— button is
replaced by word“minus”, button is replaced by word
“headlight”,button is replaced by word “Push”
”.
3. Function Summary

- 4 -
AND 5167 shows the contents:
◆Battery indicator
◆Speed display(real time speed display)
◆Mileage display(Including single mileage display and
ODO)
◆Single time riding time display
◆PAS level
◆Headlight turn on and off
◆6km/h Walk assistant function
◆Error code display
◆Riding mode display
◆Multiple setting parameters:wheel diameter,speed
limit ,backlight,gear range,initial value of gear,unit,sensitive
value.
◆Automatic control brightness of backlight
4. Normal display area

- 5 -
AND 5167 normal display area
5. Notes For Users
Be careful during using display,do not plug in and out when
electrified.To avoid bumps as much as possible . Display
need to be repaired as soon as possible when it can not
work.

- 6 -
6. Installation instruction
This product is LCD liquid crystal display ,it need to be
installed on handlebar of bike .After fixed, the connector of
the display will be installed with the connector of the
controller.
7. Normal operation
7.1 On/Off
Hold and press “Switch”for 3 seconds,display starts to work
and provide controller power supply .In the boot state,holding
and pressing“Switch”button can shutdown E-bike power
supply. In the shutdown state,display no longer uses power of
battery, leakage current of the display is less than 1uA. If do
not use E-bike for 10 minutes, display will be shutdown
automatically.
7.2 Speed/Mileage display(Cumulative mileage
/single time mileage /single time riding time)

- 7 -
Open display,display default shows real time speed、total
mileage.Short press“Switch”button to switch display
information.Shown in order:real time speed、accumulative
mileage →average speed,single mileage→Max.speed,single
time riding time.
Hold and press “headlight” in single time mileage or single
riding time interface to clear single time mileage and single
riding time at the same time.
Real time speed ,accumulative mileage Average speed,single time mileage

- 8 -
Max.speed、single time riding time
7.3 Turn on headlight
Hold and press “headlight”button to turn on or off
headlight ,display notice controller to turn on
headlight of E-bike.
Turn on headlight display interface

- 9 -
7.4 6km/h walk assist
Hold and press”walk assist”to enter electronic power
boost mode,E-bike travels at a constant speed of 6
kilometers per hour.
6km/h walk assist interface
7.5 PAS level adjustment
Short press “plus”or “minus”button to switch E-bike PAS
level,change motor output power,display default output
power range is from 0-5 ,1 gear is the Mini. power, 5 gear is
the Max. gear. Display default boot is 1 gear.

- 10 -
1 gear display 5 gear display
7.6 Battery indicator
Five segments all are on when at full state. When it is at low
voltage, the last segment will flash to warn .
Max.power display low power display under voltage
7.7 Riding mode display
Short press“Push”button to switch riding mode.T(Tour)-S
(Sport)-C(Customized)-E(Eco)-T(Tour).

- 11 -
T mode S mode
C mode E mode
7.8 Display light brightness auto adjustment
When brightness of surrounded environment changed,it will
adjust brightness of display lamp automatically through
built-in photosensitive element.When the external
environment turn dark,backlight brightness will become
dimmed,also it will turn bright when backlight brightness
become bright. Meanwhile the display will turn off headlights
automatically to ensure the rider can read riding information

- 12 -
comfortably.
After turn on light automatically and press“headlight”button
to turn off light and photosensitive function, re-open display
and restore photosensitive function.
7.9 Error code display
When the electronic control system fails ,display will
show error code automatically .The fault interface can be
removed when fault is excluded .E-bike can not continue to
drive after failure.
Error code display interface
See the following table for the definition of detailed error
code :
Error
Code
Definition
Solution
21
Current
abnormal
Check whether the three phases of
the motor shorted
22
Handle
abnormal
Check whether handle is restored to
initial state

- 13 -
23
Motor lack of
phase
Check if the phase line is good ;
Check whether the motor phase line is
Connected to the controller
24
Motor hall
Abnormal signal
No hall controller:check whether the
phase line is good with hall controller:
check whether hall is in good
condition
25
Braking
abnormal
Before turn on display,check whether
Brake is reset
30
Communication
abnormal
Check whether display and controller
Connect in good condition
8. General setup
Press“plus” and “minus” buttons at the same time to enter
setting item1 at the speed of 0,short press “switch”to select
the setting item as follows :backlight level--wheel
diameter-speed limit-metric system-backlight level,press
“plus” and “minus” buttons at the same time to enter setting
item 1 then loose button,and then press“plus” and “minus”
to enter setting item 2,short press“switch”to select setting
items as follows :Gear range-default range-sensing
threshold-gear range.
8.1 Backlight brightness setting
BL stands for backlight can set parameters1,2,3 which mean
brightness of backlight,1 is the darkest,2 is standard

- 14 -
lightness,3 is the brightness.Factory default value of the
display is 1.Short press“plus” and “minus” can change
backlight brightness parameters. Press “switch” button to
confirm the selection of backlight brightness and enter next
setting item.
Backlight brightness setting interface
8.2 Wheel diameter
Wheel diameter setting can be set to :16inch、18 inch、
20inch、22inch、24inch、26inch、700C,28inch,29inch. Factory
default wheel diameter is 700C. Press“plus” and “minus” to
switch wheel diameter,press“switch”button to confirm the
selection of diameters which corresponding to bikes and
enter next setting item at the same time.

- 15 -
Diameter setting interface
8.3 Speed limit setting
Speed limit can be set max.riding speed of E-bike .When the
motor exceeds setting value, controller stops power supply to
motor to protect riding safety of riders. Range of the Max.
limit speed setting value from 12Km/h to 40Km/h .Default
value of the Max.riding speed is 25Km/h. Press “plus” and
“minus” to switch limit speed value,press“switch”button to
select limit speed value which corresponding to bikes and
enter to next setting item at the same time.

- 16 -
Speed limit setting interface
8.4 Unit setting
Unit setting can set display speed and mileage units,default
factory is metric system ,short press “plus” or “minus” to
switch metric unit (Km/h)and English unit(MPH). Hold and
press “switch”button to confirm setting, and then enter
normal working interface.

- 17 -
Unit setting interface
8.5 Gear range setting
Gear range including 0-3,1-3,0-5,1-5,0-7,1-7,0-9,1-9.Factory
default gear rang is 0-5.Press “plus” or “minus” to switch
gear range, press “switch” to confirm the selection of
display gear range and enter next setting item at the same
time.

- 18 -
Gear range setting interface
8.6 Gear initial value
Initial value of gear including :0,1,2,3.Gear initial value of
factory default is 1 gear.Press “plus” or “minus” to switch
initial value of gear, press “switch” to confirm the selection of
initial value of gear and enter next setting item at the same
time.
Initial value of gear setting interface
Table of contents
Other Ananda Bicycle Accessories manuals