AND UA-767PC User manual


2
Preliminary Remarks
The device conforms to the following requirements: European Directive
93/42 EEC for Medical Products Act; Medical Products Act; European Standards
for Electrical Medical Equipment EN 60601-1 (General Safety Provisions),
EN 60601-1-2 and EN 55011 (Electromagnetic Compatibility); European
Standards pertaining to Non Invasive Blood Pressure Instruments
EN 1060-1(General Requirements), EN 1060-3 (Supplementary Requirements for
Electromechanical Blood Pressure Measuring Systems).
The above is evidenced by the CE mark of conformity accompanied by the
reference number of a designated authority.
This device is designed for adults only.
Environment for use
The device is for use in patient's home.
Precaution
1. Precision components were used in the
construction of this device. Extremes in
temperature, humidity, direct sunlight, shock
or dust should be avoided.
2. Clean the device with a dry, soft cloth.
Never use thinner, alcohol, benzene, or wet
dusters.
3. Avoid tightly folding the cuff or storing the
hose tightly twisted for long periods, as such
treatment may shorten the life of the
components.
4. The device and cuff are not water resistant.
Prevent rain, sweat and water from wetting
the device and cuff.
5. Measurements may be impaired if the
device is used close to televisions,
microwave ovens, cellular telephone, X-ray
or other devices with strong electrical fields.
3
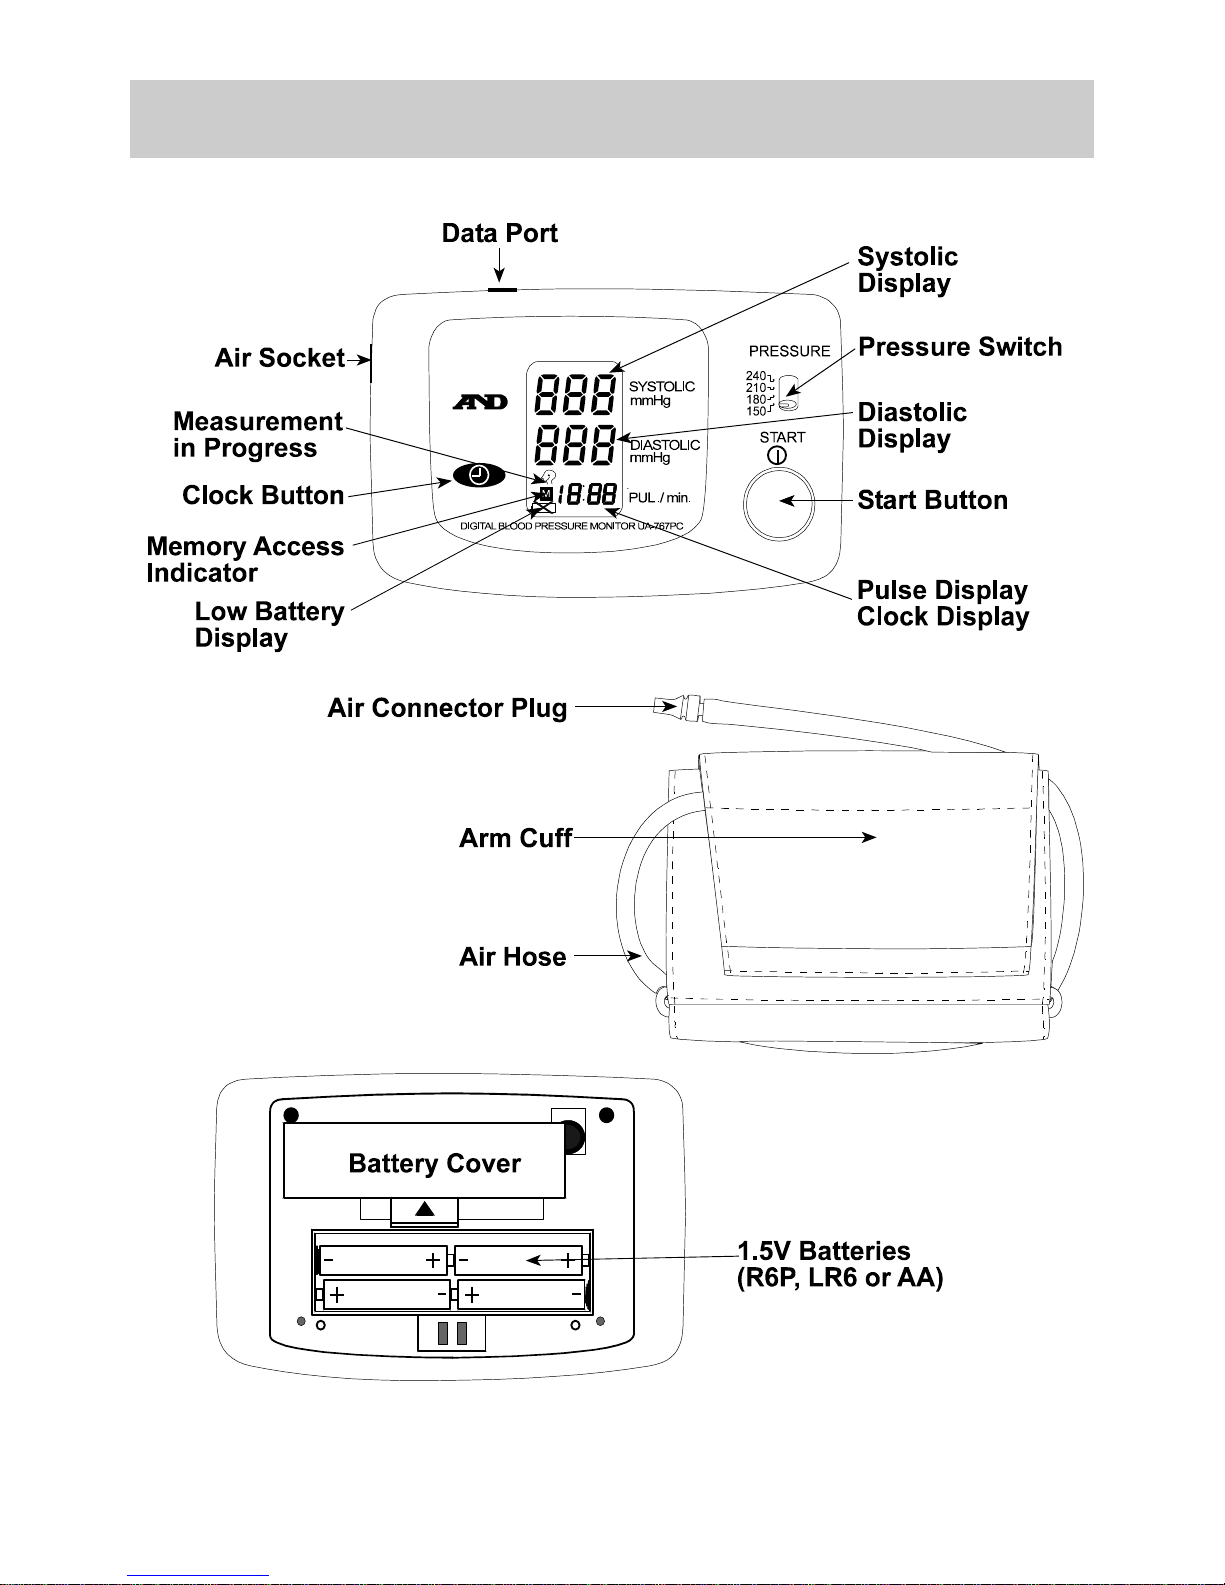
Parts Identification

4
Symbols
Symbols Function / Meaning Treatment
Turns on or off the device ___________
Set the clock / Does not store the
current data ___________
Direction guide to install battery ___________
Direct current ___________
SN Serial number ___________
Date of manufacture ___________
Type BF: Device, cuff and tubing
are designed to provide special
protection against electric shocks.
___________
Appears when measurement is in
progress and flashes when the
pulse is detected.
Measurement is in progress --
remain as still as possible.
Previous measurement stored in
MEMORY ___________
Appears when the battery voltage is
too low for the device to work
properly.
Replace all batteries with new
ones.
Appears if the systolic and diastolic
measurements are within 10 mmHg
of each other.
Verify that the air hose is
properly connected and that
the exhaust rate is between 2
and 5 mmHg. Check for air
leakage.
Appears if the pressure value is
unstable due to movement during
the measurement.
Try the measurement again.
Remain very still during the
measurement.
Appears if the pressure value did
not increase during pump up.
Verify that the air hose is
properly connected and that
the exhaust rate is between 2
and 5 mmHg. Check for air
leakage.
System error Reload batteries.
Appears if pulses are not detected
correctly.
Attach the cuff properly and try
the measurement again.
Attention symbol See instruction for use

5
Setting the Clock
The UA-767PC blood pressure monitor is equipped with a date and time function.
To set the clock on the monitor, follow these steps:
Press the clock button on the front of the monitor.
The blinking digits reflect the year. If they are not currently set on the correct year,
press the START button to advance to the correct year. The clock is set to show
years 1999 through 2098. If you pass the correct year, continue advancing the
clock until you have run through the cycle of years and are back at the correct
year.
To set the month and day, press the clock button again.
The month numeral(s) will blink. Press the START button to advance the numbers
to the correct month. Press the clock button again to advance to the day setting.
When the numbers reflecting the day of the month blink, press the START button
to advance the numbers to the correct day.
When you press the clock button again, the display will change and the time will
be shown in the same format as a digital clock, with the hour numerals blinking.
To set the correct hour, press the START button to advance the numbers to the
correct hour. To set the minutes, press the clock button again. The minute setting
will blink. Press the START button to advance the minutes until you reach the
correct setting. Press the clock again. The hour and minute display appears. This
is the standby mode.
Year
Month/Day
Hour/Minute

6
Left arm
Hose
2-3 cm (1 inch)
Excessive
constriction
Preparation for Measurements
1. Installing / Changing the Batteries
Remove the battery cover and insert
new batteries into the battery
compartment as shown, taking care to
observe the proper direction for each
battery. Use R6P, LR6 or similar type
batteries.
If the symbol appears on the display panel, this means that the batteries
are depleted. Always change all batteries at the same time. If you do not
intend to use the device for longer periods, remove the batteries. Only use
high quality, leakproof batteries with the specified ratings. Never mix new and
old batteries or batteries from different manufactures.
Note: Used equipment, parts, batteries do not fall within the category
of household waste, and must be disposed of according to the
applicable regulations.
2. Connecting the Air Hose
Insert the air connector plug into the air socket firmly.
3. Attaching the Arm Cuff
Wrap the cuff around the upper arm
about 2-3 cm (1 inch) above the elbow
as shown. Place the cuff directly against
the skin, as clothing may cause a faint
heart beat, and result in an error.
Constriction of the upper arm caused by
rolling up a shirt sleeve may prevent
accurate readings.
4. Posture While Measuring
Remain seated in a comfortable position,
placing the center of the upper arm at the
same height as your heart.
5. Measurement
During the measurement, the cuff will
become very tight. Do not be alarmed as this is normal.
6. After the Measurement
After the measurement, remove the cuff and record your data.

7
Measurements
1. Place the cuff on the arm (preferably the left arm).
2. Set the PRESSURE switch to a value that will be 30 to 40 mmHg above the
expected systolic value and press the START button.
• When the START button is pressed, all of the display symbols will appear
for about one second.
• When the "0" is blinking, the device is calibrating its zero point. If there is
still some air in the arm cuff, it will be exhausted at this time.
• The micro pump will pressurize the cuff.
Note: The cuff will become very tight. Do not be alarmed, as this is
normal.
• If the START button or clock button is pressed again during
pressurization or during the measurement, the pump will stop and the air
will be released from the cuff.
3. When pressurization has completed, the automatic exhaust mechanism will
gradually reduce the pressure in the cuff and the Measurement in Progress
symbol will appear along with the current pressure reading. This symbol will
flash in unison with the pulse of the person being monitored.
Measurement in
Progress

8
Measurements
• Remain still while the device is in operation.
• When a measurement is made with insufficient pressure, the device will
pump again to a higher pressure.
4. When measurement has completed, the buzzer sounds and the air is
automatically released from the cuff. The systolic pressure, diastolic pressure
readings, and the pulse rate are displayed.
5. Turning the Power OFF
Press the START button to turn the power off. The device will be in standby
mode.
6. Subsequent Measurements
If a subsequent measurement is required, turn off the power and turn it on
again. When the "0" is displayed, the device is ready for measurement again.
Note:Please wait for about 10 minutes before repeating the
measurement.
7. Automatic Power OFF Function
If this device is left on after a measurement, it will turn itself off after about 1
minute. It may be turned off at any time by pressing the START button.

9
Measurements
• Accurate measurement cannot be made if the exhaust velocity is outside
the range of 2 to 5 mmHg. This can be determined by watching the
display each time the "Measurement in Progress" symbol blinks. Note the
reading as the "Measurement in Progress" symbol blinks.
Notes for Proper Measurements
1. Sit in a comfortable position where you can place the arm to be used for the
measurement on a table or other support that will place the center of the
upper arm at about the same height as your heart.
2. Relax for about 5 or 10 minutes before starting the measurement. If you are
excited or depressed by emotional stress, the measurement will reflect this
stress as a higher (or lower) than normal blood pressure reading, the pulse
reading will usually be faster than normal.
3. A normal person's blood pressure varies constantly depending on what you
are doing and what you have eaten. What you drink can have a very strong
and rapid affect on your blood pressure.
4. As this device basses its measurements on the heart beat, if you have a very
weak or irregular heart beat, the device may have difficulty determining your
proper blood pressure.
5. Should the device detect a condition that is abnormal, it will stop the
measurement and display an error. See the section on description of display
symbols for details.
6. This blood pressure device is intended for use by adults only. Consult with
your physician before using this device on a child. A child should not use this
device unattended.

10
Data in Memory
Storing Data in Memory
This device stores up to 126 sets of measurement data in memory automatically.
If an error message appears, the measurement data will not be stored.
Whether the data will be stored or not after the measurement can be selected as
follows:
• When the START button is pressed or the automatic power OFF function
works after a measurement, the measurement data will be stored in
memory.
• When the clock button is pressed after a measurement, the measurement
data will not be stored in memory.
Recalling Memory Data
To access measurements stored in memory, wait until the monitor is in standby
mode. Then, press and hold the START button until the display shows the most
recent measurement.
The display will show all of the stored measurements starting with the most recent
and then will return to standby mode.
To interrupt memory display, press the START button to initiate inflation mode. To
put the monitor in standby mode, press the START button again.
Erasing Data in Memory
To erase measurements stored in memory, wait until the monitor is in standby
mode. Then, press and hold the clock button until the buzzer sounds and the
memory access indicator blinks. All data in memory will be erased.

11
Transmitting Readings to a Computer
The connected computer is not allowed to be in the patient area.
When the monitor receives the open command, it will be in the ready-to-send
mode.
When the monitor receives the open command again within five seconds,
“-“ appears one after another in succession and permission will be given to
perform various functions.

12
How to Make Proper Measurements
How is a Proper Measurement Made?
Blood pressure varies depending upon the conditions prevailing at the time of the
measurement, consider the following so that the most accurate measurements
may be made.
1. In preparation for blood pressure
measurement, the subject should urinate
and should remain relatively still for 5 to 10
minutes before a measurement.
2. Shirts or other garments which fit tightly on
the upper arm should be removed before
attaching the arm cuff.
3. Exercise, eating, drinking, and smoking
before a measurement can affect the
results.
4. Blood pressure varies constantly throughout
the day. Measurement should be made
regularly at the same time each day.
5. Do not be too impressed by the results of
one measurement. Keep a record of blood
pressure measurements. Many readings tell
a story.
6. When making repeated measurements, the
arm becomes heavy with blood, resulting in
wide variations in measurement values. For
this reason, repeated measurements should
be made after a rest period of approximately
5 to 10 minutes or after raising the arm until
the engorged condition is relieved.
7. In general, the blood pressure is low in
summer (when it is hot) and high in winter
(when it is cold).
8. Emotional stresses may cause an increase in blood pressure.

13
About Blood Pressure
What is Blood Pressure?
The blood pressure is at its highest levels in the large arteries near the heart and
drops off towards the peripheral areas of the circulatory system.
The blood pressure varies with the beating of the heart. When the heart contracts,
forcing the blood out, the pressure inside the arteries is said to be systolic. When
the heart expands, the pressure of the blood inside the arteries is said to be
diastolic.
Hypertension
Hypertension, an abnormally high arterial blood pressure, which is most common
among older adults, if left unattended, can cause many health problems including
stroke and heart attack. It is wise to control the blood pressure to prevent it from
becoming high, by reducing salt intake, and by controlling diet and activities.
People who were born with high blood pressure can prevent the progress of heart
disease by means of adequate control.
Why is it a Good Thing to Measure Blood Pressure at Home
Having your blood pressure measured in a hospital or a clinic may cause you to
become nervous, thus artificially raising the blood pressure reading. Also blood
pressure varies with a variety of conditions. So an accurate judgment of the heart
condition can not be made with a single measurement.
Having the capability to measure blood pressure at home provides a good way to
determine your fundamental blood pressure. This is defined as the first blood
pressure reading upon waking, before taking any food or drink.
It is possible for you to carry out your own blood pressure control at home. Take
blood pressure readings with your own blood pressure device on a regular basis.
Record the measurements. If the accumulated results seem to be above normal,
it is recommended that a doctor review the record.
14
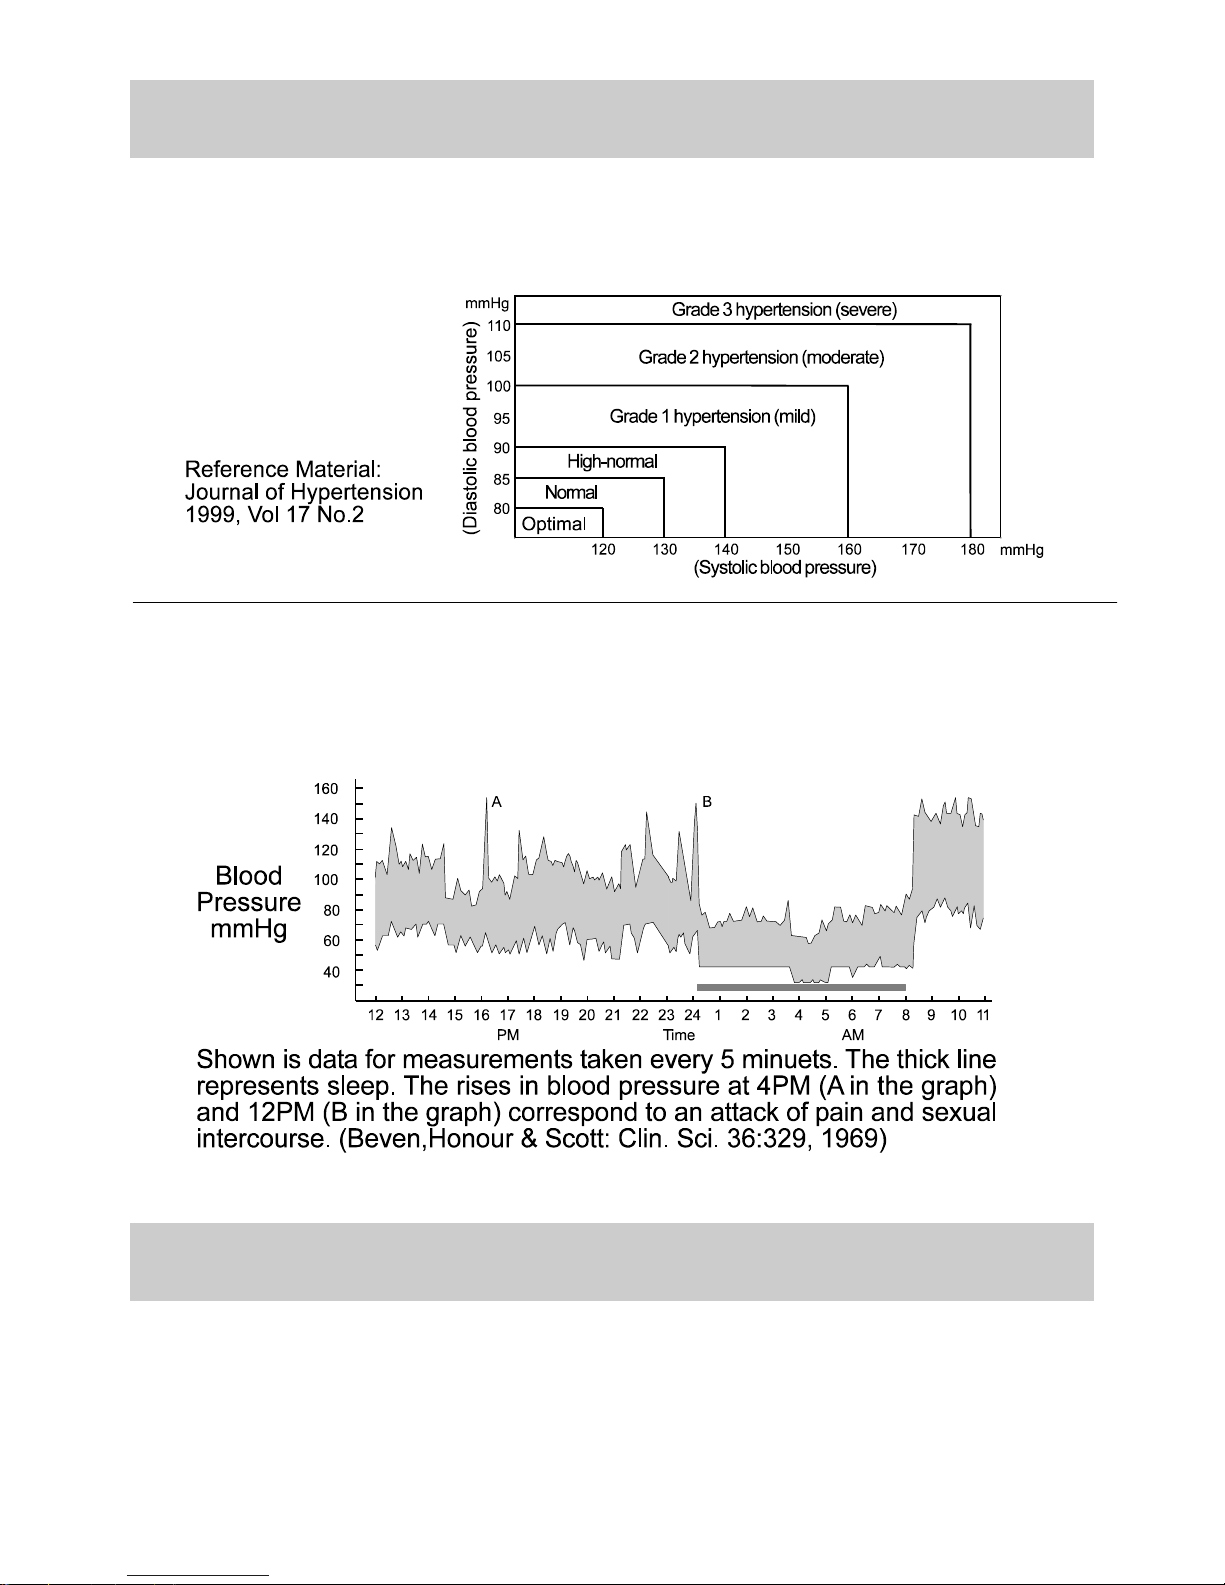
About Blood Pressure
WHO Blood Pressure Classifications
Standards for assessment of high blood pressure, without regard to age, have
been established by the World Health Organization (WHO), as shown in this
chart.
Variations in Blood Pressure
Individual blood pressures vary greatly both on a daily and a seasonal basis.
These variations are even more pronounced in the hypertensive patient. Normally
the blood pressure rises while at work and is at its lowest during the sleeping
period.

Table of contents
Other AND Blood Pressure Monitor manuals


