Talking Blood Pressure Monitor
Thank you for selecting the Oregon Scientifi c
Thank you for selecting the Oregon Scientifi cTM
Thank you for selecting the Oregon Scientifi c
Type Blood Pressure Monitor. The features voice
announcement and playback of blood pressure measurements
for added convenience and has been designed to provide you
with many years of reliable service. The unit can help you
measure and track the following metrics:
Historic record of up to 30 measurements per user
Readings taken by the blood pressure monitor are
equivalent to those obtained by a trained observer using
the cuff and stethoscope auscultation method. Clinical
performance were successfully done against ANSI/
AAMI SP10 and international protocol, and the B.H.S.(
British Hypertension Society) has rated this product
“recommended for clinical and home use”, this is the
highest grading available for blood pressure monitors.
please refer to BHS website
monitors/automatic_wrist.stm
This manual contains important safety and care
and provides step-by-step instructions for using the product.
Read the manual thoroughly before using the product.
LCD SYMBOLS
SAFETY AND CARE INSTRUCTIONS
SAFETY PRECAUTIONS
Please observe the following safety precautions when
setting up and using your blood pressure monitor.
• This device is intended for adult use only.
• This device is intended for non-invasive measuring
and monitoring of arterial blood pressure. It is not
intended for use on extremities other than the wrist
or for functions other than obtaining a blood pressure
• Do not confuse self-monitoring with self-diagnosis.
This unit allows you to monitor your blood pressure.
Do not begin or end medical treatment based solely on
the measurements of this device. Consult a physician
• If you are taking medication, consult your physician
to determine the most appropriate time to measure
your blood pressure. Never change a prescribed
medication without consulting your physician.
• This unit is not suitable for continuous monitoring
during medical emergencies or operations.
• If the cuff pressure exceeds 40 kPa (300 mmHg),
the unit will automatically defl ate. Should the cuff not
defl ate when pressures exceeds 40 kPa (300mmHg),
detach the cuff from the wrist and press the
• To avoid measurement errors, carefully read this
manual before using the product.
CARING FOR YOUR BLOOD PRESSURE MONITOR
To ensure you receive the maximum benefi t from using
this product, please observe the following care guidelines.
• When not in use, store the unit in a dry place away
• Do not immerse the unit in water. If it comes in contact
with water, dry it immediately with a soft lint-free cloth.
• Use a soft, slightly moistened cloth to wipe off the unit
and cuff. Do not use abrasive or corrosive cleaning
agents, as these may cause damage.
• Remove the batteries whenever you are planning to
store the unit for a long period of time.
• When replacing batteries, use new batteries as
specifi ed in this user manual. Do not mix new and old
• Do not place objects such as stickers on the wrist cuff
or unit, as these may impair the measurement.
• Do not subject the unit to excessive force, shock, dust,
temperature changes, or humidity. Such treatment
may result in malfunction, a shorter electronic life
span, damaged batteries, or distorted parts.
• Do not tamper with the internal components. Doing
so will terminate the product warranty and may cause
• The unit contains no user- serviceable parts.
• If you no longer need to use this product, protect the
environment by bringing it to your dealer or designated
collection point for proper disposal.
Blood pressure is the force generated by the blood against the
walls of arteries during cardiac contraction and relaxation
(e.g., the pumping action of the heart).
What are systolic pressure and diastolic pressure?
When ventricles contract and pump blood out of the heart,
blood pressure reaches its maximum value. This highest
pressure in the cycle is known as systolic pressure. When
the heart relaxes between heartbeats, the lowest blood
pressure is diastolic pressure.
What is mean arterial pressure (MAP)?
The mean arterial pressure (MAP) is the average
pressure that forces blood through the arteries. It is not
the average of the systolic and diastolic blood pressure;
rather, MAP corresponds to a state of balance between the
compressive and expansive forces acting on the arterial
wall when there is no distension outward or inward. MAP is
an excellent way to evaluate the stress on the walls of your
blood vessels, and can be used to evaluate excessive load
on the cardiovascular system. Show your MAP history to
your doctor to provide additional information that may help
him or her understand your situation.
Why measure your blood pressure?
Blood pressure measurement can highly refl ect one’s
health condition. High blood pressure is potentially linked
to serious illnesses such as stroke, heart disease and
Since there is no symptom most of the time, many
hypertensive people do not realize they are at risk until
their health is seriously threatened.
What is the standard blood pressure classifi cation?
Figure 3 illustrates the blood Pressure classifi cation made
by World Health Organization (WHO) and International
Society of Hypertension (ISH) in 1999.
Reference material:° 1999 World Health Organization-
International Society of Hypertension Guidelines for the
management of hypertension, Journal of Hypertension,
• Blood pressure is considered high when either the
diastolic or systolic blood pressure value exceeds the
normal range. When a patient s systolic and diastolic
blood pressures fall into different categories, the
higher category should apply.
• Only a physician can tell you your normal blood
pressure range and the point at which you are at risk.
Consult your physician to obtain these values. If the
measurements taken with these products fall outside
the range, consult your physician.
Why does my blood pressure fl uctuate throughout the day?
Individual blood pressure varies greatly both on a daily and
a seasonal or temperature basis. These variations may be
more pronounced in hypertensive patients. Normally the
blood pressure rises while at work and is at its lowest
The graph below illustrates the variations over a single day
with measurement taken every 5 minutes. The thick line
represents sleep time. The rises in blood pressure at 4PM
(A in the graph) and 12AM (Bin the graph) correspond to
an attack of pain and sexual intercourse (Beven, Honour &
Stott, Clin. Sci. 36:329, 1969).
HOW THE BLOOD PRESSURE MONITOR WORKS
This product uses the Oscillometric Measuring method to
detect your blood pressure. Before every measurement,
the unit establishes a “zero pressure”equivalent to the air
Then it starts infl ating the wrist cuff to 180mmHg or higher
until it senses that it has blocked your blood in the artery.
After that, the defl ation process starts, during which time
the unit detects pressure oscillations generated by beat-
to-beat pulsatile, which is used to determine the systolic,
mean and diastolic pressure, and also your pulse rate.
Any motion during this period will result in an incorrect
measurement. After all readings are determined and
displayed on the LCD, the measurement is fi nished and
the wrist cuff automatically defl ates.
GETTING STARTED
INSTALLING AND REPLACING THE BATTERIES
1. Slide off the battery cover.
2. Install the batteries by matching the correct polarity, as
shown below. Always use the correct battery type (2
Replace the batteries whenever the weak battery
shows, the display is dim, or the display does not
illuminate when the power is on. Replace all the batteries
at the same time - it is dangerous to mix old and new
Contact your local waste disposal authority for instructions
on how to dispose of used batteries. Used batteries can be
harmful to the environment, and should not be thrown out
SETTING DATE, TIME AND MEASUREMENT NITS
It is important to set the clock before using your blood
pressure monitor, so that a time stamp can be assigned to
each record that is stored in the memory.
1. When the unit is off, press and hold
to enter the setting mode.
2. The setting order is as follows: 12/24 hour format,
hour, minute, year, month/day or day / month format,
month, date, and measurement unit (kPa or mmHg).
to increase / decrease a value or change the
to increase / decrease a value or change the
to accept the change and switch to the next
5. When you are fi nished, press
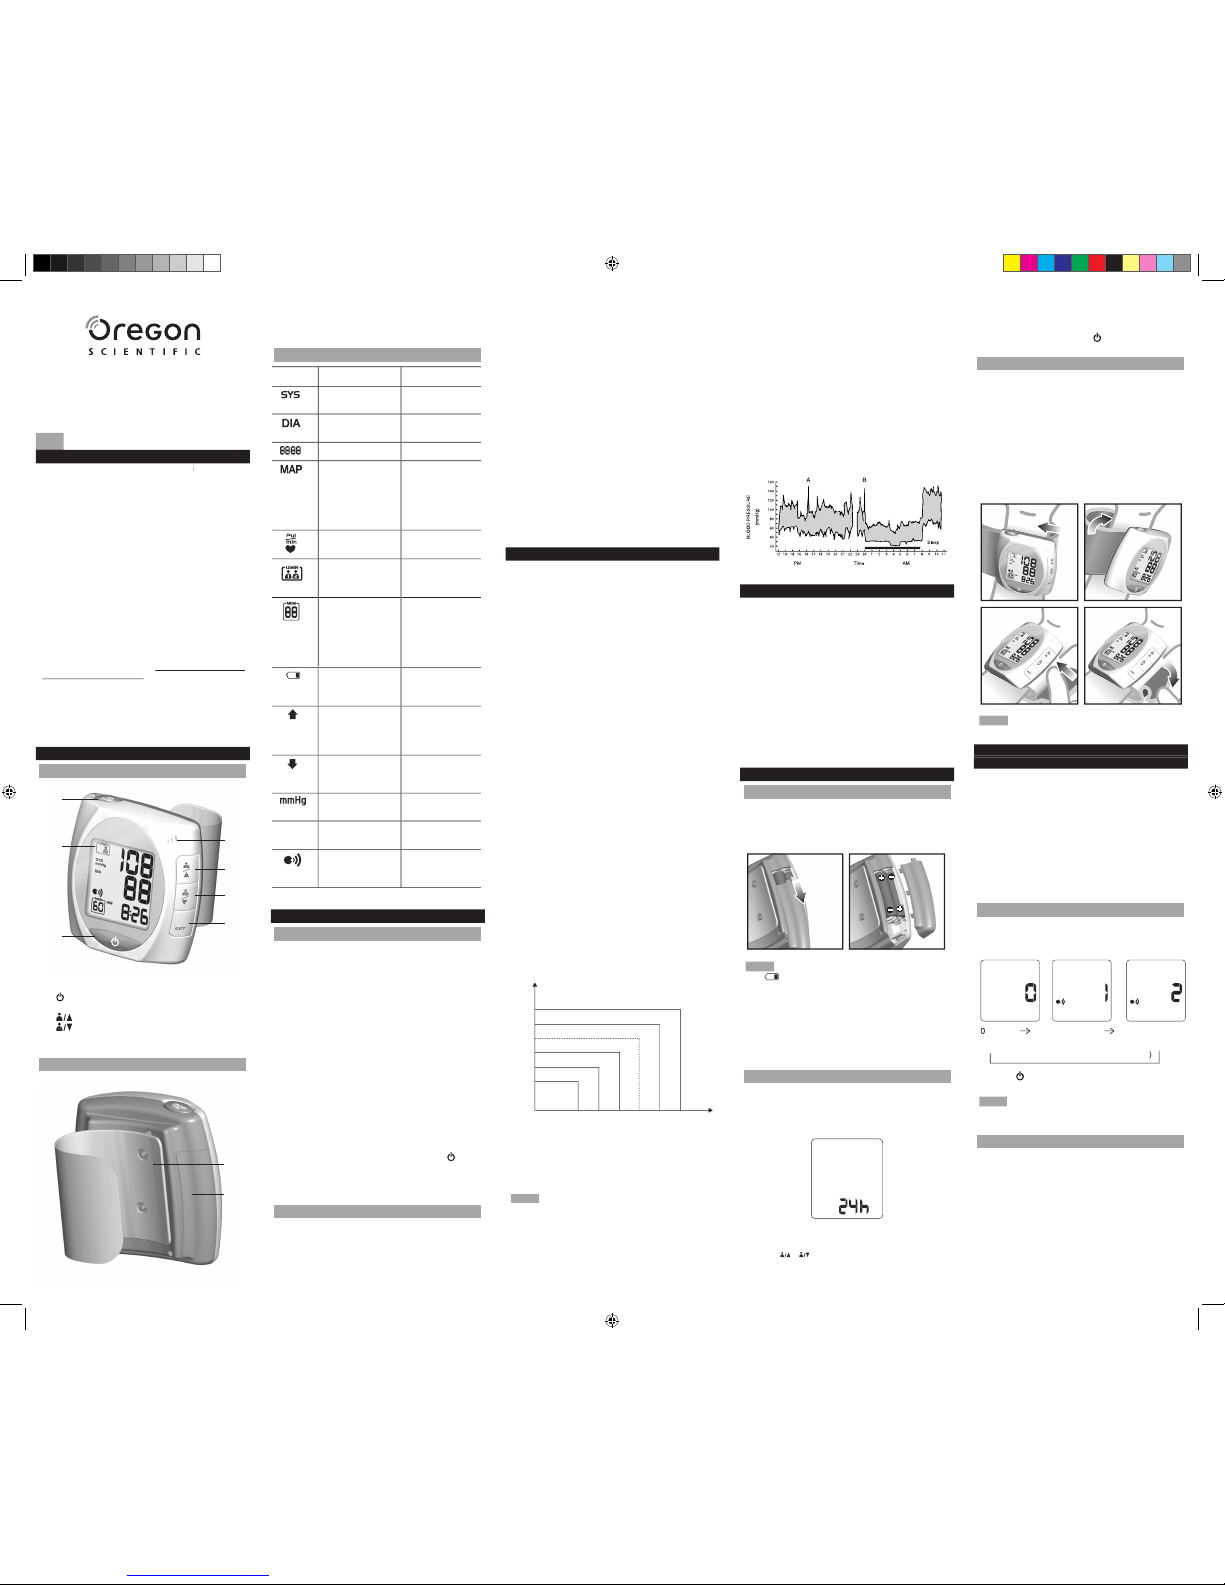
POSITIONING THE WRIST CUFF
It is important to properly position the wrist cuff to ensure
that you receive an accurate reading.
1. Remove all accessories (watch, bracelet, etc.) from
your left wrist. If your physician has diagnosed you with
poor circulation in your left arm, use your right wrist.
2. Roll or push up your sleeve to expose the skin.
3. Apply the cuff to your left wrist with your palm facing up.
4. Position the edge of the cuff about 0.4 inches (1cm)
from the bottom of your palm.
5. Fasten the wrist cuff around your wrist, leaving no
extra room between the cuff and your skin. If the cuff
is too loose, the measurement will not be accurate.
Graphics may not exactly match product.
VOICE PLAYBACK OF BLOOD PRESSURE
MEASUREMENTS
The features voice playback during and after blood
pressure measurement results, as well as general
instructions to help you prepare for taking measurements.
When the unit has fi nished taking your measurement,
your blood pressure readings, pulse and blood pressure
classifi cation are announced.
If you want to repeat the announcement, simply press
Anytime you recall a measurement record from memory,
it will also be announced. Press
need to repeat the playback of any record.
To adjust the volume level:
when you have fi nished adjusting the volume.
when you have fi nished adjusting the volume.
When volume level 0 is selected, the unit is on mute
and you will not hear any voice messages announced.
TAKING A BLOOD PRESSURE MEASUREMENT
You can choose to take your blood pressure while sitting or lying
down. Below are some helpful tips for taking a measurement:
• Be sure to set the clock before taking your fi rst
measurement, or whenever you replace the batteries,
so that the date and time are stored in the memory
with your history. For instructions, refer to p. 6.
• It is important to relax when taking your blood pressure.
Try to take a 15-minute rest before you begin.
• Do not lean backward or bend your wrist inward while
• Avoid talking or moving your fi ngers and hand while
taking a measurement. Rapid movements or other
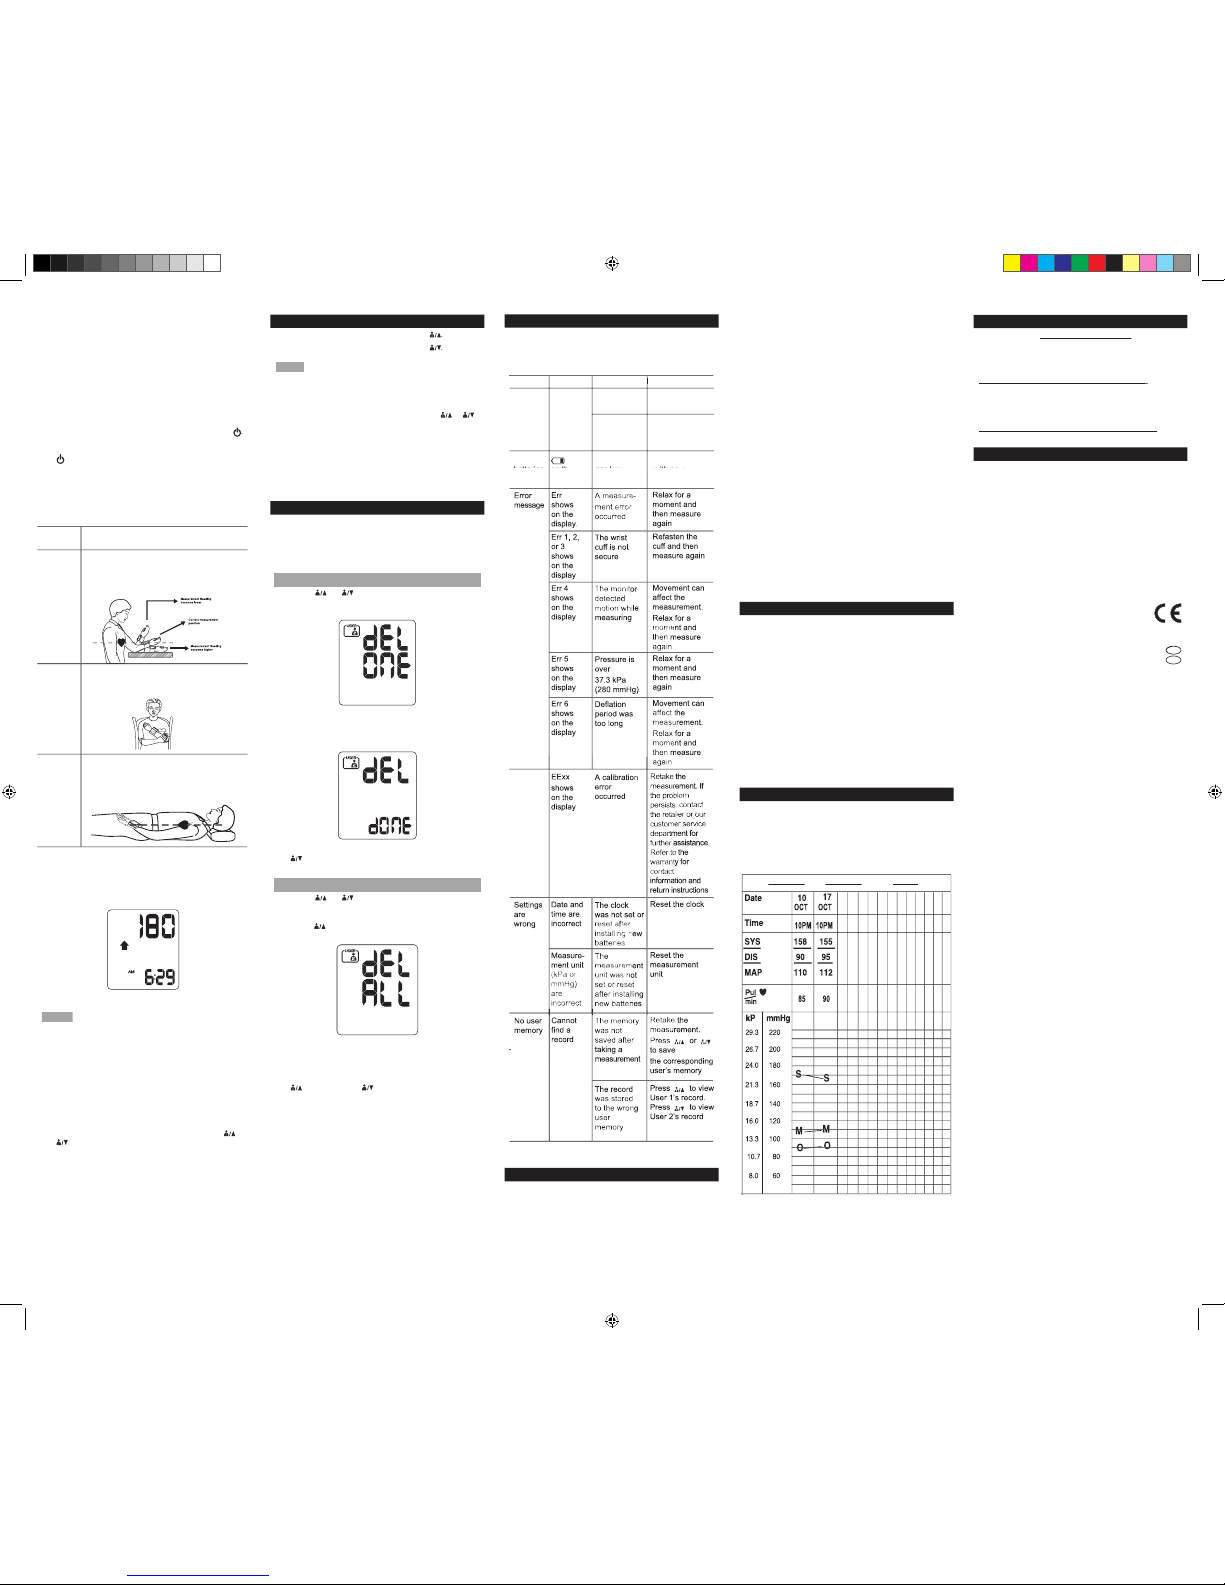
Grade 3 hypertension(severe)
Grade 2 hypertension(moderate)
Systolic blood pressure (mmHg)
Grade 1 hypertension(mild)
Subgroup: borderline
High-normal Blood Pressure
)g
Hmm(eru
ss
e
rp
do
olb
c
i
l
o
t
sa
iD
Normal Blood Pressure
Optimal Blood
Pressure
120
80
85
90
95
100
110
130 140 150 160 180
BPW810N_M_R3.indd 1 10/17/07 2:53:30 PM
P/N: 086L004064-051 REV1
1/2