iCheck 4x4 Accessories SmartCam DVR02 User manual

SmartCam User Manual DVR02/DVR023
CAUTIONS:
1. Please format the SD card after installing into the mirror, otherwise a
possible video error may occur when playing back a video.
2. In the Wi-Fi interface, when your mobile phone is connected to the
mirror by Wi-Fi, the video will display on your mobile phone only and will
not display on the mirror. If Wi-Fi is disconnected, video will display back
on the mirror automatically.
3. For the best performance and durability of video recording, we
recommend using class C10 TF card or better.

Video Resolution
1. Front 1080P
2. Rear 720P (optional)
3. In-cabin IR camera 720P
Video Format
H.264, MOV
Display Screen
4.0 inch
Memory
SD card (MAX 128GB)
Wi-Fi
0-10m
Audio
Built in mic and speaker
G-Sensor
Support
Parking Monitor
Support
Super Capacitor
(3.3F, 2.7V) X2
Supporting Platform
Android/ IOS
Operation Temperature
-20°C - 70°C
Storage Temperature
-30°C - 80°C
Working Voltage
10-16V
Language
English
2. Rear view mirror
1. Rear camera (optional)
5. Install Kit
4. Power cable
3. User manual for bracket
Front recording 1080P
Rear recording 720P (optional)
In-cabin IR camera 720P
Starvis night vision
Wi-Fi connection
Parking monitor
Back up camera display (optional)
LCD power save
Time lapse video
G-sensor
Real-time view on app
High brightness display screen
Parking monitor

`
1. Menu and back
2. Video switch
3. Screen on/off
4. Microphone switch
5. Lock video
6. Light sensor
7. Power button: short press to
turn on/off screen; long press
to turn on/off the device
8. Indicator
9. In-cabin IR camera
10. SD card slot
11. Light sensor
12. Cable connector
13. Windshield bracket
14. Camera lens
Using an anti-theft design, the SD card is hidden inside the mirror and locked in place
with a non-standard screw. A special tool is provided in the kit to remove the SD card by
the user only. A replacement tool can be provided if lost by the registered owner only.

Remove the original mirror
Car factory original mirror
Windscreen block
Different cars have different brackets.
It depends on your vehicle maker and
manufacturer. There are many
methods to remove the original rear
view mirror, however, please do not
force the mirror off the bracket.
iCheck 4x4 Accessories will not be
responsible for damage caused to your
car by wrong installation of the mirror.
Install mirror monitor on the plate
Remove your existing mirror
Install SmartCam mirror along
this direction
Please make sure to install the
mirror to the end of the bottom
of the windscreen block
Tighten screw so the mirror
stays firmly in place
NOTE: Always use caution, DO NOT force the mount. We will not be responsible for broken
windshields. If you are not sure how to remove or re-install the mirror seek trained, qualified
help.
CAUTION!

Your new SmartCam mirror utilises ‘touch frame’ technology. Rather than touching the LCD screen
and getting smudges you simply touch the frame under the corresponding icon on the mirror to
make any settings changes etc.
Yellow to battery
Red to ignition +12V
Black to GND
Rear camera (optional)
To reversing light
(if using as a reversing camera)
FRONT & REAR CAMERA VERSION
FRONT + REAR + IN-CABIN IR CAMERA VERSION
Red to ignition +12V
Yellow to battery
Black to GND

Tap the icon “ ” in the main interface to proceed to the menu settings.
File playback: “Normal file”, “Event file” and
“Picture file” are optional. After entering the
playback page, press “ ” button to switch
to view the front/ middle/ rear channel video.
Wi-Fi: Can set “on/off”.
Sensor_Mode: Can set “F+Rear/ F+Mid/
F+Mid+R”.
GPS Status: Decide the positioning status
according to the progress bar.
Satellite Status: Can set “on/off”.
Speed Unit: Can set “km/h/ mph”.
Speed Limit Alert: Can set “off/ 50km/h /
60km/h / 70km/h”.
Time Zone Select: Select the corresponding
time zone according to the time zone standards
of different countries. Can set “+08:00/ +09:00/
+10:00/ +11:00”.
Clock Setting: Can set “year/ month/ day”,
“hour/ min/ sec”. System time can be marked
on the video.
Language: “English/ Simplified Chinese/
Tradition Chinese”.
Stamp: Can set “date + logo/ date/ off”.
Movie Mode: Can set “FHD30/ HD30”.
Exposure: Can set “up/ down”
LCD Power Save: Can set “off/ 10 sec/ 30 sec/ 1
min”. After exiting the menu, the mirror will
start to count the time once there are no
operations. The screen will auto turn off when it
reaches the time you set.
Sound Record: Can set “on/off”.
Beep: Can set “on/off”.
Volume: Can set “up/ down”.
Movie Clip Time: Can set “1 min/ 2 min/ 3 min”.

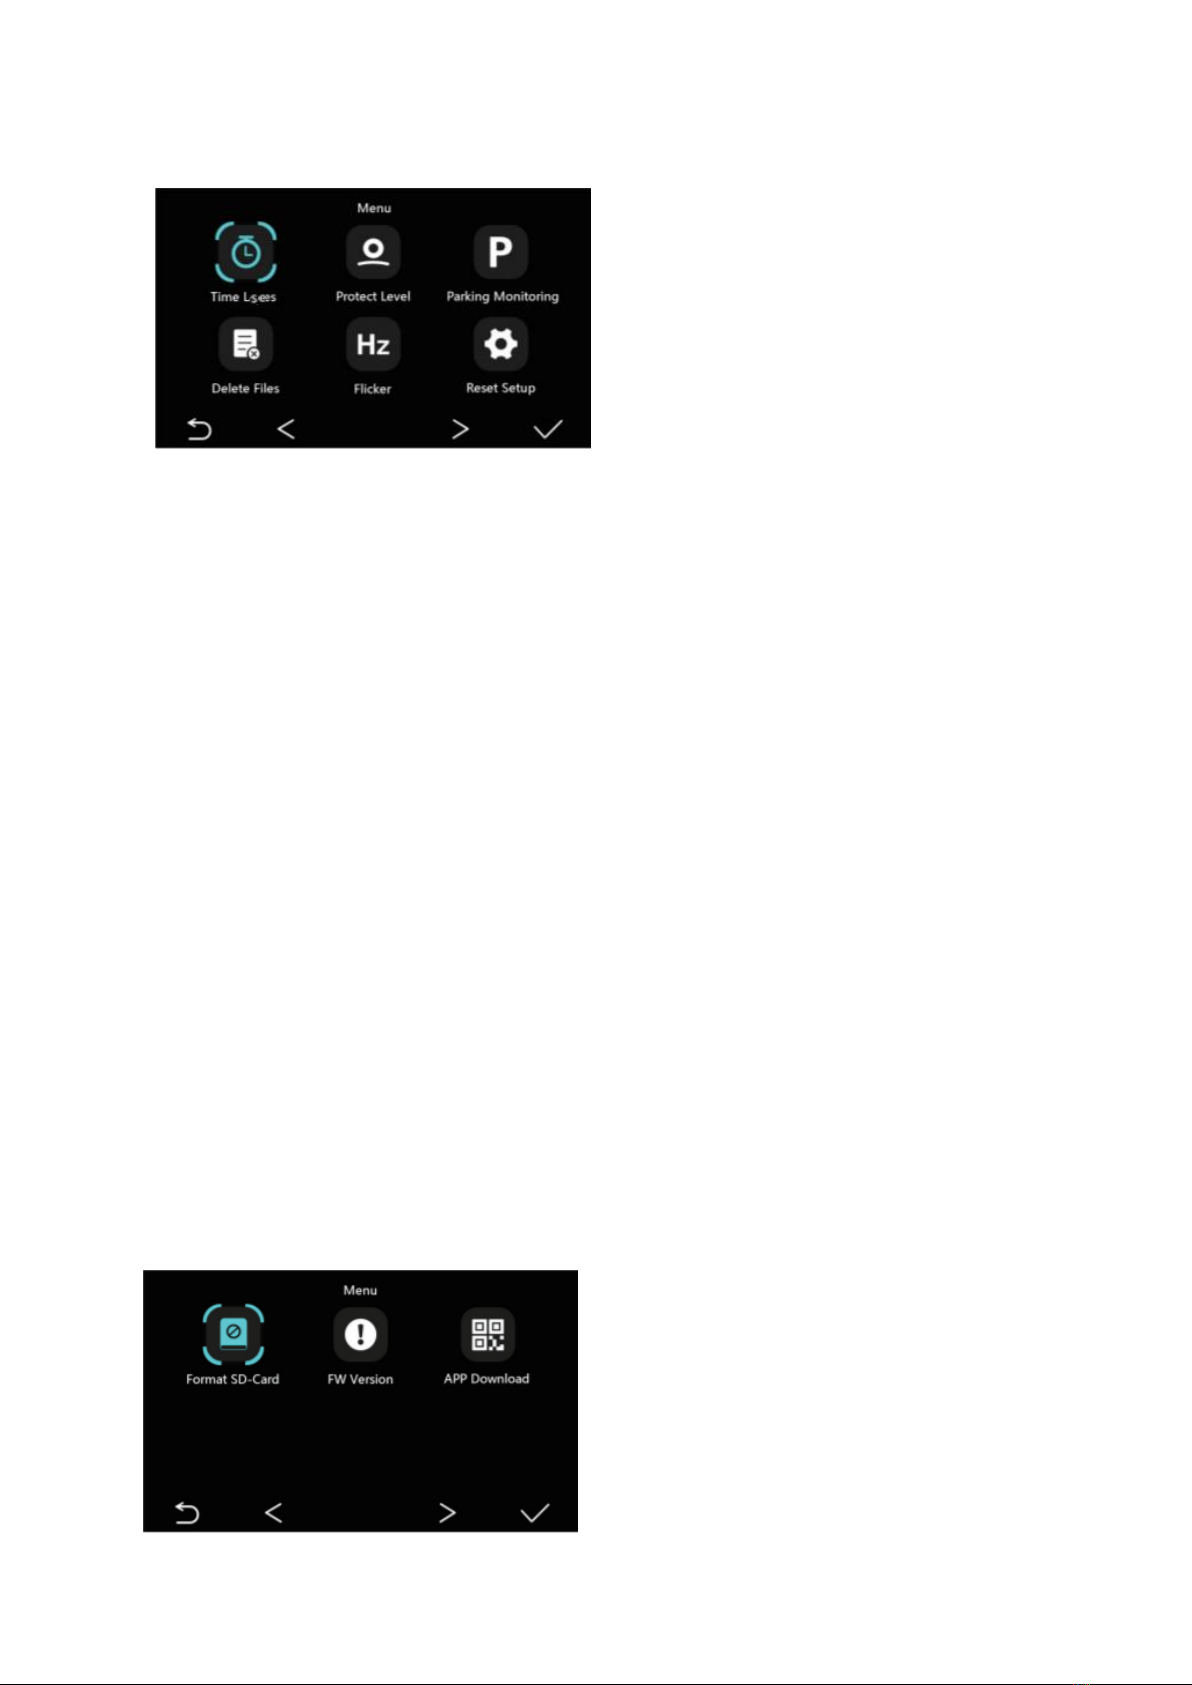
Time Lapse: Can set “on/off”. Turn on the “time lapse” video function. When the car is turned off
and the mirror is in the ACC disconnected state, the mirror will prompt to enter the “time lapse”
video. When the voltage reaches 11.8 the mirror will stop recording automatically to avoid a low
voltage situation. When playing a video, it turns a long video of slow motion into a short video of
fast motion, similar to fast forward playback in movies. For example, when recording for 1
minute, the video is compressed to 1 second and a recording for 1 hour is changed to 1 minute to
play.
Protect Level (G-sensor): Can set “off/ high/ middle/ low”. With G-sensor function, dash camera
can automatically save the video as event file when is detects acceleration of gravity changes
greatly. For example if a car crash happens the event file will be locked and cannot be
overwritten in record cycle mode. It can only be manually deleted one by one or formatted.
Parking Monitoring: Can set “off/ high/ middle/ low”. Turn on the monitoring function. When
the car is turned off and the mirror is in the ACC disconnected state, if the mirror senses that the
car is subject to an external collision the mirror will power up to record 10 seconds of video and
enter the sleep state after 10 seconds.
Delete Files: Can delete “Normal file” and “Event file”.
Flicker: Can set “50Hz/ 60Hz”. Each country has different supply frequency due to geographical
reason. Standard frequency of a dash camera lens is constant 50Hz. When the supply frequency
is inconsistent with the frequency standard the image on the device will appear incorrect. At this
point users should adjust frequency to be consistent with supply frequency.
Reset Setup: After making a lot of custom settings, users can reset the device to the original
factory settings.
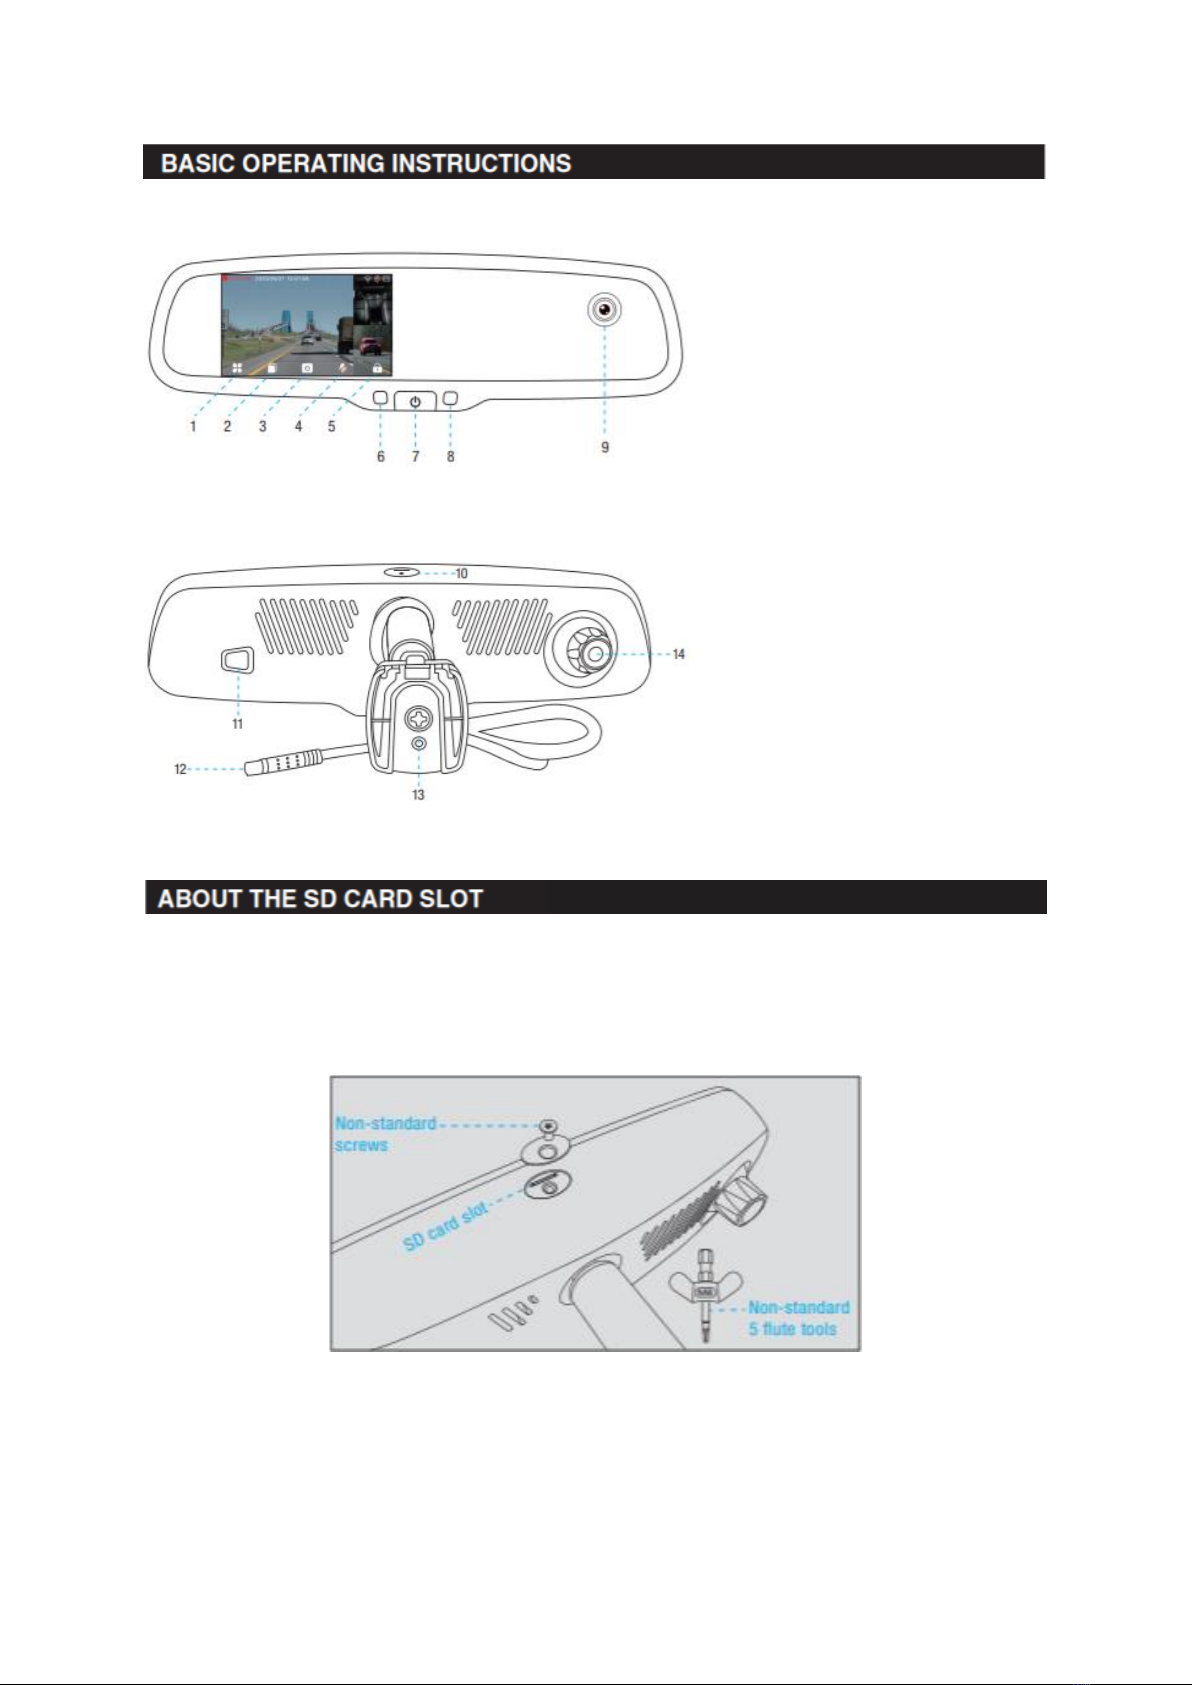
Format SD-Card: Please format the SD card
once the mirror is installed for the first time.
If the SD card is not formatted there may be
choppy playback when replaying a video.
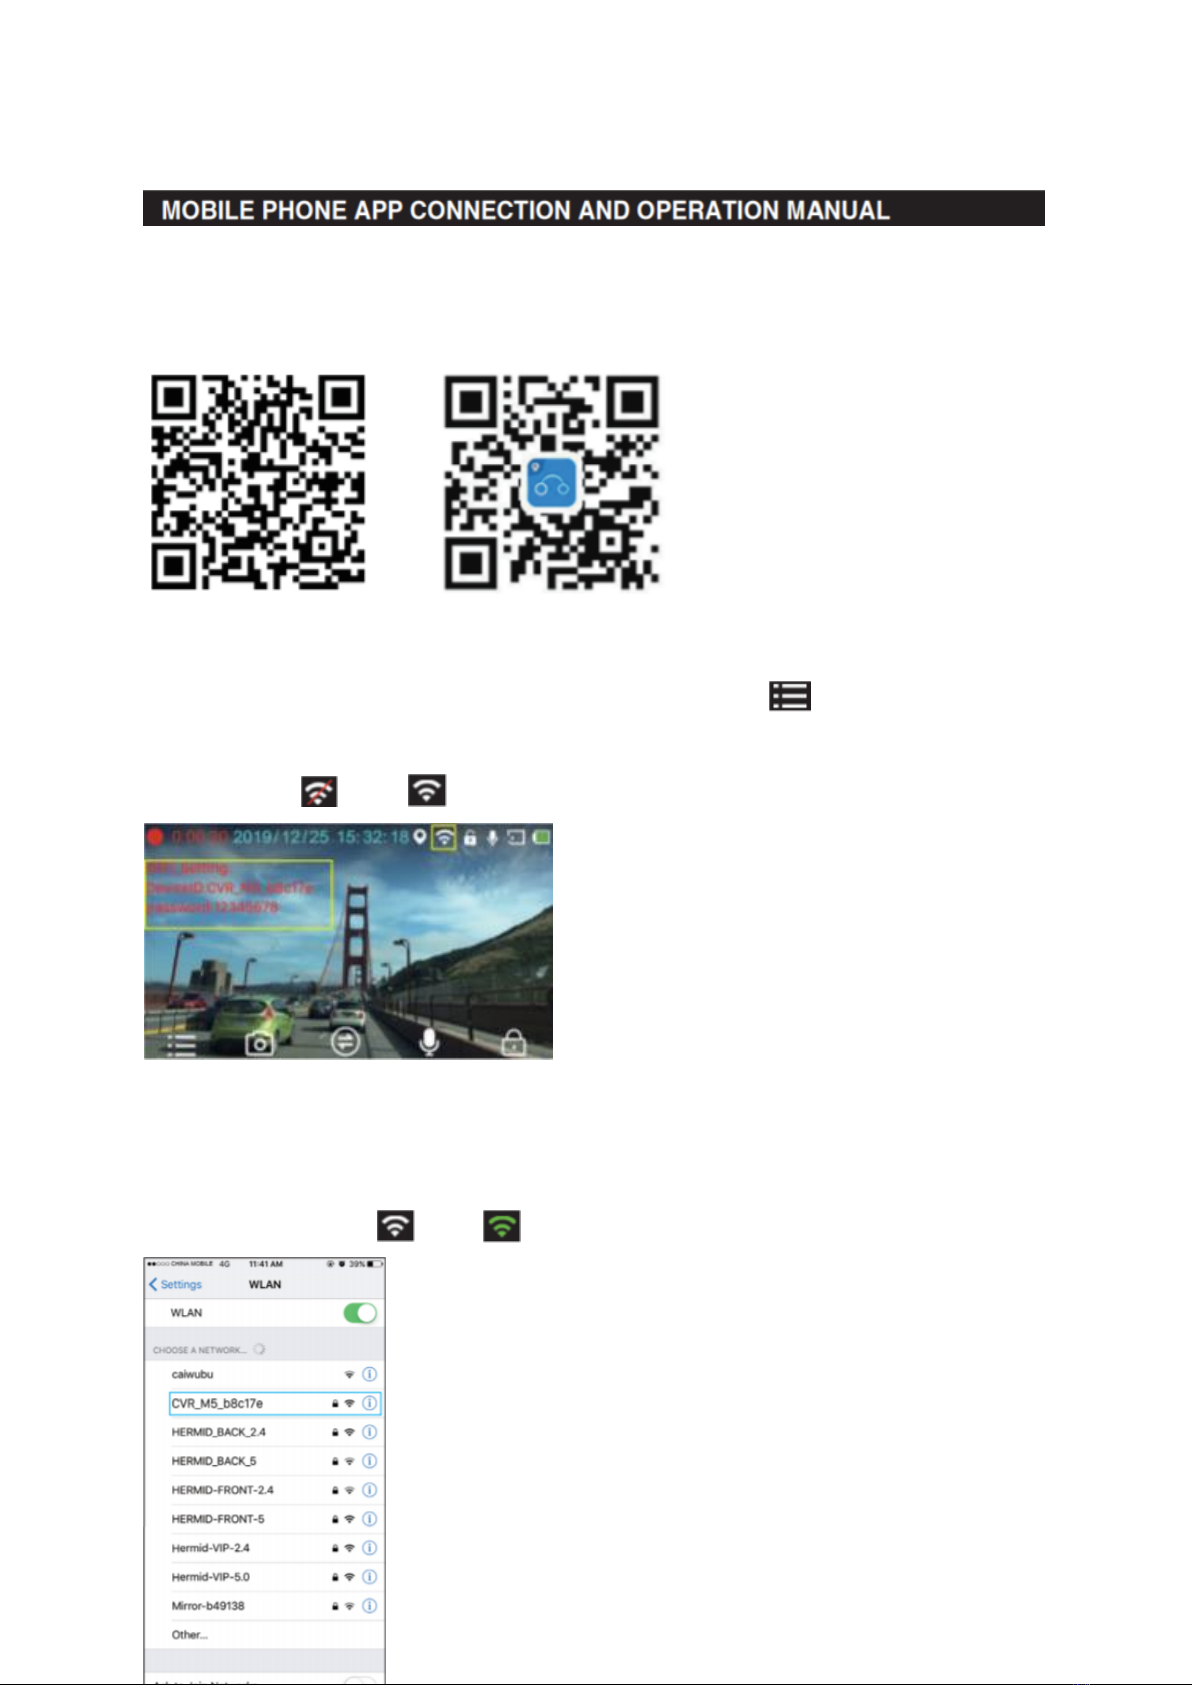
APP Download: Android version/ IOS version/
Built-in APP QR code.

Built-in Wi-Fi module, this system can connect to your mobile phone through Android or
IOS APP.
1. Scan the QR code below to quickly install your mobile app.
Android
IOS
2. In the main interface of the dash camera, short press “ ” to enter the menu
setting page, select Wi-Fi, and set it to “open”. At this time, the Wi-Fi name and
password will be displayed on the main interface, and the Wi-Fi icon will change from
“ ” to “ ”, as shown below.
3. Enter mobile phone interface, turn on Wi-Fi and connect Wi-Fi ID (default name
CVRDV_M5_*, “*” is system MAC address), enter initial password: 12345678, then
connect. After the connection is successful, the main interface Wi-Fi icon will change
from “ ” to “ ”.

4. Open mobile phone APP, you can now check the recorded video.
anoperataccordingly.
Click “ ” to enter the list of recorded videos, click “Edit” to switch between front and
back video, download the video to phone, delete videos in batches, etc. See the figure
below.

To replay any videos via the program showing on Google maps please download the program from
www.icheck4x4accessories
Once installed on your computer remove the SD card from the mirror and insert into computer.
Open the DataKam program and it will automatically bring up stored video files to replay your route
travelled, speed and locations etc. See below example.
This manual suits for next models
1
Table of contents