Angel Armor Avail User manual

BALLISTIC
DOOR PANELS
INSTALLATION GUIDE
DODGE® CHARGER PURSUIT
FOR FRONT DOORS
(2011 & NEWER MODELS)
10060_D
angelarmor.com
970 235 2961
sales@angelarmor.com

Installation Guide Angel Armor Ballistic Door Panel (Level IIIA) for Dodge® Charger PURSUIT
970 235 2961 sales@angelarmor.com angelarmor.com 2
Table of Contents
Introduction . . . . . . . . . . . . . . 3
Product Description 3
Installation Overview 3
Warnings & Cautions 4
Legal Statements 4
Tools & Parts List . . . . . . . . . . 5
Installation Kit Contents 5
Recommended Tools 5
Installation . . . . . . . . . . . . . . 6
Overview 6
- General Installation Procedure 6
- Important Notes 6
Procedure 7
- Preparing for Installation 7
- Removing the Outer Window Weatherstrip 7
- Inserting the Ballistic Door Panel 8-9
- Replacing the Outer Window Weatherstrip 9-10
and Completing Installation
Removal or Decommission . . . .10
© 2016 ANGEL ARMOR, LLC. ALL RIGHTS
RESERVED. PRINTED IN THE U.S.A.
DODGE® IS A REGISTERED TRADEMARK OF
CHRYSLER GROUP, LLC.

Installation Guide Angel Armor Ballistic Door Panel (Level IIIA) for Dodge® Charger PURSUIT
970 235 2961 sales@angelarmor.com angelarmor.com 3
Introduction
Congratulations on your
purchase of Angel Armor™ Avail™
Ballistic Door Panels (Level
IIIA) for the Dodge® Charger
Pursuit! It’s our honor to provide
advanced protection to those
who put their lives on the line in
the name of law and order.
In just a matter of minutes, your vehicle will
be upfitted with the finest ballistic technology
available. With innovative ballistic materials,
advanced designs and the fastest installation in
the industry, Angel Armor Avail Ballistic Door
Panels elevate protective technology to a higher
level.
Product Description
Angel Armor Avail Ballistic Door Panels are
constructed of a proprietary technology that
is not only remarkably strong, but also thin,
lightweight and weatherproof. These properties,
plus semi-rigid material characteristics, enable
unprecedented ease of installation, while
providing protection independently tested in
accordance with NIJ Standard 0108.01 protocols.
Angel Armor Avail Ballistic Door Panels for the
Dodge Charger Pursuit exceed NIJ Standard
0108.01 protocols for multi-round protection and
offer a five-year express limited warranty. Within
this period, the panels may be removed and
transferred to another vehicle of the same make
and model without violating the warranty.
Installation Overview
Angel Armor Avail Ballistic Door Panels for the
Dodge Charger Pursuit require no additional
brackets or fasteners, and eliminate the need
to remove the interior door panel or window
glass. The Ballistic Door Panel is inserted into
the door, adjacent to the window glass. One Torx
screwdriver is the only tool required.
Installation into Dodge Charger Pursuit vehicles
takes as little as 90 seconds for experienced
installers. The average user installation takes
only 5 to 15 minutes.
Watch an installation in action
at angelarmor.com.
Figure 1. Angel Armor Avail Ballistic Door Panel (Level IIIA) for the
Dodge Charger Pursuit
Anti-abrasion Panels
Nylon Fold

Installation Guide Angel Armor Ballistic Door Panel (Level IIIA) for Dodge® Charger PURSUIT
970 235 2961 sales@angelarmor.com angelarmor.com 4
Warnings and Cautions
Please adhere to the following
guidelines to prevent personal
injury, equipment damage and
unnecessary difficulty during
installation.
DISCONNECT THE VEHICLE BATTERY
AFTER THE WINDOW IS ADJUSTED FOR
INSTALLATION TO AVOID ACCIDENTAL
AIRBAG DEPLOYMENT. ACCIDENTAL
DEPLOYMENT OF THE AIRBAG MAY CAUSE
SERIOUS PERSONAL INJURY.
Read this guide in its entirety before
beginning installation.
Wear appropriate protective gear, including
eye and foot protection.
AVOID EXCESSIVE FORCE WHEN
INSERTING THE BALLISTIC DOOR PANEL
INTO THE CAR DOOR. EXCESSIVE FORCE
MAY DAMAGE THE PANEL, INTERNAL
DOOR COMPONENTS OR CAUSE VISIBLE
EXTERNAL DAMAGE TO THE DOOR.
Avoid puncturing speakers with screws,
push-snaps, fasteners or other sharp pieces
during door disassembly, panel insertion and
door re-assembly.
Do not drop screws or other assembly
components inside the door, as they may be
difficult to retrieve. If possible, use magnetic
tools during installation.
Use only plastic trim removal/prying tools on
finished surfaces to prevent scratching.
Avoid tearing the weatherproof cover on the
“teeth” inside of the door when removing
the Ballistic Door Panel by pushing the panel
toward the interior of the door before lifting
it out of the door.
Discard and replace any door components
that are inadvertently damaged during the
installation process, such as the moisture
barrier. Proper installation according to the
instructions in this guide should not cause
damage to any vehicle or Ballistic Door Panel
parts or components.
Use caution when removing parts that may
have sharp edges, such as the outer window
weatherstrip.
Legal Statements
See supplied Warranty and Terms and
Conditions for important legal information.
These instructions are provided for your
convenience only, and Angel Armor
expressly disclaims any liability for any
damage to personal property or personal
injury that occurs as a result of either
installation or removal of panels.

Installation Guide Angel Armor Ballistic Door Panel (Level IIIA) for Dodge® Charger PURSUIT
970 235 2961 sales@angelarmor.com angelarmor.com 5
Figure 3. Angel Armor Avail Ballistic Door Panel (Level
IIIA) for Dodge® Charger Pursuit
TOOLS & parts list
This section lists the tools
recommended for installation
and the parts included in the
installation kit.
Recommended Tools
Torx T-20 Screwdriver
Installation Kit Contents
Angel Armor Avail Ballistic Door Panel
(Level IIIA) for Dodge Charger
Pursuit (2011 and Newer Models)
Figure 2. Torx T-20 Screwdriver
Figure 4. Angel Armor Brand Label
Figure 5. Isopropyl Alcohol Wipe
Isopropyl Alcohol Wipe
Angel Armor Brand Label

Installation Guide Angel Armor Ballistic Door Panel (Level IIIA) for Dodge® Charger PURSUIT
970 235 2961 sales@angelarmor.com angelarmor.com 6
INSTALLATION
This section provides
instructions for installing Angel
Armor Avail Ballistic Door Panels
into the Dodge Charger Pursuit
(2011 & Newer models).
Overview
Installation of Angel Armor Avail Ballistic
Door Panels into Dodge Charger Pursuit is
accomplished in 3 easy steps. See Procedure, on
page 7, for detailed instructions.
General Installation Procedure
1 Remove outer window weatherstrip.
2 Insert, and secure Ballistic Door Panel.
3 Replace outer window weatherstrip.
Important Notes
The directions, photographs and
illustrations in this guide depict an
installation performed on the driver’s
side. The same installation procedure
applies to the passenger door.
NOTE: The anti-abrasion panels face the
interior of the vehicle for both the driver-
side and passenger-side Ballistic Door
Panels.
Note the location of screws, fasteners,
wires and door components before
disassembling to aid proper re-assembly
after Ballistic Door Panel installation.
Place all removed hardware and
components in a safe place during
installation.
Angel Armor Avail Ballistic Door Panels
are semi-rigid, which allows them to
be bent slightly for easy installation. To
prevent damage to the panels, do not
bend them tighter than a 6" radius (12"
diameter).
PRESSURE MAY BE NEEDED TO CLEAR
MINOR OBSTRUCTIONS DURING
INSERTION OF THE BALLISTIC
DOOR PANELS, BUT NEVER USE
EXCESSIVE FORCE. EXCESSIVE FORCE
MAY DAMAGE INTERNAL DOOR
COMPONENTS OR CAUSE VISIBILE
EXTERNAL DAMAGE TO THE DOOR.

Installation Guide Angel Armor Ballistic Door Panel (Level IIIA) for Dodge® Charger PURSUIT
970 235 2961 sales@angelarmor.com angelarmor.com 7
Procedure
Complete the following steps
to properly install Angel Armor
Avail Ballistic Door Panels for
Dodge Charger Pursuit.
Preparing for Installation
1 Lower the window glass completely.
2 Turn off the vehicle ignition switch,
and remove the key.
3 Disconnect the vehicle battery to
avoid accidental airbag deployment.
Removing the Outer Window
Weatherstrip
Use caution when removing parts that may
have sharp edges, such as the outer
window weatherstrip.
1 Remove the outer window weatherstrip
screws at the rear and front ends of the
window frame.
2 Pull up on the rear end of the outer window
weatherstrip to remove it from the window
frame. Work forward along the window
frame, pulling up on the trim to remove it
completely.
Figure 6. Outer window weatherstrip screws
Figure 7. Removing outer window weatherstrip

Installation Guide Angel Armor Ballistic Door Panel (Level IIIA) for Dodge® Charger PURSUIT
970 235 2961 sales@angelarmor.com angelarmor.com 8
4 Insert the panel at an angle, guiding the
front, top edge fully into the door, under
the side view mirror.
5 After the front, top edge is inserted fully
as described in step 3 above, rotate the
back edge of the Ballistic Door Panel down
into the door.
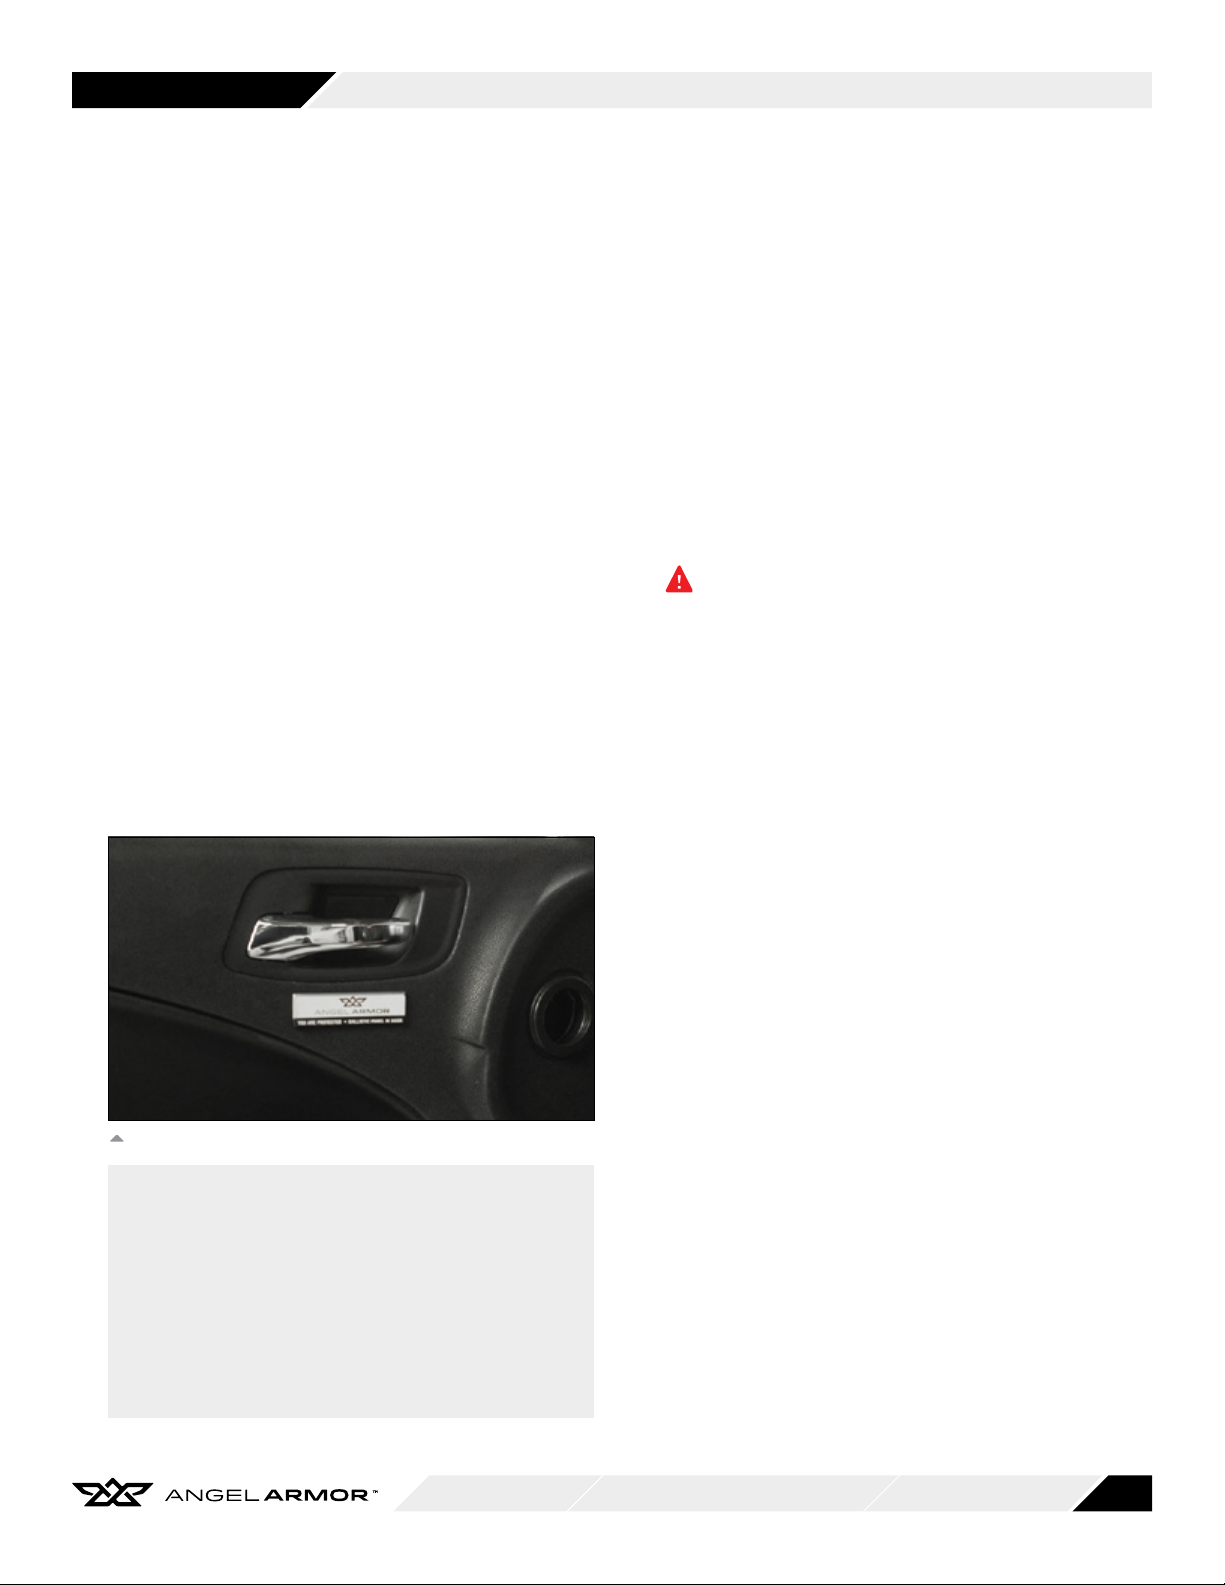
6 Grip the nylon folds at the top of the Ballistic
Door Panel when it is inserted the majority of
the way into the door.
7 Slide the Ballistic Door Panel forward into its
final position. The leading edge of the anti-
abrasion panel will likely catch on the vehicle
window track. Push on the upper anti-
abrasion panel, toward outside of door, while
pushing the panel forward to move
it past the window track.
Work the Ballistic Door Panel forward
firmly to clear any obstructions, but never
use excessive force, which may damage
internal door components or cause visible
external damage to the door. It may be
useful to shimmy the Ballistic Door Panel
side to side while pushing forward.
Figure 8. Inserting the Ballistic Door Panel into the door
Inserting the Ballistic Door Panel
1 Bend the bottom of the Ballistic Door Panel
away from you, pressing with your knee or
hand. This creates a slight curve in the panel
that matches the shape of the bottom of the
Dodge Charger door and eases installation.
NOTE: Do not bend the Ballistic Door Panel
tighter than a 6" radius (12" diameter).
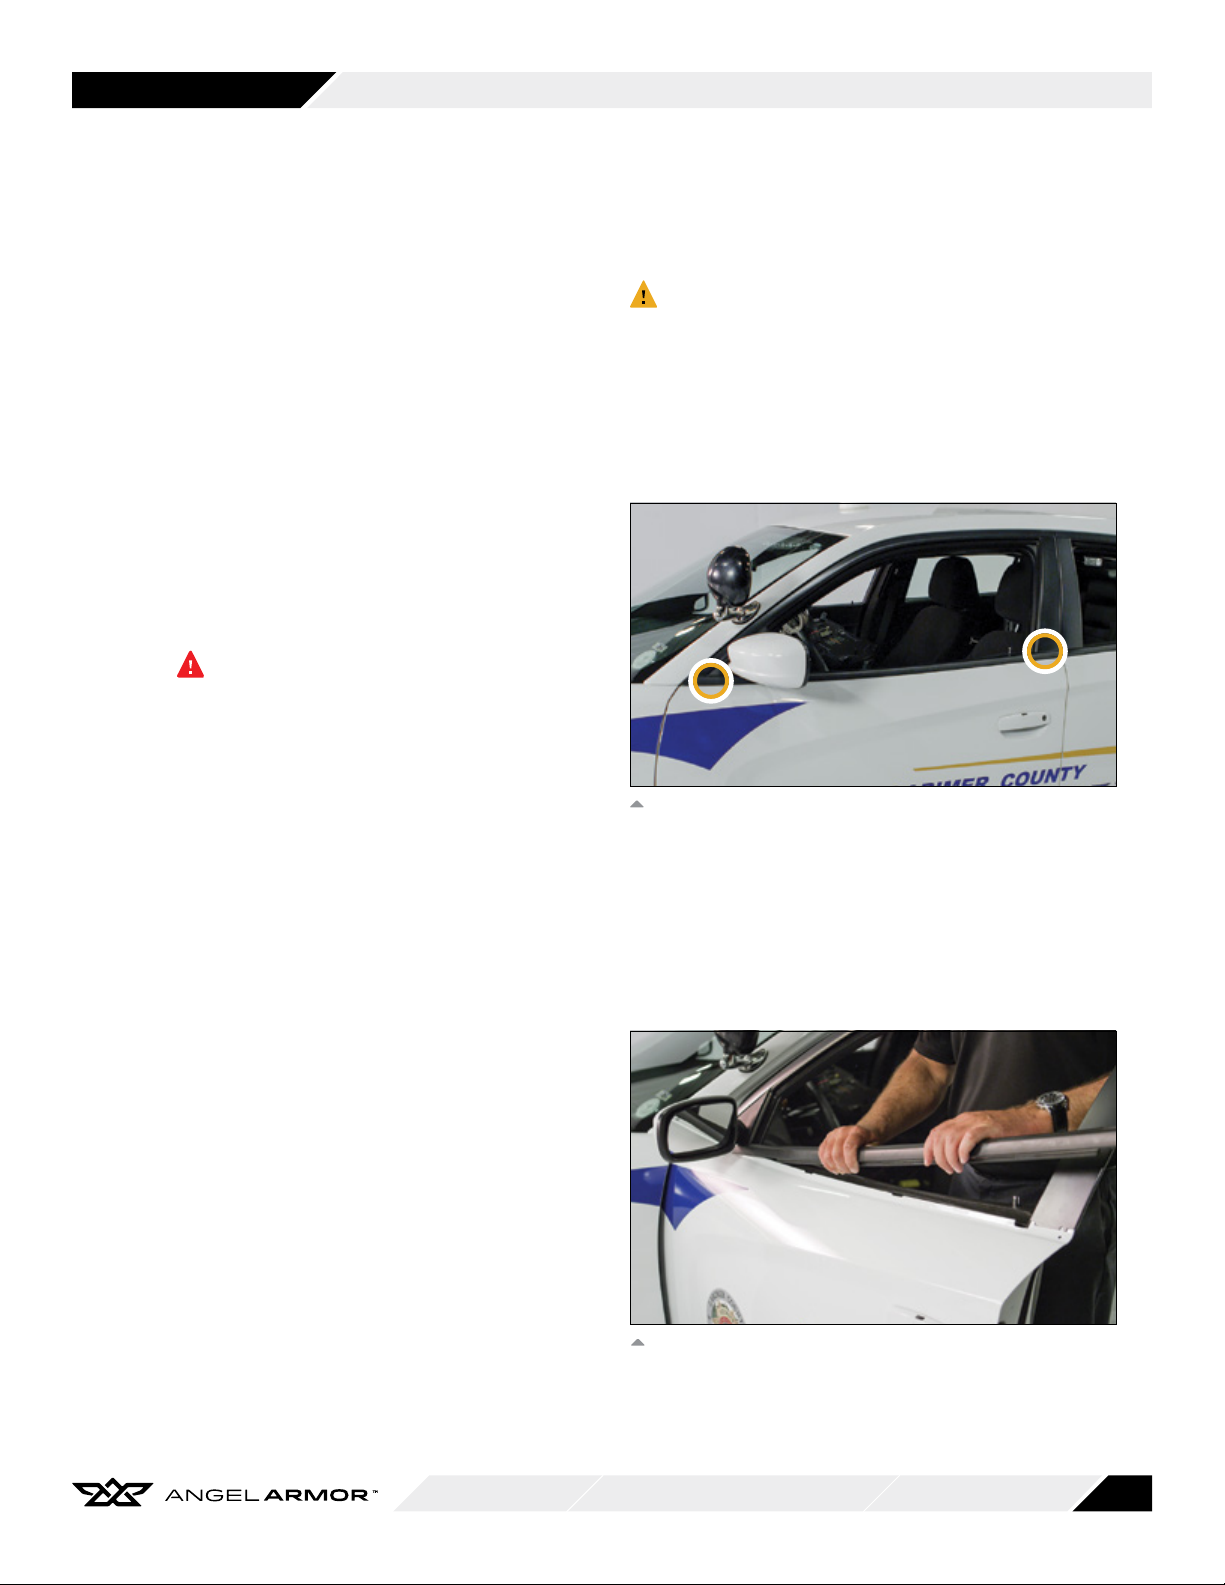
2 Standing on the outside of the door and
leading with the front, bottom corner of the
Ballistic Door Panel, begin to insert the panel
into the door, adjacent to the outer surface of
the window glass.
NOTE: To give visual perspective, Figure 6
shows the installer standing on the inside of
the door. However, we recommend standing
on the outside of the door when completing
step 2 to minimize the possiblity of external
damage to the door.
3 Continue to insert the Ballistic Door Panel
into the door, holding the panel against the
window glass to avoid obstructions inside the
door. This can be achieved by leaning
back/pulling the panel out toward the exterior
of the door.
Leaning back while inserting the panel
into the door is a critical installation step;
not following the process outlined above
may cause exterior damage to the door.
Figure 9. Gripping Ballistic Door Panel’s top-edge nylon folds

Installation Guide Angel Armor Ballistic Door Panel (Level IIIA) for Dodge® Charger PURSUIT
970 235 2961 sales@angelarmor.com angelarmor.com 9
Inserting the Ballistic Door Panel
CONTINUED
8 Verify that the crease in the nylon fold at the
top of the Ballistic Door Panel aligns with
and folds over the top edge of the window
frame.
NOTE: If excessive nylon is exposed above
the door and the crease does not align with
the top edge of the window frame, remove
the panel and repeat steps 1 through 8 of
this section. Avoid tearing the Ballistic Door
Panel’s weatherproof cover on the “teeth”
inside of door by pushing the panel toward
the interior of the vehicle before lifting it out
of the door.
Figure 10. Proper alignment of crease with window frame
Replacing the Outer Window
Weatherstrip and Completing
Installation
1 Place the front edge of the outer window
weatherstrip on the window frame and
slide forward into position, aligning the
front screw holes of the outer window
weatherstrip and window frame.
2 Verify that no nylon is exposed below or
around the outer window weatherstrip.
3 Replace the front outer window
weatherstrip screw.
4 Press down on the front end of the outer
window weatherstrip and move backward,
pressing the entire length of the outer
window weatherstrip into the window frame.
5 Replace the rear outer window
weatherstrip screw.
6 Verify that all trim and window components
are properly re-installed.
Figure 11. Exterior view of properly installed Ballistic Door Panel

Installation Guide Angel Armor Ballistic Door Panel (Level IIIA) for Dodge® Charger PURSUIT
970 235 2961 sales@angelarmor.com angelarmor.com 10
Replacing the Outer Window
Weatherstrip and Completing
Installation
CONTINUED
7 Re-connect the vehicle battery.
8 Attach the Angel Armor brand label to
the interior door panel by completing the
following procedure:
a Clean the attachment location on the
door with the supplied isopropyl
alcohol wipe.
b Allow the door surface to dry completely.
c Remove the backing from the brand
label.
d Apply the brand label to the door,
pressing for at least 30 seconds to
ensure proper adhesion.
Figure 12. Attaching Angel Armor brand label
Removal or
Decommission
This section describes the
process for removing the
Ballistic Door Panel for
decommission or transfer to
another vehicle.
1 Lower the window glass completely.
2 Disconnect the vehicle battery to
avoid accidental airbag deployment.
3 Follow the procedure described in Removing
the Outer Window Weatherstrip, on page 7.
4 Grip the nylon folds at the top edge of the
Ballistic Door Panel.
5 Slide the panel toward the back of the
vehicle, and then up, to remove it from the
door.
NOTE: Avoid tearing the Ballistic Door
Panel’s weatherproof cover on the “teeth”
inside of door by pushing the panel toward
the interior of the vehicle before lifting it out
of the door.
6 Follow the procedure described in Replacing
the Outer Window Weatherstrip, on page 9.
7 If removing the panel for transfer to another
vehicle, inspect panel after removal. Contact
Angel Armor with any concerns about wear
or damage.
INSTALLATION COMPLETE:
Your vehicle is now
equipped with advanced
ballistic protection from
Angel Armor.
Table of contents
Other Angel Armor Automobile Accessories manuals