anitoa Maverick qPCR User manual

Anitoa Maverick qPCR Quick Guide
For Windows® - based Software
Version 1.66

Maverick qPCR Quick Guide
2
Contents
1. Product overview.............................................................................................................................4
Features..............................................................................................................................................5
Key parameters...................................................................................................................................5
Applications.........................................................................................................................................6
Instrument external dimension............................................................................................................7
2. Hardware set-up guide....................................................................................................................8
Power up the instrument.....................................................................................................................8
Connect to a PC via USB....................................................................................................................8
Light indicator states...........................................................................................................................9
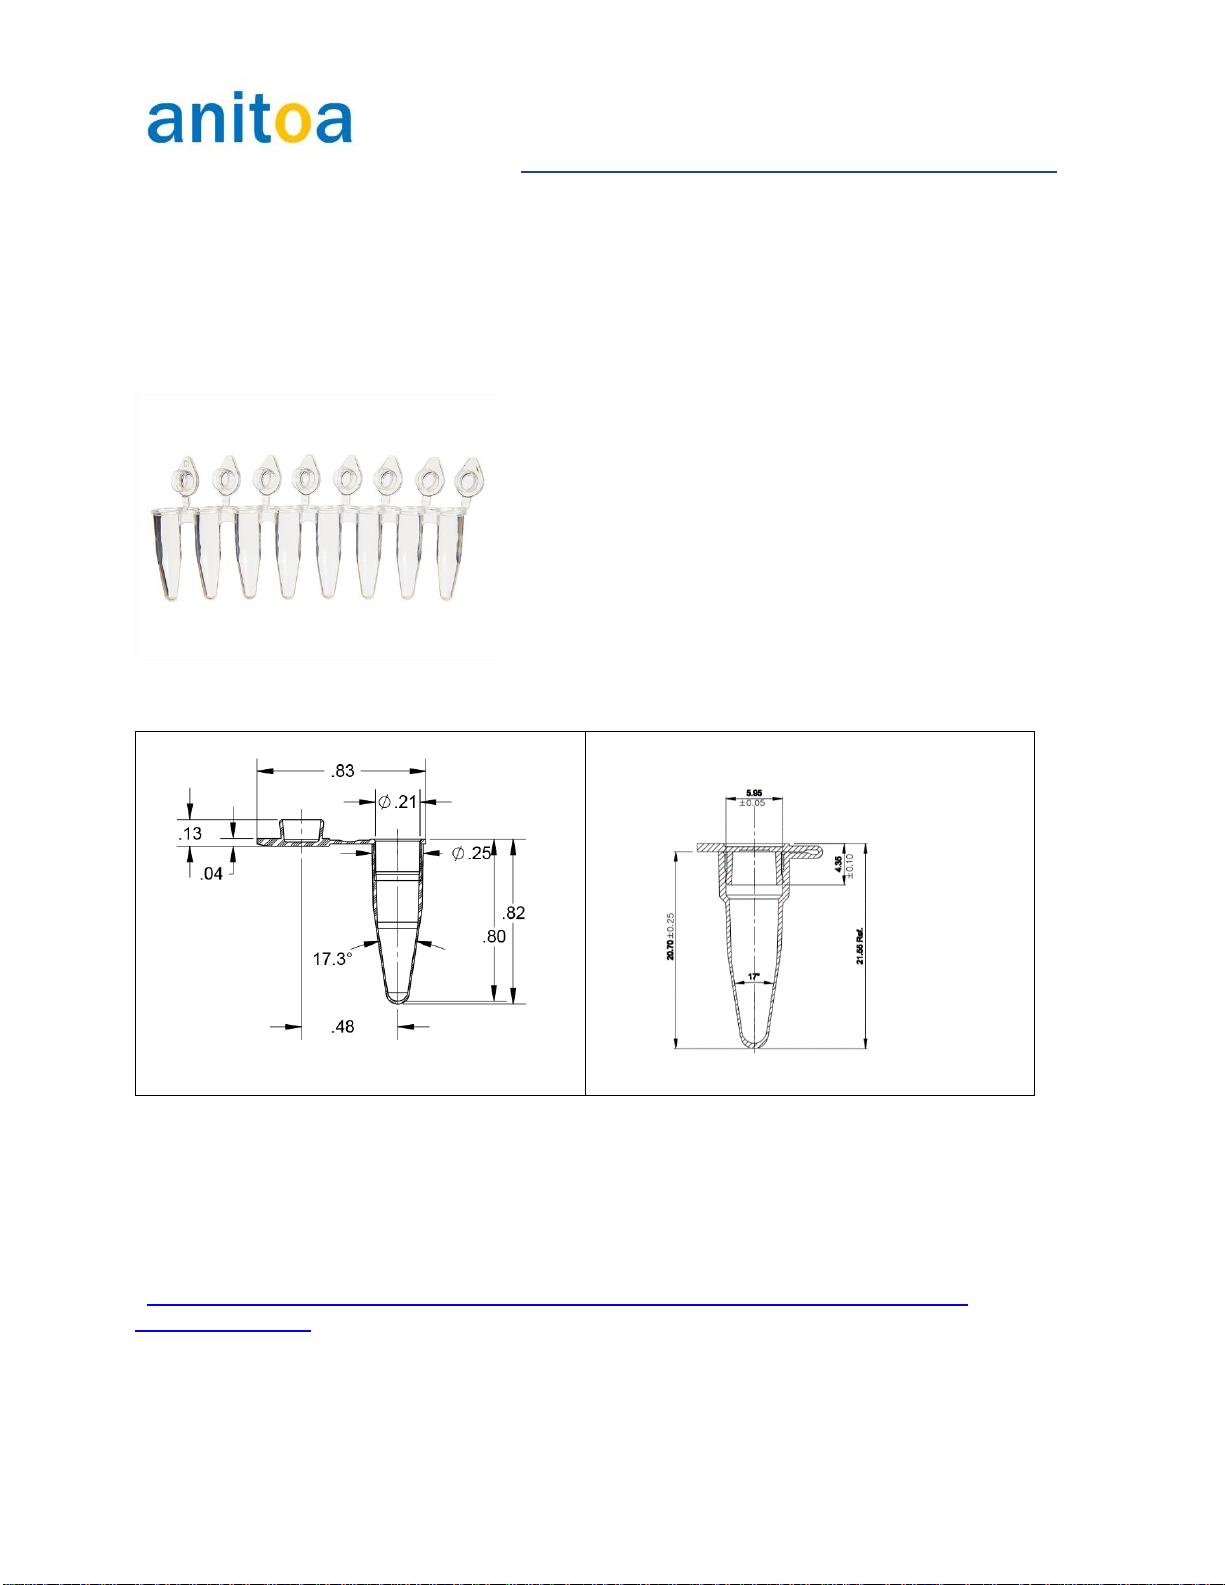
qPCR tube/plasticware requirement .................................................................................................10
Some examples of the tubes that are proven to work in Maverick instruments:...........................10
Instrument cleaning requirement ......................................................................................................12
3. Step by Step Software Guide........................................................................................................13
Install the software............................................................................................................................13
Launching the software.....................................................................................................................15
The home button ...........................................................................................................................15
Resizing the window......................................................................................................................15
The setup page –Name setup..........................................................................................................16
Samples and fluorescence channels set up..................................................................................16
Open existing experiment for template file....................................................................................17
The setup page –Cycler setup.........................................................................................................18
Melting curve analysis period........................................................................................................19
Hot lid temperature and reaction volume ......................................................................................19
Saving template.............................................................................................................................19
Auto Integration Time....................................................................................................................19
Running the experiment and monitor status .....................................................................................20
Running amplification program......................................................................................................20
Running melt analysis ...................................................................................................................21
Analysis.............................................................................................................................................22

Maverick qPCR Quick Guide
3
Amplification analysis....................................................................................................................22
Positive vs Negative results..............................................................................................................24
Standard Curve Analysis...................................................................................................................25
Steps to perform standard curve analysis:....................................................................................26
Save experiment and Print Report....................................................................................................27
4. Troubleshooting guide...................................................................................................................28
Issue with connecting the power.......................................................................................................28
The test tube would not fit, or the lid would not pressure on test tube when closed ........................29
USB connection between PC and instrument cannot be established ..............................................29
How do I know if the instrument is functioning properly when everything is plugged in?.................30
Touchscreen blank on power up.......................................................................................................31
Temperature Profile Abnormal..........................................................................................................31
Instrument is running as expected but no data were collected.........................................................31
5. PCR data processing –Positive/negative determination and Ct calculation. ...............................32
Additional data processing method –base slope correction ............................................................33
Disable data processing to view raw data for debugging purposes..................................................34
False positive detection.....................................................................................................................35
How to find the Relative strength, Amplification efficiency, and Signal to noise ratio of the reaction
data ...................................................................................................................................................38
6. Channel Crosstalk Suppression Techniques ................................................................................39
Method to adjust cross talk parameters............................................................................................41

Maverick qPCR Quick Guide
4
1. Product overview
Anitoa Maverick is a portable, high performance real time quantitative PCR system. Maverick is
equipped with a 4-channel fluorescence optical system, powered by Anitoa's ultra-low-light CMOS
bio-imaging sensor. Maverick is optimally suited for applications where portability, minimal space, fast
time-to-result is required. Applications of Maverick are point-of-care molecular diagnostics test
(POCT)
1
, food safety and environment testing, agriculture, or research lab use where bench space is
limited.
Figure 1.1 Maverick compact qPCR system
1
Clinical clearance maybe required

Maverick qPCR Quick Guide
5
Features
-Compact and rugged design. No internal moving parts, and no need for calibration.
-Multi-wavelengths 4-channels fluorescence sensing capability
2
.
-Equipped with ultra-low-light sensitive CMOS-based fluorescent imager.
-Cross platform software for Windows® and Android® OS, with cloud-ready connectivity.
-Low power. External supply with ~90W active power.
-Battery-backup option for outdoor use and power loss protection
Key parameters
Capacity (# of wells)
4, 8, 16
Channels (# of Fluorophores per well)
4 (1. FAM/SYBR Green; 2. JOE/HEX/VIC/TET;
3. ROX/Texas Red; 4. CY5/LIZ/Cy5.5)
Multiplex capability
Up to 4 targets per well
Minimum detection threshold
4 copies
Dynamic range
>1.0E9
Signal Interface
USB 2.0, Bluetooth® 2.0
Excitation source
High endurance LED
Detector
Ultra-low-light CMOS Bio-imaging chip
Thermal system
Solid-state, Peltier-based
Tube/plate formats
0.2mL, 4 or 8-tube strip
Reaction volume
10uL –60uL
Filters:
4 sets exchangeable*, **
Excitation Range:
460nm –670nm
Emission Range
510nm –720nm
DNA probes supported:
DNA binding dyes (e.g. SybrGreen), hydrolysis
probes (e.g. TaqMan probe) and hybridization
probes (e.g. FRET probes).
Temperature Uniformity
< +-0.2°C
2
Support Intercalating dyes, hydroxyls probes and FRET probes

Maverick qPCR Quick Guide
6
Temperature control resolution
+-0.1 °C
Temperature Ramp Rate
5.5°C /s heating; 4°C /s cooling
Size and weight
247mm (L) x 188mm (W) x 133mm (H).
Weight
1350g
Power supply
DC 16V, 90W (Adapter provided that accepts
110V/240V AC)
*: Wavelength characteristics can be modified by changing filter modules.
**: We support 1 –4 channels in different configurations.
Applications
•Point-of-care molecular diagnostics
3
•Food safety test
•Environmental microbial-threat monitoring
•Agriculture DNA testing
•Forensic testing
•Research and educational lab use
•Drug quality assurance testing
3
Clinical clearance required.

Maverick qPCR Quick Guide
7
Instrument external dimension
Figure 1.2 shows the external dimension of the Maverick qPCR instrument.
Figure 1.2 Maverick compact qPCR system product dimension

Maverick qPCR Quick Guide
8
2. Hardware set-up guide
Power up the instrument
The instrument is powered through an external AC/DC power adapter. The power adapter accepts
AC input ranging 110V to 240V and produces DC output of 16V
4
.
The DC power input connector port is located at the back of the instrument. Once the power is
provided, the green power indicator light will turn on.
Figure 2.1 Maverick qPCR USB and power connections
Connect to a PC via USB
The instrument is equipped with an USB port at the back, we can connect the instrument to a
Windows® based PC via the supplied USB cable.
4
10.5 V for selected custom models

Maverick qPCR Quick Guide
9
For instruments that are equipped with a touch screen, there is no need to connect the instrument to
a host PC or Tablet.
Light indicator states
There are two LED indicator lights. The green light is used to indicate power supply. As long as the
instrument is powered, the green LED indicator will stay on.

Maverick qPCR Quick Guide
10
qPCR tube/plasticware requirement
Maverick qPCR requires the use of full transparent qPCR tubes with flat caps. See figure below for
examples.
Below are drawings and dimension of the tubes we recommend both in English and Metric units
Some examples of the tubes that are proven to work in Maverick instruments:
UltraFlux® i PCR Tubes with Caps - 3247-00 from SSIBio
(https://www.ssibio.com/pcr/snapstrip-ultraflux-i-ultraflux-z-pcr-tubes/ultraflux-i-pcr-tubes-with-
caps/3247-00-detail)
EasyStrip™ Plus Tube Strip with Attached Ultra Clear Caps AB2005 from Thermo Fisher

Maverick qPCR Quick Guide
11
(https://www.thermofisher.com/order/catalog/product/AB2005)
Axygen® 0.2 mL Polypropylene PCR Tube Strips and attached Flat Cap Strips, 8 Tubes/Strip, 8 Flat
Caps/Strip, Clear, Product Number PCR-0208-AF-C
(https://ecatalog.corning.com/life-sciences/b2b/US/en/Genomics-%26-Molecular-Biology/PCR-
Consumables/PCR-Tubes-and-Strip-Tubes/Axygen%C2%AE-PCR-Strip-Tubes/p/PCR-0208-AF-C)

Maverick qPCR Quick Guide
12
Instrument cleaning requirement
Regular cleaning
For everyday cleaning requirement, we can use a soft, clean and damp cloth to wipe the external
surface of your instrument. After this step, dry your instrument with another soft cloth. Avoid abrasive
cloths, towels, paper towels, and similar items that might cause damage. Before cleaning your
instrument unplug all external power sources, devices, and cables. Don’t get moisture into any
openings.
Well cleaning for more contaminations
If the experiments were not carried out carefully, substances such as spill-over DNA that may cause
fluorescence background, cross talk etc. can get into the reaction wells. We could clean the reaction
wells with lint-free wipes or swabs. Moreover, to remove potential contaminants, we recommend use
10% bleach solution to clean suspected contamination areas. We could let the cleaning solution on
the surface for 10-15 minutes before another wide down with de-ionized water.

Maverick qPCR Quick Guide
13
3. Step by Step Software Guide
System Requirement
The Maverick software Windows version required Microsoft Windows 10 or later (Including Windows
11). The desired hardware spec. for the laptop (or desktop) system is listed below:
•If use AMD CPU systems, The AMD Ryzen 5 or better is recommended.
Install the software
The software is delivered as pair of installation files: setup.exe, and Installer.msi. Run setup.exe and
follow instructions to install the software.
If the file is one compressed file, please decompress it first. If you do not have a
compress/decompress utility installed on your computer, go get one at: http://www.7-zip.org . It is
free.
The installed application file will be in C:/Anitoa/Maverick by default.
To launch the Maverick software, click the Windows® Start button on the left bottom corner of the
desktop and find Maverick software. See below:

Maverick qPCR Quick Guide
14
An icon for Maverick software will also appear on the desktop. We could launch the software by
clicking on this icon.

Maverick qPCR Quick Guide
15
Launching the software
When the Maverick PC software is launched, after a brief delay for device initialization, the front page
will display as shown in Figure 3.1.
Figure 3.1 Maverick software front page
Several notable features are marked in Figure 1. Marker (1) is an indicator of whether the Maverick
USB device is found. If found, a message “HID Device Connected” is shown along with a green dot.
We call it HID because the Maverick instrument uses USB HID device class.
The home button
Marker (2) is the home button. At any time of running this software, click this button to return to this
front page.
Resizing the window
Marker (3) is the place to drag to resize the Maverick software windows.

Maverick qPCR Quick Guide
16
The setup page –Name setup
Click on the “Setup” button will take us to the setup page (Figure 2). Here we can set up the
experiment. Here we can name the experiment and all the samples in the wells. We can also name
and select the fluorescence channels for qPCR fluorescence reading.
A default date-coded experiment name is given on this page when we first enter. Feel free to change
it to something you choose.
Samples and fluorescence channels set up
The software automatically detects the number of reaction wells the connected instrument can
support. Each reaction well can be associated with a sample. In this page, the user can enter a name
for each sample. It a sample well name field is left empty (white spaces), it is considered that the
sample does not exist for that well.
It is important to select the fluorescence channels (Marker (2)) we need to use for the experiment.
The selection of the channels depends on the type of fluorescence dyes used in the assay design.
We can also give a name for each selected channel
Figure 3.2 The setup page –sample setup

Maverick qPCR Quick Guide
17
Open existing experiment for template file
We can also load an existing experiment file or template file by clicking on the “Open experiment file”
button (Marker (1)).
When this step is done, we can click on the “Next step” button to continue setting the thermal cycling
program.
Additional sample property setup
By double clicking the sample grid in the Sample setup window, the user can set up additional
information about the sample by entering values in a pop-up window shown below. Additional
property includes type of sample as well as standard quantities.

Maverick qPCR Quick Guide
18
The setup page –Cycler setup
Here we can setup the thermal cycler program. We could choose the type and number of thermal
periods and steps, assign time period and temperatures. We could have up to two Pre-Denature
periods. The main thermal cycling period can have 2, 3, or 4 steps. We can also define at which step
the fluorescence capture is done. Lastly, we have a hold period whose temperature and time period
are configurable.
A cycler program can have several periods; and each period can have one or more steps. For
example, we could have pre-denature period, cycle period and hold period. In the cycle period, we
can have many repeated cycles consists of denature, annealing, and extension steps.
Figure 3.3 Cycler setup
qPCR amplification thermal cycling program starts when the user clicks on the “Start” button.

Maverick qPCR Quick Guide
19
Melting curve analysis period
We can also add a Melt Curve (Marker (1)) analysis period at the end of the main thermal cycling
program. The Melt curve analysis can be triggered either manually by clicking the start melt analysis
button, or automatically by checking “” check box (not done yet).
Hot lid temperature and reaction volume
In this page, we can also set the desired hot lid temperature and reaction volume. The latter (reaction
volume setting) is used for data analysis only. It will not affect how the experiment is run.
Saving template
At this step, we can also save the settings to a template file (Marker (2)). So next time when we
perform a similar experiment, we can just load the template file instead of manually entering all the
information again.
Auto Integration Time
This is an option to let the instrument automatically choose the optical sensor integration time (i.e.
Exposure time of the fluorescence camera) according to the fluorescence strength of the assay
(Marker (3)). The goal is to adjust the sensitivity of the fluorescence camera so that the signals from
the chemistry fall into the appropriate dynamic range of the sensors and yield the best signal to noise
ratio (signal quality). We recommend leaving this check box checked.

Maverick qPCR Quick Guide
20
Running the experiment and monitor status
In the setup page –cycler setup, when we are satisfied with all the settings and loaded the samples,
we can start running the experiment by click the “Start…” button.
Before the instrument starts to execute thermal cycling program, it will automatically check to ensure
the lid is closed and the main power is applied. If either of these conditions is not met, the software
will show popup windows with warnings. We could correct these programs and start again by simply
press the “Start…” button again.
When the qPCR cycler starts to run, the software will automatically switch to Run pages. The first
Run page will allow us to monitor hot lid and reaction well temperature. We can easily see if the
temperature is going through the cycling programs or not.
Running amplification program
When running normal qPCR amplification program, the amplification window will real time monitor the
fluorescence signal from the samples. In addition, the Run-Amplification Curve page will also show
the current run status and estimated remaining run time.
Other manuals for Maverick qPCR
1
This manual suits for next models
1
Table of contents
Other anitoa Industrial Equipment manuals
Popular Industrial Equipment manuals by other brands

Kitagawa
Kitagawa GT instruction manual

SUHNER ABRASIVE
SUHNER ABRASIVE BSGV 3/12 installation instructions

Rice Lake
Rice Lake 1280 Enterprise Series quick start guide

SCHUNK
SCHUNK EOA-TM51214-PZN-plus 64-1 Assembly and operating manual

Metz Connect
Metz Connect 1502500000-E Mounting instruction

Festo
Festo DGEA-18-...-YSR Series operating instructions