Anser U2 PRO User manual

1
U2 PRO/DIESEL/SMART
USER MANUAL
ANSER CODING INC.
www.anser-u2.com
Initial version: 2014.10.01
Reversion: 2015.11.12
ANSER CODING INC.

2
CONTENTS
Specification ......................................................................................................... 4
Description...................................................................................................... 4
INstallation ..................................................................................................... 5
Operation........................................................................................................ 5
Introduction.......................................................................................................... 6
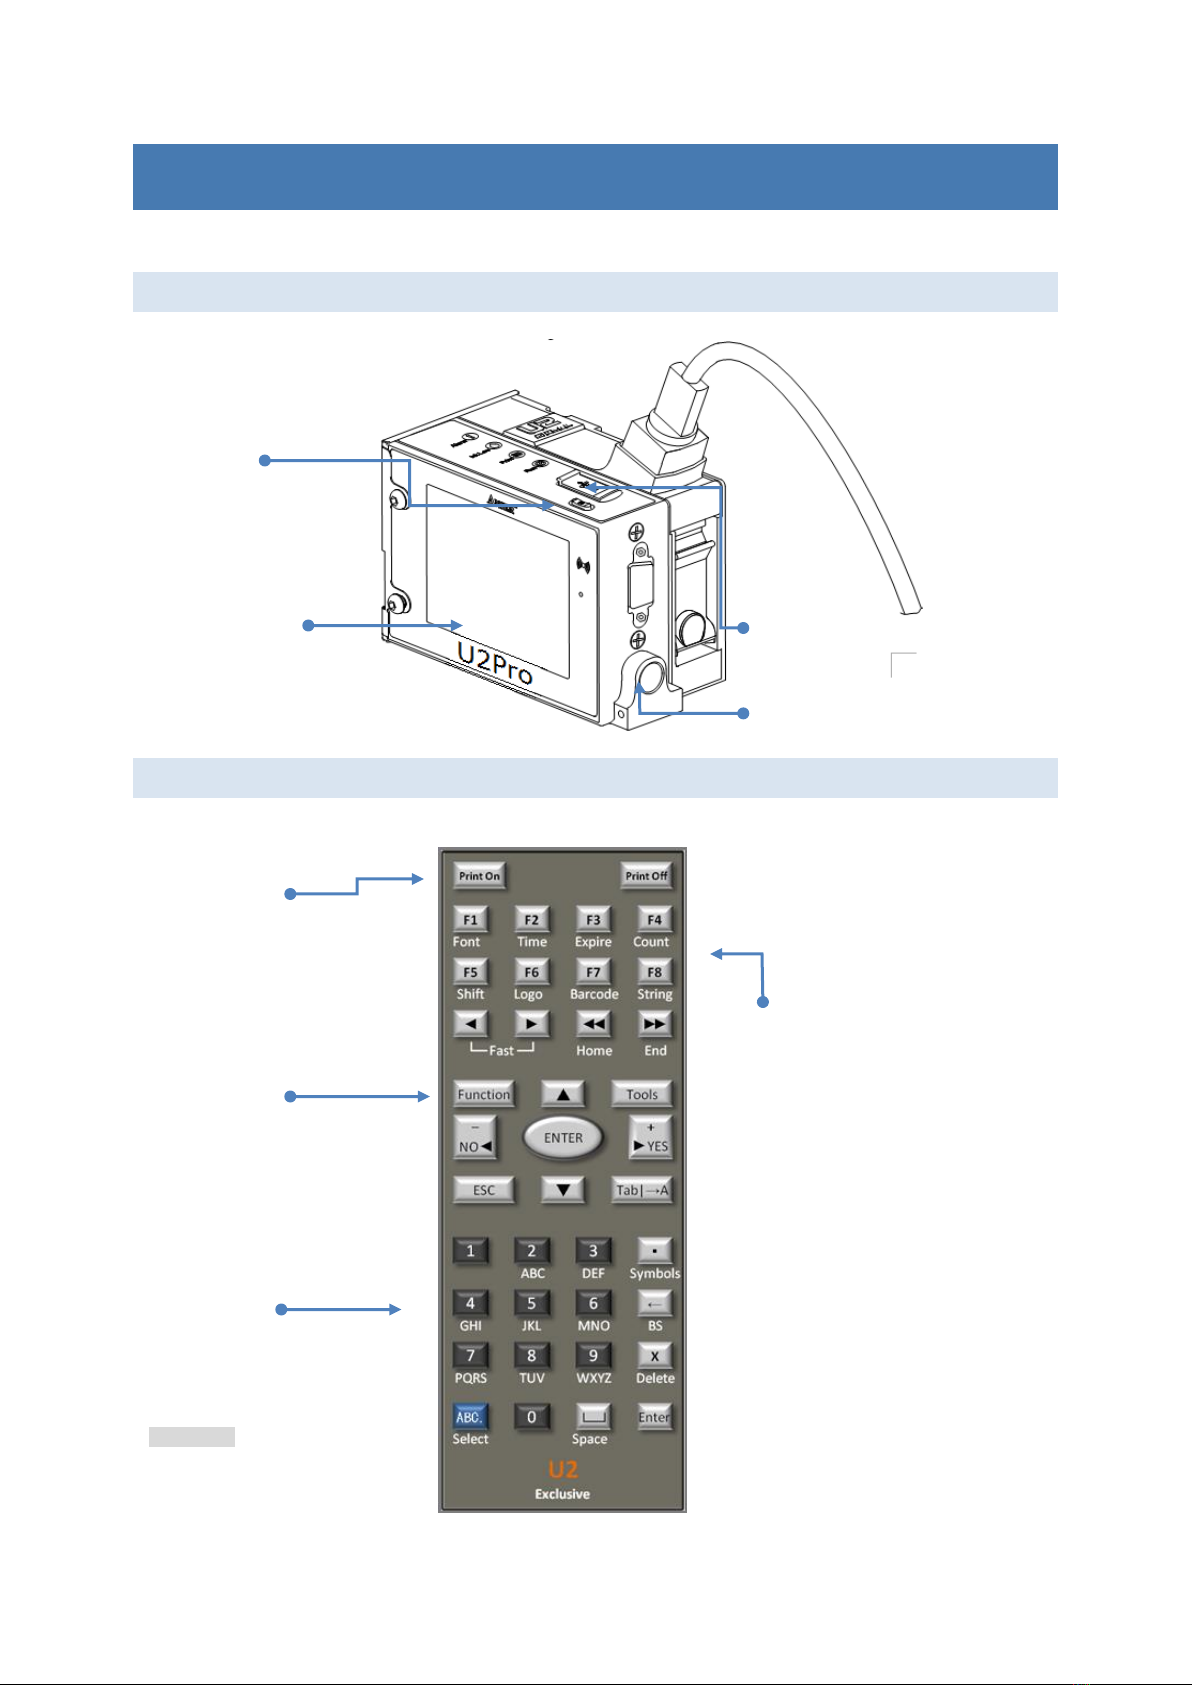
Device Overview .............................................................................................. 6
IR-remote keypad............................................................................................ 6
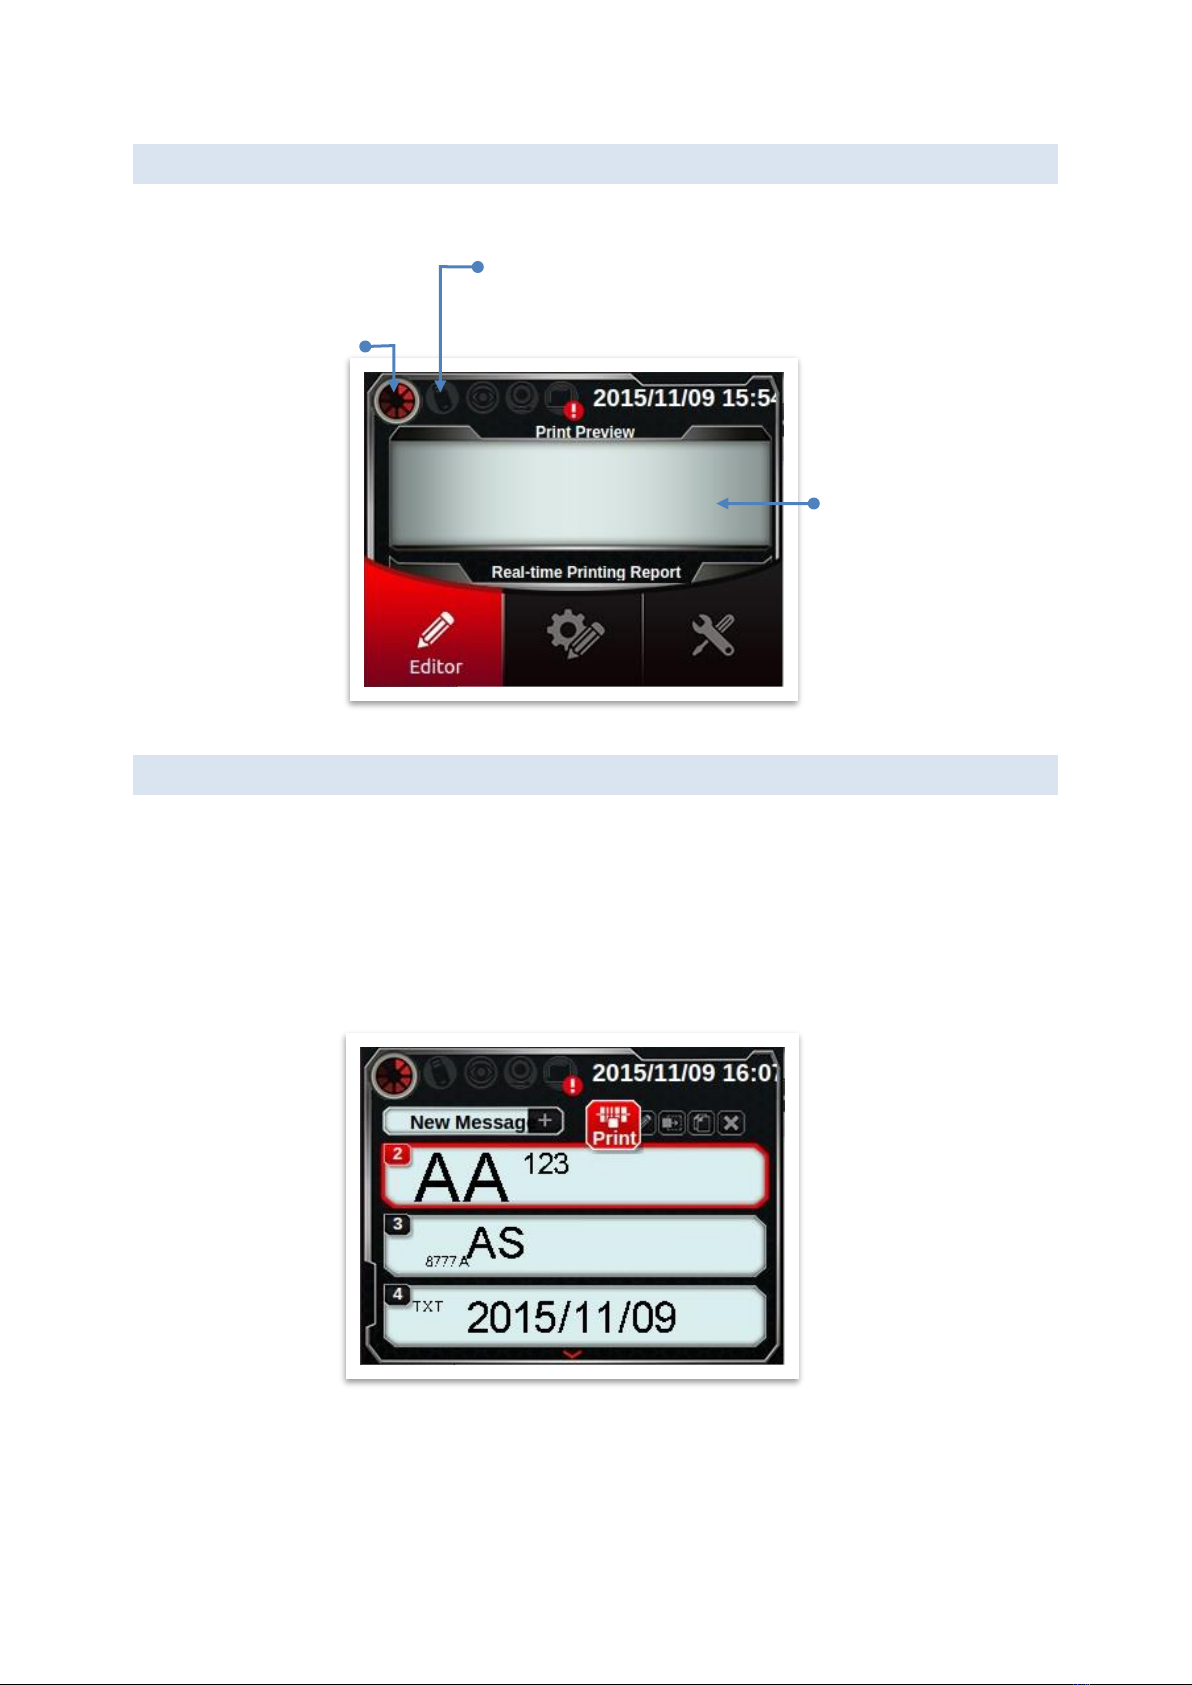
Home page ..................................................................................................... 7
printing guide.................................................................................................. 7
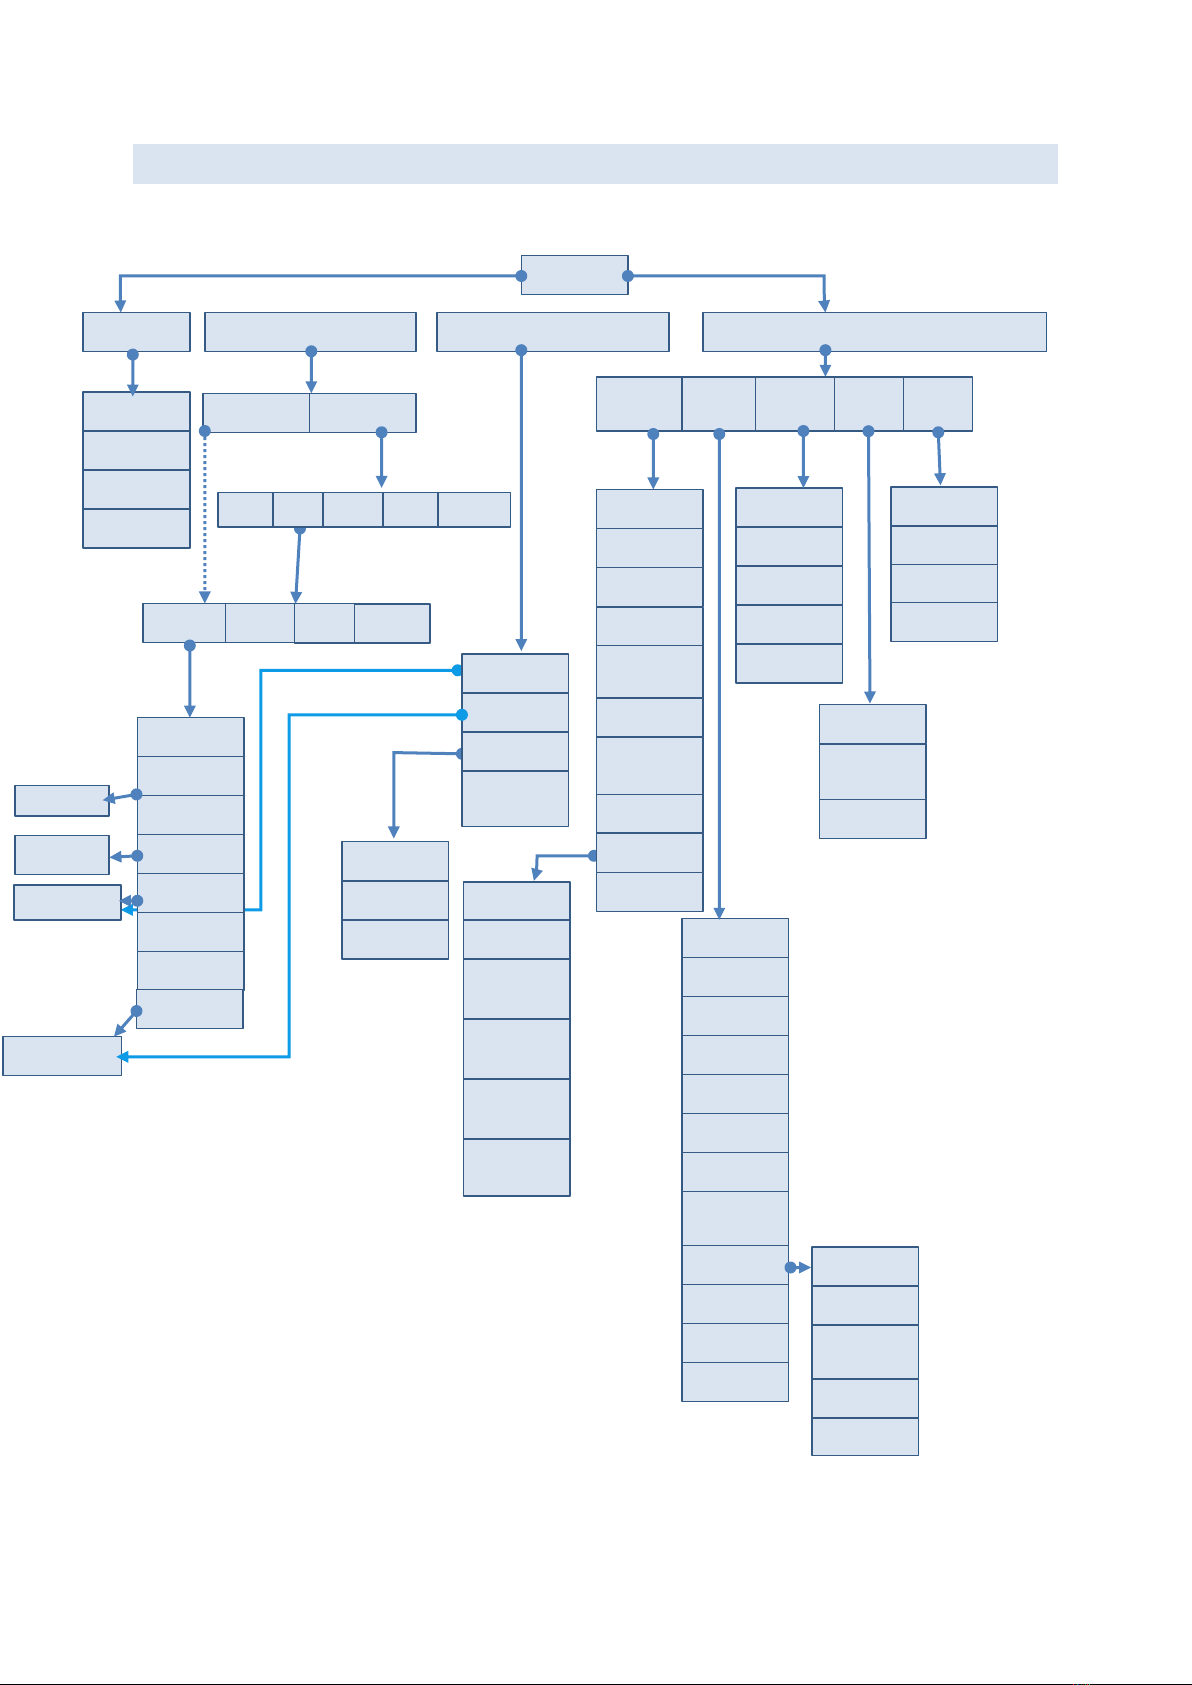
Menu tree ....................................................................................................... 8
System Settings .................................................................................................... 9
general........................................................................................................... 9
print head ......................................................................................................12
Photocell devices ............................................................................................13
display...........................................................................................................14
Sounds ..........................................................................................................14
EDITOR SETTINGS................................................................................................15
EDITOR ...............................................................................................................16
Create new message (Add Object) ....................................................................16
Preview list (select message)............................................................................21
MOdify message object....................................................................................22
Dashboard...........................................................................................................24
System..........................................................................................................24
ink ................................................................................................................24
cartridge........................................................................................................24
alarm ............................................................................................................24
USB Sync ............................................................................................................25
About message pro .........................................................................................25
About Ink saving pro .......................................................................................26

3

4
SPECIFICATION
DESCRIPTION
Printer
Display
3.5”LCD with LED backlight
User Interface
Simple and easy-to-use operating system
Input Device
Pocket-sized IR remote keypad
Compact 7’tablet PC with multi-touch (optional)
Available Language
Chinese (Traditional and Simplify), English, German,
Spanish, Portuguese, Russian, Japanese and Korean
LED Indicators
Alarm, Ink low, print, run, remote on/off
Electrical Requirements
AC 100V~240V, 50/60Hz
Dimensions
119x78.8x76 mm3
Weight
550g
Mounting Orientation
Horizontal or downside
Operating Temperature
5℃-50℃(41℉-122℉)
Data Interface
RS485, USB port
Printing Engine
Cartridge
Powered by Lexmark, 36ml Solvent compatible,
designed for non-porous surfaces.
Print Distance
6mm recommended print distance.
Print Capability
Alphanumeric, logos, data/time, shift, counter, barcode.
Print Height
Limited to 12.7mm (0.5”). Selectable font size from
2.7mm, 3.6mm, 5.5mm, 8mm, 10mm, 12.7mm.
Special Features
Complete stand-alone, no PC required
Hot-swap: Circuit safeguard for quick cartridge change-over
Group network management
Setup wizard
Cartridge shutter

5
INSTALLATION
1. Make sure all screws are tightened and use anti-shock mechanism is necessary.
Otherwise, any external damages such as box shocking isn’t covered by warranty.
2. Please load and unload cartridge in 15 degree angle.
3. The installation of an UPS is highly recommended because it helps to avoid the damage
that may be caused by power loss.
4. Power grounded is highly recommended. Furthermore, please avoid to share power
supply with any high power equipment.
5. If the working environment is dusty, it is highly recommended clean the nozzle regularly
using a low pressure compressed air supply that is dry and clean.
OPERATION
1. The remote controller will turned off automatically after three minutes if it is not being
operated.
2. Please keep the printing distance to a target object within 6mm to ensure the best
printing quality.
3. When the print head appears to have ink excessive, please apply the wet wipe to clean
the nozzle surface.
4. If the printing position is incorrect, please press the key [Tab|→] on the remote keypad
to adjust message print-delay to the best printing position.
5. In a dusty operation environment, please clear the dust using clean low pressure
compressed air daily.
6. Please contact your local distributor if the printer mal-functions and the problems cannot
be solved by yourself.

6
INTRODUCTION
This section describes: printer device, remote keypad and menu tree.
DEVICE OVERVIEW
IR-REMOTE KEYPAD
Below is key function description.
Ink Cartridge
USB Port
Extension Port
Power Connector
IR Switch
(Long press to shutdown)
IR Receiver
IR Indicator
LCD Panel
Shortcut
F2: Set system time
F3: Modify object [expire]
F4: Modify object [counter]
F5: Modify shift table
F6: Preview Logo
F8: Modify string table
◄: Move left (zoom out)
►: Move right (zoom in)
◄◄: Fast move left.
►►: Fast move right.
Printing key
Print On: start to print
Print Off: stop printing
Control Key
Function: Setting page
Tools: Dashboard
Tab|→: Message delay
ESC: Last page
Enter: Confirm
▲▼◄►: Direction
Input
0 ~ 9: Alphanumeric
.Symbols: symbols
←BS: Backspace
X Delete: Delete
ABC.Select: Case select
└┘Space: Space

7
HOME PAGE
In home page, select [Browser] by [◄][ ►] as below, then press [Enter].
PRINTING GUIDE
Printer: Fixed on the bracket or placed on the platform properly.
Photocell: For first use, please set the source (internal or external) and signal edge.
Nozzle: Adjust the nozzle direction and global delay.
Encoder/Conveyor: Set up encoder (300DPI or 400DPI) or conveyor speed.
Operation: As shown above, select [Editor] to get into preview page, select the message
you want to print by key [▲][▼]. Finally, press [print].
Please place the printing target (paper) on the sliding table (or conveyor).
Once the photocell triggered, you will see the message printed on target.
USB slot indicator (Support: flash/keyboard)
Indicates external encoder: not enable.
Indicates external photocell: not enable.
Ink cartridge: not exist
Message Preview
Browse message
Shortcut function
Configuration settings
Red roulette rotates
while printing.

8
MENU TREE
Below is the printer’s menu tree.
Home
Editor Settings
Clean Nozzle
Production
Counter
Interval
Time
Date
Counter
System Settings
Channels
Brightness
Unit
Source
Language
Nozzle
Direction
DPI
Resolution
Print Scale
Pre-purge
Level
Repeat Print
Time Refresh
Password
Font Type
Customer
Font
System Time
Log Clear
Restore
Log Report
Counter
Keypad Tone
Printing
Screen
Saver
Check beep
Diagnose
Trigger
Encoder
Conveyor
Box Width
Daylight
saving
Global Delay
Repeat
Times
Infinite
Init Delay
Gap
Trigger
Settings
Export
Log Export
Editor
List
New
Counter
Expire
Time
Text
Delete
Add
Shift
Logo
Barcode
String
Format
Parameter
Shift Table
String Table
General
Print
Head
Devices
Display
Sounds
Dash
Printer
Ink
Cartridge
Alarm
Print
Edit
Copy
Delete
Edit
Move
Customer
Year
Global Shift
Global String
Zero Display
Delay
Msg Files
Export
All Files
Export

9
SYSTEM SETTINGS
GENERAL
LANGUAGE:
Supported 12 languages which include: Chinese, simplified Chinese, Japanese, Korean,
English, German, Portuguese, Spanish, Russian, French, Italian and Turkish.
UNIT OF MEASUREMENT:
Switch unit of measurement to metric (mm) or imperial (inch).
PASSWORD:
Once this function enabled, every time will ask for password to get into system.
System could setup 5 groups of user password at most.
Notes: Admin password: 1234
FONT TYPE
Font type
Basic
Arial
Gothic
Customize
Customize
User could select basic or customize font type.
About customize fonts, we can customize the new font according customer request, it needs
the PC software (Message Pro) and USB to import. Switch [Font Type] to [Customer], you
will find the customized font list in [Customer Font].
GLOBAL DELAY
Set up the value of global delay. This value will function for every message.

10
TIME
SET TIME
Set the system clock. (YYYY/MM/DD hh:mm:ss)
DAYLIGHT SAVING
Set up daylight saving mode.
SPEC\Time
Start
End
European
The last Sunday in March, time
shift at 01:59:59→03:00:00.
The last Sunday in October, time
shift at 01:59:59→01:00:00.
American
The 2nd Sunday in March, time
shift at 01:59:59→03:00:00.
The 1st Sunday in November, time
shift at 01:59:59→01:00:00.
MESSAGE REPORT
CLEAR REPORT
Clear all the content in the report.
BACKUP REPORT
Please insert the USB to the printer before this function.
It will back up the report file (report.log) to the USB, the path is USB://auprn/u2d/ or
USB://auprn/u2s/.
IMPORT/EXPORT CONFIGURATION
Please insert the USB to the printer before this function.
Export the configuration to USB, or import it from USB.
IMPORT/EXPORT MESSAGES
Please insert the USB to the printer before this function.
Export messages to USB, or import them from USB.

11
RESET TO DEFAULT
Following is the factory default value.
Language
English
Photocell Source
Internal
Measurement
Metric
Global Delay
0 mm
Password
Off
Encoder and
Conveyor
Encoder: Off
Print Mode
Arial
Conveyor speed:
76m/min
Dots/inch
50
Resolution
50*300
Daylight Saving
Off
Screen Brightness
Maximum
Channel
Single channel
Screen Saver
Off
Auto nozzle
Off
Key tone
On
Nozzle Switch
Off
Printing Beep
off
Printing direction
ABC→
Repeat Print
Off
Time Refresh
Off

12
PRINT HEAD
NOZZLE SWITCH
U2 Diesel/Smart supports dual channel printing.
NOZZLE/NOZZLE SWITCH
In single channel mode, you can select left or right channel manually.
PRINT DIRECTION
ABC→: Print from left to right, ←ABC: Print from right to left.
RESOLUTION (DPI)
Encoder range is between 50~600 DPI.
Resolution
Single Channel
Dual channel
DPI*300
DPI*600
Channel mode: single
nozzle switch: left/right

13
PRE-PURGE
Once you enable this function, you can set up the Pre-purge humidity (1~5), higher the
environment temperature, higher the humidity value.
REPEAT PRINT
Following table describes how to setup initial delay and gap value for repeat print.
Setting\Condition
Repeat several
times after triggered
Repeat print continuously
after triggered
Repeat print
continuously
Trigger
On
Off
Off (trigger free)
Finite mode
Finite
Infinite
Infinite
Repeat time
Set value
0
0
TIME REFRESH
[Setting]→[Print head]→[Duration], range is 1~9 minutes.
If you have more precise requirements for printing contents of object in seconds, please set
this value to 1.
CLEAN NOZZLE
Use function [clean nozzle] to clean print head when nozzle clogging or blocking.
PHOTOCELL DEVICES
PHOTOCELL SOURCE
Set up the photocell source, internal or external.
TRIGGER MODE
According photocell specification, set proper trigger mode.
ENCODER AND CONVEYOR SPEED
The printing speed of printer should be the same with movement speed of target. Otherwise,
the output message will be stretched or shortened.
Solution:
Use encoder: [System]→[Encoder: On]→[DPI Setting]
Input Conveyor speed: [System]→[Encoder: Off]→[Conveyor Speed]
Notes: When the [Encoder] is “on”, the [Conveyor Speed] will be unavailable.
BOX WIDTH
Set up the box widh(mm).

14
DISPLAY
BRIGHTNESS
Set screen brightness, rang is 10%~100%.
SCREEN SAVING
Screen saving time, range is 1~60min.
DIAGNOSTIC
After start testing, LCD will display red, green, blue and white for 1 sec sequentially.
SOUNDS
Turn on/off the alarm for counter, remote keypad and printing beep.

15
EDITOR SETTINGS
SHIFT
Shift table divides a day into 5 periods, each represent a working shift. Shift object will use
current time to match proper shift name and then print it out.
Ex: Now is 09:14, so the shift name is ‘AAA’.
STRING
Setup the string number (1~5) of string object.
String table: Edit content for each string number.
PRE-ZERO (TIME, DATE, COUNTER)
CUSTOMER YEAR
Set customer year.
Ex: Assume this value is 103. The content of year will be replaced by 0103.
ROLLOVER HOUR
Set a time point for date change. This value will not affect the system clock, just has the
effect on the date which we print out.
Assume now is 2014/10/08 23:52:00, and rollover hour is set to 23:50, then actual print
time is 2014/10/09 23:52:00. (10 minutes in advance to change day).
Time
Date
Counter (digit:6,value:8)
Fill 0
12:08:05-
2014/02/08-
000008-
Align left
12:8 :5 -
2014/2 /8 –
8 -
Align right
12: 8: 5-
2014/ 2/ 8-
8-
Compact
12:8:5-
2014/2/8-
8-

16
EDITOR
This page includes 2 functions: [Create new message] and [Message list].
CREATE NEW MESSAGE (ADD OBJECT)
Press [New Message], you will get into [Add Object] page as below. Type of objects could be
text, time, expire, counter, shift, logo and string. Other properties include context, font size
and angle.
TEXT
Any new message must input mode first: free or row mode. Font type of text could be arial
or gothic, parameter setting includes: font size (2.7mm, 3.6mm, 5.5mm, 8.0mm, 10.0mm,
12.7mm) and angle (0,180).
Print
[Edit]
Delay
Copy
Delete
New
Message
Select
Message

17
TIME/EXPIRE
[Time/Expire]→[Format]: It allows user to edit 20 types of custom time format.
Remote keypad: Press [0~9] to input the number (T9 keyboard for input letter), ‘└┘’key
could input space.
Remote keypad: Press [.] to pop up symbol window.
[JJJ365]: What day of year
[Week52]: What week of year
[Day7]: What day of week
[#+/]: Symbol window
Please input alphanumeric
and symbols here

18
COUNTER
There are 3 types of counter, general counter, box counter and lot counter.
Each type has 4 parameters, which are max, min, start (current) and step value.
Each counter will reset to its minimum value when current value exceeds its maximum
value. If box counter’s current value exceeds its max, it will carried to lot number counter.
Ex: General counter: step=1, current:5→6
0 1 2 3456…999
Box: step=10, reset:100→10 Lot:step=2,current:4→6
10 20 30 …99 100 2 4 68 …20
In this example, counter’s current value changes from (5,100,4) to (6,10,6).
SHIFT
Shift table divides a day into 5 periods, each represent a working shift. Shift object will use
current time to match proper shift name and then print it out.
Ex: Now is 09:14, so the shift name is ‘AAA’.
LOGO
Select the logo object for logo list. Besides, we also could use Message Pro to import more
logo sources.
Box# overflow
Lot# carried

19
BARCODE
This function only supports barcode with static content.
For example, a CODE128 barcode with content ‘text’is below.
For the dynamic barcode, you can use the PC software (Message Pro).
All types of barcode:
Name1
Name2
Description
1
EAN8
2
EAN13
3
EAN14
4
EAN128
5
UPCA
6
UPCE
7
CODE39
8
CODE128
9
ITF14
SCC-14
10
NVE18
SSCC-18
11
C25INTER
12
CODABAR
13
PDF417
14
DATAMATRIX
15
QRCODE
STRING
Setup the string number (1~5) of string object.
String table: Edit content for each string number.

20
MOVE OBJECT
Final stage of add new message is [Move Object] page.
After add the object, you can get into the move object page, initial position of the new
object will be the end (most right edge) of message.
Direction key [▲][▼][◄][►] could move object.
Notes: [◄◄][►►] could fast move left/right of object.
This manual suits for next models
2
Table of contents
Other Anser Printer manuals