logo
Brands
  1. Home
  2. •
  3. Brands
  4. •
  5. ANTAIRA
  6. •
  7. Switch
  8. •
  9. ANTAIRA LNX-0500-M12-67 Series User manual

ANTAIRA LNX-0500-M12-67 Series User manual

Other manuals for LNX-0500-M12-67 Series

1

Other ANTAIRA Switch manuals

ANTAIRA LNX-1002C-SFP Series User manual

ANTAIRA

ANTAIRA LNX-1002C-SFP Series User manual

ANTAIRA LNX-C500G Series User manual

ANTAIRA

ANTAIRA LNX-C500G Series User manual

ANTAIRA LNX-C501G-SFP Series User manual

ANTAIRA

ANTAIRA LNX-C501G-SFP Series User manual

ANTAIRA LMP-0500 Series User manual

ANTAIRA

ANTAIRA LMP-0500 Series User manual

ANTAIRA LMX-0804G-SFP-T User manual

ANTAIRA

ANTAIRA LMX-0804G-SFP-T User manual

ANTAIRA LNX-1204G-10G-SFP User manual

ANTAIRA

ANTAIRA LNX-1204G-10G-SFP User manual

ANTAIRA LNP-0800G-24 Series User manual

ANTAIRA

ANTAIRA LNP-0800G-24 Series User manual

ANTAIRA LMX-1802G-M12-10G-SFP-67-110 Series User manual

ANTAIRA

ANTAIRA LMX-1802G-M12-10G-SFP-67-110 Series User manual

ANTAIRA LNX-602N User manual

ANTAIRA

ANTAIRA LNX-602N User manual

ANTAIRA LMP-1204G-SFP Series User manual

ANTAIRA

ANTAIRA LMP-1204G-SFP Series User manual

ANTAIRA LNX-0601G-SFP User manual

ANTAIRA

ANTAIRA LNX-0601G-SFP User manual

ANTAIRA LMX-C602G-SFP-V2 Series User manual

ANTAIRA

ANTAIRA LMX-C602G-SFP-V2 Series User manual

ANTAIRA LMP-1802G-M12-10G-SFP-67-110 Series User manual

ANTAIRA

ANTAIRA LMP-1802G-M12-10G-SFP-67-110 Series User manual

ANTAIRA LMP-1802G-SFP Series User manual

ANTAIRA

ANTAIRA LMP-1802G-SFP Series User manual

ANTAIRA LNX-800A Series User manual

ANTAIRA

ANTAIRA LNX-800A Series User manual

ANTAIRA LMP-2602G-SFP Series User manual

ANTAIRA

ANTAIRA LMP-2602G-SFP Series User manual

ANTAIRA LNX-0501 Series User manual

ANTAIRA

ANTAIRA LNX-0501 Series User manual

ANTAIRA LNP-0500-24 Series User manual

ANTAIRA

ANTAIRA LNP-0500-24 Series User manual

ANTAIRA LNP-1802G-SFP Series User manual

ANTAIRA

ANTAIRA LNP-1802G-SFP Series User manual

ANTAIRA LNX-1600-E Series User manual

ANTAIRA

ANTAIRA LNX-1600-E Series User manual

ANTAIRA LMX-0501G-SFP-T User manual

ANTAIRA

ANTAIRA LMX-0501G-SFP-T User manual

ANTAIRA LNX-C501G-SFP Series User manual

ANTAIRA

ANTAIRA LNX-C501G-SFP Series User manual

ANTAIRA LMX-1802G-M12-10G-SFP-67 Series User manual

ANTAIRA

ANTAIRA LMX-1802G-M12-10G-SFP-67 Series User manual

ANTAIRA LMX-2012G-SFP Series User manual

ANTAIRA

ANTAIRA LMX-2012G-SFP Series User manual

Popular Switch manuals by other brands

TRENDnet TK-401R null

TRENDnet

TRENDnet TK-401R null

TRENDnet TK-200K null

TRENDnet

TRENDnet TK-200K null

TRENDnet TE100-S8 null

TRENDnet

TRENDnet TE100-S8 null

URC Total Control MFS-8 installation manual

URC

URC Total Control MFS-8 installation manual

Azbil HPQ-D11 user manual

Azbil

Azbil HPQ-D11 user manual

Sony DFS-900M operating instructions

Sony

Sony DFS-900M operating instructions

SICK i17S operating instructions

SICK

SICK i17S operating instructions

F&F SZR-277 quick start guide

F&F

F&F SZR-277 quick start guide

Shure UAMS/BK user guide

Shure

Shure UAMS/BK user guide

Dräger X-zone Switch Off Instructions for use

Dräger

Dräger X-zone Switch Off Instructions for use

Asco Joucomatic 349 Series manual

Asco

Asco Joucomatic 349 Series manual

BT Mini Hub user guide

BT

BT Mini Hub user guide

D-Link DES-1226G manual

D-Link

D-Link DES-1226G manual

Johnson Controls FS80-C installation instructions

Johnson Controls

Johnson Controls FS80-C installation instructions

MicroNet SP1200A user manual

MicroNet

MicroNet SP1200A user manual

Ruijie RG-PF2920 Series Hardware  installation and reference guide

Ruijie

Ruijie RG-PF2920 Series Hardware installation and reference guide

Altinex DA1914SX user guide

Altinex

Altinex DA1914SX user guide

RJM MASTERMIND PBC/6X user manual

RJM

RJM MASTERMIND PBC/6X user manual

https://manuals.online logo
https://manuals.online logoBrands
  • About & Mission
  • Contact us
  • Privacy Policy
  • Terms and Conditions

Copyright 2026 Manuals.Online. All Rights Reserved.

Antaira Technologies
LNX-0500-M12-67 Series
5-Port M12 Industrial IP67 Waterproof Ethernet Switch,
with 5*10/100Tx with M12 Connector
Quick Installation Guide
Version 1.0
(May 2018)
Tel: 1-844-268-2472
Fax: 1-714-671-9944
www.antaira.com
19020000000066
Package Check List
The package contains the following items:
1 – Quick installation guide
1 – LNX-0500-M12-67(-T)
1 – DIN-Rail kit with screws
6 – M12 protective caps
6 – Port labels
Front Panel Layout
Product Overview
System Interface/Performance
All Ethernet ports support the auto MDI/MDI-X function
M12 connector with IP67 rated protection
Store-and-forward switching architecture
Power Input & Connection
DC 12 to 48V redundant power
It is recommended to use a UL listed industrial power supply
Operating Temperature
Standard operating temperature model: -10°C to 70°C
Extended operating temperature model: -40°C to 75°C
Case/Installation
IP67 protection
Wall Mount/DIN-Rail design
LED Indicators
LED Color Description
PWR Green On Power input 1 or 2 is active
Off Power input 1 and 2 are inactive
LAN Port 1~5
(LINK/ACT) Green
On Connected to network, 10/100Mbps
Flashing Networking is active
Off Not connected to network
Quick Installation
Ethernet Ports
M12 Ports (Auto MDI/MDI-X)
All M12 ports (4-Pin D-Coded Female Connector) are
auto-sensing for 10Base-T or 100Base-TX device connections.
Please follow the wiring pin assignment table below for Ethernet
port installation.
M12 4-Pin D-Coded Female Connector
Illustration Pinouts 10/100Base-T(X) Signal
1 Transmit Data + (TX+)
2 Receive Data + (RX+)
3 Transmit Data - (TX-)
4 Receive Data - (RX-)
Power Input Wiring
•Input voltage: 12-48VDC
•Dual DC power inputs for power redundancy
•Connection format: M12 5-Pin A-Coded male connector
•Suggest using UL listed industrial power supply
•Pin assignment of M12 power connector:
M12 5-Pin A-Coded Male Power Connector
Illustration Pinouts Function Description
1 V1+ Power Input 1 +
2 V2+ Power Input 2 +
3 V2- Power Input 2 -
4 V1- Power Input 1 -
5 Grounding
NOTE: Recommended use the wire gauge between 18~24AWG.
Screw Holes for Wall Mounting/Grounding
Ethernet Port Label
Power Inputs Port
(M12 5-pin A-Coded Male Connector)
10/100 Ethernet Port 1-5
(M12 4-pin D-Coded Female Connector)
Power LED
10/100Mbps Link/Activity LED
Power Port Label
Screw Holes for Wall Mounting/Grounding
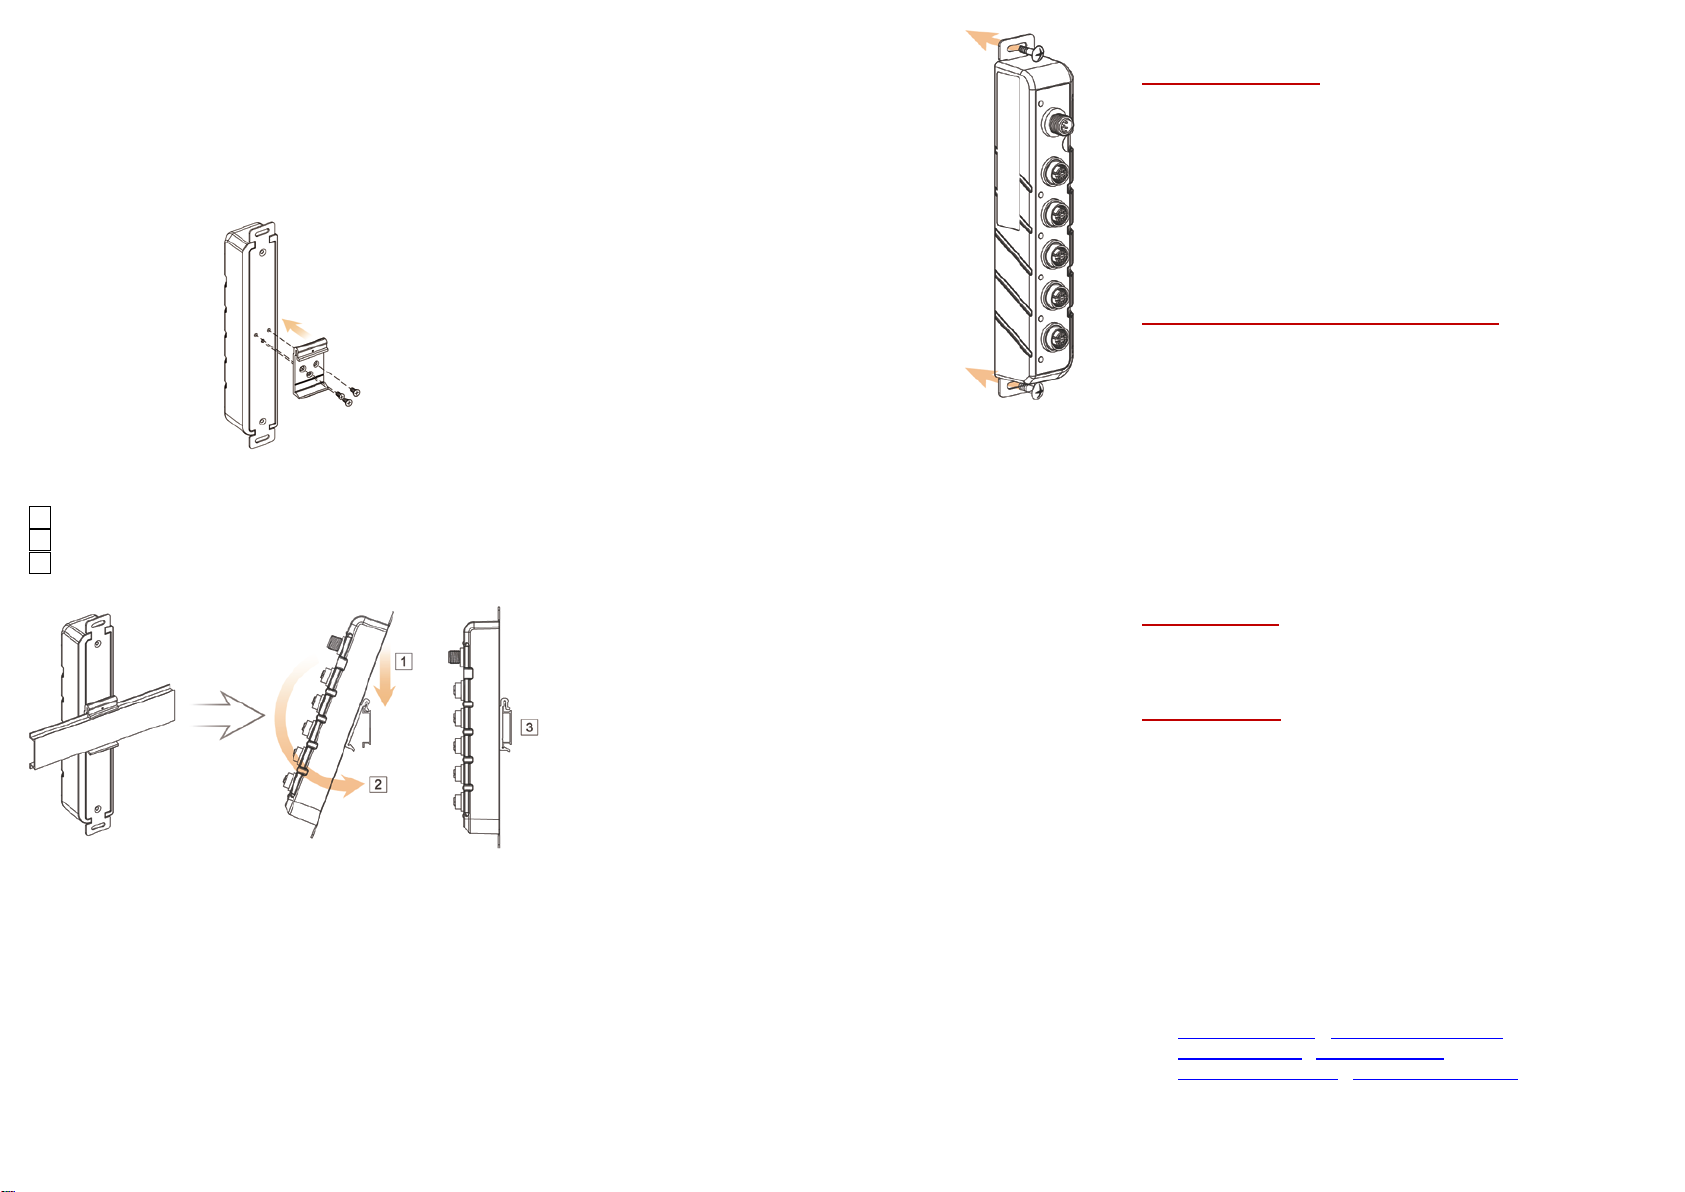
Industrial Switch Mounting
DIN-Rail Mounting
Follow the steps below to learn how to install the DIN-Rail on the
industrial Ethernet switch and how to hang the switch.
Step 1. Use the screws to install the DIN-Rail bracket on the
rear side of the industrial Ethernet switch.
NOTE: To remove the DIN-Rail bracket, do the opposite from
Step 1.
Step 2. After the DIN-Rail bracket is installed on the rear side of
the switch, refer to below Figures to mount the switch.
.1:Insert the top of the DIN-Rail on to the track.
.2:Lightly pull down the bracket on to the rail.
.3:Check to ensure the bracket is mounted tightly on the rail.
Step 3. To remove the industrial Ethernet switch from the rail,
perform above steps in reverse.
Wall Mounting
Follow the steps below to mount the switch to a wall using the
screw holes as shown below in Figure.
Step 1.
Prepare 2 screws for mounting the
switch to a wall. (Recommended
use the M6 screws.)
Step 2.
Based on the positions of 2 screw
holes on the top and bottom side of
the switch to make 2 screw holes
on a wall accordingly.
Step 3.
Insert the screws through the
screw holes on the switch and
screw the switch into the wall.
Step 4.
To remove the switch from the wall,
do the opposite from the steps
above.
NOTE: Make sure all cables from the switch
are disconnected before removing the unit
from the wall.
Field Maintenance and Service
If the device requires servicing of any kind, the user is
required to disconnect and remove it from its mounting. The
initial installation should be done in a way that makes this as
convenient as possible.
Voltage/power lines should be properly insulated as well as
other cables. Be careful when handling them so as to not trip
over.
Do not under any circumstance insert foreign objects of any
kind into the heat dissipation holes located in the different
faces of the device. This may not only harm the internal
layout, but might cause harm to user as well.
Do not under any circumstance open the device for any
reason. Please contact your dealer for any repair needed or
follow the instructions within the manual.
Warranty Policy
Products supplied by Antaira Technologies are covered in this
warranty for sub-standard performance or defective
workmanship. The warranty is not, however, extended to goods
damaged in the following circumstances:
Warranty Conditions
(a) Excessive forces or impacts
(b) War or an Act of God: wind storm, fire, flood, electric shock,
earthquake
(c) Use of unqualified power supply, connectors, or
unauthorized parts/kits
(d) Replacement with unauthorized parts
Customers shall always obtain an authorized "RMA" number
from Antaira before shipping the goods for repair or
replacement.
RMA and Shipping Costs Reimbursement
•Within the warranty period (based on the invoice date), all
parts and labor are free of charge to the customers.
•Customers are responsible for the cost of parts and labor, if
the products are out of warranty.
•For RMA service, customers are responsible for the shipping
expense for shipping the RMA unit(s) to Antaira. Antaira is
responsible for the shipping expense via a ground service
for the return repair/replace unit(s) back to customers.
Antaira would not be held responsible for any consequential
losses from using Antaira’s product.
Limited Liability
5-Year Warranty
Warranty Period
Antaira’s Customer Service and Support
•Antaira’s Technical Service & Support Centers:
+ 844-268-2472 (Antaira US Headquarter)
+ 48-22-862-88-81 (Antaira Europe Office)
+ 886-2-2218-9733 (Antaira Asia Office)
•Antaira’s Web Sites & Repair/Support Emails:
www.antaira.com / support@antaira.com
www.antaira.eu / info@antaira.eu
www.antaira.com.tw / info@antaira.com.tw
*Any changes will be announced on the Antaira website.