Antari W-715 Fog Jet User manual

1
W-715
Fog Jet User Manual
English Français Deutsch
• • •
中文
©2018 Antari Lighting and Effects Ltd.


3
English User Manual
Safety Information
Please read the following safety information carefully before operating the
machine. Information includes important safety information about installation,
usage, and maintenance. Pay attention to all warning labels and instructions in
this manual and printed on the machine.
If you have questions about how to operate the machine safely, please contact your local
Antari dealer for help.
Keep this device dry.
Always connect to a grounded circuit to avoid risk of electrocution.
Before connecting the machine to power, always check the voltage indicated on the
machine matches to your local AC voltage. Do not use the machine if the AC power
voltage does not match.
Disconnect the machine from AC power before servicing and when not in use.
This product is for indoor use only! Do not expose to rain or moisture. If fluid is
spilled, disconnect AC power and clean with a damp cloth. If fluid is spilled onto
electronic parts, immediately unplug the machine and contact your local Antari
dealer for advice.
No user serviceable and modifiable parts inside. Never try to repair this product, an
unauthorized technician may cause damage or malfunction.
For adult use only. Never leave the machine running unattended.
Position the machine in a well-ventilated area. Please leave about 50 cm of space
around the machine.
Never add flammable liquid of any kind to the machine.
Make sure there are no flammable materials close to the machine while operating.

4
Only use Antari fluid. Other fluid may lead to a heater clog and malfunction.
If the machine fails to work, unplug the machine and stop operation immediately.
Contact your local Antari dealer for assistance.
Before transporting the machine, make sure the fluid tank is completely drained.
Fog fluid may present health risks if swallowed. Do not drink fog fluid. Store it
securely. In case of eye contact or if fluid is swallowed immediately look for medical
advice.
Unpacking and Inspection
Immediately upon receiving the machine, carefully unpack the carton, check all content to
ensure that all parts are present and have been received in good condition. If any parts
appear damaged or mishandled from shipping, notify the shipper immediately and retain the
packing material for inspection.
What is included: 1 x W-715 Fogger
1 x Power Cord
1 x User Manual
1 x W-1 Wireless Transmitter (excluded in W-715X)
Product Overview
②
③
④
⑤
⑥
⑦
①
⑧

5
(1) Handle
(2) Wireless Receiver
(3) DMX 3-Pin
(4) DMX 5-Pin
(5) Power Input
(6) Breaker
(7) LCD Control Panel
(8) Tank Cap (Group)
Setting Up
Step 1: Place the machine on a flat surface and in a suitably large area with at least 50 cm
of open space at each side of the machine and 5 meters for the output direction of the
machine.
Step 2: Fill the fluid tank with Antari FLC fog fluid.
Step 3: Connect the machine to suitably rated power supply. To determine the power
requirement for the machine refer to the label on the back of the machine.
Always connect the machine to a protected circuit and ensure it is properly
grounded to avoid risk of electrocution.
Step 4: Turn on the machine by connecting the power cord and turning the Neutrik
Powercon. Heat-up takes approximatley 9 minutes. Once the machine has reached
operating temperature, the LCD screen will display “Ready To Fog”. Now the machine is
ready for operation.
Step 5: To turn off the machine, turn the Neutrik Powercon again.
Language Setting
To switch the language used for the control interface, press the [Menu] button BEFORE
turning on the machine and HOLD it until the LCD screen flashes twice. After the two flashes,
press [Menu] to choose the language: English and 中文 (Chinese).
Operation
Control Panel
The machine can be operated with the LCD control panel located on top of the fogger.

6
Button Function
[Menu] Select from functions
[
▲
/ Timer] To increase value or choose from options
To activate Timer Mode
[
▼
/ Volume]
To decrease value or choose from options
To active Volume Mode
To emit fog under 2-Second Jet Mode
[Stop] To stop output or go back to main screen
Functions Value Description
Interval Set 10-300 Seconds
Interval time under Timer Mode
Duration Set 2-15 Seconds Duration time under Timer Mode
Timer Output 50-100% Output volume under Timer Mode
Volume Output 50-100% Output volume under Volume Mode
2-Second Jet Mode On/Off Activate or deactivate 2-Second Jet Mode
DMX512 Address 1-512 Setting the DMX address
Wireless Control Mode On/Off Activate or deactivate Wireless Control Mode
Quick Start Mode On/Off Activate or deactivate Quick Start Mode
Timer Operation
To operate the machine in Timer Mode, interval, duration time and output volume under
Timer Mode must be set first:
Interval Time Setup - Press the [Menu] button until the LCD screen displays “Interval Set”
and then press the ▲or ▼button to set the interval time from 10-300 seconds.

7
Duration Time Setup - Press the [Menu] button until the LCD screen displays “Duration
Set”and press the ▲or ▼button to set the duration time from 2-15 seconds.
Output Volume Setup - Press [Menu] until the LCD screen displays “Timer Output”and
press the ▲or ▼button to set the output percentage from 50-100%.
After finishing the above setting, go back to the main screen by pressing the [Stop] button.
To activate Timer Mode, press the [Timer] button below the display. To deactivate Timer
Mode, press [Stop] button.
Volume Operation
To operate the machine in Volume Mode, the output volume under Volume Mode must be
set first:
Output Volume Setup - Press the [Menu] button until the LCD screen displays “Volume
Output”and then press the ▲or ▼button to set the output percentage from 50-100%.
After finishing the above setting, go back to the main screen by pressing the [Stop] button.
To activate Volume Mode, press the [Volume] below the display. To deactivate Volume
Mode, press the [Stop] button.
Note: In Volume Mode, the machine emits fog continuously until a re-heat is needed.
2-Second Jet Operation
To activate 2-Second Jet Mode, press the [Menu] button until the LCD screen displays
“2-Second Jet Output”and then press the ▲or ▼button to activate or deactivate
2-Second Jet Mode. Once the 2-Second Jet Mode is activated, the main screen will keep
showing “2-Sec Jet Mode”. Press the [Volume] button and the fog will be emitted for 2
seconds with maximum output (100%).
DMX Operation
Making the DMX Connection – Connect machine to a DMX controller or to one of the
machines in the DMX chain. The machine uses an 3-pin and 5-pin XLR connector for DMX

8
connection, the connector is located on the rear of the machine.
Address Setup – Press [Menu] until the LCD screen displays “DMX512 Add:” and then press
▲
the
▼
or button to set the DMX address from 1-512.The machine occupies 1 control
channel. The starting address is defined as the first channel from which the machine will
respond to the controller. Always double check to make sure there are no overlapping
channles in order to control the machine correctly.
DMX Channel Function
Channel DMX Value Range Function
1
0 – 5 Fog Off
6 –255
Fog Output 50 –100%
Fog Output 100% for 2 seconds
(under 2-Second Jet Mode)
DMX Connector Pin Assignment
The machine provides 3- and 5-pin XLR connector for DMX connection. The diagram below
indicates pin assignment information.
Pin Function
1 Ground
2 Data-
3 Data+
4 N/A
5 N/A

9
Wireless Remote Control Operation (Not applicable for W-715X)
The wireless remote control system consists of a transmitter equipped with two buttons for
on and off functions and a receiver pre-attached to the rear of the machine.
*Transmitter
With the transmitter it is possible to emit fog via radio signal at maximum distance of 50
meters. Press the button “A” or “B”, to emit fog.
*Receiver
The receiver is tested and pre-attached to the rear of the machine. The included transmitter
has been registered to the machine before shipping.
To activate or deactivate the wireless remote control function, press [Menu] until the LCD
▲
displays “Wireless”. Then press the
▼
or button to activate or deactivate the wireless
remote control function. When the wireless remote control function is activated, the LCD
screen will display “Wireless Detect …” for 15 seconds. During this time, wireless
transmiter(s) must be registered by pressing either button A or B on the transmitter(s). The
button used (A or B) for registration will be the button for fog emission in wireless remote

10
control mode.
Notes:
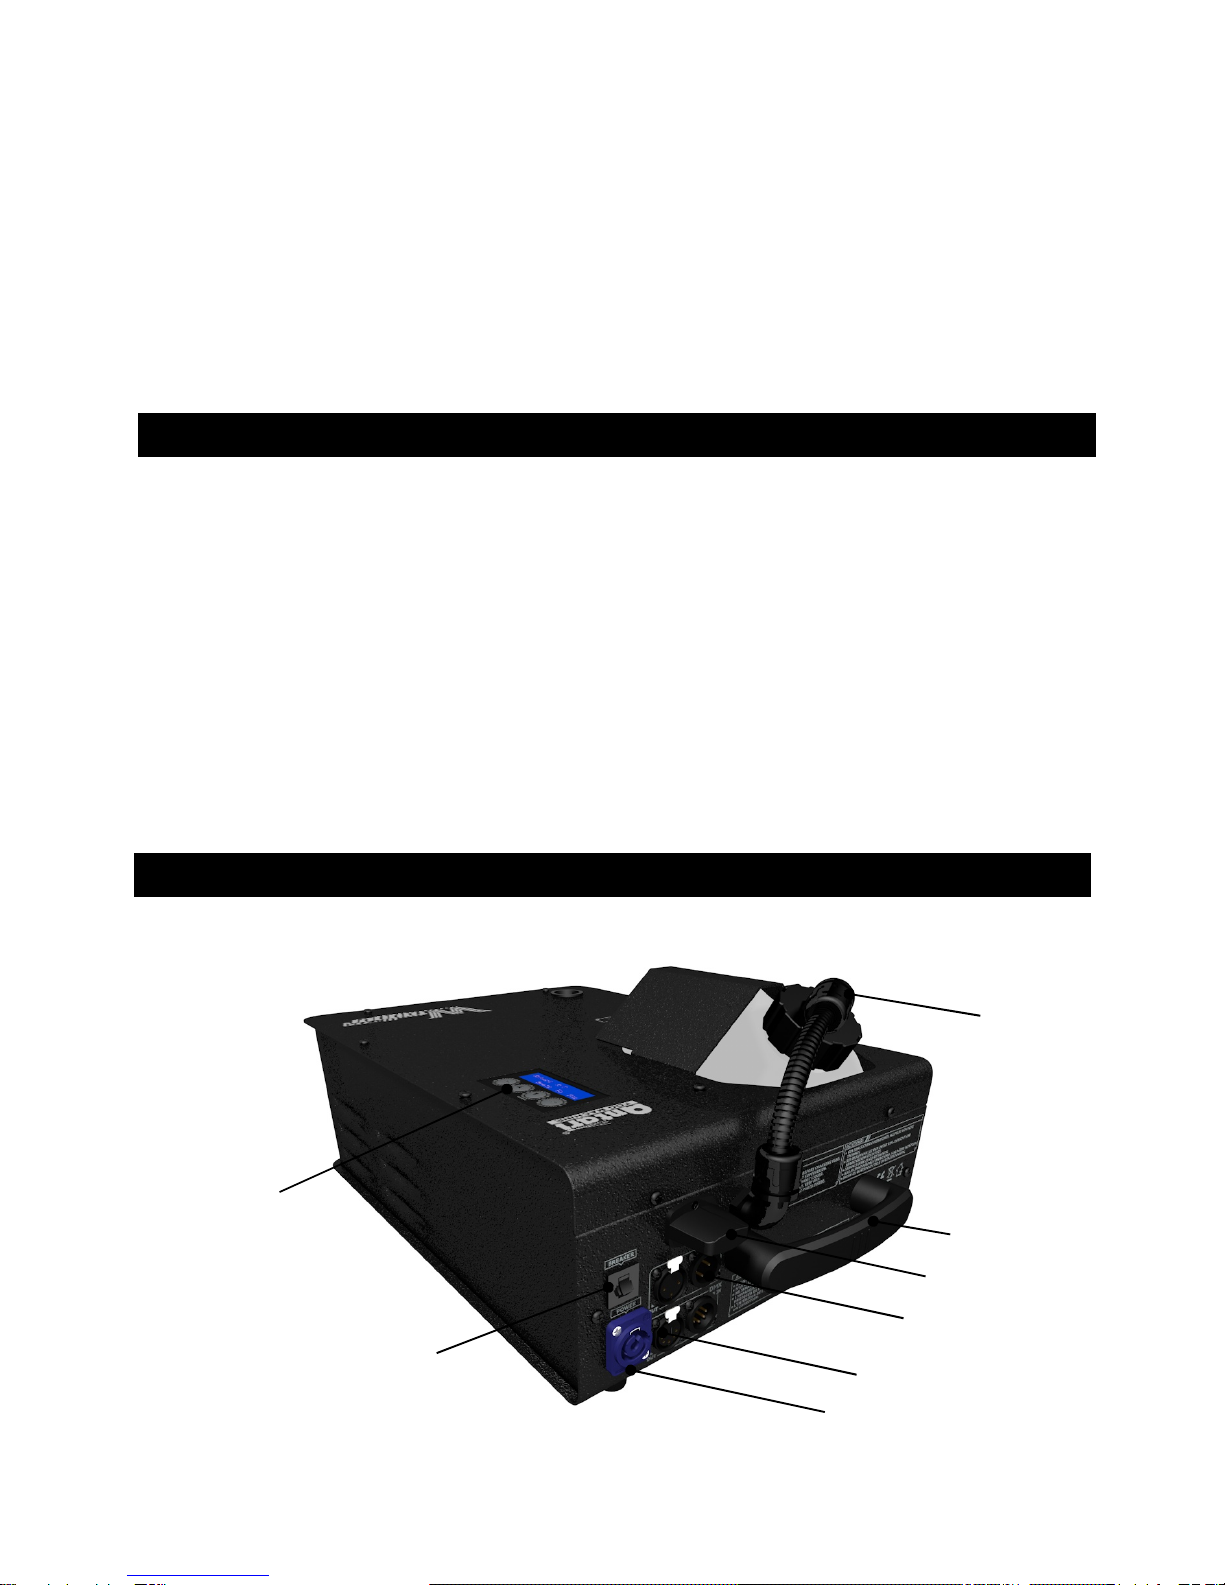
1. Once the wireless remote control function is activated, the letter “W”will be displayed
on the LCD screen.
2. Once the wireless remote control function is activated, the LCD screen will display
“Wireless Detect …” each time the machine is turned on; this allows new registration.
Every new registration overwrites the previous memory.
3. One machine can be controlled by up to 5 transmitters while one transmiter can be
registered to an unlimited number of machines.
4. Battery used in transmiter: type A27S 12V.
5. In 2-Second Jet Mode, pressing the button (A or B) on the transmitter will emit fog for 2
seconds with maximium output (100%).
Power Saving
Keep pressing the [Stop] button for 3 seconds; the LCD screen will display a
countdown of 60 seconds. After the countdown, the machine will go into sleep
mode. To wake up the machine again, press any button.
When the machine is idle for 15 seconds, the backlight of the LCD screen becomes
dim. To light up again the LCD screen, press any button.
When DMX connector is disconnected from the machine, the machine will go into
sleep mode, and when the DMX connector is re-connected to the machine again,
the machine will be woken up.
Fluid
Only use Antari FLC water-based fluid for the W-715 Fogger. The machine is tested and
calibrated with this fluid to achieve the best output performance. Warranty will be voided if
any other type of liquid is used, improper use of liquid may lead to machine failure and
malfunction.
Service and Maintenance
Do not allow the machine to become contaminated.
Remove dust from air vents with air compressor, vacuum or a soft brush.

11
Only use a damp cloth to clean the casing.
Before storing run distilled water through the system to help avoid condensing the
pump or heater.
It is recommended to run the machine on a monthly basis in order to achieve best
performance and output condition.
Excessive dust, liquid and dirt built up will degrade performance and cause
overheating.
Technical Specifications
- Input voltage
- Rated power
- Warm-up time
- Fluid consumption
- Fluid tank capacity
- Compatible fluid
- Ambient temp. range
- Output
- Control
- DMX channels
- Connection
- Optional accessories
- Dimension
- Weight
US model : AC 100-120V, 50 / 60Hz 13.6A
EU model : AC 220-240V, 50 / 60Hz 6.8A
1600W
7.5 minutes (approx.)
300 ml/min
2.4l (0.63gal)
Antari FLC Super Light Fog Fluid
0 °C - 40 °C (32 °F-104 °F)
8 meters height
DMX512, Timer, Manual, Wireless
1 channel
Neutrik Powercon (Power)
XLR 3-pin and 5-pin (DMX)
FX-4 Flightcase
L448 W295 H210 mm
(L17.64 W11.61 H8.27 inch)
15.5 kg (34.17 lbs)

12
Mode d'emploi
Notices de Sécurité
En vue d'utiliser correctement votre nouvel appareil, veuillez lire attentivement ce
mode d'emploi. Pour assurer la longévité et le bon fonctionnement de votre
machine à fumée, veuillez lire attentivement les instructions suivantes
concernant le maniement, la sécurité et l'entretien. Veuillez suivre toute
instruction de sécurité appliquée sur le boîtier de votre générateur à fumée
Antari.
Si vous avez des questions sur l'usage de la machine en toute sécurité, contactez votre
revendeur Antari.
Protéger de l'humidité.
Utilisez uniquement des prises de courant à terre à 3 broches.
Avant la première mise en marche, assurez-vous que l'appareil soit branché à
l'alimentation correcte. Ne jamais utiliser la machine quand la voltage n'est pas
correcte.
Débranchez l'appareil du secteur avant d'entretien ou quand vous n'utilisez pas la
machine.
L'appareil a été conçu pour un emploi dans des locaux clos. Protéger de l'humidité.
Si du liquide is spilled, débranchez l'appareil du secteur et nettoyez la machine
avec un chiffon sec. Si du liquide devait pénétrer à l’intérieur de l’appareil,
débranchez le immédiatement et contactez un technicien ou votre revendeur Antari
avant de le réutiliser.
A l'intérieur de l'appareil, il n'y a aucune partie qui ait besoin d'être révisée. Ne
jamais essayer de reparer le produit parce quet détruire la machine.
L'usage de cet appareil n'est prévu que pour les adultes. Ne jamais faire marcher

13
sans surveillance.
Installez l'appareil à un endroit bien aéré. Pour garantir une aération suffisante,
laissez un espace libre de 50 cm tout autour de l’appareil.
Ne jamais mélanger des liquides enflammables gazeuz ou huileux avec le liquide à
fumée.
Respectez une distance minimum de 50 cm entre le bec de la machine et les
matériaux enflammables.
Employez uniquement des liquides à fumée de haute qualité à base d'eau Antari
FLC ou liquides recommandée par votre revendeur. D'autres liquides à fumée
pourraient causer des problèmes d'encrassage ou des crachotements.
Si votre machine à fumée Antari ne devait plus fonctionner correctement, éteignez
le immédiatement. S'il vous plaît contactez votre revendeur Antari.
Faites attention à ce que le réservoir soit toujours complètement vidé avant
d’envoyer ou transporter l’appareil.
Ne jamais avaler le liquide à fumée. Stocker avec prudence. Si c’était tout de
même le cas, consultez un médecin immédiatement.
Déballage & Inspection
Ouvrez le carton extérieur et assurez vous que toutes les pièces n'aient subi aucun
dommage durant leur transport. En cas de livraison endommagée ou incomplète, toujours
contactez immédiatement votre revendeur Antari.
Contenu de la livraison: 1 x W-715 Fogger
1 x Câble d'alimentation
1 x Mode d'emploi
1 x Transmetteur sans fil (sauf W-715X)

14
Aperçu d'appareil
(1) Bras
(2) Récepteur sans fil
(3) DMX 3 pôles
(4) DMX 5 pôles
(5) Douille d'alimentation
(6) Fusible
(7) Panneau de Contrôle
(8) Couvercle du réservoir (groupe)
Mise en service
Pas 1: Placez la machine à fumée sur une surface plane et laissez libre un espace de 50 cm
tout autour de la machine et 5 mètres dans la direction du débit.
Pas 2: Employez uniquement des liquides à fumée de haute qualité à base d'eau
recommandée par votre revendeur.
Pas 3: Branchez la fiche d'alimentation dans une prise de courant avec terre. Veuillez voire
l'affichage du type pour en trouver d'information sur l'alimentation.
Avant la première mise en marche, assurez-vous que l'appareil est branché à
l'alimentation correcte.
②
③
④
⑤
⑥
⑦
①
⑧

15
Pas 4: La machine est équipée avec un raccordement au secteur verrouillable. Insérez le
cable de secteur et tournez à droite jusqu’à verrouillage. La machine ne dispose pas d’un
interrupteur secteur. Quand brancher la machine au secteur, la machine commence à
chauffer. Le temps de chauffage prend environ 9 minutes. Quand la temps de chauffage est
terminé, l'écran indique “Ready To Fog” et émission de fumée est possible.
Pas 5: Mettre la machine hors de service en débranchant-le du secteur.
Réglage de la Langue
Vous pouvez choisir la langue du panneau de contrôle. Maintenez pressé le bouton [Menu]
AVANT de mettre l’appareil en service jusqu'à ce que l'écran clignote deux fois. Après le
double clignotement de l'écran, appuyez sur le bouton [Menu] pour sélectionner la langue :
English ou 中文 (Chinese).
Opération
Panneau de Contrôle
Vous pouvez contrôler l'appareil avec le panneau de contrôle sur la partie supérieure de
l'appareil.
Bouton Fonction
[Menu] Pour sélectionner des fonctions
[
▲
/ Timer] Pour augmenter une valeur ou choisir entre options
Pour activer le mode Timer
[
▼
/ Volume]
Pour diminuer une valeur ou choisir entre options
Pour activer le mode continu
Pour dégager la fumée pour le fonctionnement 2-Second Jet

16
[Stop] Pour inactiver le débit de fumée ou accéder l'affichage de
démarrage
Fonctions Valeur Description
Interval Set 10-300 secondes
Réglage de l'intervalle pour le
fonctionnement timer
Duration Set 2-15 secondes Réglage de la durée pour le fonctionnement
timer
Timer Output 50-100% Réglage du volume de fumée pour le
fonctionnement timer
Volume Output 50-100% Réglage du volume de fumée pour le
fonctionnement continu
Fonctionnement
2-Second Jet marche/arrêt Activer ou inactiver le fonctionnement
2-Second Jet
DMX512 Address 1-512 Réglage de l'adresse DMX512
Wireless Control Mode marche/arrêt Activer or inactiver la fonction sans fil
Quick Start Mode marche/arrêt
Pour activer ou inactiver la fonction démarrage
rapide
Fonctionnement Timer
Pour le fonctionnement timer vous pouvez ajuster les intervalles, la durée et le volume de
fumée sur l'option Timer Mode :
Réglage de l'intervalle - Appuyez sur le bouton [Menu] jusqu’à ce que l'écran indique
“Interval Set” [réglage de l'intervalle]. Utilisez les boutons ▲et ▼pour ajuster les intervalles
entre les dégagements individuels de fumée pour le fonctionnement timer (plage de réglage :
10 à 300 secondes).
Réglage de la durée pour - Appuyez sur le bouton [Menu] jusqu’à ce que l'écran indique
“Duration Set” [réglage de la durée]. Utilisez les boutons ▲et ▼pour ajuster la durée de
chaque dégagement de fumée de 2 à 15 secondes.
Réglage du volume de fumée - Appuyez sur le bouton [Menu] jusqu’à ce que l'écran indique
“Timer Output” (réglage du volume de fumée). Utilisez les boutons ▲et ▼pour ajuster le

17
volume de fumée pour le fonctionnement timer de 50 % à 100 %.
Aprés avoir configuré les paramètres, vous pouvez revenir à l'écran de démarrage.
Pour activerle mode Timer, appuyez sur le bouton [Timer] sous l'écran. Pour inactiver le
mode Timer, appuyez sur le bouton [Stop].
Fonctionnement continu
Pour le fonctionnement continu vous pouvez ajuster le volume de fumée sur l'option
Volume mode :
Réglage du volume de fumée - appuyez sur le bouton [Menu] jusqu’à ce que l'écran indique
“Volume Output” (réglage de la volume de fumée). Utilisez les boutons ▲et ▼pour ajuster
le volume de fumée pour le fonctionnement continu de 50 % à 100 %.
Après avoir configuré les paramètres, vous pouvez revenir à l'écran de démarrage.
Pour activer le mode continu, appuyez sur le bouton [Volume] sous l'écran. Pour inactiver
le mode continu, appuyez sur le bouton [Stop].
Remarque : En mode continu, l'appareil peut produire de fumée continue jusqu'à l'appareil
commence à réchauffer.
Fonctionnement 2-Second Jet
Pour activerle mode 2-Second Jet, appuyez sur le bouton [Menu] jusqu’à ce que indique
“2-Second Jet Output”. Utilisez les boutons ▲et ▼pour activer ou inactiver le mode
2-Second Jet. Quand le mode 2-Second Jet est activé, l'écran indique “2-Sec Jet Mode”.
Appuyez sur le bouton [Volume] pour dégager la fumée pour 2 secondes avec un
dégagement maximal (100 %).
Operation DMX
Connexion DMX – Connectez la machine à un contrôleur DMX ou une machine dans la
chaîne DMX. Pour la connexion DMX, les raccords XLR 3 pôles et 5 pôles se trouvent au
derrière de la machine.

18
Réglage de l'adresse – Appuyez sur le bouton [Menu] jusqu’à ce que l’écran indique
▲ ▼
“DMX512 Add:” (Réglage de l'adresse DMX512). Utilisez les boutons et pour régler
l'adresse DMX de l'appareil de 1 à 512. L'appareil a un canal de contrôle pour le réglage du
débit de fumée. The starting address is defined as the first channel from which the device
will respond to the controller. Assurez-vous qu'il n'y a pas de canaux doubles.
Fonctions DMX
Canal Valuers DMX Fonction
1
0 – 5 arrêt (aucun dégagement de fumée)
6 –255
réglage de débit (50-100 % débit)
dégagement maximal de fumée (100 %)
pour 2 secondes
(pour le fonctionnement 2-Second Jet)
Configuration de la connexion DMX
La machine possède fiches XLR 3 pôles et 5 pôles pour connecter un contrôleur DMX Le
graphique ci-dessous montre la configuration des fiches.
Contact Fonction
1 Masse
2 Signal-
3 Signal+

19
Télécommande sans fil (sauf W-715X)
La contrôleur sans fil W-1 compose d'un transmetteur avec deux boutons pour activer le
débit de fumée et un récepteur fixé au dos l'appareil.
*Transmetteur
Avec le transmetteur, il est possible de débiter de fumée dedans un rayon d'action de 50
mètres. Pour dégager la fumée, appuyez sur la bouton “A” ou “B”.
*Récepteur
Le récepteur est testé et fixé au dos de l'appareil. Le transmetteur inclus est registré avec la
machine avant la livraison.
Pour activer ou inactiver la fonction sans fil, appuyez sur le bouton [Menu] jusqu’à ce que
l'écran indique “Wireless” (sans fil). Utilisez les boutons ▲et ▼pour activer ou inactiver la
fonction sans fil. Quand la fonction sans fil est activé, l'écran indique “Wireless Detect …”
(sans fil detect) pour 15 secondes. Pendant l'intervalle de 15 seconds, l'usager peut
registrer un ou plusieurs de transmetteurs en pressant le bouton “A” ou “B” sur chaque
transmetteur. Le bouton utilisé (A ou B) pour la régistration sera le bouton pour dégager la

20
fumée pour le fonctionnement sans fil.
Remarques :
6. Quand la fonction sans fil est activée, l'écran indique “W” pour Wireless (sans fil).
7. Quand la fonction sans fil est activée, l'écran indique “Wireless Detect …” lorsque vous
mettez la machine sous tension pour régistrer de nouveaux transmetteurs. Les
transmetteurs précédents sont éteints de la mémoire du récepteur.
8. Le récepteur réagit à 5 transmetteurs différents au maximum registrés avec la machine.
Un transmetteur peut contrôler des machines illimitée en même temps.
9. Le transmetteur nécessite 1 batterie type A27S 12V.
10.En mode 2-Second Jet, maintenez pressé le bouton (A out B) pour dégager la fumée
pour 2 secondes avec un dégagement maximal (100 %).
Mode d'Économie
Maintenez pressé le bouton [Stop] pour 3 secondes jusqu’à ce que l'écran indique
un countdown de 60 secondes. L'appareil compte les secondes à partir de 0 et
entre dans le mode d'économie. Appuyez sur un bouton pour quitter ce mode.
L'écran s'éteint automatiquement si l'appareil n'est pas utilisé pendant 15 secondes.
Appuyez sur un bouton pour quitter ce mode.
Le mode d’économie d’énergie permet la machine de s'arrêter automatiquement si
elle ne reçoit aucun signal DMX. Lorsqu'un signal DMX est présent, la machine se
remet en marche.
Liquide
Employez uniquement des liquides à fumée de haute qualité à base d'eau Antari FLC ou
liquides recommandée par votre revendeur. La machine est testée avec ce liquide pour la
puissance plus haute. Autres liquides peuvent endommager la machine. Des casses causés
du fait de l'usage de liquide different ne sont pas inclus dans la garantie.
Nettoyage et Maintenance
Faites toujours attention de ne pas polluer le liquide à fumée.
Enlevez la poussière de les orifices d'aération avec un compresseur d'air,
aspirateur ou une brosse tendre.
Table of contents
Languages:
Other Antari Fog Machine manuals

Antari
Antari Z-390 Series User manual

Antari
Antari F-1 Fazer User manual

Antari
Antari Z-800II User manual

Antari
Antari X-310PRO User manual

Antari
Antari Z-3000II User manual

Antari
Antari W-515 User manual

Antari
Antari HZ-400 User manual

Antari
Antari FT-100 Fire Training User manual

Antari
Antari B-100X User manual

Antari
Antari WiFi-800 User manual

Antari
Antari F-1 Fazer User manual

Antari
Antari M-1 User manual

Antari
Antari Z-1000X MK3 User manual

Antari
Antari Z-1020 User manual

Antari
Antari M-9 RGBAW User manual

Antari
Antari HZ-350 User manual

Antari
Antari F-7X User manual

Antari
Antari HZ-100 User manual

Antari
Antari IP-1600 User manual

Antari
Antari FT-50 User manual