Apex Digital Sturdy SA-300VMA-R User manual

Please read manual carefully before using and keep it well.
SA-300VMA-R
Instruction Manual
“
“S
St
tu
ur
rd
dy
y”
”
A
Au
ut
to
oc
cl
la
av
ve
e
S
St
te
er
ri
il
li
iz
ze
er
r

Contents
1. Important Safety Instructions ...................................................................................................1
2. Explanation of Safety Symbols and Notes...............................................................................3
3. Unpacking................................................................................................................................4
4. Installation................................................................................................................................5
4.1 Environment....................................................................................................................5
4.2 Install the sterilizer..........................................................................................................5
5. Introduction..............................................................................................................................9
5.1 Intended Use ..................................................................................................................9
5.2 Description of the Sterilizer.............................................................................................9
5.2.1 External View........................................................................................................9
5.2.2 Internal Configuration .........................................................................................10
5.2.3 Control Panel (Liquid Program) ..........................................................................11
5.2.4 Control Panel (Re-Dry Program).........................................................................12
6. Operation...............................................................................................................................13
6.1 Operation Overview......................................................................................................13
6.1.1 Re-Dry Program..................................................................................................13
6.1.2 Liquid Program ...................................................................................................14
6.1.3 PUMP test / BD test / PRION..............................................................................15
6.2 Prepare Sterilization......................................................................................................16
6.3 Standard Sterilization Program .....................................................................................18
6.4 Re-Dry Program (exclusive either to liquid functions)...................................................19
6.5 Liquid Program (optional, exclusive either to Re-Dry function).....................................20
6.6 PRION Program............................................................................................................22
6.7 B.D. TEST Program......................................................................................................23
6.8 PUMP TEST Program...................................................................................................25
6.9 Vacuum Release...........................................................................................................26
6.10 Reset / Stop................................................................................................................26
6.11 Emergency Stop..........................................................................................................26
6.12 Placement for items to be sterilized............................................................................26
6.12.1 Sterilization for Implements...............................................................................27
6.12.2 Glassware.........................................................................................................27
7. Recorder................................................................................................................................29
7.1 Intended use.................................................................................................................29
7.2 Recording contents.......................................................................................................29
7.2.1 Description of Detail Content..............................................................................30
7.2.2 Description of Summary Contents ......................................................................31
7.3 Storage medium............................................................................................................33

7.4 Recorder panel .............................................................................................................34
7.5 Function description of the recorder..............................................................................34
7.5.1 General...............................................................................................................35
7.5.1.1 Stand-by mode.................................................................................................35
7.5.1.2 Recording mode ..............................................................................................35
7.5.1.3 Adjusting mode................................................................................................36
7.5.2 Set up.................................................................................................................37
7.5.2.1 Set up date and time........................................................................................37
7.5.2.2 Set up unit (temperature and pressure)...........................................................37
7.5.2.3 Remove USB...................................................................................................38
7.5.2.4 Download.........................................................................................................39
7.5.2.5 Printer..............................................................................................................40
7.5.2.6 SN:...................................................................................................................40
7.5.2.7 Cycle:...............................................................................................................40
7.5.2.8 Exit...................................................................................................................41
7.6 Message and troubleshooting (for recorder).................................................................42
8. Test Instructions.....................................................................................................................43
8.1 Biological performance of sterilizers .............................................................................43
8.2 Air removal (Bowie-Dick type test pack)........................................................................44
8.3 Helix test.......................................................................................................................46
9. Maintenance Instructions.......................................................................................................48
9.1 Daily..............................................................................................................................48
9.2 Weekly..........................................................................................................................48
9.3 Monthly.........................................................................................................................51
9.4 Annually........................................................................................................................52
9.4.1 Silicone door gasket ...........................................................................................53
10. Troubleshooting ...................................................................................................................55
10.1 Symptoms...................................................................................................................55
10.2 List of Error Codes......................................................................................................56
11. Specifications.......................................................................................................................57
12. Warranty...............................................................................................................................59

1
1. Important Safety Instructions
In order to clearly indicate the extent of the harm, loss or damage which may result from falling
to heed these precautions and the degree of their urgency, the precaution have been classified
into the three categories of Danger, Warning and Caution.
DANGER: This indicates an imminently hazardous situation arising from the
mishandling or mis-operation of the unit which, if not avoided, might cause
the death or serious injury of the operator or other persons.
WARNING: This indicates a potentially hazardous situation arising from the mishandling
or mis-operation of the unit which, if not avoided, might cause the death or
serious injury of the operator or other persons.
CAUTION: This indicates a potentially hazardous situation arising from the mishandling
or mis-operation of the unit which, if not avoided, may cause the minor injury
of the operator or other persons and property damage.
CAUTION: Please install, operate and maintain the sterilizer in accordance with this
Instruction Manual. Failure to do so could result in serious injury or damage to
the unit.
WARNING: The outer casing and metal surfaces of the sterilizer will be hot during
operation, please do not touch it.
WARNING: Steam and hot water will be present when opening the door after a sterilizer
cycle. Avoid contact.
WARNING: DO NOT place alcohol or other flammable items in the sterilizer. An explosion
could occur, causing personal injury.
WARNING: DO NOT place any objects on the top of the sterilizer.
WARNING: It takes at least two (2) or more people to carry the sterilizer to prevent it from
dropping.
WARNING: Always check the pressure gauge before opening the door. DO NOT attempt
to open the door if the pressure is not at zero (0).
WARNING: Use only distilled water. Normal tap water contains minerals, especially
chlorides, which have corrosive effects on stainless steel. Failure to use
distilled water will invalidate the warranty.
WARNING: Always allow a minimum of 20 minutes between each sterilization cycle.

2
WARNING: The door must be closed completely during operation of the unit. If the
“DOOR” indicator light illuminates, it means that the door is not closed
properly.
WARNING: Clean the water filter located at the back of the unit at least once per month.
Refer to Maintenance Instructions.
WARNING: Use sterilization indicator test strips to check that sterilization has been
successful.
WARNING: Always check the water level in the reservoir before running a sterilization
cycle. If the LOW WATER indicator light illuminates, add distilled water. If the
water is sufficient, but the LOW WATER indicator light is still illuminating, refer
to Troubleshooting.
WARNING: Do not overfill the water reservoir. The water level must be maintained
between the green Full and Minimum labels on the right hand side of the
sterilizer.
WARNING: The ADD WATER indicator light will illuminate during the sterilization cycle.
This is part of normal operation and no action on the part of the user is
required.
WARNING: If the ALARM indicator light illuminates, the machine is over-pressure or
overheated. The sterilizer will shut down automatically. Contact your supplier
for service support.
WARNING: Failure to follow the Maintenance Instructions will adversely affect
performance and lifespan of the sterilizer, and may invalidate the warranty.
WARNING: Always keep the sterilizer clean.
WARNING: In an emergency, or before carrying out any maintenance, always disconnect
the power cord from the outlet.
WARNING: A separate (dedicated) circuit is recommended for the sterilizer. The sterilizer
should not be connected to an electrical circuit with other appliances or
equipment.
WARNING: Please unplug the power cord and drain off water from the reservoir if the
sterilizer will not be used regularly.
WARNING: Always check the status of the electric wire; unplug the power cord if
breakage comes up. Contact your supplier for service support.

3
2. Explanation of Safety Symbols and Notes
Caution, consult instruction manual for use
Protective earth (ground)
Alternating Current
Attention! Hot surface
Disposal of Electrical & Electronic Equipment (WEEE):
This product should be handed over to an applicable collection point for the
recycling of electrical and electronic equipment. For more detailed information
about the recycling of this product, please contact your local city office,
household waste disposal service or the retail store where you purchased this
product. (European community only)
Authorised representative in the European community
Manufacturer
Date of manufacture
It is a 6-digit number. The first 4 digits represent the year and the last 2 digits
represent the month.
Consult instruction manual for use
On, connection to the mains
Off, disconnection from the mains
POWER
Power switch
NOTE
Indicates information that user should pay special attention to.
CAUTION
Indicates correct operating or maintenance procedures in order to prevent
damage or destruction of the equipment or other property.
WARNING
Indicates correct operating or maintenance procedures in order to prevent
damage or destruction of the equipment or other property.

4
3. Unpacking
CAUTION: It takes at least two (2) or more people to carry the sterilizer to prevent it from
dropping.
Figure 1
A Cut the banding
B Lift off the top cover of the carton
C Remove the wall and the foam packaging inserts
D Carefully move the sterilizer from the packaging base
E Check all accessories are present as follows (accessories are packed inside the sterilizer
chamber):
- Instruction Manual × 1
- Heater Cover × 1
- Sterilization basket x 2
- Cover of basket × 1
- 2000cc bottle x 1
- Exhaust hose X 2
NOTE: We recommend that all packaging material is retained for possible re-use.
NOTE: For Reduce, Reuse, Recycle information, the packing material is made by corrugating
medium-catalogue AA.
Top
Wall
Base

5
4. Installation
4.1 Environment
This equipment has been designed for use in accordance with the International EMC
(Electromagnetic Compatibility) Standards. In view of different environments, please follow the
instructions given below to eliminate interference, if necessary.
- Move the equipment or rotate its direction;
- Enlarge the space between the equipment and other machines;
- Put the plug into other outlets;
- Please consult with the local distributor or qualified electrician.
- Regarding the environmental temperature for installation, please refer to “11 Specifications”.
4.2 Install the sterilizer
CAUTION: Please read and follow “5.2” in order to understand the operation of the
sterilizer.
CAUTION: While installation; please make sure that the bearing capacity of installation
table is enough to carry the sterilizer. For the weight information of the
sterilizer, please refer to “Specifications”.
CAUTION: Make sure that the door can be opened freely after installation.
WARNING: Do not install or operate the sterilizer in areas where flammable items or
volatile substances are used or stored. An explosion could occur, causing
personal injury. An installation site with good air circulation is required.

6
A. Position the sterilizer on a stable bench or work surface, ensuring at least 10 cm clearance
between the wall or other pieces of equipment and the sides of the unit for free circulation of
air. And keep this autoclave in level condition then press the caster. To fix the machine.
POWER
SA-300VMA
STURDY
STERI
STERI
ITEM
TEMP
!
Figure 2
B. Pipeline installation:
B-1: Install the water inlet that one end to be fixed at the pipe connector “E” port. And
another end must be fixed on the connector of the water source system.
B-2: Install the exhaust hose: that one end to be fixed on the pipe connector “F” port. And
another end must be fixed on the connector of the water exhaust piping system.
Figure 3
At least 10 cm
Wall
Wall
Wall
At least 10 cm
At least 20 cm
A:No Fuse Breaker
C:Waste water Filter
D:Exhaust for safety valve
E:Water inlet
F:Waste water outlet
B:Power Cord
7
WARNING: Waste water must be brought into the public water piping in accordance with
the local rules or requirements, i.e. only non-hazardous liquids may be
disposed in public sewage!
C. Install the heater cover as Figure 4.
POWER
SA-300VMA
STURDY
STERI
STERI
ITEM
TEMP
!
Figure 4
Heater cover
Chamber
Door handle
Air filter

8
D. Install the sterilization basket as Figure 5.
STURDY
SA-300VMA
Figure 5
E. Close the door and press Door handle.
F. Ensure the Power Switch is in OFF “O” position, and then plug the power cord into a
separate (dedicated) mains socket.
WARNING: A separate (dedicated) socket is required for the sterilizer. Make sure the
socket is earthed and can offer the capacity of 16 A / 230V AC.
WARNING: The plug is one of the measures of emergency cutoff; please make sure that
the plug is accessible after installation.
G. Press the “POWER” switch to ON “I” position, the power indicator light should illuminate.
The “DOOR” indicator light should be off. If the sterilizer does not perform as
above-mentioned, please turn off the power and unplug the sterilizer, repeat the steps from
4.2.A to 4.2.F. If the problem still presents, please turn off the power and unplug the
sterilizer. Contact the local distributor for help.
Sterilization basket
Cover of basket

9
5. Introduction
5.1 Intended Use
This product is a vertical high pressure steam sterilizer which is designed and developed for the
sterilization of wrapped and unwrapped items. It can also perform sterilization of liquid which is
not for medical purpose.
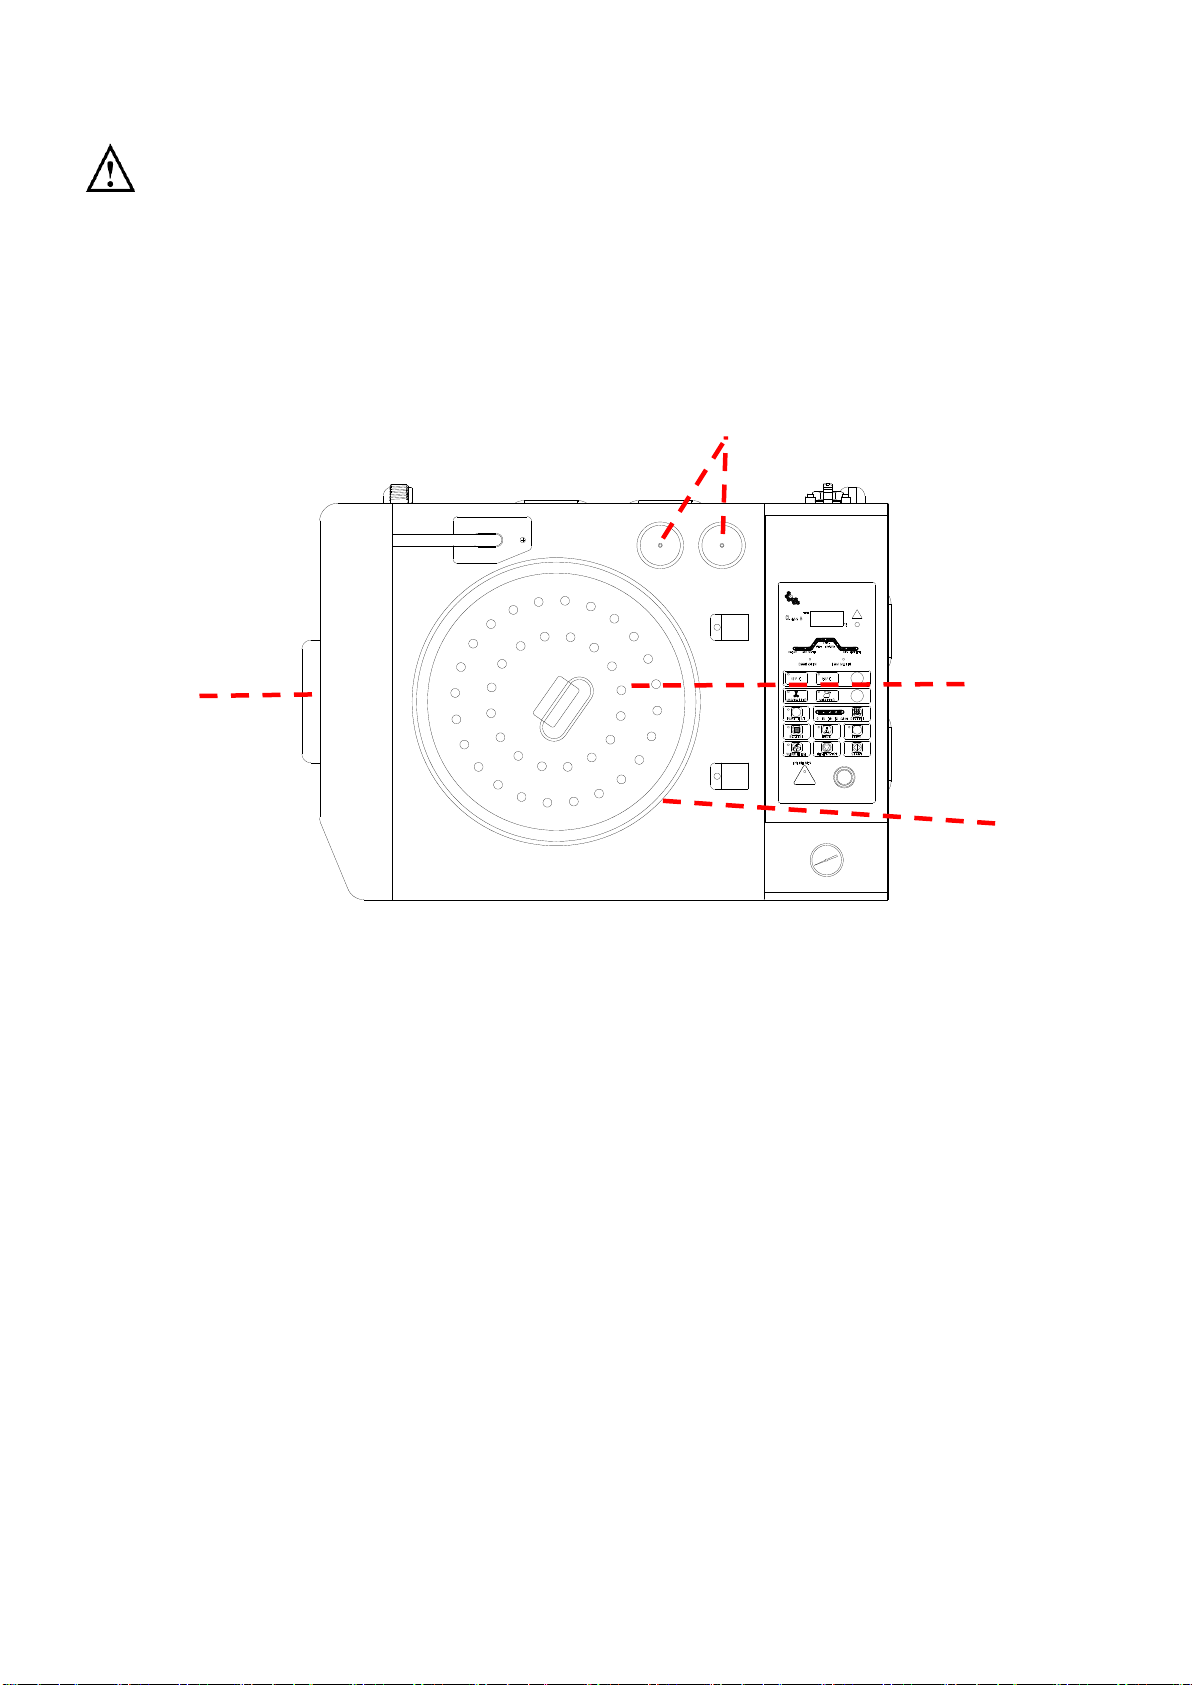
5.2 Description of the Sterilizer
5.2.1 External View
STURDY
SA-300VMA
Figure 6
Figure 7
Pressure Gauge
Door handle
Control Panel
Caster with total lock
Fan air out
Exhaust for safety valve
Power Cord
No Fuse Breaker
Waste water Filter
Water inlet
Water outlet

10
5.2.2 Internal Configuration
Figure 8
Over temperature controller
Water Level Sensor
Heater
Exhaust
Stopper

11
5.2.3 Control Panel (Liquid Program)
SA-300VMA
SA-300VMA-R
Low Water Indicator Light
Indicates the water level is
below the minimum level or the
program has been unable to
add sufficient water after 5 min..
And reservoir
Sterilization Temperature
Button
Select the required sterilization
temperature of 121°C or 134°C.
The selected temperature light
will illuminate.
Sterilization Item Button
Select between unwrapped or
wrapped items. The selected
item light will illuminate.
Dry Timer Button
Select a 0/15/30/35/ 40 min.
drying time. The light will
illuminate when selected.
Visual Alarm Indicator Light
Indicates over-temperature or
over-pressure in the chamber.
PRION Button
Start the PRION Program.
Start Button
Start the selected Program.
Reset / Stop Button
Reset program while running.
(Press for more than 3
seconds.)
Power Switch
ON/OFF switch and power
indicator (Illuminates when ON)
Process Status Indicator
Individual LED light to
indicate the current status
of the sterilization
program.
Vacuum
Add Water
Heating
Sterilization
Exhaust –pressure
release and water
drain
Dry
Complete
Door Open Indicator
Light
Indicates the chamber
door is open or not closed
fully.
Temperature Panel
Display the temperature
inside the chamber.
Display “REC” with recorder
type (optional).
Pump Test Button
Perform pumping step for
verifying the pump
function.
B.D. Test Button
Perform B.D. Test
program.
Liquid Button
Select Liquid Sterilization
Program. The light will
illuminate when selected.
Vacuum Release Button
To release the pressure
inside the chamber prior
opening the door.
Emergency Stop Button
Stop program and release
pressure/vacuum. (Press
for more than 3 seconds.)

12
5.2.4 Control Panel (Re-Dry Program)
SA-300MA
Low Water Indicator Light
Indicates the water level is
below the minimum level or the
program has been unable to
add sufficient water after 5 min..
And reservoir.
Sterilization Temperature
Button
Select the required sterilization
temperature of 121°C or 134°C.
The selected temperature light
will illuminate.
Sterilization Item Button
Select between unwrapped or
wrapped items. The selected
item light will illuminate.
Dry Timer Button
Select a 0/15/30/35/ 40 min.
drying time. The light will
illuminate when selected.
Visual Alarm Indicator Light
Indicates over-temperature or
over-pressure in the chamber.
PRION Button
Start the PRION Program.
Start Button
Start the selected Program.
Reset / Stop Button
Reset program while running.
(Press for more than 3
seconds.)
Power Switch
ON/OFF switch and power
indicator (Illuminates when ON)
Process Status Indicator
Individual LED light to
indicate the current status
of the sterilization
program.
Vacuum
Add Water
Heating
Sterilization
Exhaust –pressure
release and water
drain
Dry
Complete
Door Open Indicator
Light
Indicates the chamber
door is open or not closed
fully.
Temperature Panel
Display the temperature
inside the chamber.
Display “REC” with recorder
type (optional).
Pump Test Button
Perform pumping step for
verifying the pump
function.
B.D. Test Button
Perform B.D. Test
program.
Re-Dry Button
Select Re-Dry Program
for 10 min. The light will
illuminate when selected.
Vacuum Release Button
To release the pressure
inside the chamber prior
opening the door.
Emergency Stop Button
Stop program and release
pressure/vacuum. (Press
for more than 3 seconds.)
SA-300VMA
SA-300VMA-R

13
6. Operation
6.1 Operation Overview
6.1.1 Re-Dry Program
Sterilization
Press “START” Button
Vacuum, Add Water and Heat
Repeat Vacuum and Heat steps for 4 times, and then
Heat to Selected Sterilization Temperature.
Sterilization Finishes and Exhaust Starts
Buzzer Alarms and COMPLETE indicator will illuminate. The Sterilizer goes to
STANDBY mode.
If the COMPLETE indicator did not illuminate, repeat the sterilization cycle.
Select Sterilization Temp.121°C or 134°C
Select Sterilization Item
Select Dry Time 0/15/30/35/40 min.
Drain Water
Put the sterilization items and close door
Drying Starts
(0/15/30/35/40 min.)
If Dry Timer selected
If Dry Timer
Not
selected
Select
Re-Dry Button
Re-Dry
(10 min.)
Standard Sterilization Program

14
6.1.2 Liquid Program
Sterilization
Press “START” Button
Vacuum, Add Water and Heat
Repeat Vacuum and Heat steps for 4 times, and then
Heat to Selected Sterilization Temperature.
Select Sterilization Temp.121°C or 134°C
Select Sterilization Item
Select Dry/No Dry 0/15/30/35/40 min.
Put the sterilization items and close door
Standard Sterilization Program
Select
Liquid Program
Button
Buzzer Alarms and COMPLETE indicator will illuminate. The Sterilizer goes to
STANDBY mode.
If the COMPLETE indicator did not illuminate, repeat the sterilization cycle.
Drying Starts
(0/15/30/35/40 min.)
If Dry Timer selected
If Dry Timer
Not selected
Sterilization Finishes
without Exhausting
Step.
Sterilization Finishes and Exhaust Starts
Drain Water
Liquid Program
Heat to Sterilization
Temperature

15
6.1.3 PUMP test / BD test / PRION
Press “START” Button
Vacuum, Add Water and Heat
Repeat Vacuum and Heat steps for 4 times, and then
Heat to Selected Sterilization Temperature.
Sterilization Finishes and Exhaust Starts
Buzzer Alarms and COMPLETE indicator will illuminate. The Sterilizer goes to
STANDBY mode.
If the COMPLETE indicator did not illuminate, repeat the sterilization cycle.
Drain Water
Vacuum
(10 min.)
Put the sterilization items and close door
Pump Test
B.D Test
No Dry
Sterilization
B.D. test, PRION
PRION
Drying Starts (15 min.)

16
6.2 Prepare Sterilization
A. Follow “4. Installation” to finish installation first.
B. Follow “4.2 Install the sterilizer” to make sure the water inside reservoir is sufficient.
C. Check the Pressure Gauge is reading ZERO, and then open the door by turning the door
knob 90°counterclockwise.
D. Place the items to be sterilized and the sterilization indicator strips (or biological indicator)
into the basket as required as Figure 9.
Figure 9
CAUTION: Before loading, ensure instruments are cleaned and rinsed.
WARNING: Refer to “11. Specifications” for the maximum permissible load. Failure to
follow these instructions may cause the sterilizer to malfunction and result in
an unsuccessful sterilization cycle.
E. Close the door and press Door handle.
F. Press the “POWER” switch to ON “I” position, the power indicator light should illuminate.
The “DOOR OPEN” indicator light should be off.
WARNING: The door must be closed completely during operation of the unit. If the
“DOOR” indicator light illuminates, it means that the door is not closed
properly.
Put the sterilization items into baskets.
But the sterilization items don’t over
the basket.

17
STURDY
SA-300VMA
Figure 10
Table of contents
Other Apex Digital Laboratory Equipment manuals


Popular Laboratory Equipment manuals by other brands


Stuart
Stuart SMP10 Instructions for use

Rosemount
Rosemount 700XA quick start guide

VWR
VWR avantor PCR instruction manual

Lighthouse
Lighthouse REMOTE 2 Series operating instructions

VWR
VWR avantor Star-Blender 400 Silent instruction manual

Oroboros Instruments
Oroboros Instruments O2k-FluoRespirometer manual