Aponorm BASIS PLUS BLUETOOTH User manual

Upper arm BASIS CONTROL
PLUS
Automatic multiple measurement
for increased measuring reliability
* Functional warranty of 2 years on the cuff as a wear part
Trafc light
display
Trafc light
2
users Arrhythmia
detection
storage slots
Instructions for use
Also suitable for: YEARS
WARRANTY*
Multiple
measurement
Diabetics

aponorm®Basis Control PLUS
2
10
11

3
Switches, housing and accessories
1On/off switch
2Display
3M button (Memory)
4MAM/Multiple measurements &
time selection button
5User selection button
6Cuff connection
7Mains adapter connector
8Battery compartment
9Cuff
10 Cuff tube
11 Cuff connector
aponorm®Basis Control Plus
BF part.
Important! Please observe the information in this booklet in order to
prevent damage to the device and avoid error messages.
Protect from moisture.
Before use, carefully read the operating
instructions.
Display indication
12 Systolic value
13 Diastolic value
14 Pulse indicator
15 MAM mode (multiple measurement mode active)
16 Battery level warning light
17 Cuff seating check
-A Optimum cuff seat
-B Less than optimal cuff seat
-C Arm movement disturbance indicator «Err 2»
-D Cuff signal disturbance indicator «Err 1»
-E Cuff pressure disturbance indicator «Err 3»
18 Pulse arrhythmia detector (PAD)
19 MAM waiting time symbol
20 Blood pressure traffic light indicator
21 Pulse measurement active
22 User selection display
23 Stored value
24 Date/time display

4
aponorm®Basis Control Plus
Use:
This oscillometric blood pressure monitor serves
for the non-invasive blood pressure measurement
for persons aged 12 years or more.
It is clinically validated for patients suffering from
hypertension, diabetes, pregnant women, pregnant
women suffering from preeclampsia, patients
suffering from atherosclerosis, terminal kidney
diseases, obesity and for the elderly.
Dear Customer,
This instrument was developed in collaboration
with physicians and clinical tests prove its mea-
surement accuracy to be of a very high standard.*
If you have any questions or problems or want to
order spare parts, please contact the aponorm®
customer service at the product website www.
aponorm.de or the distributor where you purchased
the monitor. The product website provides much
additional useful information on your product.
Stay healthy – the aponorm®team!
* This device uses the same measuring technology as the award
winning «BP 3BTO-A» model tested according to the British and
Irish Hypertension Society (BIHS) protocol.

5
Table of contents
1. Using the monitor for the first time
6
· Inserting the batteries
6
·
Setting the date and time 6
·
Selecting the correct cuff 6
2. Check list for realiable measurement
8
3. Taking a blood pressure measurement
8
· Manual inflation
9
·
How not to store a reading 9
·
How do I evaluate my blood pressure? 10
·
Pulse arrhythmia detector (PAD) 10
4. Data memory
11
· Viewing the stored values
11
· Clearing all values
11
5. Battery indicator and battery change
11
· Batteries almost flat
11
· Batteries flat - battery replacement
11
· Which batteries and which procedure?
11
· Using rechargeable batteries
12
6. Using a mains adapter
12
7. Error messages and problems
12
8. Safety, care, accuracy test
and disposal
14
· Safety and protection
14
· Monitor care
16
· Cleaning the cuff
16
· Accuracy test
16
· Disposal
16
9. Warranty terms
16
10. Technical data
17
Warranty card 19

6
1. Using the monitor for the first time
Inserting the batteries
After having unpacked the monitor, insert the batte-
ries. The battery compartment 8is on the bottom of
the monitor. Insert the batteries (4 x size AAA 1.5 V),
observing the polarity +/- indicated on the housing.
Setting the date and time
1.After the new batteries are fitted, the year
flashes in the display. Press the M button 3
several times to set the present year. To confirm
the year you want to set, press the MAM & time
combination button 4.
2.Now you can set the present month in
the same way, using the M button 3and
confirm your setting by pressing the MAM &
time button 4.
3.Now repeat the instructions above to set the
day, hour and minutes.
4.Once you have set the minutes and confirmed
the setting, the date/time setting is com-
plete. When the monitor is not in operation,
it displays the time 24 .
The date, however, is only required for the
memory display.
If you want to change the date and time
again, press and hold the MAM & time
button 4down for approx. three seconds until
the year starts to flash. Now you can enter the
new values as described above.
Selecting the correct cuff
Microlife offers different cuff sizes. Select the cuff
size to match the circumference of your upper arm
(measured by close fitting in the centre of the upper
arm).
If the cuff 9coming with the monitor does not fit,
please contact your local pharmacist who can order
an alternative size for you
Cuff size for circumference of
upper arm
S 17 - 22 cm
M 22 - 32 cm
M - L 22 - 42 cm
L - XL 32 - 52 cm
In addition to the soft cuffs in the above-
mentioned sizes, as an alternative, a prefor-
med comfort cuff is available in M - L, one
size fits all.
Use only aponorm®cuffs manufactured by
Microlife.
All aponorm®cuffs are latex-free.
Connect the cuff to the monitor by inserting the
cuff connector 11 into the cuff socket 6as far
as it will go.
Selecting the users

7
This monitor stores the data of 2 different users.
Before each measurement, ensure that the correct
user is selected.
Select the desired user (user 1 or user 2 22 ),
activating the user button 5by activating the user
button. The last selection is always stored for the
next measurement.
Selection of multiple/MAM or indivi-
dual measurement
Please select before each measurement whether
you want to perform a normal single measurement
(NO MAM symbol 15 in the display) or a multiple/
MAM measurement (MAM symbol 15 visible in
the display). In the MAM mode, three measure-
ments are automatically taken one after the other,
the result from all measurements is automatically
analysed and then displayed. As the blood pres-
sure varies constantly even within a very short
time, a result determined in such a way is slightly
more reliable than just one single measurement.
To select the MAM mode, press the MAM & time
button 4until the MAM symbol appears in the
display. In order to return to the normal mode (indi-
vidual measurement), press the MAM button again
until the MAM symbol is no longer displayed.
During the measurement in the MAM mode,
the number 1, 2 or 3 at the bottom right of the
display shows which of the three measure-
ments is currently taken.
Between the individual measurements, there
is an automatic pause of 15 seconds each,
indicated by the MAM waiting symbol 19 . A
countdown indicates the remaining time.
The results of the individual measurements
are not shown. Instead, you will be shown the
total result from the three measurements on
completion of the cycle.
Leave the cuff on your arm between the indivi-
dual measurements.
If the monitor detects that one of the individual
measurements within the cycle was unsuc-
cessful, a fourth measurement is automatically
performed.
2. Check list for performing
realiable measurements
Please read the enclosed flyer on the “8
golden rules of taking the blood pressure”.
Avoid activity, eating or smoking immediately
before taking the measurement.
Sit down on a chair with a backrest and relax
for at least 5 minutes. Keep your feet flat on
the floor and do not cross your legs.

8
Always take your blood pressure on the
same arm (normally the left one). It is
recommended that doctors perform double
arm measurements on a patient’s first visit in
order to determine which arm to measure in
the future. Select the arm where the higher
blood pressure was determined.
Remove close-fitting garments from the upper
arm. To avoid constriction, shirt sleeves should
not be rolled up - they do not interfere with
the cuff if they are laid flat (please take off any
heavy clothing, as it interferes with the signal).
Always ensure that the correct cuff size is
used (see on the cuff for size information).
· Fit the cuff closely, but not too tight.
· Make sure that the cuff is positioned 2.5 cm
above the crook of the arm.
· The artery mark on the cuff (approx. 3 cm
long bar) must lie over the artery which runs
down the inner side of the arm.
· Support your arm so it is relaxed.
· Ensure that the cuff is at the same height as
your heart.
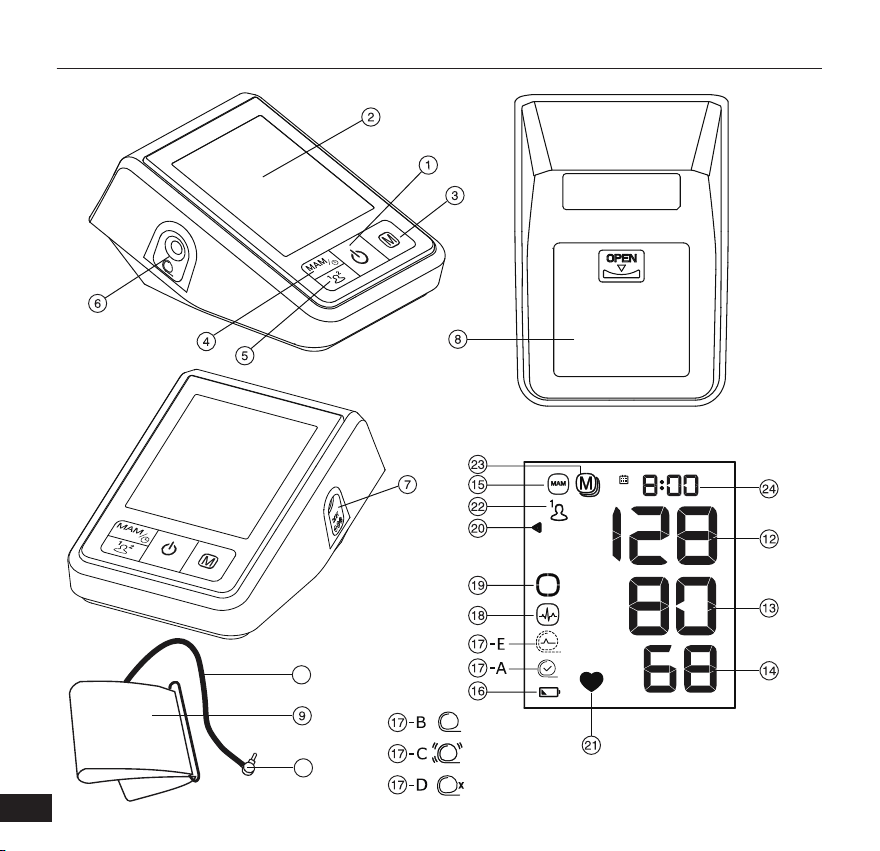
3. Taking the blood pressure
1.Press the On/off button to start the measure-
ment 1.
2.The cuff will now inflate automatically. Relax,
do not move and do not tense your arm musc-
les until the measurement result is displayed.
Breathe normally and do not talk.
3.If after a short while a cuff symbol appears
with a check mark ( 17 -A), the cuff signal and
pressure are optimal for measurement. If
there is no mark inside the cuff symbol ( 17 -B),
signal and/or pressure are less than optimal,
but still sufficient for proper measurement.
If, however, the cuff signal and pressure are
absolutely too low for measuring or if there
are excessive interferences (e. g. due to the
patient moving, tensing their muscles or
talking, etc.), an error message «ERR» (Error)
will be displayed together with one of the
cuff symbols 17 -C, 17 -D or 17 -E. In this
case re-position the cuff and repeat the mea-
surement. For other error messages, please
read chapter 7 on page 12
.
4.Once the correct pressure is reached, the in-
flating stops and the pressure gradually falls.
If the required pressure was not reached, the
monitor will automatically pump some more
air into the cuff until the blood pressure can
be taken.

9
5. During the measurement, the “pulse rate
measurement active” icon 21 flashes in the
display.
6. The result, comprising the systolic 12 and the
diastolic 13 blood pressure and the pulse rate
per minute 14 is displayed.
7. When the monitor has finished measuring,
remove the cuff.
8. Switch off the monitor.
(The monitor does switch off automatically
after approx. 1 minute, though).
You can stop the measurement at any time by
pressing the On/off button 1(e.g. if you feel
uneasy or an unpleasant pressure sensation).
This monitor is specially tested for use in
pregnancy and when suffering from pre-
eclampsia. When you detect unusually
high readings in pregnancy, take your blood
pressure again after a short while (approx.
1 hour). If the reading is still too high in the
repeat measurement, please contact your
doctor or gynaecologist.
Manual inflation
In case of very high systolic blood pressure (e. g.
exceeding 135 mmHg), it can be of use that you
determine the pressure yourself. Press the On/
off button, after the monitor started inflating and
a pressure of approx. 30 mmHg appears in the
display. Keep the button pressed until the pressure
is about 40 mmHg above your average systolic
value – then release the button.
How not to store a reading
As soon as the result appears in the display, press
the On/off button 1and keep it pressed until «M»
23 flashes. flashes. Confirm the deletion by pressing
the MAM & time button 4.
«CL» is shown after the reading was success-
fully deleted from the memory.
How do I evaluate my blood pressure?
The triangle at the left edge of the display 20
points at the range your blood pressure reading is
in. The reading is either in the optimum (green),
increased (yellow) or high (red) blood pressure ran-
ge. The classification corresponds to the following
ranges defined by international guidelines (ESH,
ESC, JSH) (values in mmHg).

10
Range
Systolic Diasto-
lic
Recommenda-
tion
1.
blood
pressure
too high
≥135 ≥85 seek medical
advice
2.
blood
pressure
elevated
130 -134 80-84 self-check
3.
blood
pressure
optimum
< 130 < 80 self-check
The higher value is the one that determines the
evaluation. Example: a blood pressure value of
140/80 mmHg or a value of 130/90 mmHg indi-
cates «blood pressure too high».
Pulse arrhythmia detector (PAD)
This symbol 18 indicates that certain pulse
irregularities were detected during the mea-
surement. If the result deviates from your normal
blood pressure repeat the measurement. In most
cases, this is no cause for concern. However, if the
symbol appears on a regular basis (e.g. several
times a week with measurements taken daily) we
advise you to tell your doctor.
4. Data memory
This monitor automatically stores the last 99
readings for each user.
Viewing the stored values
Press the M button 3briefly while the monitor
is switched off. Now the display changes over to
the data memory display, indicated by «M» 23
(M» = Memory). First, the average value of all
measurement stored in the memory is shown, as
indicated by the «A» to the right of the value («A»
= Average).
Pressing the M button again displays the last value
measured. Pressing the M button repeatedly allows
you to move from one stored value to another (from
the last to the first entry in the memory).
Blood pressure readings with the cuff posi-
tion and fit 17 -B being not optimal are not
included in the average.
Pay attention that the maximum memory
capacity of 99 values for either user is not
exceeded. When the memory is full, the oldest
value is automatically overwritten with the
100th value. The values should be evaluated
by a doctor or documented in a blood pres-
sure diary before the full memory capacity is
reached - otherwise data will be lost.

11
Clearing all values
If you are sure that you want to permanently re-
move all stored values, hold down the M button
(the monitor must have been switched off before-
hand) until «CL ALL» («CL ALL» = Clear All) appears
and then release the button. To permanently clear
the memory, press the M button while «CL ALL» is
flashing.
Aborting the deletion:
Simply press the On/off button 1again
while «CL ALL» is flashing to abort the
deletion.
It is not possible to clear individual readings.
5. Battery indicator and battery
change
Batteries almost flat
When the batteries are approximately 3/4 empty,
the partly filled battery symbol 16 will flash as soon
as the device is switched on. Although the monitor
will continue to measure reliably, you should obtain
replacement batteries.
Batteries flat - replacement
When the batteries are flat, the empty battery sym-
bol 16 will flash as soon as the device is switched
on. You cannot take any further measurements and
must replace the batteries.
In the event of a battery change or power
failure, the memory retains all values mea-
sured; the date and time must, however, be
reset. This is indicated by the year indicator
flashing.
For changing the batteries and resetting the date/
time please follow the instructions in Section 1 on
page 6.
Which batteries and which procedure?
Please use 4 new, long-life 1.5 V, size AA
alkaline batteries.
Do not use batteries beyond their date of
expiry.
If the monitor is not going to be used for a
prolonged period of time, the batteries must
be removed.
Using rechargeable batteries
You can also operate this monitor with recharge-
able batteries.
Only use «NiMH» type reusable batteries.
When the flat battery symbol appears,
remove the batteries and recharge them.
They must not remain in the monitor as they
may become destroyed (exhaustive discharge
due to low consumption of the monitor even
when switched off).

12
Always remove the rechargeable batteries
if you do not intend to use the monitor for a
week or more.
The batteries can NOT be charged while inserted
in the blood pressure monitor. Recharge the
batteries in an external charger and observe
the information regarding charging, handling
and service life.
6. Using a mains adapter
You can operate this monitor using the Microlife
mains adapter (DC 6 V, 600 mA).
Only use the aponorm®mains adapter
available as an original accessory appropriate
for your supply voltage. You can purchase the
mains adapter from your local pharmacy.
Ensure that neither the mains adapter nor the
cable are damaged.
1. Plug the adapter cable into the mains adapter
socket 7of the blood pressure monitor.
2. Plug the adapter plug into the wall socket.
When the mains adapter is connected, no battery
current is consumed. We recommend to have
batteries in the monitor even with mains operation,
just as a back-up. They ensure that in the event of
a power failure date and time are retained and do
not have to be entered manually again.
7. Error messages
When an error occurs during a measurement, the
measurement is interrupted and an error message
displayed, e.g. «Err 3».
If you do not receive an error message, but if
the results seem unusual to you, please check
whether you observed all points of the check
list on page 8 and in the enclosed flyer “8
golden rules of taking the blood pressure”.
For more detailed help in troubleshooting the
monitor, please refer to the download section
of the www.aponorm.de product website.
Error Designa-
tion
Potential cause and
remedy
«ERR 1»
17
-E
Signal too
weak
The pulse signals on
the cuff are too weak.
Re-position the cuff and
repeat the measure-
ment.*

13
Error Designa-
tion
Potential cause and
remedy
«ERR 2»
17
-C
Interference
signal
During the measurement,
interference signals
were detected at the
cuff, caused for instance
by movement or muscle
tension. Repeat the
measurement, keeping
your arm still.
«ERR 3»
17
-D
Irregular
cuff pres-
sure
It is not possible to build
up sufficient pressure in
the cuff. A leak may have
occurred. Check that the
cuff connection is correct
and that the cuff is not
too loose around your
arm. Replace the batter-
ies if necessary. Repeat
the measurement.
«ERR 5» Irregular
measuring
result
The measuring signals
are inaccurate and no
result can therefore be
displayed. Read through
the check list for perfor-
ming reliable measure-
ments and repeat the
measurement.*
Error Designa-
tion
Potential cause and
remedy
«ERR 6» MAM mode Too many errors occurred
during the measurement
in the MAM mode so
that no final result can
be determined. Read
through the check list
for performing reliable
measurements and then
repeat the measure-
ments.*
«HI» Pulse or cuff
pressure too
high
The pressure in the cuff
is too high (over 299
mmHg) or your pulse
rate is too high (over 200
beats per minute). Relax
for 5 minutes and repeat
the measurement.*
«LO» Pulse too
low
The pulse rate is too
low (less than 40 beats
per minute). Repeat the
measurement.*
* Please consult your doctor immediately, if this or
any other problem occurs repeatedly.

14
8. Safety, care, accuracy check
and disposal
Safety nd protection
· Carefully follow these instructions. This
document gives important information on the
operation and safety of this monitor. Before
using the monitor, please read these instructions
carefully and retain them for future reference.
· This device may only be used for the purposes
described in these instructions. The manufac-
turer will not accept any liability for damage
caused by improper use.
· This device comprises sensitive components
and must be treated with caution. Observe
the storage and operating conditions de-
scribed in Section 10 on page 18.
· Protect the monitor from:
water and moisture
extreme temperatures
impacts and falls
contamination and dust
direct sunlight
heat and cold
· The cuffs are rather delicate and must be
handled with care.
· Do not use any other cuffs or cuff connectors
for measurements with this monitor.
· Only inflate the cuff once fitted to your arm.
· Do not use this monitor close to strong elec-
tromagnetic fields such as mobile telephones
or radio installations. We recommend obser-
ving a minimum distance of 3.3 m from such
devices when using this monitor.
· Do not use the monitor if you think it is dam-
aged or notice anything unusual.
· Never open the monitor.
· If the monitor is not going to be used for a
prolonged period of time, the batteries must
be removed.
· Please observe the additional safety infor-
mation in the different sections of these
instructions.
·The measuring result shown by this monitor
is NOT a diagnosis. It is not a substitute for a
professional evaluation by a physician, in parti-
cular not if the result does not correspond to the
patient’s physical condition. Never rely on blood
pressure measurements alone. All potential
symptoms and the patient’s statements must
be taken into consideration. If necessary, call an
ambulance or contact a physician.
· Permanently high blood pressure values
can damage your health and must be
treated by your doctor!
· Always discuss your values with your doctor
and tell them if you have noticed anything

15
unusual or feel unsure. Never rely on blood
pressure readings alone.
· Under no circumstances should you alter
the dosages of any drugs prescribed or
start medication without consultation
with your doctor.
· Deviations between measurements taken
by your doctor or in the pharmacy and those
taken at home are quite normal, as these
situations are completely different.
· The pulse display is not suitable for check-
ing the frequency of heart pacemakers!
· If you are pregnant, you should monitor your
blood pressure very closely as it can change
drastically during this time!
Do not let unsupervised children use the
monitor. Some of the components are so
small that children can swallow them or
choke on them. Beware of the risk of
strangulations in case this monitor is fitted
with cables or tubes.
Monitor care
Clean the monitor with a soft, dry cloth only.
Cleaning the cuff
Remove stains on the cuff carefully with a damp
cloth and soapsuds or a commercial disinfectant.
WARNING: Do not wash the cuff in a
washing machine or a dishwasher!
WARNING: Do not dry the cuff in a tumble
dryer!
Accuracy test
We recommend to have this monitor tested for
accuracy every 2 years or after severe mechanical
impact (e.g. e.g. the device dropped to the floor).
Please contact the aponorm®customer service on
the website www.aponorm.de.
Disposal
Batteries and electronic devices must not be
disposed of as normal domestic trash. They
must be disposed of in accordance with the
applicable local provisions.
9. Warranty terms
We are confident in the quality of our aponorm®
blood pressure monitors. Therefore we, WEPA
Apothekenbedarf GmbH & Co. KG, grant end
customers who are private consumers, a voluntary
5 year warranty for all aponorm®blood pressure
monitors purchased in Germany, subject to the
following terms:

16
Subject matter and scope of the warranty
The warranty applies to all aponorm®blood pres-
sure monitors which customers in their capacity as
consumers purchased in Germany. WEPA Apothe-
kenbedarf GmbH & Co. KG warrants the customer
that the product is free from defects in material
and workmanship. Should, despite proper handling
of the product, a defect occur within the 5-year
warranty period, WEPA Apothekenbedarf GmbH
& Co. KG will repair the product free of charge
(except for the transport costs for returning the mo-
nitor to WEPA) or fully replace it at its discretion.
Exclusion of warranty
No claims can be derived from this warranty in case
of damage caused by the customer’s or third par-
ties’ negligence such as drop, accident or improper
handling. The same applies to damage caused by
leaking batteries or failure to observe the operating
instructions.
Warranty by WEPA Apothekenbedarf GmbH & Co.
KG is also excluded if a defect/damage was caused
by improper repair or other third party interventions.
The warranty does not cover wear parts, accessories
(e.g. pouches, cables, etc.), batteries and the cuff
forming part of the product. We grant a functional
guarantee of 2 years on the cuff (tightness of the
inner chamber).
Warranty term
The warranty covers a period of 5 years from the
date of purchase (warranty period). The relevant
proof is the date of the proof of purchase or of the
warranty card with purchase date filled in by the
distributor.
The warranty period is not extended by the fact
that benefits under this warranty were granted, in
particular not in the event of a repair or exchange
of the product. In such cases, the warranty does
not recommence.
Assertion of warranty claims
Within the warranty period, the customer can
claim his/her rights under this warranty by present-
ing the faulty product and the proof of purchase or
the warranty card filled in by the distributor directly
to WEPA Apothekenbedarf GmbH & Co. KG or the
distributor where the customer had purchased the
product.
If the fault/damage is covered by the warranty,
WEPA Apothekenbedarf GmbH & Co. KG will repair
the product free of charge (except for the transport
costs for returning the monitor to WEPA) or fully
replace it at its discretion.
If it is found that the fault/damage is not covered by
the warranty, the product can be repaired by WEPA
Appthekenbedarf GmbH & Co. KG at the customer’s
expenses. In this case, WEPA Apothekenbedarf

17
GmbH & Co. KG informs the customer of the estimated
costs in a cost estimate before starting the repair
work. In this case, the customer is free to commission
the repair of the product with costs or to request the
return of the unrepaired product.
Further customer rights
WEPA Apothekenbedarf GmbH & Co. KG grants the
warranty subject to the terms and conditions stated.
Customers can have further statutory rights. The
contractual and statutory rights of customers, in par-
ticular the statutory warranty rights against the seller
of the product, shall not be affected by the warranty.
The warranty is governed by the legislation of the
Federal Republic of Germany. Date: 02/2019
10. Technical data
Operating 10 - 40 °C / 50 - 104 °F
conditions: 15 - 95 % relative
maximal humidity of air
Storage -20 - +55 °C / -4 - +131 °F
conditions: 15 - 95 % relative
maximum humitidy of air
Weight: 402 g (incl. batteries)
Dimensions: 138 x 94.5 x 62.5 mm
Measuring method: oszillometric, validated
by the Korotkoff method:
phase I systolic,
phase V diastolic
Measuring range: 20 - 280 mmHg – blood
pressure
40 - 200 beats per minute -
pulse
Cuff pressure
display range: 0 - 299 mmHg
Measuring
resolution: 1 mmHg
Static
accuracy: pressure within ± 3 mmHg
Pulse accuracy: ± 5% of meas. value
Voltage source: · 4 x 1.5 V alkaline bat-
teries, size AA
· Mains adapter DC 6V,
600 mA (optional)
Battery ca. 920 measurements
life: (with new batteries)
IP class: IP 20
Reference to EN 1060-1 /-3 /-4;
standards: IEC 60601-1;
IEC 60601-1-2 (EMC);
IEC 60601-1-11

18
Average monitor: 5 years or
life: 10.000 measurements;
accessories: 2 years
This monitor complies with the requirements of the
Medical Device Directive 93/42/EEC.
Technical alterations reserved!

Order No. 047291
PZN -15204725
Sold by:
WEPA Apothekenbedarf
GmbH & Co KG
Am Fichtenstrauch 6-10
D-56204 Hillscheid
www.aponorm.de
www.wepa-dieapothekenmarke.de
Manufactured by:
Microlife AG
Espenstraße 139
CH-9443 Widnau
www.microlife.ch
Functional overview
Important advice:
In the download area of www.aponorm.de you find these instructions with updates
also in digital form for download, also in German, Turkish, French and Russian.
Homepage
Cuff check Automatic
switch-off
Arrhythmia
detection
2
users storage slots
PLUS
Average value
indication
PLUS = Enhanced functionality compared with basic model aponorm®Basis Control
Trafc light
display
Trafc light
Multiple
measurement
Other manuals for BASIS PLUS BLUETOOTH
1
Table of contents
Other Aponorm Blood Pressure Monitor manuals