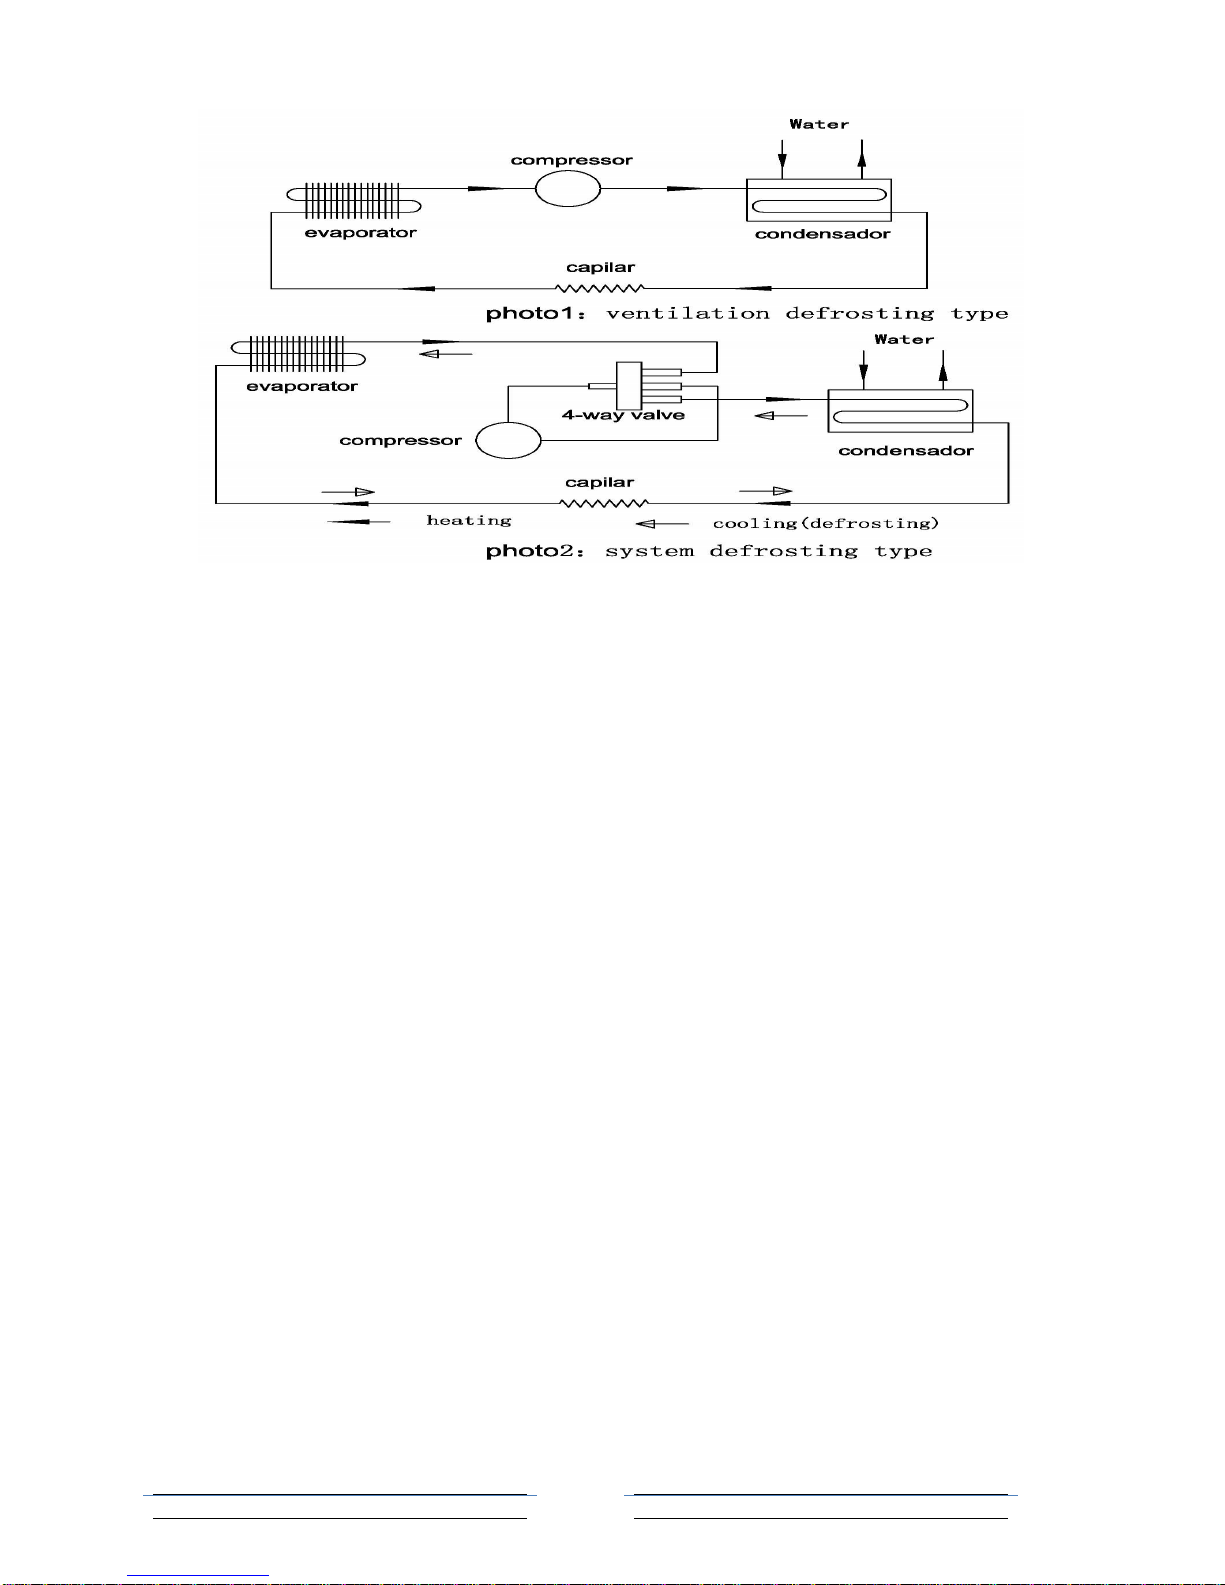
Aquant BLM200 User manual

1
Swimming Pool Heat Pump
Installation and Operation Manual
BLM100 BLM200 BLM400 BLM500 BLM600
BLM700 BLT700 BLM800 BLT800 BLT900
Warning
RISK OF ELECTRIC SHOCK OR ELECTROCUTION
The electrical supply to this product must be installed by a licensed or certified electrician in
accordance with applicable national and local codes and ordinances. Improper installation
may cause electrical hazard, which could result in death or serious injury to pool or spa
users, installers or others, and may also cause damage to property.
Read and follow the specific instructions inside this manual.

2
Contents
ⅠWorking Principle and composing 3
ⅡMain characteristics 4
ⅢTechnical data. 5
ⅣElectric circuit diagram 6
ⅤOperation instruction 8
ⅥInstructions and notices for installation 15
ⅦSafety Cautions 20
ⅨTroubleshooting and solutions 21

3
Ⅰ、Working principle and composing
1、Composing
A water heater is basically composed of a compressor, an evaporator, some capillary or
expanding valves and a condenser.
2、Working principle
Heat pumps use electricity to capture heat and move it from one place to another. They
don't generate heat. As the pool pump circulates the swimming pool's water, the water
drawn from the pool passes through a filter and the heat pump heater. The heat pump
heater has a fan that draws in the outside air and directs it over the evaporator coil. Liquid
refrigerant within the evaporator coil absorbs the heat from the outside air and becomes a
gas. The warm gas in the coil then passes through the compressor. The compressor
increases the heat, creating a very hot gas that then passes through the condenser. The
condenser transfers the heat from the hot gas to the cooler pool water circulating through
the heater. The heated water then returns to the pool. The hot gas, as it flows through the
condenser coil, returns to liquid form and back to the evaporator, where the whole process
begins again.
3、Example of how a heat pump operates.

4
Ⅱ、Main characteristics
1、Efficient and economical
The unit's Coefficient of Performance(cop)≥4.0. In comparison, an electric boiler (cop)≤0.95,
a gas or oil boiler (cop) is about 0.5--0.8,a coal-boiler(cop) is only about 0.3--0.7.
2、Safety ensured
When the unit is working, all electrophorus parts are absolutely isolated from circulating
water, thus avoiding some possible dangers such as explosion, dry heating, gas poisoning,
which may happen with a common water heater.
3、Environmentally friendly
The applied refrigerant is not Freon, and when the unit is working, no waste water, no waste
residue, no waste heat and no waste gas will pollute the circumstance.
4、Installation convenient
It can be installed at outdoor area, balcony, flat roof, carbon, equipment floor, and does not
need special room only for it.
5、Modularized control function
You can combine several units to make one heat water supply system controlled by
modularization. The system can adjust the running time and order automatically, by which
the whole system can run efficiently, and every unit's total running time can be unified.

5
6、Operation convenient
The unit is controlled by microcomputer. According to the condition of water temperature
and circular water volume, the unit will adjust itself. There is no need for anybody to keep on
watching it.
7、Automatic defrost function
With intelligent zed defrost function, you can set defrost condition according to different
climates to make the unit defrost in a flexible way.
8、Far-ranging applicability
Can be used in hotel, bathe centre, school, factory, indoor natatorium and so on.

1
Ⅲ、Technical Data
CV 1/2HP 1HP 2HP 2.5HP 3HP 4HP 5HP 6HP
Model ASTRAL BLM100 BLM200 BLM400 BLM500 BLM600 BLM700 BLT700 BLM800 BLT800 BLT900
HEATING CAPACITY BTU/H 10200 14000 29000 34000 43000 58000 58000 72000 72000 85000
W 3000 4200 8500 10000 13000 17000 17000 21000 21000 25000
HEATING POWER INPUT W 600 850 1700 2000 2600 3500 3500 4500 4500 5500
EFFICIENCY COP 5 5 5.0 5.0 5 4.9 4.9 4.7 4.7 4.6
HEATING NOMINAL
CURRENT A 2.8 4.1 8.3 9.2 12 16 6 21 7.8 9.6
VOLTAGE/FREQUENCY V/PH/Hz 220/1/50 220/1/50 220/1/50 220/1/50 220/1/50 220/1/50 380/3/50 220/1/50 380/3/50 380/3/50
COMPRESSOR UNIT 1 1 1 1 1 1 1 1 1 1
COMPRESSOR TYPE ROTARY ROTARY ROTARY ROTARY ROTARY SCROLL SCROLL SCROLL SCROLL SCROLL
HEAT EXCHANGER PVC HERMETIC WATER BARREL WITH SPIRAL SOFT TITANIUM PIPES INSIDE
REFRIGERANT R407C
BLOWER QUANTITY 1 1 1 1 1 1 1 1 1 1
FAN POWER INPUT W 15 20 45 95 95 120 120 200 200 200
FAN ROTATE SPEED RPM 850 850 850 850 850 850
BLOWER STYLE LATERAL-BLOW
NOISE LEVEL dB(A) ≤47 ≤47 ≤51 ≤58 ≤58 ≤58 ≤58 ≤58 ≤58 ≤58
WATER CONNECTION mm 50 50 50 50 50 50 50 50 50 50
WATER FLOW m3/h ≥4.0 ≥4.0 ≥5.0 ≥7.0 ≥7.5 ≥8.0 ≥8.0 ≥9.0 ≥9.0 ≥10.0
WATER PRESSURE
LOSS kPa 10 10 10 12 12 12 12 12 12 12
NET DIMENSION mm 720¡ 330¡ 50
0720¡ 330¡ 500 910¡ 360¡ 650 910¡ 360¡ 650 910¡ 360¡ 650 1100¡ 460¡ 95
01100¡ 460¡ 95
01100¡ 460¡ 95
01100¡ 460¡ 95
01100¡ 460¡ 95
0
GROSS DIMENSION mm 830*430*64
0830*430*640 1030*470*790 1030*470*790 1030*470*79
01230*580*109
01230*580*109
01230*580*109
01230*580*109
01230*580*109
0
NET WEIGHT Kg 34 38 70 73 75 100 100 110 110 120
GROSS WEIGHT Kg 42 46 85 88 95 125 125 135 135 145
Short circuit protection
derive A 20 25 30 40 45 80 30 100 35 40
Fuse gauge A 16 16 20 32 32 40 20 60 20 20
Supply gauge mm23¡ 1.5 3¡ 1.5 3¡ 2.5 3¡ 2.5 3¡ 2.5 3¡ 4.0 5¡ 2.5 3¡ 4.0 5¡ 2.5 5¡ 2.5

2
○! NOTE: Rated condition: Circumstance dry bulb temperature :24℃Inlet water temperature:27℃

1
Ⅳ、Electric circuit diagram
BLM100 BLM200 BLM400 BLM500 BLM600

2
BLM700 BLM800
BLT700 BLT800 BLT900

3

4
Ⅴ、Operation instruction
Panel:
What¡s the meaning of the index lights on the panel?
The function of the LED on the panel is showing below:
Index
Light Name Light Flash
Temp
Setting In the state of
temp setting -
Refrigeratio
nRefrigerating Ready to refrigerate, in the state of
compressor start delay protection
Heat Heating Ready to heat, in the state of compressor
start delay protection
Defrost Defrosting Ready to defrost, in the state of compressor
start delay protection
Fan Fan running -
Alarm - Alarm state
The meaning of the LED display
The LED usually shows temperature, if it shows ¡SHr¡, it means the temperature
sensor is short, and ¡OPE¡ means the temperature sensor is open. The temperature
and the alarm code (Axx) will show alternately when in the alarm state.
The code is showing below:
Code Signification Explanation
A11 External alarm Alarm from external alarm signal, please refer to the internal
parameter code ¡F50¡
A21 Water temperature
sensor error Open or short(showing ¡OPE¡ or ¡SHr¡)
A22 Outdoor machine
sensor error Open or short(showing ¡OPE¡ or ¡SHr¡ when press the
key
“↓”)
A99 Over probation time If you have set the probation time F87, the alarm occurs
when the accumulative running time is over probation time,
and the controller can not work.
How to set the temperature?
Press the key ¡set¡ for at least 2 seconds, then enter the state of temperature setting,
here the LED displays the setting temperature, then using ¡¡ key or ¡¡ key can
change the parameter(the key¡¡adds 0.1¡C, the key¡¡minuses 0.1¡C, press and
hold it over 0.5 seconds can add or minus rapidly). After setting, press ¡set¡ again,

5
then exit the state of parameter setting. (The setting temp range is limited by the
parameters F13 and F14, please refer to the advanced operation). Pressing the key
¡M¡ in the setting process means cancel and exit, but the setting value will not be
saved.
How to read the outdoor temperature?
When displaying current temperature, press ¡¡ key, Controller will display defrosting
temperature. Loose ¡¡ key, then return to current temperature. Notice that if you
press the key and hold it for 5 seconds, the controller will enter or exit the defrosting
state forcibly.
How to look over and adjust the real clock time?
Press the key ¡Set¡ to enter the state of displaying time when in the state of displaying
temperature. Press the key ¡Set¡ for some time to enter the state of adjusting time,
and press the key ¡Set¡ to return to the state of displaying temperature.
In the state of adjusting time, the hour part of the LED flashes, and you can adjust the
hour by using the key ¡¡ and ¡¡, then press the key ¡Set¡, and the minute part of
the LED flashes, you can also use the key ¡¡ and ¡¡ to adjust the value, then press
the key ¡Set¡ again to exit. Pressing the key ¡M¡ in the adjusting process means giving
up and exiting, but the time will not be saved.
How to heat forcibly?
When displaying current temperature, the temperature is between ¡setting
temperature -temperature difference¡ and ¡setting temperature +temperature
difference¡, the system may or not heat, here you press the key ¡¡ and hold it for 5
seconds, the controller will enter the heat state forcibly when in the heat state, and
stop heating when the temperature is above ¡setting temperature +temperature
difference¡.
Advanced Operation
Press the key ¡M¡ and hold it for 5 seconds, and if you have set the password, the
LED display the ¡PAS¡ to hint you to enter the password, you can use the key “↑” and
“↓” to enter the password, if the password is correct, the LED will display the
parameter code, use “↑” or “↓” to select the parameter code,Pressing the ¡set¡ key
can make it to show the value of the parameter after select the parameter, here you
use “↑” or “↓” to set the parameter(pressing the key and not release can add or minus
rapidly), then press the ¡set¡ key to return to the state of showing parameter code
after finishing setting. Pressing the key ¡M¡ can exit the parameter setting state when
display the parameter code, pressing the key ¡M¡ means cancel when in the process
of setting parameter, and the parameter will not be changed.
Internal parameter code is showing below:
Sort Code Parameter Name Range Factory
setting Unit Remark
Temperatu
re
F11 Setting
temperature F14 ¨ F13 28 ℃/℉The setting range
is limited by F13
and F14
F12 Temperature
difference 0.1 ¨ 20 1.0 ℃/℉Control the
temperature
difference, please

6
refer to the
temperature
controlling
F13 Max setting
temperature -58 - 302 35 ℃/℉Notice: the
controller will follow
the rule of
F14<F11<F13
forcibly, if you find
out that one
parameter can not
be adjusted, it is
because the
parameter is
limited by other
parameters, you
must first adjust
other parameters
F14 Min setting
temperature -58 ¨ 302 10 ℃/℉
F17 Auto mode
temperature
difference 3 - 20 3 ℃/℉If
F17<F12,F17=F12
admitted
F18 Evaporator
sensor
adjustment -20 ¨ 20 0.0 ℃/℉Adjust the outdoor
machine sensor
bias
F19 Temp sensor
adjustment -20 ¨ 20 0.0 ℃/℉Adjust the
temperature sensor
bias
Compress
or
F21 Compressor
delay time 0 -- 10 3 min
F29
Compressor
controlling mode
(temp controlling
mode)
COOL /
HEAT
/C/H HEAT -
COOL:
refrigeration mode
HEAT: Heat mode
C/H :Auto mode
Defrosting
F31 Defrost start
temperature -20 ¨ 80 -2 ℃/℉
F32 Defrost end
temperature 0 ¨ 100 10 ℃/℉
F33 Defrost start time 1 ¨ 999 30 min
F34 Max defrost time Off, 1 ¨ 99 10 min Off means no
defrost
F37 Defrost mode 0 - 1 0 - 0:air defrost
1: 4 way valve
defrost
Water
Pump
F40 Water Pump
Select 0 ¨ 1 1 -
0: water pump is
not enable
1: water pump is
enable
F41 Water pump
starts time before
compressor starts 1 ¨ 10 3 min

7
F42 Water pump
stops time after
compressor stops 0 ¨ 10 3 min
F43 Water pump stop
time OFF
1 ¨ 99 60 min
F44 Water pump run
time OFF
1 ¨ 10 5 min
Alarm
F50 External alarm
mode 0 -- 4 3 -
0: without external
alarm
1: always open,
unlocked
2: always open,
locked
3: always closed,
unlocked
4: always closed,
locked
F59 Buzzer alarm
sound duration
OFF,
0.1 -- 10,
On OFF min
Off: No alarm
sound
On: Alarm sound is
always on until
pressing any key
RTC
F60 Set the RTC time 00:
00¡ 23:
59 - -
F61 Period 1 start
time
00:
00¡ 23:
59
OFF 05:00 -
OFF means not
using
F62 Period 1 end time 00:
00¡ 23:59
OFF 07:00 -
F63 Period 2 start
time
00:
00¡ 23:59
OFF 16:00 -
F64 Period 2 end time 00:
00¡ 23:59
OFF 18:00 -
F65 Period 3 start
time
00:
00¡ 23:59
OFF 22:00 -
F66 Period 3 end time 00:
00¡ 23:59
OFF 00:00 -
F69 Run Mode 0/1 0 - 0:Automatic
1:Economical

8
System
setting
F80 Password OFF
0001 --
9999 OFF -
OFF means no
password
0000 means
clearing password
F8
1Temperature unit C/F C - C: Centigrade
F: Fahrenheit
F85 Display
accumulative
running time - - hour
F86 Accumulative
running time
reset - - -
F87 Probation time OFF
1 -- 9999 OFF hour
The controller will
stop if the
accumulative time
is over probation
time, and show the
alarm code ¡A99¡.
OFF means no
probation time
Testing F98 Reserved
F99 Test self This function can attract all relays in turn, and
please don¡t use it when the controller is running!
End Exit
Basic Operating Principle
Temperature controlling
The controller has 3 temperature controlling mode: Refrigeration, Heat and auto(F29).
Temperature controlling point is controlled by ¡setting temperature (F11, or press the
¡set¡ key for some time to set)¡ , ¡temperature difference(F12)¡and ¡Auto mode
temperature difference ¡.In refrigeration mode (4 way Valve is enable and follow
compressor), the controller begins to refrigerate when the temperature of the
temperature sensor is over ¡setting temperature +temperature difference¡, and it
stops refrigerating when the temperature is under ¡setting temperature -
temperature difference¡; In heat mode (Valve is disable except when defrosting), the
controller begins to heat when the temperature of the temperature sensor is under
¡setting temperature -temperature difference¡, and it stops heating when the
temperature is over ¡setting temperature +temperature difference¡ ;In auto mode,
the controller begins to refrigerate when the temperature of the temperature sensor is
over ¡setting temperature +Auto mode temperature difference¡, and it stops

9
refrigerating when the temperature is under ¡setting temperature¡, the controller
begins to heat when the temperature of the temperature sensor is under ¡setting
temperature -Auto mode temperature difference¡, and it stops heating when the
temperature is over ¡setting temperature¡.(Attention: when set F17<F12, F17=F12
admitted)
Compressor delay time
The compressor delay time is set by F21, for example, 3 minutes. The controller
contains a ¡compress or halt calculagraph ¡, and it begins to time when compressor
stops, the program first check the calculagraph before booting the compressor next
time, the program will immediately boot the compressor if the calculagraph reach 3
minutes ,if the calculagraph doesn¡t reach 3 minutes ,it will boot again when the
calculagraph reaches 3 minutes. Thus you can ensure that the boot alternation is over
3 minutes after halt, so it can prevent to breaking the compressor as a result of
frequent boot. In addition, the controller doesn¡t boot the compressor within 3 minutes
after turning on the power supply, thus the compressor can also be protected in the
state of power cut and then power on.
Auto defrosting principle
The controller will supervise the temperature of outdoor machine when heating
normally, and decide whether need to defrost according to the time of the outdoor
machine in the continuous low temperature state. In other words, the defrosting
calculagraph begins to time when the outdoor machine temperature is lower than
¡defrost start temperature¡, and turns on the defrosting when the value of time
reaches ¡defrost start time¡. The calculagraph will be cleared if the outdoor machine
temperature is higher than ¡defrost start temperature¡ when timing, and it begins to
time again when the outdoor machine temperature is lower than ¡defrost start
temperature¡ next time. In other words, the value of defrosting calculagraph shows
the continuous low temperature time of the outdoor machine.
The controller can check the defrosting effect with the temperature of outdoor
machine, if the temperature of outdoor machine goes up to the ¡defrost end
temperature¡, the controller will turn off the function of defrosting. If the defrosting time
is above ¡max defrost time¡, the controller will turn off defrosting forcibly.

10
The process above can only run in heating state, in other words, the controller will not
turn on defrosting in non-heating state.
Air defrost mode: when start defrost, the compressor stop running ,the fan continue
running; when stop defrost the compressor and fan continue running;
4 way valve defrost mode: when start defrost,the compressor and fan continue
running,the four-way valve energized;when stop defrosting the compressor and fan
continue running, the four-way valve powered off.
Water pump control
The controller can choose whether to use water pump or not (F40),0 means no water
pump function, 1 means use water pump. When water pump runs, the compressor
start up ahead of the time of F41, delaying turn off the compressor of the time of
F42.When external alarm and probation time over alarm,cut off water pump output
immediately.The compressor won¡t start up until the water pump achieve the working
time of F41.
When the machine unit stop running,the water pump follow the below request:
F43stop, F44 run,and circle.
External alarm
The controller can connect a switching value as external alarm source (Pin 4, 5), Only
when the compressor is running ,and the external alarm occurs, the controller stops,
displays the alarm code ¡A11¡. External alarm signal has 5 modes (F50):
0: without external alarm
1: always open, unlocked
2: always open, locked
3: always closed, unlocked
4: always closed, locked
¡Always open¡ means in normal state, external alarm signal is open, if closed, the
controller will give an alarm; ¡Always closed¡ is on the contrary. ¡Locked¡ means that
when external alarm signal becomes normal, the controller is still in the alarm state,
and it needs to press any key to resume.
Running in different period of time
The controller contains real time clock, and can time accurately. In ¡Econ Mode¡, the

11
controller will ensure that whether need to heat according to water temperature,
otherwise the current time is in or not in the setting period of time, if it is not in the
setting period of time, then the controller will not heat whether the water temperature
is high or low.
The controller can be set 3 heat periods of time at most, if you don¡t need some
periods of time, you can set the starting time and ending time which you don¡t need as
¡OFF¡.
In addition, if the ending time is earlier than starting time, the controller considers this
ending time is next day. For example, the period of time is ¡22:00¡to¡03:30¡, the
controller considers it as 22:00 at night to 03:30 next day.
Probation time
A probation time can be set (F87), the controller can add up the running time after
power is on, if the accumulative running time is over the probation time, the controller
will stop and display the alarm code A99, if you want to eliminate the limit of probation
time, set the F87 to ¡OFF¡, also you can use the F86 to clear the accumulative
running time, and you can try to use it again. The parameter F85 can be used to
examine the accumulative running time of the controller (hour).
Password
In order to prevent irrespective persons from changing the parameters, you can set a
password (F80), and if you have set a password, the controller will hint you to enter
the password after you press the key ¡M¡ for 5 seconds, you must enter the correct
password, and then you can set the parameters. If you don¡t need the password, you
can set F80 to ¡OFF¡. Notice that you must remember the password, and if you forget
the password, you can not enter the set state.
Wiring Diagram:

12
Notice:
1. Please read the guide carefully before using, and set the parameter accurately.
2. Please place the temperature sensor at the place of air return of the air-cooler.
3. Please use the temperature sensors which are supplied by our company.
Ⅵ、Instructions and notices for installation
1、Materials Needed For Installation:
Plumbing connections(φ50mm);
Level surface for proper drainage;
Suitable electrical supply line. See rating plate on unit for electrical specifications.
A junction box is not needed at the heat pump; connections are made inside of
the heat pump electrical compartment. Conduit may be attached directly to the
heat pump jacket.
Electric cutout(Disconnect)switch that will interrupt all power to the unit. This
switch must be within line of sight of the heat pump.
Watertight conduit to run the electrical supply line.
Recommends installing isolation valves on the inlet and outlet water connections
for ease of serviceability.

13
NOTE: Flex conduit is recommended for connecting the electrical supply wires to the
heat pump so that the front panel may be removed easily for servicing.
2、The requirements for heat pumps include the following
Appropriate site location and clearances;
Sufficient air ventilation;
Proper electrical wiring;
Adequate water flow;
NOTE: This manual provides the information needed to meet these requirements.
Review all application and installation procedures completely before continuing the
installation。
3、Clearances
Avoid placing the heat pump in locations where it can cause damage by water or
condensate leakage. If this is not possible, provide a suitable drain pan to catch and
divert any leakage. All criteria given in the following sections reflect minimum
clearances. However, each installation must also be evaluated, taking into account
the prevailing local conditions such as proximity and height of walls, and proximity to
public access areas.
D
D
C
B
AA
B
C
80cm
150cm
30cm
80cm60cm
15cm
100cm
60cm
Minimum
Clearances for
Operation
Recommended
Clearances for
Serviceability
4、Equipment Pad
Place the heat pump on a flat slightly itched surface, such as a concrete or fabricated
slab (pad).This allows proper drainage of condensation and rain water from the base
of the unit. If possible, the pad should be placed at the same level or slightly higher
than the filter system equipment pad.
This manual suits for next models
9
Table of contents
Popular Swimming Pool Pump manuals by other brands

Hayward
Hayward TriStar VS 950 user manual

VEVOR
VEVOR HCP370A-D user manual

Astral Pool
Astral Pool COLUSA 70574 Installation and maintenance manual

Astral Pool
Astral Pool SENEXT XP Installation and maintenance manual

aqua technix
aqua technix AQUA Master Series Original installation and operating manual

Aqua Guard
Aqua Guard AG92395 Installation & operation manual

Astral Pool
Astral Pool VICTORIA PLUS SILENT VS quick guide

AQUA FORTE
AQUA FORTE Vario1.1 Installation & operation manual

Aqua PRO
Aqua PRO WIP100PRO Operating instructions and parts manual

Davey
Davey SpaPower SP500 user guide

Intex
Intex Krystal Clear 602G owner's manual

Intex
Intex Krystal Clear SX2100 owner's manual