Aquos Phone IS Series Installation guide

GettingReadyContentsIntroductionLearningtheBasicsPhoneAddressBookMailInternetMultimediaApplications1SegSettingsofIS14SHGlobalFunctionAppendix/IndexBasicManual
Forinquiries,call:CustomerServiceCenter
Forgeneralinformationandcharges(tollfree)
Fromfixed-linephones:Fromaucellphones:Fromfixed-linephones:Fromaucellphones:
Incaseabovenumbersarenotavailable,
0120-977-033(exceptOkinawa)0120-977-699(Okinawa)
Forloss,theftordamageandoperationinformation
(tollfree)PRESSINGZEROWILLCONNECTYOUTOANOPERATORAFTERCALLING157ONYOURauCELLPHONE.areacodenotrequiredareacodenotrequiredSales:KDDICORPORATION・OKINAWACELLULARTELEPHONECOMPANYManufacturedby:SHARPCORPORATIONCellphoneandPHSoperatorscollectandrecycleunusedtelephones,batteriesandbatterychargersatstoresbearingthelogoregardlessofbrandandmanufacturertoprotecttheenvironmentandreusevaluableresources.November2011Edition

ii
Thank you for purchasing the IS14SH.
Before using your IS14SH, be sure to read the Basic Manual (this PDF
manual) to ensure correct usage.
After you have finished reading this manual, store this PDF manual
and the printed manuals (Accessories) in safe places so you can
retrieve them whenever you need them. If the printed manuals
(Accessories) are lost, please contact an au shop or Customer
Service Center.
■Instruction Manual (Accessory)
This manual describes basic operations of major functions of the
IS14SH.
For detailed descriptions on various functions, refer to the Instruction
Manual application (Japanese) available on the IS14SH or full
Instruction Manual (Japanese) available on the au homepage.
■Instruction Manual Application
You can use the Instruction Manual application (Japanese)
pre-installed in the IS14SH with which you can check detailed
operation methods on this au phone terminal.
Also, you can activate intended functions from an explanation screen
depending on the functions.
On the home screen, tap [Instruction Manual
To use the application for the first time, you need to download and
install it by following on-screen instructions. ■Downloading Manuals
You can download the Basic Manual (this manual) and the Instruction
Manual (Accessory) (Japanese) or full Instruction Manual (Japanese)
in PDF format from the au homepage.
http://www.au.kddi.com/torisetsu/index.htmlTo display the Basic Manual (this manual), the Instruction Manual
(Accessory) (Japanese) or full Instruction Manual (Japanese) in PDF
format on the IS14SH, purchase the full version of Documents To Go
or install an application which allows you to display PDF files.
Be sure to read the Safety Precautions “安全上のご注意” in the
Instruction Manual (Japanese) to ensure proper usage of the IS14SH.
For troubleshooting, check the symptom of your IS14SH in
auお客さまサポート(au Customer Support) on the au homepage.
http://www.kddi.com/customer/service/au/trouble/kosho/index.htmlPreface
For Learning Operations of the IS14SH Safety Precautions
KUUJAWGDQQMKKࡍࠫ㧞㧜㧝㧝ᐕ㧝㧞㧝ᣣޓᧁᦐᣣޓඦᓟ㧡ᤨ㧝㧥ಽ

1
You cannot receive or make calls in a location where the signal
cannot be received, even within the service area. Calling may not be
available in a location where the signal is weak. If you move to a
location where the signal is weak during a call, the call may be
interrupted.
The au phone is a digital cell phone and can maintain a high call
quality until the signal weakness reaches its limit. Therefore, once
the limit has been reached, the call may be disconnected suddenly.
Note that the au phone uses signals which may be intercepted by a
third party. (However, the CDMA system enables highly confidential
call communications.)
The au phone is a wireless station which is compliant with the Radio
Act, and may be subject to inspections regulated by the Radio Act.
When you insert the au IC-Card, the product number information of
your au phone is sent to the au server for the security and operation
status notification of the au phone.
Always be considerate of others around you when using your au
phone in public places.
For a child’s use, read the Basic Manual and give your child
instructions on proper use.
The IS14SH is a cell phone compatible with the international
roaming service. Each network service which is described in the
Basic Manual varies depending on the area or service. For details,
refer to Global Passport Owner’s Guide (Japanese).
Before Using an au Phone
KUUJAWGDQQMࡍࠫ㧞㧜㧝㧝ᐕ㧝㧞㧝ᣣޓᧁᦐᣣޓඦᓟ㧡ᤨ㧝㧥ಽ

2
Introduction
Cell phones always emit weak radio waves when power is on. Use cell
phones in an enjoyable and safe manner without forgetting to be
considerate of others around you.
■Use of cell phones is not allowed in some places.
Using a cell phone while driving a car/motorcycle is dangerous and
is prohibited by law. Also, using a cell phone while riding a bicycle
may be punished by law.
Using a cell phone in an aircraft is prohibited.
■Be considerate of where you use the cell phone and
how loudly you talk.
Do not make calls in theaters, museums, libraries, and other similar
places. Turn power off or turn on Manner mode so as not to disturb
others around you by ring tones.
Do not use the cell phone on a street where you might interrupt the
flow of pedestrians.
Move to areas where you will not inconvenience others on trains or in
hotel lobbies.
Refrain from talking in a loud voice.
Obtain the permission of other people before you take their photos
with the cell phone’s camera.
■Be considerate of people around you.
Some people close to you in crowded places such as packed trains
may be using a cardiac pacemaker. Turn the cell phone off in such
places.
Abide by the rules of hospitals and other medical institutions where
it is forbidden to use or carry cell phones.
Check whether all the contents are included.
ƔInstruction Manual (Japanese)
ƔSafety Precautions (Japanese)
ƔNotice Sheet (Japanese)
ƔSetting Guide (Japanese)
ƔJIBUN BANK・au Insurance Service Guide (Japanese)
ƔGlobal Passport Owner’s Guide (Japanese)
Ɣau International Call Guide (Japanese)
The following items are not included.
Purchase a specified charger (sold separately).
The illustrations in this manual may look different from the actual
product.
Cell Phone Etiquette Accessories
•AC adapter
•Earphone
•microUSB cable
Warranty
(Japanese)
IS14SH microSD memory card
(2 GB) (Sample)
* This is inserted in the
IS14SH at the time of
purchase.
Battery pack
(SHI11UAA)
KUUJAWGDQQMࡍࠫ㧞㧜㧝㧝ᐕ㧝㧞㧝ᣣޓᧁᦐᣣޓඦᓟ㧡ᤨ㧝㧥ಽ
3
Introduction
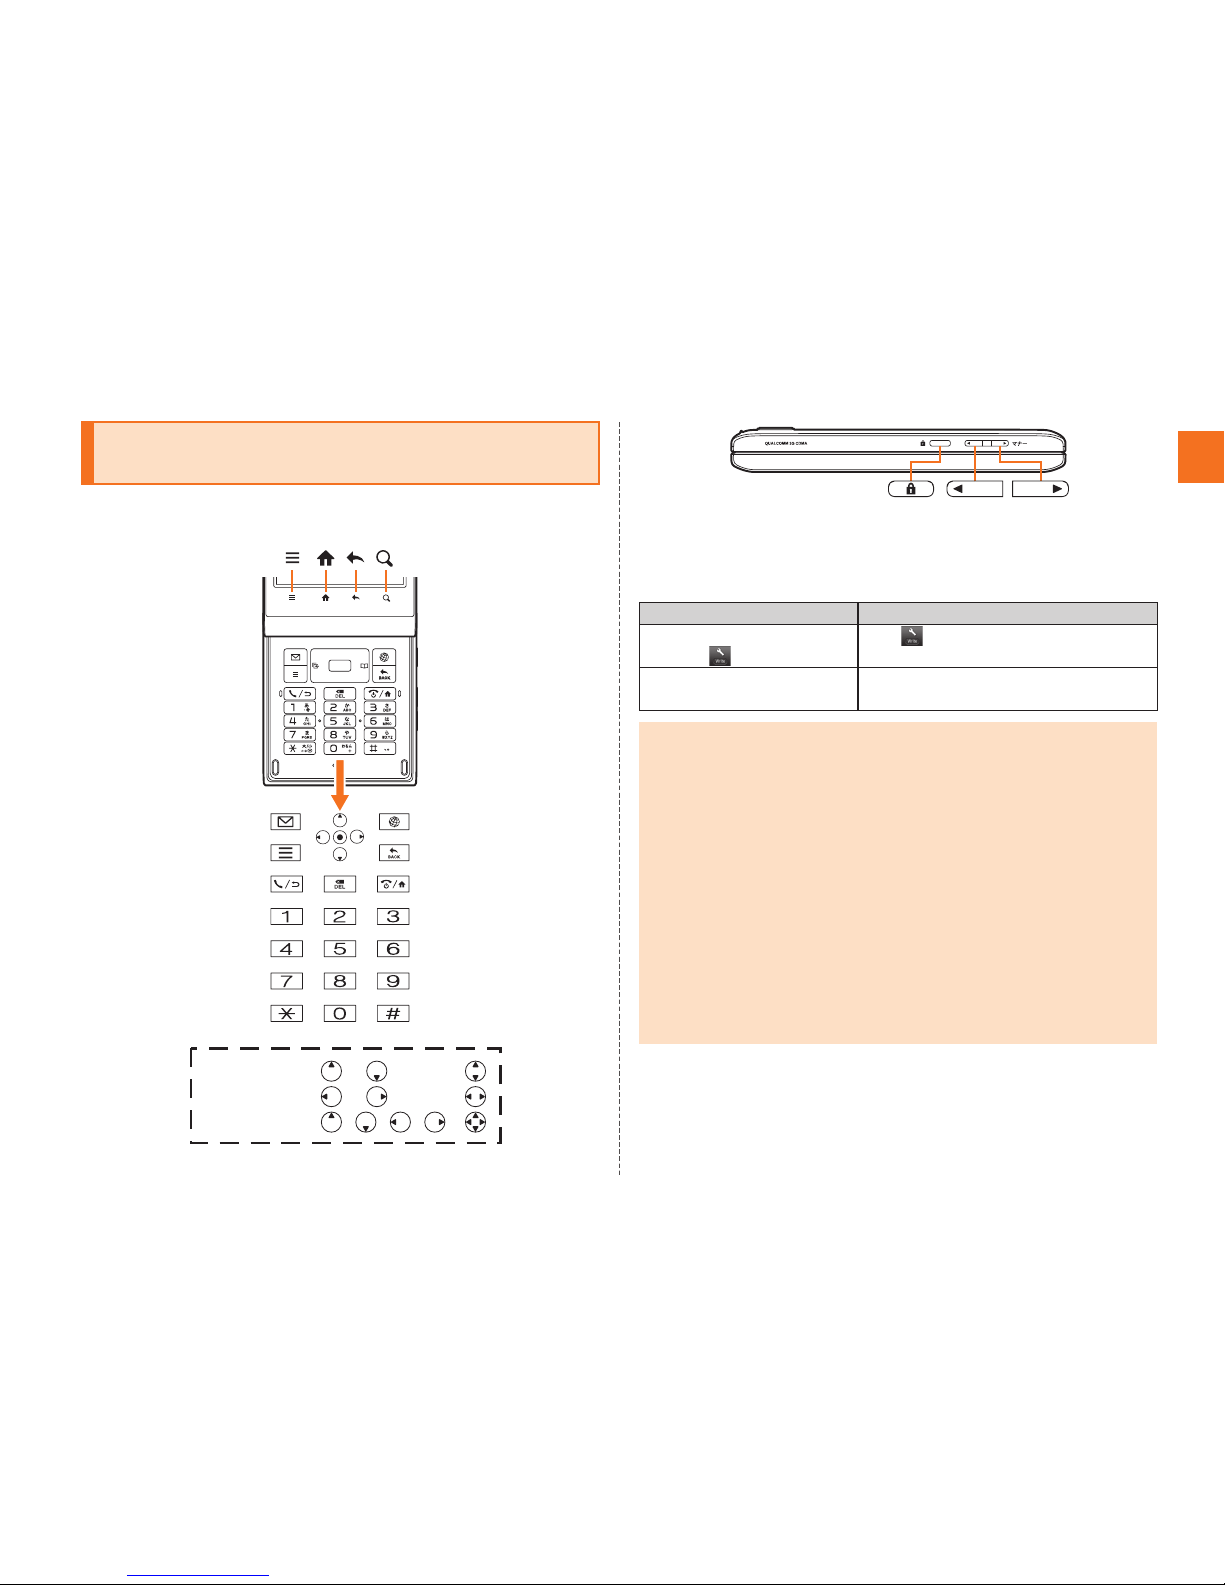
■Note on Key Illustrations
In this manual, the key illustrations are simplified as shown below. ■Description of Operations for Selecting Item/Icon/
Key etc.
In this manual, operation steps are described as below.
Illustrations and Descriptions in This
Manual
When pressing or ................
When pressing or ................
When pressing , , , ...
Description Explanation
On the character entry
screen, [Input mode.
Tap on the character entry
screen. Then tap Input mode.
On the character entry
screen, A.
Press Aon the character entry
screen.
•Explanations of this manual are based on the case when the color of the
IS14SH is “Champagne Pink” as an example.
•Explanations of this manual are based on the case when the IS14SH is held
vertically. If you hold it horizontally, menu items/icons/on-screen keys etc.
may be different.
•Explanations of this manual are based on touch panel operations when you
can operate with either touch panel or keys.
•Explanations of this manual are based on the case when the IS14SH is
closed. If it is opened, menu items/icons/on-screen keys etc. may be
different.
•Menu items, layers and icons described in this manual may be different
according to functions being used and conditions.
•In this manual, entering Lock No. is mentioned as one of the unlock
methods.
•“microSD™memory card” and “microSDHC™ memory card” are
abbreviated as “microSD memory card” or “microSD”.
KUUJAWGDQQMࡍࠫ㧞㧜㧝㧝ᐕ㧝㧞㧝ᣣޓᧁᦐᣣޓඦᓟ㧡ᤨ㧝㧥ಽ

4
Introduction
■Note on Screenshots
The screenshots in this manual are simplified and may look different
from the actual screens. Also, part of the screen may be abbreviated.
You have to use each security code for using the IS14SH.
You can use a security code and other passwords described below.
Take care not to forget your security code and passwords because
they are required for performing various operations and using
subscription services.
●Security Code
●Lock No.
●PIN Code
Actual screen
In this manual,
part of the screen
such as icons are
abbreviated.
In this manual
Security Code and PIN Code
Security Code and Passwords
Usage
Example
AUsing the Answering Service (Voice Mail) and Call Transfer
remotely from a fixed-line phone
BMaking inquiries, applications, and changes while using
Customer Service Center voice guidance, and au homepage
Initial
Setting
The four-digit number you wrote on your subscription form
Usage
Example
Setting/Canceling Screen lock, Restrict address book, etc.
Initial
Setting
1234
Usage
Example
Preventing unauthorized use of the au IC-Card by a third party
Initial
Setting
1234
KUUJAWGDQQMࡍࠫ㧞㧜㧝㧝ᐕ㧝㧞㧝ᣣޓᧁᦐᣣޓඦᓟ㧡ᤨ㧝㧥ಽ

5
Introduction
If the PIN code is incorrectly entered three times consecutively, the
PIN code will be locked. Use the PUK code to unlock the PIN code.
■PIN Code
You can set the IS14SH to require PIN code entry every time the
power is turned on, to prevent unauthorized use of the au IC-Card by
a third party.
At the time of purchase, the PIN code is not to be required to use
phone. On the home screen, tap [Settings [Location &
security [Set up UIM card lock [Mark Lock UIM card to set the PIN
code to be required.
The PIN code is also required when setting Lock UIM card.
The initial setting of the PIN code is “1234”. On the home screen, tap
[Settings [Location & security [Set up UIM card lock
[Change UIM PIN to change the PIN code to a four- to eight- digit
number.
■PUK Code
Enter the PUK code when the PIN code is locked.
PUK code is an eight-digit number given at the time of purchase,
and is printed on the back side of the plastic card where your au
IC-Card is attached.
When you enter the PUK code, on the home screen, tap
[Settings [Location & security [Set up UIM card lock [Change
UIM PIN to set the new PIN code.
If the PUK code is incorrectly entered ten times consecutively,
contact an au shop, PiPit or the Customer Service Center.
PIN Code
•When the PIN code is locked, the IS14SH may be restarted for the security
reasons.
•PIN code cannot be reset even if you carry out the operation (on the home
screen, tap [Settings [Privacy [Reset all).
<Back up notes on the memory contents of the IS14SH>
●Please back up* notes on the important information whose contents are
saved on the IS14SH by yourself or are received/downloaded to the
IS14SH from external devices.
The memory contents of the IS14SH may be deleted or changed because
of unexpected elements such as static electricity and malfunction or
modifications, improper operations, etc.
* Methods for the backup
It is recommended that text information such as the address book or downloaded
dictionaries be backed up in the microSD memory card. You can forward each data to
a PC by attaching one on mails.
However, some data such as data protected by copyright cannot be backed up even
with the above mentioned methods.
KUUJAWGDQQMࡍࠫ㧞㧜㧝㧝ᐕ㧝㧞㧝ᣣޓᧁᦐᣣޓඦᓟ㧡ᤨ㧝㧥ಽ

6
Contents
Preface............................................................ ii
For Learning Operations of the IS14SH.......... ii
Safety Precautions.......................................... ii
Before Using an au Phone.............................. 1
Cell Phone Etiquette ...............................................2
Accessories.............................................................2
Illustrations and Descriptions in This Manual ..........3
Security Code and PIN Code ..................................4
Security Code and Passwords................................4
PIN Code.................................................................5
Names and Functions of Parts ................................8
Opening the IS14SH .............................................11
Removing/Attaching the Battery Pack...................11
Removing the Battery Pack...................................11
Attaching the Battery Pack ...................................12
Using au IC-Card ..................................................12
au IC-Card ............................................................12
Removing au IC-Card ...........................................12
Inserting au IC-Card .............................................13
Using microSD Memory Card ...............................13
microSD Memory Card .........................................13
Removing microSD Memory Card ........................14
Inserting microSD Memory Card ..........................15
Charging the Battery Pack ....................................16
Turning the Power On/Off .....................................18
Turning the Power On ...........................................18
Turning the Power Off ...........................................18
Restarting the IS14SH...........................................18
Sleep Mode ...........................................................18
Unlock Screen ...................................................... 19
Switching the Display Language to English .......... 19
Initial Setup ........................................................... 19
Setting Up a Google Account ............................... 20
Setting an au one-ID............................................. 20
Operating the Touch Panel................................... 21
Using the Home Screen........................................ 22
Viewing the Home Screen .................................... 22
Using Menu in the Home Screen.......................... 23
Moving/Removing Shortcuts/Widgets/Folders ..... 24
Switching the Home Screen ................................. 24
Using the Launcher............................................... 24
Using the Status Bar............................................. 28
Indicators.............................................................. 28
Using Notification/Status Panel ............................ 30
Switching Orientation............................................ 31
Displaying Available Menu.................................... 32
Character Input (Software Keyboard) ................... 33
Switching Software Keyboards............................. 33
Viewing the Character Entry Screen..................... 33
Switching Character Entry Modes ........................ 35
Entering Emoji/Decoration-emoji/Symbol/Facemark
.............................................................................. 35
Switching Input Software ...................................... 36
Character Input (Hardware Keyboard).................. 36
Switching Character Entry Modes ........................ 37
Entering Emoji/Decoration-emoji/Symbol/Facemark
.............................................................................. 37
Making a Call ........................................................ 38
Making an International Call (au International Call
Service)................................................................. 39
Answering a Call ................................................... 40
Answering an Incoming Call................................. 40
Putting the Call on Hold........................................ 40
Answering with the Message of Answering Memo
..............................................................................40
Returning a Call (Outgoing History/Incoming
History) ..................................................................40
Turning On Manner Mode .....................................41
Turning On the Answering Memo..........................41
Playing a Message in Answering Memo................42
Adding an Address Book Entry .............................43
Using an Address Book.........................................44
Viewing the Address Book Details Screen............44
Using Phone Number ............................................45
Using Mail Address ...............................................45
Using E-mail/C-mail...............................................46
Sending E-mail Messages.....................................46
Sending C-mail Messages ....................................47
Receiving E-mail/C-mail Messages.......................49
Reading Received E-mail/C-mail Messages .........49
Setting Mail Filters .................................................52
Rejecting Spam C-mail Messages ........................55
Setting Account for PC-mail ..................................55
Sending PC-mail Messages ..................................57
Receiving PC-mail Messages................................57
Using Gmail...........................................................57
Sending Gmail.......................................................58
Receiving Gmail ....................................................58
Viewing Sites with Browser ...................................59
Using Bookmarks/History ......................................59
Displaying a Site from Bookmarks/History ............59
Bookmarking a Web Page ....................................60
Contents
Introduction
Getting Ready
Learning the Basics
Phone
Address Book
Mail
Internet
KUUJAWGDQQMࡍࠫ㧞㧜㧝㧝ᐕ㧝㧞㧝ᣣޓᧁᦐᣣޓඦᓟ㧡ᤨ㧝㧥ಽ

7
Contents
Using the Camera................................................. 61
Cautions for Using the Camera ............................ 61
Taking Photos....................................................... 62
Recording Movies ................................................. 64
Using Gallery ........................................................ 65
Using Contents Manager ...................................... 65
Displaying/Playing Data ....................................... 65
Using Menu in the Contents Screen ..................... 66
Cautions for Using 1Seg....................................... 67
TV antenna ........................................................... 67
Initial Setup of 1Seg.............................................. 67
Watching 1Seg ..................................................... 68
Using au Disaster Countermeasure Application ... 70
Using Android Market ........................................... 72
Using au one Market............................................. 72
Using GREE Market ............................................. 72
Using Anshin Security Pack.................................. 72
Anshin Security Pack............................................ 72
Using 3LM Security .............................................. 73
Using Remote Support ......................................... 73
Using VirusBuster™ mobile for au........................ 74
Managing Applications.......................................... 74
Checking Your Profile ........................................... 75
Changing the Incoming Ring Tone ....................... 75
Changing the Wallpaper ....................................... 75
Initializing microSD Memory Card ........................ 76
Using Global Passport CDMA ...............................77
For Overseas Use without Anxiety ........................77
Configuring the Overseas Settings .......................77
Making a Call at Your Travel Destination ..............78
Receiving a Call at Your Travel Destination ..........79
Troubleshooting.....................................................80
Index......................................................................82
Multimedia
1Seg
Applications
Settings of IS14SH
Global Function
Appendix/Index
KUUJAWGDQQMࡍࠫ㧞㧜㧝㧝ᐕ㧝㧞㧝ᣣޓᧁᦐᣣޓඦᓟ㧡ᤨ㧝㧥ಽ
8
Getting Ready
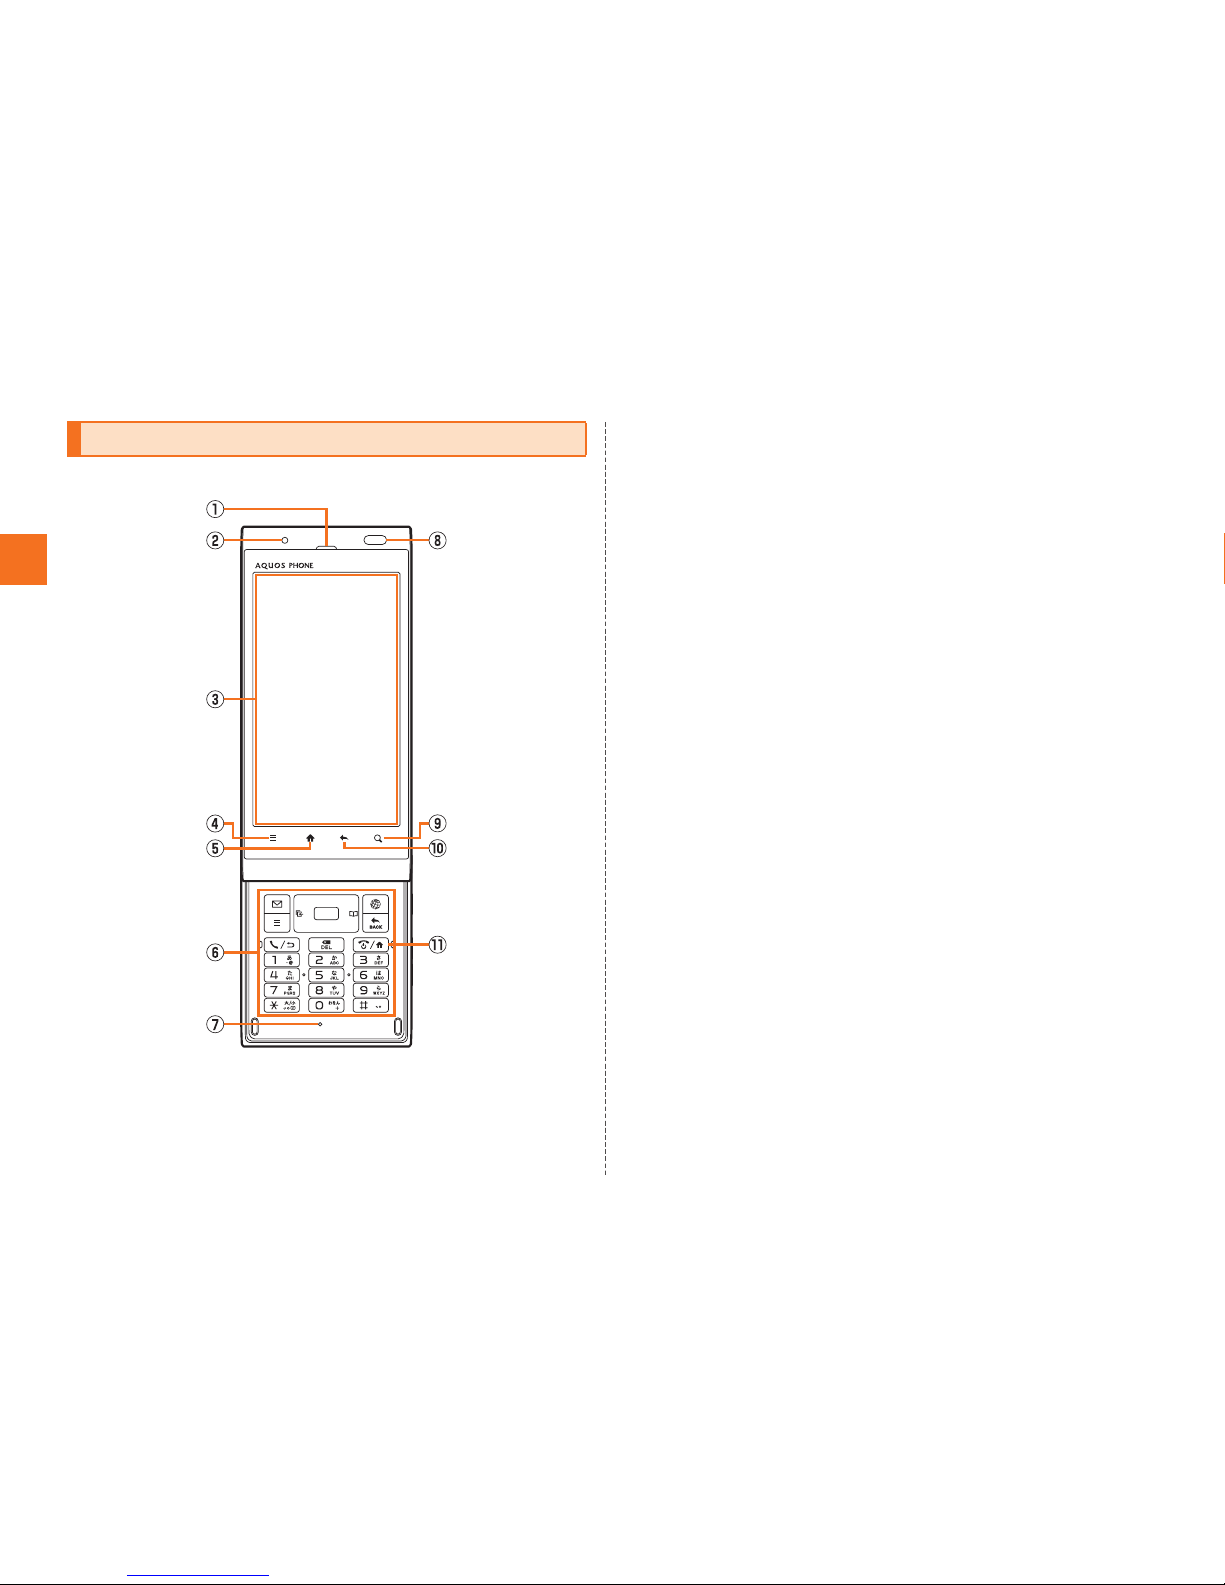
■Front
AEarpiece (Receiver)
Emits voice of other party during a call, messages in Answering
memo, etc.
BCharging/Incoming indicator
Illuminates in red while charging.
Flashes according to the settings when receiving a call or mail
message.
CDisplay
DeMenu key
Displays the option menu.
E#Home key
Use it to display the home screen etc.
FHardware keyboard
GMouthpiece (Microphone)
Transmits your voice to the other party during a call. It is also used
for recording sounds. Take care not to cover the microphone with
your fingers etc.
HProximity sensor/Light sensor
Proximity sensor prevents operating the touch panel incorrectly
during a call.
Light sensor detects the ambient brightness and adjusts the
brightness of display.
ImSearch key
Use it to display the Quick Search Box etc.
J^Return key
Returns to the previous page.
KKPower key
Turns on/off the power.
Names and Functions of Parts
KUUJAWGDQQMࡍࠫ㧞㧜㧝㧝ᐕ㧝㧞㧝ᣣޓᧁᦐᣣޓඦᓟ㧡ᤨ㧝㧥ಽ

9
Getting Ready
■Left Side/Right Side
LExternal connection jack cover
MExternal connection jack
Use it to connect the IS14SH to the common AC adapter 03 (sold
separately), the microUSB cable 01 (sold separately), SHARP
microUSB-18-pin (charger) conversion cable 01 (sold separately),
the microUSB stereo earphone conversion adapter 01 (sold
separately), etc.
NStrap eyelet
OfLock key
Use it to move/disable sleep mode, and turn off the power.
Pud Volume up/down key
Adjusts the volume.
Hold udown on the unlock screen to turn on the mobile light.
Hold ddown on the unlock screen to enable/disable Manner
mode.
■Back
QTV antenna
Extend and use it to watch 1Seg. It has no influence on calls or
data communication if you extend the TV antenna when calling or
using browser.
RCamera lens
SInfrared port
Sends and receives data via infrared communication.
KUUJAWGDQQMࡍࠫ㧞㧜㧝㧝ᐕ㧝㧞㧝ᣣޓᧁᦐᣣޓඦᓟ㧡ᤨ㧝㧥ಽ

10
Getting Ready
TFeliCa mark
Hold it over a reader/writer when using Osaifu-Keitai®.
Sends and receives data via IC communication.
UBattery pack cover
VInternal antennas
Do not cover the internal antennas area with your hand when you
call, use the Internet, Wi-Fi®or Bluetooth®function or retrieve GPS
information (only the upper part on the back of the cell phone is
responsible for Wi-Fi®, Bluetooth®and GPS functions). Also, do not
paste stickers around the internal antennas area. Otherwise, the
quality of calls/communications will deteriorate.
WMobile light
Flashes in red while activating Camera.
XSpeaker
Emits ring tones, alarm tones, etc. ■Back (Inside the Battery Pack Cover)
YReset button
If operations become unstable or unavailable, press the reset
button with a pointed end of an object for at least two seconds to
restart the IS14SH. Restarting with the reset button does not delete
any saved data or application.
ZTray
Use it when inserting an au IC-card.
amicroSD memory card slot
bBattery pack
KUUJAWGDQQMࡍࠫ㧞㧜㧝㧝ᐕ㧝㧞㧝ᣣޓᧁᦐᣣޓඦᓟ㧡ᤨ㧝㧥ಽ

11
Getting Ready
Slide the display part of the IS14SH to the direction of the arrow to
open it.
When removing the battery pack, turn off the IS14SH.
ARemove the battery pack cover on the back of the
IS14SH.
Hook a fingertip (nail) on the concave portion with the center of the
battery pack cover pressed (A), and then remove the battery pack
cover by pulling up in the direction of the arrow (B).
BRemove the battery pack.
Remove the battery pack by pulling up on the PULL tab in the direction
of the arrow.
Opening the IS14SH
•Note that touching the display/e/#/^/mmay be recognized as an
operation when you open or close the IS14SH while the backlight
illuminates.
Removing/Attaching the Battery Pack
Removing the Battery Pack •When removing the battery pack cover, do not warp it too much.
•When removing the battery pack, always pull up on the PULL tab.
Or use the protruding edge of the battery pack. Doing otherwise may result
in damage to the IS14SH or the battery contacts.
Concave portion
PULL tab
Protruding edge
Battery pack
KUUJAWGDQQMࡍࠫ㧞㧜㧝㧝ᐕ㧝㧞㧝ᣣޓᧁᦐᣣޓඦᓟ㧡ᤨ㧝㧥ಽ

12
Getting Ready
Use the specified battery pack for the IS14SH and attach it properly.
AAfter making sure that the PULL tab is closely
attached to the battery pack, align the contacts on the
battery pack with those of the IS14SH and then insert
the battery pack securely.
BAfter attaching the battery pack cover, press the
battery pack cover securely, and make sure that it is
closed properly.
An au IC-Card records your personal information
such as phone numbers.
Turn off the power and remove the battery pack before removing the
au IC-Card.
APull the tab of the tray straight out and remove the au
IC-Card.
BAttach the battery pack and battery pack cover.
Attaching the Battery Pack
•Before attaching the battery pack, make sure that the au IC-Card is inserted
properly.
•Failure to follow the correct procedure when attaching the battery pack may
result in damage to the battery pack or the battery pack cover.
PULL tab
Contacts on IS14SH
Using au IC-Card
au IC-Card
•Confirm the correct direction when you insert the au IC-Card.
•Note that inserting or removing the au IC-Card forcibly may result in
malfunction or damage.
•Make sure to unplug microUSB plugs such as AC adapter 03 (sold
separately) from the IS14SH when inserting or removing the au IC-Card.
Removing au IC-Card
au IC-Card
IC (metal
surface) part
Tab
KUUJAWGDQQMࡍࠫ㧞㧜㧝㧝ᐕ㧝㧞㧝ᣣޓᧁᦐᣣޓඦᓟ㧡ᤨ㧝㧥ಽ

13
Getting Ready
Turn off the power and remove the battery pack before inserting the
au IC-Card.
APull the tab of the tray straight out.
BPlace the au IC-Card on the tray with the IC (metal
surface) side up and insert it securely.
Insert the au IC-Card according to the orientation of its cutout.
CAttach the battery pack and battery pack cover.
You can set microSD memory card (including microSDHC memory
card) to the IS14SH, and save data. And also you can save address
book, mail messages, bookmarks, etc. in microSD memory card.
■Handling Precautions
Do not remove the microSD memory card or the battery pack and do
not turn off the IS14SH and other equipments while reading, writing,
playing, saving or moving/copying data. It may result in damage to
data in the IS14SH or microSD memory card or data loss.
Do not drop or subject the IS14SH to vibration or impact with a
microSD memory card inserted. It may result in damage to recorded
data or data loss.
Do not insert objects other than microSD memory card such as
liquid, metals or flammable items into the microSD memory card
slot. It may result in a fire, electric shock or malfunction.
Do not apply excessive force to open or close the guide of the
microSD memory card slot.
Inserting au IC-Card
•Inserting the tray not deeply enough may prevent the IS14SH from
functioning properly.
•When the tray comes off, insert the tray straightly.
Cutout
Using microSD Memory Card
microSD Memory Card
•The maximum file size available on a microSD memory card is 2 GB per file
when saving data to microSD memory card.
•A microSD memory card initialized on other devices may not be used on the
IS14SH properly. On the home screen, tap [Settings [microSD &
phone storage [Unmount microSD [OK [Erase microSD [Erase microSD
[Enter Lock No. [OK [Erase everything to initialize the microSD
memory card.
•For operations to play/display data in the microSD memory card, on the
home screen, tap [Contents Manager to use Contents Manager.
•Some files such as copyright protected data may not be played on the
IS14SH even if they are moved/copied from the PC etc. to a microSD
memory card successfully.
KUUJAWGDQQMࡍࠫ㧞㧜㧝㧝ᐕ㧝㧞㧝ᣣޓᧁᦐᣣޓඦᓟ㧡ᤨ㧝㧥ಽ

14
Getting Ready
The following microSD memory cards have been confirmed for
operation based on the criteria by au. For operation confirmation
results of other microSD memory cards, contact each microSD
memory card manufacturer.
<microSD/microSDHCMemoryCard>○: Confirmed operation
−: Unconfirmed operation or not for sale
As of November 2011
* 4 GB or more are for microSDHC memory card.
* Operation is confirmed for microSD memory cards that are sold as of November 2011. For
the latest information on operation confirmation, visit the au homepage or contact the
Customer Service Center.
Turn off the power and remove the battery pack cover before
removing the microSD memory card.
AUnlock the guide of the microSD memory card slot.
BRaise the guide of the microSD memory card slot and
remove slowly the microSD memory card straight.
CPut back slowly the guide of the microSD memory
card slot and lock it.
Manufacturer 2 GB 4 GB 8 GB 16 GB 32 GB
Toshiba ○○○○○Panasonic ○○○○○SanDisk ○○○○○ADTEC ○○○○−Buffalo ○○○○○Sony ○○○−−Removing microSD Memory Card
Guide
KUUJAWGDQQMࡍࠫ㧞㧜㧝㧝ᐕ㧝㧞㧝ᣣޓᧁᦐᣣޓඦᓟ㧡ᤨ㧝㧥ಽ
15
Getting Ready
DAttach the battery pack cover.
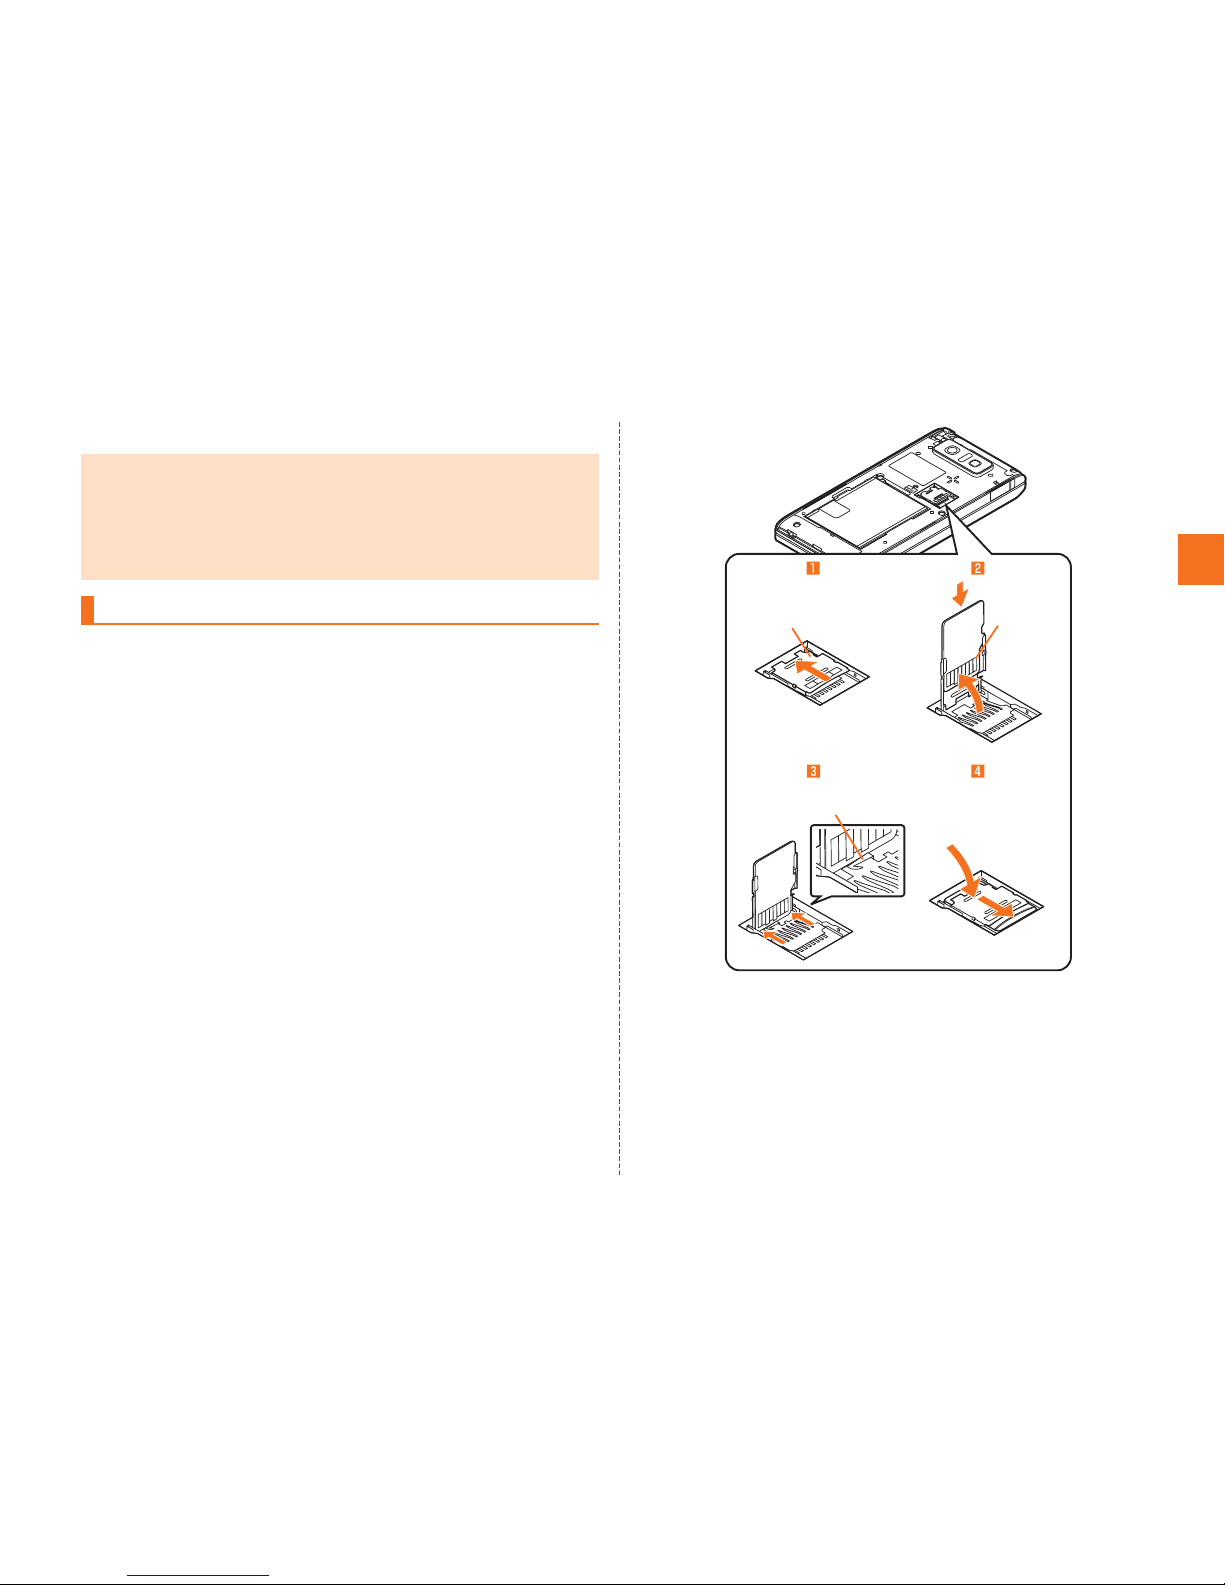
Turn off the power and remove the battery pack cover before inserting
the microSD memory card.
Follow the steps below to insert a microSD memory card. If you
insert it forcefully, the terminal at the back of it may be damaged and
the IS14SH may not recognize the microSD memory card.
AUnlock the guide of the microSD memory card slot.
BRaise the guide of the microSD memory card slot for
approximately 90 degrees, confirm the direction of
the terminal side of the microSD memory card and
insert it slowly.
CSlide the guide of the microSD memory card slot until
you can see the terminal at the back of it.
•Do not touch the terminal part of microSD memory card.
•Do not remove the microSD memory card forcefully. It may result in damage
to the microSD memory card or the IS14SH or data loss.
•Application installed to microSD memory card cannot be used once you
removed microSD memory card.
•The microSD memory card may be warm after a long time use. It is normal.
Inserting microSD Memory Card Guide
With the terminal
at the back in sight.
Terminal
side
KUUJAWGDQQMࡍࠫ㧞㧜㧝㧝ᐕ㧝㧞㧝ᣣޓᧁᦐᣣޓඦᓟ㧡ᤨ㧝㧥ಽ

16
Getting Ready
DPut back slowly the guide of the microSD memory
card slot and lock it.
EAttach the battery pack cover.
The battery pack is not fully charged at the time of purchase. Charge
the battery pack when you use the IS14SH for the first time or the
battery level becomes low. Charging is finished when the red
charging/incoming indicator goes out.
The usage times are as follows.
* These times are based on the case when the IS14SH is used in Japan.
•Insert a microSD memory card with the right side up in the appropriate
direction.
Inserting a microSD memory card forcefully into the slot could result in
failure to remove the microSD memory card or damage to the microSD
memory card or the IS14SH.
•Do not insert the microSD memory card too deeply when attaching it.
Charging the Battery Pack
Continuous stand-by
time
Approx. 310 hours (while Wi-Fi®is not
used)
Approx. 160 hours (while Wi-Fi®is used)
Continuous talk time Approx. 400 min
•The IS14SH and battery pack may become warm during charging but this is
not a malfunction.
•Charging the IS14SH while using the camera function etc. may lengthen the
charging time.
•If you perform various operations with a specified charger (sold separately)
connected to the IS14SH, charging/battery level consumptions may take
place in a short time. Frequently charging the battery pack shortens its
service life. •If the charging/incoming indicator of the IS14SH flashes in red, check
whether the battery pack is properly attached, an external device is
properly connected to the cell phone, etc. If the cell phone flashes even
after you have checked that, stop recharging the cell phone and please
contact an au shop or Customer Service Center.
•Properly close the external connection jack cover. Also, do not pull it
forcibly or twist it.
•Each of the continuous talk time and continuous stand-by time is an
average usage time combining the time during which a cell phone is carried
around by a user and properly receives radio waves plus the time during
which a cell phone is stationary and properly receives radio waves.
According to usage conditions such as battery level status and
temperature, the signal strength in a place where the cell phone is used,
settings of functions, etc., the usage times may be reduced to less than half
under the following cases.
A cell phone is frequently used in a place where (out of service area
indicator) appears on it.
The Wi-Fi®function, Bluetooth®function, mail function, camera function,
1Seg function, location information, etc. is used.
A cell phone is set not to enable the sleep mode because of an
application etc.
Applications which remain activated in the background are used.
•If you stop charging while the charging/incoming indicator still illuminates
during charging, the cell phone may be left not fully charged even if
appears on it. In such case, the average usage times shorten.
KUUJAWGDQQMࡍࠫ㧞㧜㧝㧝ᐕ㧝㧞㧝ᣣޓᧁᦐᣣޓඦᓟ㧡ᤨ㧝㧥ಽ

17
Getting Ready
■Charging the Battery Pack with the Specified AC
Adapter (sold separately)/DC Adapter (sold
separately)
The followings are the explanation of how to connect the common AC
adapter 03 (sold separately)/the common DC adapter 03 (sold
separately) to charge.
Charging time is as shown below.
AOpen the external connection jack cover of the
IS14SH.
BInsert the microUSB plug of the common AC adapter
03 (sold separately)/the common DC adapter 03 (sold
separately) to the external connection jack of the
IS14SH.
CPlug the common AC adapter 03 (sold separately)
power plug into a 100 V AC power outlet/Plug the
common DC adapter 03 (sold separately) plug into a
cigarette lighter socket.
Charging/incoming indicator illuminates in red, and the battery icon
appears with superimposed. When charging is finished, the
charging/incoming indicator goes out.
DWhen charging is finished, pull the microUSB plug of
the common AC adapter 03 (sold separately)/common
DC adapter 03 (sold separately) straight out from the
external connection jack of the IS14SH.
EClose the external connection jack cover of the
IS14SH.
Specified AC adapter
(sold separately)
Approx. 150 min
Specified DC adapter
(sold separately)
Approx. 210 min
External
connection jack
Common AC adapter 03 (sold separately)/
Common DC adapter 03 (sold separately)
Check the
orientation
Common DC
adapter 03
(sold separately)
Common AC
adapter 03
(sold separately)
KUUJAWGDQQMࡍࠫ㧞㧜㧝㧝ᐕ㧝㧞㧝ᣣޓᧁᦐᣣޓඦᓟ㧡ᤨ㧝㧥ಽ

18
Getting Ready
FUnplug the common AC adapter 03 (sold separately)
power plug from the power outlet/Unplug the
common DC adapter 03 (sold separately) plug from
the cigarette lighter socket.
■Charging with a PC
When you connect the IS14SH to a USB port of a PC through which
the IS14SH can be charged, the charging/incoming indicator
illuminates in red and charging starts. When charging is finished, the
charging/incoming indicator goes out.
AHold down Kfor at least two seconds.
AHold down Kfor at least two seconds.
Alternatively, hold down ffor at least two seconds.
BPower off [OK.
Turn off the IS14SH once and restart.
AHold down Kfor at least two seconds.
Alternatively, hold down ffor at least two seconds.
BReboot [OK.
If you press for no operation is made for a while, the screen is
turned off temporarily, and then sleep mode is set.
■Disabling Sleep Mode
■When the IS14SH is closed
Afwhile sleep mode is set.
Alternatively, open the IS14SH while sleep mode is set to disable sleep
mode.
■When the IS14SH is opened
APress any key (other than e, #, ^and m) while
sleep mode is set.
•Although you can charge the IS14SH while the power is turned on, charging
time lengthens.
•If you charge the IS14SH when the battery has run out, the charging/
incoming indicator may not illuminate soon. However, charging is in
progress.
•If you use the microUSB cable to charge the IS14SH, it may take the IS14SH
longer to be fully charged than if you use the specified AC adapter (sold
separately).
Turning the Power On/Off
Turning the Power On
•The initial setting of the touch panel is executed while the logo
Android™ au with Google™ is displayed after the power is turned on. Do not
touch the screen, otherwise touch panel operations may not be performed
properly.
Turning the Power Off
Restarting the IS14SH
Sleep Mode
•In some applications in use, the screen which was displayed before sleep
mode is set may be displayed when sleep mode is disabled.
KUUJAWGDQQMࡍࠫ㧞㧜㧝㧝ᐕ㧝㧞㧝ᣣޓᧁᦐᣣޓඦᓟ㧡ᤨ㧝㧥ಽ
Other manuals for IS Series
1
This manual suits for next models
1
Table of contents
Popular Telephone manuals by other brands

CoComm
CoComm F740 manual

Polycom
Polycom SoundStation IP 5000 quick start guide

Alcatel
Alcatel Premium Reflexes user manual

Avaya
Avaya one-X Deskphone Value Edition 1608 user guide

Grandstream Networks
Grandstream Networks GXV3350 Quick installation guide

Extel
Extel VisioSmart 720303 Installation and user guide


