Ar?v Meld Series User manual

QUICK REFERENCE GUIDE
Assemble
Connect
1
2
3
Charge
Welcome to the world of Arīv eBikes! In just 3 steps, you’ll
be ready to hit the road.*
Plus! Watch handy video tutorials on:
ARĪV MOBILITY YOUTUBE CHANNEL.
CONGRATS!
YOU’RE GOING PLACES.
*Check local laws and regulations before you operate an eBike.

TOOLS FOR ASSEMBLY……………………………………………............………1
HANDLEBARS: HOW TO ASSEMBLE………………………………………..2
PEDALS: HOW TO ASSEMBLE………………………………………...........…3
KICKSTAND: HOW TO USE…………………………………………………....…4
SEAT HEIGHT: HOW TO ADJUST..…………………………………………….5
BATTERY: HOW TO CHARGE..………………………………………………….6
MELD CONTROLS..………………………………………………………………..78
APP: MOUNTING & PAIRING WITH THE EBIKE……………….……..9
30 DAY GUARANTEE....………………..…………………………………………10
TABLE OF CONTENTS

TOOLS FOR ASSEMBLY
You’ll nd everything needed to assemble your Meld in the parts box.
This includes:
1. Pedal wrench
2. Torque wrench
1

The Meld ships nearly ready to ride. You’ll just need to make
a few adjustments before hitting the road.
HANDLEBARS: HOW TO ASSEMBLE
Loosen the two steerer bolts using
the torque wrench. This will allow you
to turn the handlebars into position.
Align the handlebars so the
headlight is facing forward and the
handlebars are perpendicular to
the front wheel. Ensure there is
approximately a 2mm gap at the
base of the steering unit.
Using the torque wrench, tighten
both bolts, a little at a time, until
the torque measures 12 NM.
Snap the bolt cover, located
in the parts box, on top of
the steerer bolt opening.
1
2
3
4
1 2

3
3
LEFT
PEDALS: HOW TO ASSEMBLE
1. There is a Right and Left pedal, as indicated by “L” and “R” decals
on the pedals. *IMPORTANT: the pedals are not interchangeable
and must be attached to the indicated side.
2. Thread the right-side pedal onto the chainwheel side of the bike.
3. Tighten the pedal by hand in a clockwise motion then nish
it with the pedal wrench.
4. Repeat on the left side, turning the pedal counter clockwise.
RIGHT
3
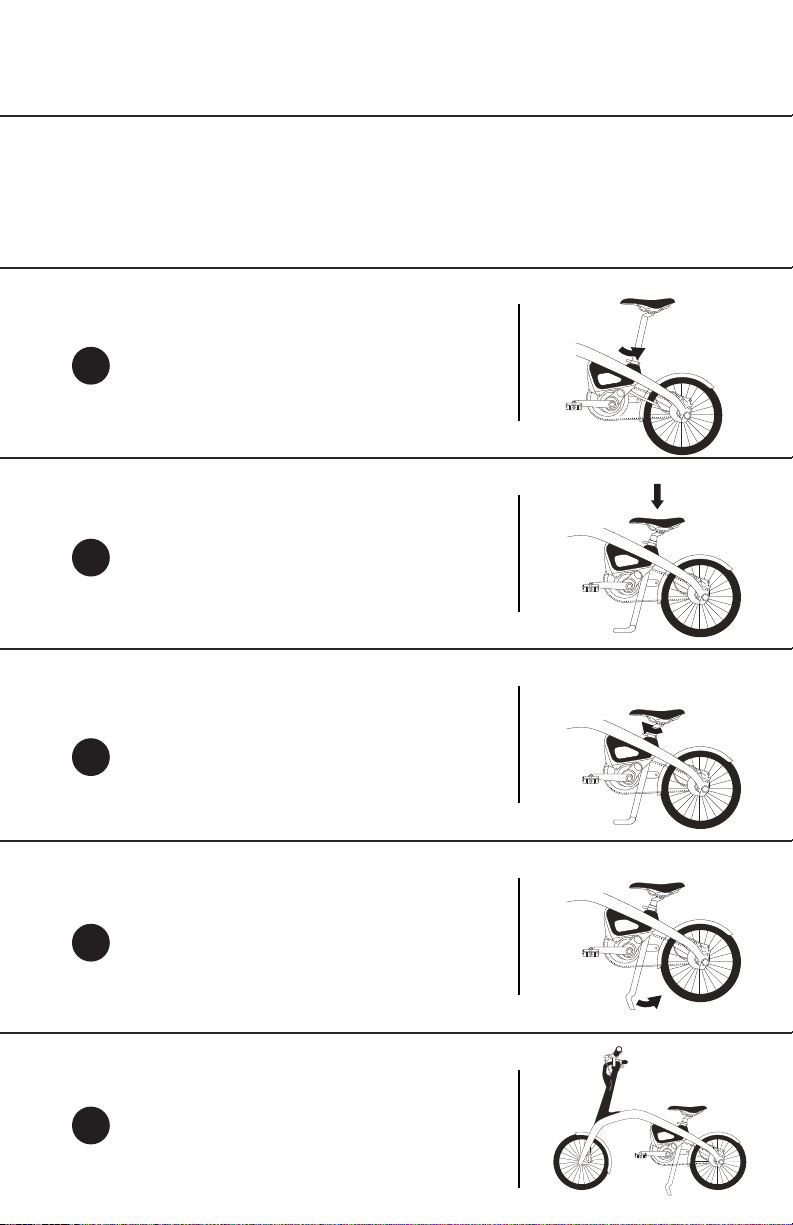
KICKSTAND: HOW TO USE
Your eBike features an integrated kickstand, uniquely
connected to the seatpost. Here’s how to use it:
Lower the seatpost until
the indicator line is ush
with the seatpost clamp.
Tighten the
seatpost clamp.
Turn the kickstand
out with your foot.
Lean the bike onto the
kickstand. Make sure
the bike is stable before
walking away.
Open the
seatpost clamp.
1
2
3
4
5
4

SEAT HEIGHT: HOW TO ADJUST
1
2
3
Open the
seatpost clamp.
Lower or raise the seat
to meet the height of
your hip.
Close the
seatpost clamp.
5
5
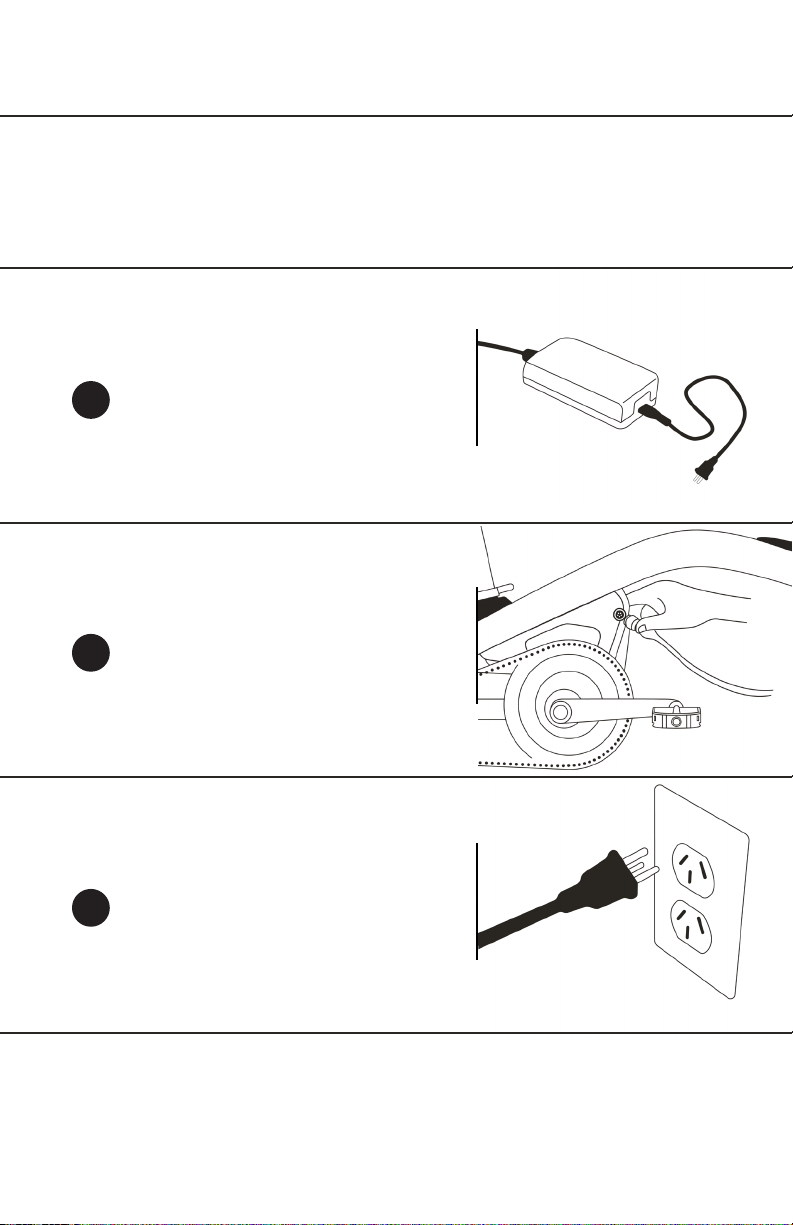
BATTERY: HOW TO CHARGE
Your eBike is partially charged prior to shipping but you’ll need
to “wake” up the battery before your rst ride. Here’s how:
Locate the charging cord
in the eBike box.
Uncap the charging port on
the battery. Plug the cord into
the eBike battery, ensuring it is
properly aligned with the port.
Plug the battery into a standard
wall outlet. A green light will appear
when charging then turn o once
the battery is fully charged. This
takes 2-3 hours.
1
2
3
You can also charge the battery o the eBike by removing
it with a hex key.
TIP!
6

MELD CONTROLS
1
2
3
POWER ASSIST + /
There are 4 levels of power assist. Press the ‘+’ button to increase
assistance and the ‘-‘ button to decrease.
WALK ASSIST
Get a small power assist while walking your eBike. Begin by walk-
ing at a pace of at least 3 km/h then press and hold the ‘+’ button
until the white lights on the power display start ashing. Then,
press and hold the red Walk Mode button. To deactivate, press and
hold the ‘-‘ button.
1
2
HEADLIGHT
Press the button above the headlight to turn it On or O.
3
7
Other manuals for Meld Series
1
Table of contents
Languages:
Other Ar?v Bicycle manuals


