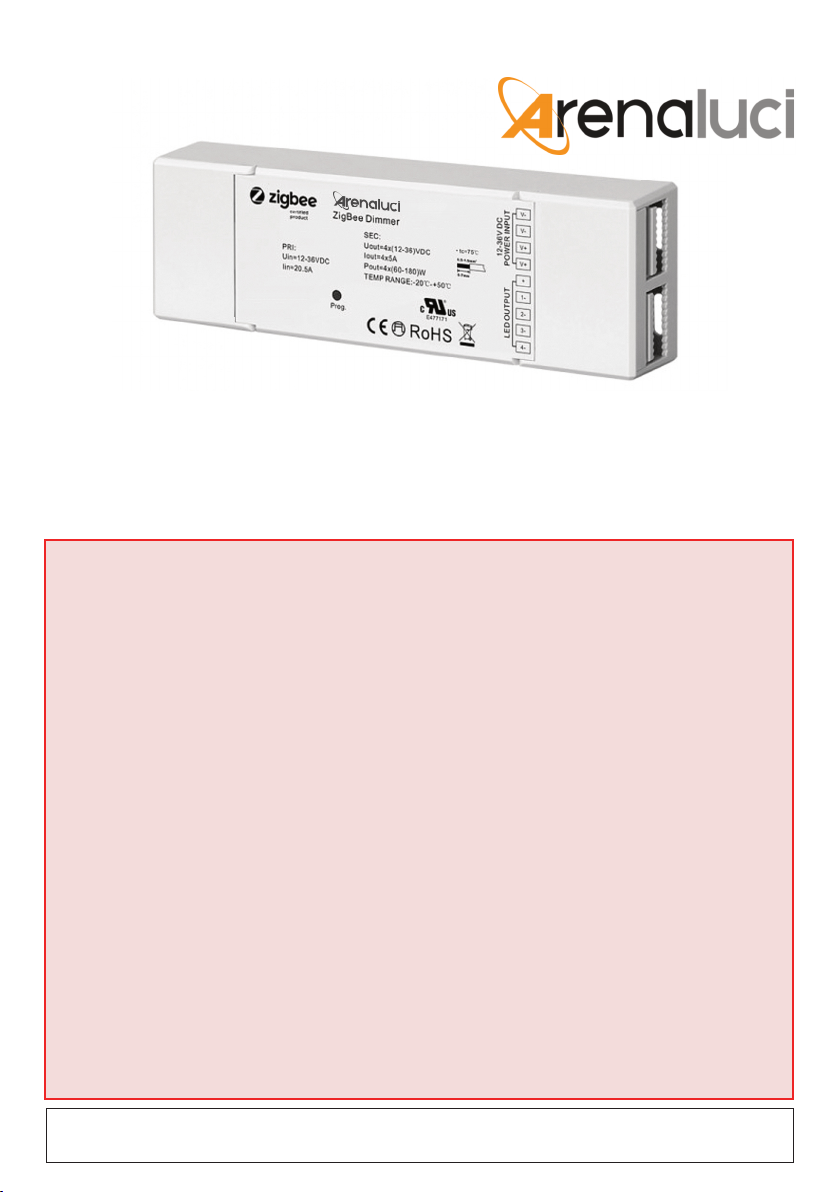
Arena Luci LCZG1019FA-RGBW User manual

LCZG1019FA-RGBW
User’s manual
RGB / RGBW controller based on ZigBee 3.0 protocol
Please note that as part of Arena Luci's ongoing commitment to continuous product development, specications
are subject to change in the course of product improvement without notice. Arena Luci is not responsible for
damages resulting from improper or different use than expected.
This instruction manual contains important
information about the installation and use of the
projector. Please read and follow these
instructions carefully.
The security of this device is guaranteed only with
the proper use of the following instructions,
therefore they must be kept carefully.
Never install the device in locations easily
accessible by people who ignore the existence of
this user's manual and safety instructions.
Disconnect the unit from any power supply before
attempting any operation in contact or inside the
unit, and when not in use.
It is essential that each device is correctly earthed
and that electrical installation conforms to all
relevant standards.
Prior to connect the unit to the mains supply,
check the output voltage ts the technical
requirements on the label.
Never let the power cord come into contact with
other cables.
Never touch the electrical contacts, either directly
with your ngers, or indirectly by means of sharp
or metal objects.
Make sure that cables cannot cause trip hazard.
Do not attempt to dismantle and modify the unit.
Due to the high technological level of this unit, any
service maintenance should be performed by
specialised operators. Please contact your Arena
Luci dealer for any operation.
Always ensure that the structure to which you are
attaching the unit is secure and is able to support
the weight of each unit.
Do not allow contact with water or any other uids,
or metallic objects (IP 20).
Do not install the projector in areas of high
humidity. The unit is intended only for indoor
purposes.
Avoid installing the unit close to heat sources.
Allowed to be mounted directly on inammable
surfaces.
Install the unit where it can be easily aerated.
Do not use any solvent based cleaning agents.
Use only a soft, dry anti-static cloth.
The installation of LED modules (including power
supplies) should be done according to current
technical rules and regulations. The installation
should be performed only by a qualied operator.
Avoid contact with either corrosive agents or
humidity and moisture on delicate elements:
damages from corrosion are not refunded as
component defects.
WARNINGS

2/8
LCZG1019FA-RGBW
Function introduction
Important: Read All Instructions Prior to Installation
•ZigBee RGBW LED light device based on latest ZigBee 3.0 protocol
•Enables to control ON/OFF, light intensity and RGB color of connected RGBW LED lights
•W channel can only be controlled through color temperature control command
•Color temperature control will mix RGB channels as 1 channel white and then make color tuning with the
4th channel white
•ZigBee end device that supports Touchlink commissioning
•Supports self-forming ZigBee network without coordinator
•Supports find and bind mode to bind a ZigBee remote
•Supports ZigBee green power and can bind max. 20 ZigBee green power remotes
•Compatible with universal ZigBee gateway products
1/R-
LED OU TPUT
2/G-
3/B-
4/W-
12-36VDC Input
Common Anode output (+)
CH 1 (R) output (-)
CH 2 (G) output (-)
CH 3 (B) output (-)
CH 4 (W) output (-)
ZigBee RGBW Receiver
Note: W channel can only be controlled through color temperature control command since ZigBee only has
tunable white control. Color temperature control will mix RGB channels as 1 channel white and then make color
tuning with the 4th channel white.
Program Key: short press to switch on/off load, press and hold down to increase/decrease light intensity
Prog.
Operation
1.Do wiring according to connection diagram correctly.
2.This ZigBee device is a wireless receiver that communicates with a variety of ZigBee compatible
systems. This receiver receives and is controlled by wireless radio signals from the compatible ZigBee
system.
3. ZigBee Network Pairing through Coordinator or Hub (Added to aZigBee Network)
L
N
GV+
V-
OUTP UT
INPU T
AC Power
50/60Hz
12V/24V/36V
CVPSU
V+ V+
R- R-
G- G-
B- B-
W- W-
1/R-
LED
2/G-
3/B-
4/W-
ZigBeeRGBWLightingDevice
Prog .
Step 1:Remove the device from previous ZigBee network if it has already been added to,otherwise pairing will
fail.Please refer to the part "Factory Reset Manually". Switch off the device.
Step 2: From your ZigBee Controller or hub interface, choose to add lighting device and enter Pairing mode as
instructed by the controller.
Step 3: Re-power on the device to set it into network pairing mode (connected light flashes twice slowly), 15
seconds timeout, repeat the operation.
Step 4: Connected light will blink 5 times
and then stay solid on, then the device
will appear in your controller's menu and
can be controlled through controller or
hub interface.

3/8
USER’S MANUAL
4. TouchLink to a ZigBee Remote
< 10cm
Note: 1) Directly TouchLink (both not added to a ZigBee network), each device can link with 1 remote.
2) TouchLink after both added to a ZigBee network, each device can link with max. 30 remotes.
3) For Hue Bridge & Amazon Echo Plus, add remote and device to network first then TouchLink.
4) After TouchLink, the device can be controlled by the linked remotes.
ZigBee
Remote
L
N
GV+
V-
OUTP UT
INPU T
AC Power
50/60Hz
12V/24V/36V
CVPSU
1/R-
LED
2/G-
3/B-
4/W-
ZigBeeRGBWLightingDevice
Prog .
V+ V+
R- R-
G- G-
B- B-
W- W-
Step 1: Method 1: Short press “Prog” button (or re-power on the device) 4 times to start Touchlink
commissioning immediately, wait for the connected light to ash twice before proceeding. 180s timeout, repeat the
operation.
Method 2: Re-power on the device, Touchlink commissioning will start after 15s if it’s not added to a ZigBee
network, 165s timeout. Or start immediately if it’s already added to a network, 180s timeout. Once timeout,
repeat the operation.
Step 2:Bring the remote or touch panel within
10cm of the lighting device.
Step 3: Set the remote or touch panel into
Touchlink commissioning, please refer to
corresponding remote or touch panel manual
to learn how.
Step 4: There shall be
indication on the
remote for successful
link and connected
light will flash twice.
5. Remove from a ZigBee Network through Coordinator or Hub Interface
From your ZigBee controller or hub interface,
choose to delete or reset the lighting device
as instructed. The connected light blinks 3
times to indicate successful reset.

4/8
LCZG1019FA-RGBW
6. Factory Reset Manually
Note:
If the device is already at factory default setting, there is no indication when factory reset again .
All configuration parameters will be reset after the device is reset or removed from the network.
If a remote control had been previously paired with the device, before being able to pair it again with the
device in TouchLink mode, the remote control must also be reset to the factory settings.
After the reset, the search for the ZigBee network restarts for 15 seconds, the connected light flashes twice
slowly.
L
N
GV+
V-
OUTP UT
INPU T
AC Power
50/60Hz
12V/24V/36V
CVPSU
V+ V+
R- R-
G- G-
B- B-
W- W-
1/R-
LED
2/G-
3/B-
4/W-
ZigBeeRGBWLightingDevice
Prog .
Step 1: Short press “Prog.” key for 5 times continuously or re-power on the device for 5 times continuously if
the “Prog.” key is not accessible.
< 10cm
ZigBee
Remote
L
N
GV+
V-
OUTP UT
INPU T
AC Power
50/60Hz
12V/24V/36V
CVPSU
1/R-
LED
2/G-
3/B-
4/W-
ZigBeeRGBWLightingDevice
Prog .
V+ V+
R- R-
G- G-
B- B-
W- W-
Step 4: There shall be
indication on the remote and
connected light flashes 3
times for successful reset.
Step 1: Re-power on the device to start TouchLink Commissioning, 180 seconds timeout, repeat the operation.
The same considerations already seen for manual reset apply.
7. Factory Reset through a ZigBee Remote (Touch Reset)
Note: Make sure the device already added to a network, the remote added to the same one or not added to any
network.
Step 2:Bring the remote or touch panel within
10cm of the lighting device.
Step 3: Set the remote or touch panel into
Touch Reset procedure to reset the device,
please refer to corresponding remote or touch
panel manual to learn how.
Step 2: Connected light will blink 3 times
to indicate successful reset.

5/8
USER’S MANUAL
8. Find and Bind Mode
Step 1: Short press “Prog.” button 3 times (Or re-power on the device (initiator node) 3 times) to start Find and
Bind mode (connected light flashes slowly) to find and bind target node, 180 seconds timeout, repeat the operation.
Step 2:Set the remote or touch panel (target node) into find and bind mode, and enable it
to find and bind initiator, please refer to corresponding remote or touch panel manual.
Step 3: There shall be indication on the remote or touch panel that it bind the device
successfully and can control it then.
ZigBee
Remote
L
N
GV+
V-
OUTP UT
INPU T
AC Power
50/60Hz
12V/24V/36V
CVPSU
1/R-
LED
2/G-
3/B-
4/W-
ZigBeeRGBWLightingDevice
Prog .
V+ V+
R- R-
G- G-
B- B-
W- W-
9. Learning to a ZigBee Green Power Remote
Step 2: Set the green power remote into
Learning mode, please refer to its manual.
ZigBee
Green Power
Remote
L
N
GV+
V-
OUTP UT
INPU T
AC Power
50/60Hz
12V/24V/36V
CVPSU
1/R-
LED
2/G-
3/B-
4/W-
ZigBeeRGBWLightingDevice
Prog .
V+ V+
R- R-
G- G-
B- B-
W- W-
Step 3: Connected light
will flash twice to indicate
successful learning. Then
the remote can control the
device.
Step 1: Short press “Prog.” button 4 times (Or re-power on the device 4 times) to start Learning mode (connected
light flashes twice), 180 seconds timeout, repeat the operation.
Note: Each device can learn to max. 20 ZigBee green power remote.

6/8
LCZG1019FA-RGBW
10. Delete Learning to a ZigBee Green Power Remote
Step 2: Set the paired green power remote into
Learning mode, please refer to its manual.
ZigBee
Green Power
Remote
L
N
GV+
V-
OUTP UT
INPU T
AC Power
50/60Hz
12V/24V/36V
CVPSU
1/R-
LED
2/G-
3/B-
4/W-
ZigBeeRGBWLightingDevice
Prog .
V+ V+
R- R-
G- G-
B- B-
W- W-
Step 3: Connected light will
flash 4 times to indicate
successful deleting.
Step 1: Short press “Prog.” button 3 times (Or re-power on the device 3 times) to start delete Learning mode
(connected light flashes slowly), 180 seconds timeout, repeat the operation.
11. Setup a ZigBee Network & Add Other Devices to the Network (No Coordinator Required)
ZigBee
Remote
L
N
GV+
V-
OUTP UT
INPU T
AC Power
50/60Hz
12V/24V/36V
CVPSU
V+ V+
R- R-
G- G-
B- B-
W- W-
1/R-
LED
2/G-
3/B-
4/W-
ZigBeeRGBWLightingDevice
Prog .
1/R-
LED
2/G-
3/B-
4/W-
ZigBeeRGBWLightingDevice
Prog .
< 10cm TouchLink
Step 1: Short press “Prog.” button 4 times (Or re-power on the device 4 times) to enable the device to setup a
ZigBee network (connected light flashes twice) to discover and add other devices, 180 seconds timeout, repeat
the operation.
Step 2: Set another device or remote or touch panel into network pairing mode and pair to the network, refer to
their manuals.
Step 3: Pair more devices and remotes to the network as you would like, refer to their manuals.
Step 4: Bind the added devices and remotes through Touchlink so that the devices can be controlled by the
remotes, refer to their manuals.
Note: 1) Each added device can link and be controlled by max. 30 added remotes.
2) Each added remote can link and control max. 30 added devices.

7/8
USER’S MANUAL
Input Clusters
•0x0000: Basic •0x0003: Identify •0x0004: Groups •0x0005: Scenes
•0x0006: On/off •0x0008: Level Control •0x0300: Color Control •0x0b05: Diagnostics
Output Clusters
•0x0019: OTA
12. ZigBee Clusters the device supports are as follows:
13. OTA
Wiring Diagram
L
N
GV+
V-
OUTPUT
INPUT
AC Power
50/60Hz
12V/24V/36V
CV PSU
Con n e c t w ith RG B W L E D S trip
V+ V+
R- R-
G- G-
B- B-
W- W-
Con n e c t w ith RG B W L E D S trip
V+ V+
R- R-
G- G-
B- B-
W- W-
1/R -
LED
2/G -
3/B -
4/W -
ZigBeeRGBWReceiver
1/R -
LED
2/G -
ZigBeeRGBWReceiver
Prog.
3/B -
4/W -
Prog.
The device supports firmware updating through OTA, and will acquire new firmware from ZigBee controller or
hub every 10 minutes automatically.

8/8
LCZG1019FA-RGBW
Arena Luci srl via Svizzera 12/14 46042 Castel Goffredo (MN), Italy
Tel. +39 0376 782411 Fax +39 0376 780973
www.arenaluci.com [email protected]
Power supply
Current
Power
Signal
Colours
Material
Color
Operating temperature
Dimensions
Protection
Suitable to be tted on normally inammable surfaces
Applied standards
Input 12÷36 V dc - Output 12÷36 V dc
4 x 5A max
4 x 60W @ 12V - 4 x 120W @ 24V - 4 x 180W @ 36V
Protocol ZigBee 3.0, 2.4 GHz, 4 control channels
RGB mix + W separate management
Policarbonate
White
-20 ÷ +50°C
170x53.4x28 mm
IP20
TECHNICAL SPECIFICATIONS
LCZG1019FA-RGBW EN-R0 | 12/2020
WARRANTY CONDITIONS
The unit is guaranteed for 24 months from the date
ofpurchaseagainstdefectsinworkmanshipormaterials
that compose it.
This warranty does faults due to incorrect or improper
use of the device.
The warranty is immediately void if the unit has been
tampered with or opened by unauthorized personnel.
The warranty provides, at the discretion of Arena Luci,
repair or replacement of faulty equipment.
The serial number and model of the device are
required to obtain information or assistance from the
dealer. We invite you to transcribe them in time: for
any request of information or services, this will result
in a quick and effective operation.
CE RULES
The device meets the essential requirements of the
Directives LVD 2014/35/UE, EMC 2014/30/UE, RAEE
2012/19/UE, RoHS 2011/65/UE, Ecodesign
2009/125/CE reg. (UE) 1194/2012, Energy label
2010/30/UE reg. (UE) 874/2012 reg. (UE) 518/2014,
GPSD 2001/95/CE.
Warnings
Disposal of Old Electrical & Electronic Equipment
(applicable in the European Union and other European
countries with separate collection systems).
The product shall not be treated as household
waste but must be handed over to the
applicable collection point for the recycling of
electrical and electronic equipment. By
ensuring this product is correctly disposed, you will help
prevent potential negative consequences for the
environment and human health, which could otherwise
be caused by inappropriate waste handling. The recycling
of materials will help to conserve natural resources. For
more detailed information about recycling of this product,
please contact your city ofce, your household waste
disposal service or your supplier.
Table of contents
Other Arena Luci Controllers manuals
Popular Controllers manuals by other brands

Vimar
Vimar by-me 02021 instruction sheet

Pixsys
Pixsys ATR 171 user manual

Mitsubishi Electric
Mitsubishi Electric MELSERVO-J2S-S061 Specifications and Instruction Manual

Johnson Controls
Johnson Controls LN-DSWSC1-0 installation instructions

DEVI
DEVI DEVIreg 527 installation guide

Norac
Norac UC4+ installation manual