Argo CHIC SILVER User manual

1
V 06/19
Il presente prodotto è adatto solo a ambienti correttamente
isolati o ad un uso occasionale.
ISTRUZIONI PER L’USO
Leggere attentamente le istruzioni prima di far funzionare l’apparecchio oppure fare manutenzione.
Osservare tutte le istruzioni di sicurezza; la mancata osservanza delle istruzioni può portare a
incidenti e/o danni. Conservare queste istruzioni.
TERMOVENTILATORE CERAMICO DA PARETE
IT

2
V 06/19
INFORMAZIONI GENERALI DI SICUREZZA
•Utilizzare questo termoventilatore solo come descritto in questo
manuale. Qualsiasi altro uso non consigliato dal costruttore può
causare incendi, scosse elettriche, o incidenti a persone.
•Assicurarsi che il tipo di alimentazione elettrica sia conforme alle
richieste elettriche del termoventilatore (220-240V~50Hz).
•Questo termoventilatore è stato progettato per l’installazione a
muro, a 1,8 m dal pavimento e almeno 25 cm dai due lati del
muro. Non utilizzarlo appoggiato sul pavimento.
•Questo apparecchio può essere utilizzato da bambini di età non
inferiore a 8 anni e da persone con ridotte capacità fisiche,
sensoriali o mentali, o prive di esperienza e della necessaria
conoscenza, purché sotto sorveglianza oppure dopo che le stesse
abbiano ricevuto istruzioni relative all’uso sicuro dell’apparecchio e
alla comprensione dei pericoli ad esso inerenti.
•I bambini non devono giocare con l’apparecchio.
•La pulizia e la manutenzione destinata ad essere effettuata
dall’utilizzatore non deve essere effettuata da bambini senza
sorveglianza.
•Questo prodotto non è un giocattolo.
•I bambini di età inferiore ai 3 anni devono essere tenuti a distanza
se non continuamente sorvegliati.
•I bambini di età compresa tra i 3 e gli 8 anni devono solamente
accendere/spegnere l'apparecchio a condizione che questo sia
stato posto o installato nella sua posizione di funzionamento
normale, che siano state loro impartite istruzioni su come utilizzare
l'apparecchio in sicurezza e ne siano stati compresi i pericoli.
•I bambini di età compresa tra 3 e 8 anni non devono poter collegare
la spina, regolare il funzionamento o pulire l'apparecchio o fare
manutenzione su di esso.
•ATTENZIONE: Alcune parti di questo prodotto possono
diventare molto calde e causare ustioni. Particolare attenzione
deve essere prestata in presenza di bambini e persone
vulnerabili.
•Al fine di evitare il rischio di una reimpostazione involontaria della
protezione termica, questo apparecchio non deve essere alimentato
attraverso e dispositivo di commutazione esterno, come un timer, o
connesso a un circuito che viene regolarmente acceso e spento
dalla utility.

3
V 06/19
•AVVERTENZA: Non utilizzare il termoventilatore con un
programmatore o qualsiasi altro dispositivo esterno che
accenda il termoventilatore automaticamente, in quanto
sussistono rischi di incendio se il termoventilatore è coperto o
posizionato in modo scorretto.
•Non restringere le griglie di ingresso ed uscita aria.
•Il termoventilatore si riscalda molto durante l'uso con rischio di
scottature. Evitare pertanto il contatto della pelle non protetta con la
superficie calda.
•Tenere materiali infiammabili come mobili, cuscini, coperte, carte,
vestiti, tende ed altro a una distanza di 1 m dal davanti, dai lati e dal
retro.
•Disinserire l'alimentazione della rete in caso di non utilizzo o pulizia.
•Non usare il termoventilatore in ambienti polverosi o in presenza di
vapori infiammabili (ad esempio in un’officina o in un garage).
•Non posizionare nulla sul prodotto; non appendere indumenti
bagnati sul termoventilatore.
•Utilizzare il termoventilatore in un ambiente ben ventilato.
•Non permettere che le dita o oggetti estranei entrino nelle griglie di
entrata o di uscita dell’aria poiché questo può causare una scossa
elettrica o un incendio o danneggiare il termoventilatore.
•Per prevenire incendi non bloccare nè manomettete le griglie in
alcuna maniera mentre il termoventilatore è in funzionamento.
•Non utilizzare l'apparecchio in presenza di fili o spine
danneggiati. Se il filo dell'alimentazione è danneggiato dovrà
essere sostituito dal produttore, dal suo rivenditore o da una
persona similmente qualificata onde evitare rischi.
•Non utilizzare il termoventilatore se è stato fatto cadere da una certa
altezza o se è stato danneggiato in qualche modo. Contattare un
centro assistenza per far controllare il termoventilatore o effettuare
riparazioni elettriche o meccaniche.
•La più comune causa di surriscaldamento è l’accumulo di polvere
nell’apparecchio. Rimuovete gli accumuli di polvere estraendo la
spina e pulendo le griglie con l’aiuto di un aspirapolvere.
•Non utilizzare prodotti abrasivi per pulire l’apparecchio. Pulirlo con
l’aiuto di uno straccio umido (non bagnato) risciaquato con acqua
saponata. Rimuovere la spina dalla presa prima di fare
manutenzione.

4
V 06/19
•Per disconnettere il termoventilatore, mettere l’interruttore in
posizione OFF e rimuovere la spina dalla presa. Tirare solo la spina.
Non tirare il cavo quando si spegne il termoventilatore .
•Non collocare nulla sul cavo e non piegare il cavo.
•E' sconsigliato l'uso di prolunghe, perchè la prolunga potrebbe
surriscaldarsi e provocare un rischio di incendio. Non utilizzare mai
una singola prolunga per far funzionare più di un apparecchio.
•Non immergere il filo, la spina o qualsiasi altro elemento
dell'apparecchio in acqua o in altri liquidi.
•Non toccare la spina con le mani bagnate.
•Non posizionare il termoventilatore sopra o in prossimità di un'altra
fonte di calore.
AVVERTENZA: NON COPRIRE IL TERMOVENTILATORE ONDE
EVITARNE IL SURRISCALDAMENTO.
Il simbolo sottostante significa appunto questo
•Pericolo di incendio se, durante il funzionamento, il termoventilatore
è coperto da oppure è a contatto con materiale infiammabile
comprese tende, drappeggi, coperte ecc. TENERE IL
TERMOVENTILATORE LONTANO DA TALI MATERIALI.
•Non collegare il termoventilatore all’alimentazione prima che sia
stato correttamente assemblato o posizionato.
•Non fare andare il cavo sotto a tappeti. Non coprire il cavo con
coperte, tappeti o simili. Porre il cavo lontano da aree trafficate o
dove non può essere accidentalmente estratto.
•Non utilizzare il termoventilatore nelle immediate vicinanze di
vasche da bagno, docce, lavabi o piscine.
•Non posizionare il termoventilatore sotto una presa.
•Non utilizzare all'aperto.
•Alla prima accensione il termoventilatore potrebbe emettere un
odore leggero e innocuo. Tale odore è la normale conseguenza del
primo riscaldamento degli elementi interni riscaldanti e non
dovrebbe poi ripresentarsi in seguito.
ATTENZIONE:
L’INTERRUTTORE ON/OFF NON E’ L’UNICO MEZZO PER
SCOLLEGARE L’ALIMENTAZIONE.
IN CASO DI NON UTILIZZO, SPOSTAMENTO O
MANUTENZIONE DELL’APPARECCHIO, ESTRARRE

5
V 06/19
SEMPRE LA SPINA DALLA PRESA.
•Un termoventilatore ha al suo interno parti che generano archi o
scintille. Non deve essere utilizzato in aree che potrebbero essere
pericolose come ad esempio aree a rischio di incendio, di
esplosione, cariche di sostanze chimiche o atmosfere cariche di
umidità.
•Estrarre sempre la spina quando l’apparecchio non è in uso.
•Al fine di evitare incidenti spegnere l'unità se incustodita.
•In caso di anomalie (un rumore anomalo o uno strano odore),
spegnere subito l’apparecchio, non tentare di ripararlo e portarlo al
centro di assistenza di zona.
DESCRIZIONE DELLE PARTI
7. Telecomando
1.Griglia di aspirazione dell’aria
2.Display a LED
3.Griglia di emissione dell’aria
4.Aletta orizzontale (flap)
5.Tasto TIMER
6.Tasto Fselezione funzioni
3
4
1
2
6
5

6
V 06/19
COME INSTALLARE IL TERMOVENTILATORE
Il termoventilatore deve essere installato su un muro prima dell’utilizzo. Non tentare di utilizzarlo senza installazione. La
sequenza di installazione è la seguente:
1. Predisporre uno spazio per installare l’apparecchio (figura 1).
2. Fare due buchi adatti della dimensione del Fisher Ø 8 mm nel muro. (figura 2) – D= 575 mm
3. Inserire i Fisher nei fori e stringere bene le viti fornite.
NOTA: Fissare le viti in modo saldo. Non fissare le viti nei Fisher completamente, la lunghezza della parte che deve
essere mantenuta libera è 10 mm.
4. Montare l’apparecchio sul muro (figura 3).
Assicurarsi che i fori situati sul retro dell’apparecchio siano direzionati verso le due viti, spingere all’indietro il
termoventilatore verso il muro, quindi verso il basso finché sarà stabile.
PANNELLO COMANDI E DISPLAY LED SULL’UNITA’
Figura 1
Figura 2
Figura 3
Fisher
LED TIMER
LED °C
TEMPERATURA
DISPLAY
TEMPERATURA
AMBIENTE
LED Modalità ECO
risparmio di energia
(1000 W)
LED Modalità COMFORT
Massimo calore (2000 W)
LED TIMER
SETTIMANALE
LED Modalità
FINESTRE APERTE
TASTO TIMER
TASTO ON/OFF
TASTO F
Selezione funzioni

7
V 06/19
TELECOMANDO
1. Tasto ON/OFF - accensione / spegnimento da stand-by
2. Tasto SWING - impostazione oscillazione flap
3. Tasto TIMER - impostazione timer giornaliero ON/OFF (1-12h)
4. Tasto SET - impostazione
5. Tasto MODE - selezione modalità ventilazione fredda, ECO, COMFORT
6. Tasto -regolazione della temperatura
7. Tasto OK - conferma programmi settimanali
8. Tasto + regolazione della temperatura
9. Tasto attivazione funzione Finestra aperta
10. Tasto DAY - selezione giorno per timer settimanale
11. Tasto P - attivazione Timer settimanale
12. Tasto Time ON – impostazione accensione timer settimanale
13. Tasto EDIT -impostazione periodi di funzionamento timer settimanale
14. Tasto Time OFF -impostazione spegnimento timer settimanale
Utilizza pile a bottone Litio/Manganese, modello no. CR2025 -3 V, conformi alla Direttiva Batterie no. 2006/66/CE e modifiche
da Direttiva 56/2013/UE (non fornite).
COME INSERIRE / RIMUOVERE LE BATTERIE DEL TELECOMANDO (fare riferimento al disegno sottostante)
Aprire lo sportello batteria sul retro del telecomando (premere il retro e tirare lo sportellino).
Porre la pila nello sportellino avendo cura di verificare il corretto posizionamento delle polarità.
Inserire lo sportellino nel telecomando.
INFORMAZIONE PER ILCORRETTO SMALTIMENTO DELLE BATTERIE AI SENSI DELLA DIRETTIVA EUROPEA
2006/66/EC e modifiche ex Direttiva 56/2013/UE
Prego sostituire la batteria quando la sua carica elettrica è esaurita: alla fine della sua vita utile questa pila non deve essere
smaltita insieme ai rifiuti indifferenziati. Deve essere consegnata presso appositi centri di raccolta differenziata oppure presso i
rivenditori che forniscono questo servizio. Smaltire separatamente una batteria consente di evitare possibili effetti negativi
sull’ambiente e sulla salute umana derivanti da uno smaltimento inadeguato e permette di recuperare e riciclare i materiali di
cui è composta, con importanti risparmi di energia e risorse. Per sottolineare l’obbligo di smaltire separatamente le batterie,
sulla pila è riportato il simbolo del cassonetto barrato. Lo smaltimento abusivo del prodotto da parte dell’utente comporta
l’applicazione delle sanzioni amministrative previste dalla normativa vigente.
1
3
4
6
7
9
12
2
5
8
10
11
13
14

8
V 06/19
COME UTILIZZARE IL TERMOVENTILATORE
Collegare il cavo di alimentazione ad una presa di corrente appropriata (220-240V~50Hz), come indicato sulla targhetta dati.
ACCENSIONE DEL TERMOVENTILATORE
Premere il pulsante sull’unità per accendere il termoventilatore in modalità stand-by. Premere il pulsante sul
telecomando per mettere il moto l’unità.
OATTIVAZIONE OSCILLAZIONE AUTOMATICA FLAP
Premere il pulsante sul pannello comandi o sul telecomando per selezionare le modalità di funzionamento.
ATTIVAZIONE DELLE MODALITA’ VENTILAZIONE ESTIVA (FAN) E RISCALDAMENTO (ECO – COMFORT)
Premere il pulsante sul pannello comandi o sul telecomando per selezionare le modalità di funzionamento.
In modalità stand-by il display LED è il seguente:
In modalità Ventilazione estiva (FAN) il display LED è il seguente
In modalità riscaldamento ECO (1000 w) il display LED è il seguente:
In modalità riscaldamento COMFORT (2000 w) il display LED è il seguente:
Per tornare alla modalità stand-by premere nuovamente i pulsanti o rispettivamente sull’unità e sul telecomando.
La temperatura impostata di default è di 23°C.
Il ventilatore si spegne circa 30 secondi dopo l’attivazione della modalità stand-by.
REGOLAZIONE DELLA TEMPERATURA
È possibile regolare la temperatura solo dal telecomando. Premere i pulsanti + o – per regolare la temperatura desiderata
(da 10°C a 49°C). Impostando la temperatura a 25°C si illumina il LED “°C” come mostrato in figura:
Premere per cancellare l’impostazione della temperatura.
FUNZIONE ECO SMART
Il termoventilatore lavora alla massima potenza (modalità COMFORT) quando la temperatura impostata è di almeno 4°C
più alta rispetto alla temperatura ambiente; se la temperatura impostata è tra 0-2°C più alta rispetto alla temperatura
ambiente il termoventilatore lavora a media potenza (modalità ECO), se la temperatura ambiente è più alta della
temperatura impostata invece il termoventilatore si spegne e riprende a funzionare quando la temperatura ambiente scende
di 2°C rispetto a quella impostata.
IMPOSTAZIONE DEL TIMER GIORNALIERO DI ACCENSIONE / SPEGIMENTO
In modalità stand-by premere il pulsante per impostare il timer di accensione. Il timer di accensione può essere
impostato da 1 a 12 ore, premendo sullo stesso pulsante, ad intervalli di 1 h: all’accensione la temperatura di default è di
23°C.
Quando l’unità è in funzione per impostare il timer di spegnimento premere il pulsante , il timer di spegnimento può
essere impostato da 1 a 12 ore premendo sullo stesso pulsante, ad intervalli di 1 h.
IMPOSTAZIONE DELL’ORA (Solo da telecomando)
Premere il pulsante SET per mostrare l’ora sul display, premere i pulsanti + o – per impostare l’orario attuale (00-24),
premere nuovamente il pulsante SET per impostare i minuti (00-59), premere nuovamente il pulsante SET per impostare il
giorno della settimana, premendo + o – appaiono sul display le seguenti sigle: d1, d2, d3,… che corrispondono
rispettivamente a lunedì, martedì, mercoledì,… una volta selezionato il giorno attuale premere il pulsante OK per
confermare.

9
V 06/19
IMPOSTAZIONE DEL TIMER SETTIMANALE (solo da telecomando)
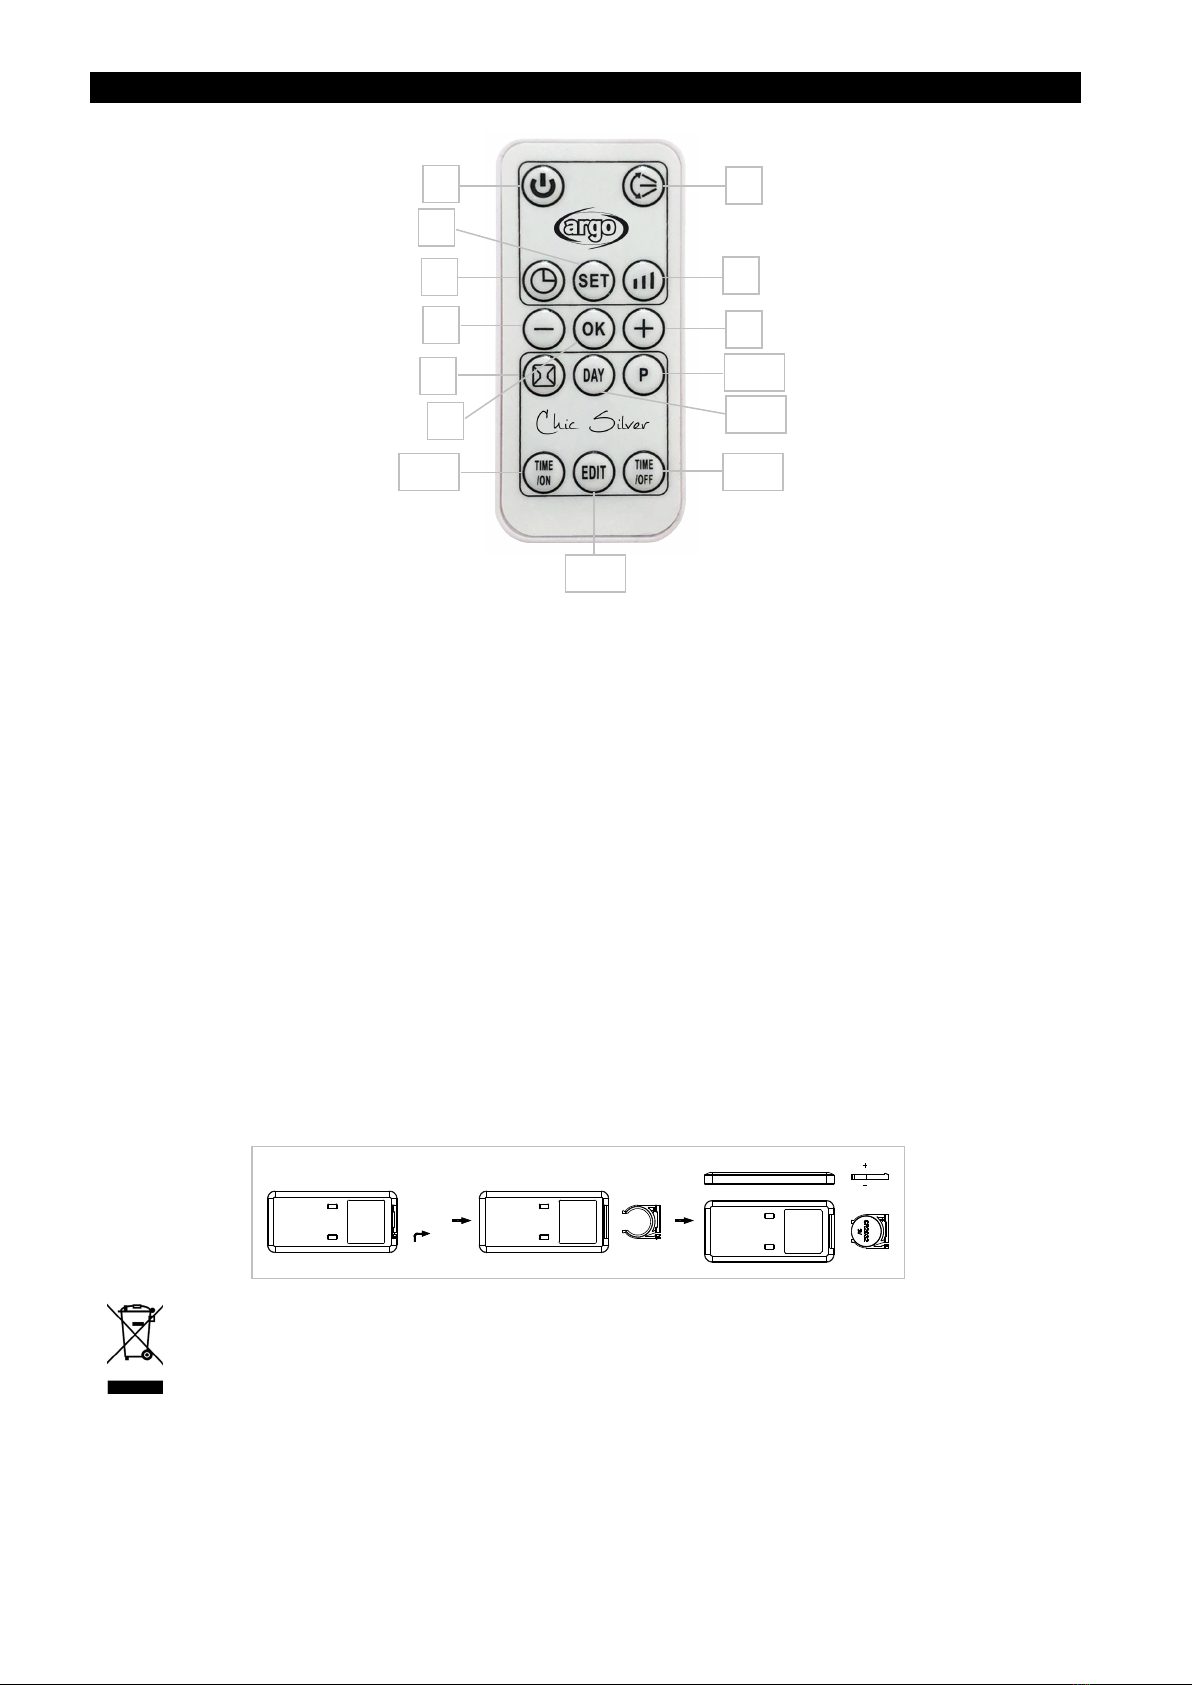
Dopo aver impostato l’orario e il giorno della settimana premere P per accedere all’impostazione del timer settimanale,
1. Premere DAY per impostare il giorno di accensione (d1, d2, d3,…),
2. Premere EDIT per impostare i periodi di funzionamento del termoventilatore (P1, P2,… P6)
3. Premere TIME/ON per impostare l’orario di accensione (00-24)
4. Premere TIME/OFF per impostare l’orario di spegnimento (00-24)
5. Premere i pulsanti + o – per impostare la temperatura desiderata
6. Premere OK per confermare le impostazioni
Per impostare gli eventialu successivi periodi di funzionamento, (max 6) ripetere il procedimento dal punto 2 al punto 6.
Ripetere il procedimento dal punto 1 per impostare gli altri giorni della settimana.
Dopo aver completato il procedimento di impostazione del timer settimanale, premere i pulsanti DAY EDIT TIME/ON e
TIME/OFF per controllare le impostazioni per ogni giorno.
Tutte le impostazioni si cancellano quando il termoventilatore viene spento con il pulsante
IMPOSTAZIONE DELLA FUNZIONE “FINESTRA APERTA”
Quando l’unità è in funzionamento premere il pulsante sul telecomando per attivare la funzione finestra aperta, sul
display appare il LED come mostrato in figura: Premere i pulsanti + o – per impostare la
temperatura. Quando questa funzione è attiva se la temperatura ambiente scende di 5-10°C in meno di 10 minuti, il
termoventilatore smette di funzionare entrando in modalità stand-by. Premere per riavviare l’unità.
Se si impostano entrambe le funzioni di timer settimanale e finestra aperta e, in base alla programmazione settimanale,
l’unità è spenta, anche la funzione finestra aperta non è attiva. Quando invece, in base alla programmazione settimanale,
l’unità è funzionante, la funzione finestra aperta può controllare spegnimento e riaccensione della stessa.
DISPOSITIVO DI SICUREZZA CONTRO IL SURRISCALDAMENTO
In caso di surriscaldamento il sistema di protezione dell’apparecchio disattiva automaticamente gli elementi riscaldanti ed il
motore, facendo così interrompere il funzionamento del termoventilatore.
In questo caso:
•spegnere il termoventilatore;
•rimuovere le cause di surriscaldamento (per es. ostacoli di fronte alla griglia di ingresso e/o uscita dell’aria, anomalo
accumulo di polvere dentro l’apparecchio, ecc);
•lasciar raffreddare la stufa per 15/20 minuti;
•accendere nuovamente il termoventilatore e verificarne il corretto funzionamento.
Se il malfunzionamento dovesse persistere, rivolgersi ad un Centro Assistenza Autorizzato.
MANUTENZIONE E STOCCAGGIO
ATTENZIONE: ESTRARRE SEMPRE LA SPINA PRIMA DI PULIRE L’APPARECCHIO O FARE MANUTENZIONE.
IMPORTANTE: NON IMMERGERE IL TERMOVENTILATORE IN ACQUA.
Pulizia della superficie esterna dell'apparecchio
Spegnere il termoventilatore e rimuovere la spina prima di fare pulizia o muovere l’apparecchio.
Usare un panno morbido per rimuovere la polvere dal prodotto.
Se questo non basta, usare un panno morbido inumidito con acqua e detergente neutro a temperatura inferiore a 50°C.
Lasciare asciugare completamente l’apparecchio prima di utilizzarlo.
Non applicare detergenti corrosivi o solventi quali benzina. Non lavare l'apparecchio con acqua. Durante la pulizia non
usare oli, sostanze chimiche o altri oggetti che possano danneggiare la superficie.
Utilizzare un aspirapolvere per rimuovere la polvere dalle griglie di entrata e uscita dell’aria.
STOCCAGGIO
Nei periodi di non utilizzo, conservare l’apparecchio insieme a questo manuale nella scatola originale in luogo
fresco e asciutto.

10
V 06/19
INFORMAZIONI OBBLIGATORIE PER GLI APPARECCHI PER IL RISCALDAMENTO D'AMBIENTE LOCALE
ELETTRICI
Tabella 2 - Allegato II -Specifiche per la progettazione ecocompatibile - Informazioni obbligatorie sul prodotto -
REGOLAMENTO (UE) 2015/1188 DELLA COMMISSIONE del 28 aprile 2015 recante modalità di applicazione della direttiva
2009/125/CE del Parlamento europeo e del Consiglio in merito alle specifiche per la progettazione ecocompatibile degli
apparecchi per il riscaldamento d'ambiente locale
Identificativo del modello:
CHIC SILVER/CHIC WHITE
Dato Simbolo Valore Unità Dato Unità
Potenza termica
Tipo di potenza termica, solo per gli apparecchi per il
riscaldamento d'ambiente locale elettrici ad accumulo
(indicare una sola opzione)
Potenza termica
nominale
Pnom 2,0 kW controllo manuale del carico termico, con
termostato integrato
[no]
Potenza termica
minima (indicativa)
Pmin 0 kW kW controllo manuale del carico termico con
riscontro della temperatura ambiente e/o
esterna
[no]
Massima potenza
termica continua
Pmax,c 2,0 kW controllo manuale del carico termico con
riscontro della temperatura ambiente e/o
esterna
[no]
Consumo ausiliario di
energia elettrica
potenza termica assistita da ventilatore [no]
Alla potenza termica
nominale
elmax 0 kW
Tipo di potenza termica/controllo della temperatura
ambiente (indicare una sola opzione)
Alla potenza termica
minima
elmin 0 kW potenza termica a fase unica senza controllo
della temperatura ambiente
[no]
In standby elsb 0,001 kW due o piùfasi manuali senza controllo della
temperatura ambiente
[no]
con controllo della temperatura ambiente
tramite termostato meccanico
[no]
con controllo elettronico della temperatura
ambiente
[no]
con controllo elettronico della temperatura
ambiente e temporizzatore giornaliero
[no]
con controllo elettronico della temperatura
ambiente e temporizzatore settimanale
[sì]
Altre opzioni di controllo (
è
possibile selezionare pi
ù
opzioni)
controllo della temperatura ambiente con
rilevamento di presenza
[no]
controllo della temperatura ambiente con
rilevamento di finestre aperte
[sì]
con opzione di controllo a distanza [no]
con controllo di avviamento adattabile [no]
con limitazione del tempo di funzionamento [sì]
con termometro a globo nero [no]
Contatti : ARGOCLIMA SPA - Via A. Varo,35 - Alfianello (BS) - ITALY -
www.argoclima.com

11
V 06/19
INFORMAZIONE PER IL CORRETTO SMALTIMENTO DELPRODOTTO ai sensi dell’art. 26 D.Lgs 14/03/14, no. 49
“ATTUAZIONE DELLA DIRETTIVA EUROPEA 2012/19/UE SUI RIFIUTI DA APPRECCHIATURE ELETTRICHE ED
ELETTRONICHE”
Alla fine della sua vita utile questo apparecchio non deve essere smaltito insieme ai rifiuti domestici. Richiamiamo l’importante
ruolo del consumatore nel contribuire al riutilizzo, al riciclaggio e ad altre forme di recupero di tali rifiuti.
L’apparecchio deve essere consegnato in modo differenziato presso appositi centri di raccolta comunali oppure gratuitamente
presso i rivenditori, all’atto dell’acquisto di una nuova apparecchiatura di tipo equivalente.
Per prodotti di dimensione esterna inferiore a 25 cm tale servizio di ritiro gratuito del rifiuto deve essere obbligatoriamente
fornito gratuitamente dai rivenditori di grandi dimensioni (superficie di vendita di almeno 400m2) anche nel caso in cui non
venga acquistata alcuna apparecchiatura equivalente.
Smaltire separatamente un apparecchio elettrico ed elettronico consente di evitare possibili effetti negativi sull’ambiente e sulla
salute umana derivanti da uno smaltimento inadeguato e permette di recuperare ericiclare i materiali di cuiècomposto, con
importanti risparmi di energia e risorse.
Per sottolineare l’obbligo di smaltire separatamente queste apparecchiature, sul prodotto è riportato ilsimbolo del cassonetto
barrato.
www.argoclima.com

12
V 06/19
This product is only suitable for well insulated spaces or
occasional use.
OPERATING INSTRUCTIONS
Read the instructions carefully before operating the appliance or carrying out maintenance
operations.
Observe all the safety instructions; failure to observe the instructions may lead to accidents and/or
damage. Store these instructions.
WALL-MOUNTED CERAMIC FAN HEATERS
EN

13
V 06/19
GENERAL SAFETY INFORMATION
•Use this fan heater only as outlined in this manual. Any other use
not recommended by the manufacturer may cause fire, electric
shock or injury to persons.
•Make sure that the type of mains power complies with the electrical
requirements of the fan heater (220-240 V~50 Hz).
•This fan heater is designed for wall-installation; it must be
mounted 1.8 m above the floor and at least 25 cm from the wall
on each side. Do not use it as a floor-standing device.
•This appliance can be used by children of at least 8 years of age
and by people with reduced physical, sensory or mental abilities, or
who lack sufficient experience or the necessary knowledge,
provided that they are supervised or have been instructed on how to
use the appliance safely and understand the hazards related to its
use.
•Children must not be allowed to play with the appliance.
•Cleaning and maintenance operations normally carried out by the
user must not be performed by unsupervised children.
•This product is not a toy.
•Children under the age of 3 years must be kept out of reach unless
properly supervised, to ensure that they do not play with the
appliance.
•Children aged between 3 and 8 years must only be able to turn the
appliance on/off, provided that the appliance has been placed in its
normal operating position, that instructions have been given on how
to use the equipment safely, and that its risks have been
understood.
•Children aged between 3 and 8 years must not be able to plug in,
adjust, clean or perform any maintenance on the appliance.
•WARNING: Certain parts of this product may become very hot
and cause burns. Special care should be taken when children
and vulnerable people are nearby.
•To avoid the risk of accidentally resetting the thermal protection, this
appliance must not be powered through an external switching
device, such as a timer, or connected to a circuit that is switched on
and off by the utility.
•WARNING: Do not use the fan heater with a controller or any
other device that activates the appliance automatically, as
there may be a risk of fire if the fan heater is covered or
incorrectly positioned.

14
V 06/19
•Do not restrict the air inlet and outlet grilles.
•The appliance heats up significantly when running and can cause
burns. Avoid unprotected contact with the hot surface.
•Keep flammable materials, such as furniture, cushions, blankets,
paper, cloths, curtains and similar items at least 1 m away from the
front, sides and back of the appliance.
•Disconnect the mains power when the appliance is not in use or
during cleaning.
•Avoid using the fan heater in dusty environments or in the presence
of flammable vapours (e.g. in workshops or garages).
•Do not place anything on the product; avoid placing wet garments
on the fan heater.
•Use the fan heater in a well-ventilated area.
•Avoid placing fingers or foreign objects in the air inlet/outlet grilles,
as this may lead to electric shock or fire and may damage the fan
heater.
•To prevent the risk of fire, do not block the grilles or tamper with
them in any way while the fan heater is in use.
•Do not use the appliance if the power cable or plug are
damaged. If the power supply cable is damaged, it must be
replaced by the manufacturer, dealer or a similarly qualified person
so as to avoid any safety risks.
•Do not use the fan heater if it has fallen from a certain height or if it
has been damaged in any way. Contact a service centre to check
the fan heater or make any necessary electrical or mechanical
repairs.
•The most common cause of overheating is the build-up of dust in
the appliance. Remove accumulated dust, after taking the plug out,
by cleaning the grilles using a vacuum cleaner.
•Do not use any abrasive products to clean the appliance. Clean it
using a damp (not wet) cloth rinsed in soapy water. Remove the
plug from the socket before performing any maintenance.
•To disconnect the fan heater, turn the switch to OFF and remove
the plug from the socket. Pull on the plug only. Do not pull on the
cable when turning off the fan heater.
•Do not place any objects on the cable and also avoid bending the
cable.

15
V 06/19
•Using extension leads are not recommended as they may overheat
and cause a fire hazard. Never use a single extension lead to
operate multiple appliances.
•Do not immerse the power cable, plug or any other part of the
appliance in water or other liquids.
•Do not touch the plug with wet hands.
•Do not place the fan heater above or near another heat source.
WARNING: AVOID COVERING THE FAN HEATER TO PREVENT IT
FROM OVERHEATING.
The symbol below signals this warning:
•The fan heater may cause the risk of fire if, while operating, it is
covered or comes into contact with flammable material including
curtains, drapery, blankets, etc. KEEP THE FAN HEATER AWAY
FROM THESE MATERIALS.
•Do not connect the fan heater to the power supply until it has been
correctly assembled or positioned.
•Do not run the cable under carpets. Do not cover the cable with
blankets, carpets or similar materials. Place the cable away from
busy areas and where it cannot accidentally be pulled out.
•Do not operate the fan heater in close proximity to bathtubs,
showers, washbasins or pools.
•Do not position the fan heater beneath a power socket.
•Do not operate the appliance outdoors.
•Upon initial start-up, the fan heater may emit a slight, harmless
smell. This smell is a normal effect of the initial heating up of the
internal heating elements, and should not recur subsequently.
WARNING:
THE ON/OFF SWITCH IS NOT THE ONLY METHOD OF
DISCONNECTING THE MAINS POWER.
ALWAYS UNPLUG THE APPLIANCE DURING MAINTENANCE
OPERATIONS, WHEN MOVING IT OR WHILE IT IS NOT IN USE.
•A fan heater contains parts that generate electrical arcs and sparks.
It must not be used in potentially dangerous areas such as those
subject to the risk of fire or explosion, or areas filled with chemical
substances or humidity.
•Always unplug the appliance when it is not in use.
•Turn the appliance off if unattended, in order to prevent accidents.

16
V 06/19
•In the event of any anomalies (abnormal noise or a strange smell),
immediately turn off the appliance; do not attempt to repair it but
take it to your local service centre.
DESCRIPTION OF PARTS
7. Remote control
1.Air suction grille
2.LED display
3.Air output grille
4.Horizontal flap
5.TIMER button
6.Function selection Fbutton
3
4
1
2
6
5

17
V 06/19
HOW TO INSTALL THE FAN HEATER
The fan heater must be installed on the wall before use. Do not try to use it without installation. The installation sequence is
listed below:
1. Select a space for installing the appliance (figure 1).
2. Drill two holes on the wall that are suitably sized for inserting the Ø 8 mm Fischer screw plugs. (figure 2) – D=575 mm
3. Insert the Fischer screw plugs into the holes and tighten the screws provided.
NOTE: Tighten the screws securely. Do not insert the screws into the Fischer plugs entirely - leave around 10 mm free.
4. Mount the appliance on the wall (figure 3).
Ensure that the holes on the rear of the appliance are directed towards the two screws, push the fan heater backwards
onto the wall then downwards until it lies in a stable position.
CONTROL PANEL AND LED DISPLAY ON THE APPLIANCE
Figure 1
Figure 2
Figure 3
Fischer
TIMER LED
TEMPERATURE
°C LED
ROOM
TEMPERATURE
DISPLAY
ECO Mode LED
energy saving (1000
W)
COMFORT Mode LED
Maximum heat (2000 W)
WEEKLY
TIMER LED
OPEN WINDOWS
Mode LED
TIMER
BUTTON
ON/OFF BUTTON
F BUTTON
Function selection

18
V 06/19
REMOTE CONTROL
1. ON/OFF button - switching on/off from stand-by mode
2. SWING button - flap swivel setting
3. TIMER button - setting daily timer ON/OFF (1-12h)
4. SET button - set
5. MODE button - fan mode setting cold, ECO, COMFORT
6. Button - temperature regulation
7. OK button - confirm weekly programmes
8. + Button temperature regulation
9. Open window function activation button
10. DAY button - day selection for weekly timer
11. P button - weekly Timer activation
12. Time ON button – weekly timer switch ON setting
13. EDIT button - weekly timer operation period setting
14. Time OFF button - weekly timer switch OFF setting
Use Lithium/Manganese button cells, model no. CR2025 -3 V, conforming to Battery Directive no. 2006/66/EC and
modification by Dir.no 2013/56/EU (not supplied).
HOW TO INSERT / REMOVE THE REMOTE CONTROL BATTERIES (refer to the diagram below)
Open the battery cover at the back of the remote control (press the back and pull the flap).
Insert the battery into the slot, making sure you respect the polarities.
Put the cover back onto the remote control.
INFORMATION FOR THE CORRECT DISPOSAL OF BATTERIES IN ACCORDANCE WITH EUROPEAN DIRECTIVE
2006/66/EC AND CHANGES INTRODUCED BY DIRECTIVE 2013/56 / EU
Replace batteries when they are depleted. At the end of their life, batteries must be disposed of separately from unsorted
waste. They must be taken to designated recycling centres or returned to a retailer providing this service. Separate disposal of
batteries prevents potential negative effects on the environment and human health due to inadequate disposal, and also allows
their constituent materials to be recovered and recycled, resulting in significant savings in terms of energy and resources. In
order to highlight the obligation regarding separate disposal, the battery carries the crossed-out dustbin symbol. Illegal disposal
of the product by the user may lead to administrative sanctions being applied as per current regulations.
1
3
4
6
7
9
12
2
5
8
10
11
13
14

19
V 06/19
HOW TO USE THE FAN HEATER
Connect the power cable to a suitable electric socket (220-240V~50Hz), as indicated in the data plate.
SWITCHING THE FAN HEATER ON
Press the button on the appliance to switch the fan heater to stand-by mode. Press the on the remote control
to switch the appliance ON.
AUTOMATIC FLAP SWIVEL
Press the button on the control panel or on the remote control to select the operating mode.
ACTIVATION OF SUMMER VENTILATION (FAN) AND HEATING (ECO – COMFORT) MODES
Press the button on the control panel or on the remote control to select the operating mode.
In stand-by mode the LED display is the following:
In Summer ventilation (FAN) mode the LED display is the following
In ECO heating mode (1000 W) the LED display is the following:
In COMFORT heating mode (2000 W) the LED display is the following:
To return to stand-by mode press the buttons or again respectively on the appliance and on the remote control.
The default set temperature is 23°C.
The fan heater switches off about 30 seconds after the stand-by mode has been activated.
TEMPERATURE REGULATION
The temperature can only be set via the remote control. Press the + or – buttons to regulate the desired temperature (from
10°C to 49°C). If you set the temperature to 25°C the “°C” LED comes on as shown in the figure:
Press to cancel the temperature setting.
ECO SMART FUNCTION
The fan heater operates at maximum power (COMFORT mode) when the set temperature is at least 4°C higher than the
room temperature; if the set temperature is 0-2°C higher than the room temperature, the fan heater operates at medium power
(ECO mode), if the room temperature is higher than the set temperature the fan heater switches off and starts operating again
when the room temperature drops 2°C below the set temperature.
ON/OFF DAILY TIMER SETTING
In stand-by mode, press the button to set the switch-on timer. The switch-on timer can be set from 1 to 12 hours, by
pressing on the same button to move on in intervals of 1 h: the default set temperature when it switches on is 23°C.
When the appliance is operating, to set the switch-off timer press the button; the switch-off button can be set from 1 to 12
hours, by pressing on the same button to move on in intervals of 1 h.
TIME SETTING (Only from the remote control)
Press the SET button to show the time on the display; press the + or – buttons to set the current hour (00-24); press the SET
button again to set the minutes (00-59); press the SET button again to set the day of the week – if you press + or – the display
will show the following abbreviations: d1, d2, d3,… which correspond respectively to Monday, Tuesday, Wednesday etc.;
once you have selected the current day press OK to confirm.
SETTING THE WEEKLY TIMER (only via the remote control)
After having set the time and day of the week, press P to enter the weekly timer setting,
1. Press DAY to set the switch-on day (d1, d2, d3,...),
2. Press EDIT to set the operating periods for the fan heater (P1, P2,… P6)

20
V 06/19
3. Press TIME/ON to set the switch-on time (00-24)
4. Press TIME/OFF to set the switch-off time (00-24)
5. Press the + or – buttons to set the desired temperature
6. Press OK to confirm the settings
To set any other subsequent operating times, (max 6) repeat the procedure from point 2 to point 6.
Repeat the procedure from point 1 to set the other days of the week.
After completing the weekly timer setting, press the buttons DAY EDIT TIME/ON and TIME/OFF to check the settings for each
day.
All settings are deleted when the fan heater is switched off using this switch
“OPEN WINDOW” FUNCTION SETTING
When the appliance is operating, press the button on the remote control to activate the open window
function; the LED appears on the display, as shown in the figure: Press the + or – buttons
to set the temperature. When this function is active, if the room temperature drops by 5-10°C in less than 10 minutes, the fan
heater stops operating and switches to stand-by mode. Press to restart the appliance.
If both the weekly timer and open window functions are set and, according to the weekly programme, the appliance is off, the
window open function will also be inactive. Conversely, when the appliance is operating in line with the weekly programme,
the window open function can control the ON/OFF operation of the appliance.
OVERHEATING SAFETY DEVICE
In the event of overheating, the protection system of the appliance will automatically disable the heating elements and the
motor, thus causing the fan heater to stop working.
In this case:
•turn the fan heater off;
•remove the causes of the overheating (e.g. obstacles in front of the air input/output grilles, dust build-up inside the
appliance, etc.);
•leave the appliance to cool down for 15-20 minutes;
•turn the fan heater on again and check that it works properly.
If the malfunction persists, contact an Authorised Service Centre.
MAINTENANCE AND STORAGE
CAUTION: ALWAYS UNPLUG THE APPLIANCE BEFORE CLEANING OR PERFORMING ANY MAINTENANCE.
IMPORTANT: DO NOT SUBMERGE THE FAN HEATER IN WATER.
Cleaning the outside surface of the appliance
Switch off the appliance and unplug it before cleaning or moving the appliance.
Use a soft cloth to remove any dust from the product.
If this is not enough, use a soft cloth dampened with water and neutral detergent at a temperature below 50 °C. Leave the
appliance to dry thoroughly before using it again.
Do not use corrosive detergents or solvents such as petrol. Do not wash the appliance with water. When cleaning the
appliance, do not use oils, chemical substances or other items that may damage the surface.
Use a vacuum cleaner to remove dust from the air inlet/outlet grilles.
STORAGE
If the appliance is not used for prolonged periods, it must be stored together with this manual in its original packaging, in a
cool and dry place.
Other manuals for CHIC SILVER
1
This manual suits for next models
1
Table of contents
Languages:
Other Argo Heater manuals