Electrorad Digi-Line DE Series Supplement

Electrorad Digi-Line
Installation, Operating & Instruction Manual
ELECTRORAD UK LTD
Unit 1, Clayton Park, Clayton Wood Rise, West Park, Leeds, LS16 6RF
After Sales Service:
ELECTRORAD UK LTD
01.01.2018

03
Electrorad Digi-Line
1.0 Warnings & Safety Information
Contents
1.0 Warnings & Safety Information 03
2.0 General Information 05
3.0 Installation 06
4.0 Maintenance, Repair & Disposal 07
5.0 Waste Disposal According to The WEEE Directive (2002/96/EC) 08
6.0 Warranty 08
7.0 Operating Instructions 08
7.1 Display 08
7.2 Behaviour Indicator 09
7.3 Keyboard 09
8.0 Working Mode Definition 09
8.1 Manual Comfort Mode 09
8.2 Manual Reduced Mode 09
8.3 Frost Protection Mode 09
8.4 Standby Mode 10
8.5 Automatic Mode 10
8.6 How To Set The Time 10
8.7 Programme Selection Mode 11
8.8 Defining a User Programme 11
8.9 Wireless Programmer 14
8.10 Timed Override Mode 15
8.11 Power Settings 15
8.12 Sensor 15
9.0 Key Lock Function 15
10.0 Window Open Function 16
11.0 Parameter’s Menu 16
12.0 Technical Characteristics 19
13.0 Troubleshooting & Solution 20
14.0 Preset Programmes 21
15.0 Eco Directive Characteristics 22
SAFETY INFORMATION
This appliance can be
used by children aged
from 8 years and above
and persons with reduced
physical, sensory or
mental capabilities or
lack of experience and
knowledge, if they have
been given supervision
or instruction concerning
use of the appliance in a
safe way and understand
the hazards involved.
Children shall not play
with the appliance.
Cleaning and user
maintenance shall not be
made by children unless
they are older than 8 and
supervised.
Keep the appliance and
its cord out of reach of
children aged less than
8 years.
Children of less than
3 years should be kept
away from the unit unless
continuously supervised.
Children aged from
3 years and less than
8 years shall only switch
on/off the appliance
provided that it has been
placed or installed in
its normal operating
position and they have
been given supervision
or instruction concerning
use of the appliance in a
safe way and understand
the hazards involved.
Children aged from
3 years and less than
8 years shall not plug
in, regulate, clean the
appliance or perform
user maintenance.

05
Electrorad Digi-LineElectrorad Digi-Line
04
1.0 Warnings & Safety Information (cont...) 1.0 Warnings & Safety Information (cont...)
The radiator is filled with an exact amount
of environmental friendly vegetable oil. Any
repairs that require the radiator to be opened
shall therefore only be carried out by the
manufacturer or his approved agent. Please
contact Electrorad UK Ltd in case of leakage.
2.0 General Information
lThe appliance is a sealed electric radiator
designed for fixed wall mounted installation.
lThe radiator conforms to the standards EN
60 335-1 and EN 60 335-2-30.
lThe radiator is class 1 and splash resistant
(IP44).
lThe radiator complies with the European
Directive 2004/108/EC (CE Marking on all
radiators).
lThe radiator is supplied complete with
power cable* and wall brackets.
l*A restricted range of radiators come with
a 3 pin plug.
CAUTION
Some parts of this
product can become very
hot and cause burns.
Particular attention has to
be given where children
and vulnerable people
are present.
In order to avoid
overheating, do
not cover the radiator.
“Do not cover” means
that the radiator must
not be used for drying
clothes, for example,
by placing them directly
on the radiator.
IMPORTANT SAFETY
INSTRUCTIONS!
Before starting work disconnect power supply!
All installation work and wiring work related
to the radiators, thermostats and programmers
must be carried out only when de-energised.
The appliance should be commissioned by
qualified professionals only.
Make sure to adhere to valid safety regulations.
Any repairs or maintenance within the warranty
period should be carried out only by approved
service engineers confirmed by Electrorad UK
Ltd.
For the correct installation of radiators it
is essential that the fixing of the radiator is
carried out in such a way that it is suitable
for intended use AND predictable misuse. A
number of elements need to be taken into
consideration including the fixing method
used to secure the radiator to the wall, the
type and condition of the wall itself, and
any additional potential forces or weights,
prior to finalising installation. IN ALL CASES
IT IS STRONGLY RECOMMENDED THAT
A SUITABLY QUALIFIED PROFESSIONAL
INSTALLER OR SIMILAR TRADESPERSON
CARRIES OUT THE INSTALLATION.
PLEASE NOTE: The fixing materials provided
are only intended for installation on walls made
of solid wood, bricks, concrete or on timber-frame
stud walls where the fixing is into the timber. All
walls being considered should have no more than
a maximum of 3mm wall finishing. For walls made
of other materials, for example hollow bricks,
please consult your installer and/or specialist
supplier. ONCE AGAIN, IF YOU ARE UNSURE,
IT IS STRONGLY RECOMMENDED THAT
A SUITABLY QUALIFIED PROFESSIONAL
INSTALLER OR SIMILAR TRADESPERSON
CARRIES OUT THE INSTALLATION.
The radiator is equipped with an overheat
protection that cannot be reset (melt fuse).
This overheat protection disconnects the
current if the radiator becomes too hot (e.g.
when covered).
If the supply cord is damaged, it must be
replaced by the manufacturer, his service
agent or similar qualified persons in order to
avoid a hazard.
1. Thermostat Control
3. Room Temperature Sensor
Cable Hook Assembly
Back of Radiator
2. Power On/Off Switch
4. Power Cable*

07
Electrorad Digi-LineElectrorad Digi-Line
06
3.0 Installation (cont...)
4.0 Maintenance, Repair & Disposal
lUse only a damp cloth for cleaning and
wiping of the radiator which should be
switched off at this time.
lWhen scrapping the radiator, follow the
regulations concerning the disposal of oil.
3.0 Installation
FLOOR
CONNECTION
lThe electrical installation must comply with
the local or national regulations.
lThe radiator must be connected to the
electrical supply, using a switched fused
spur with 3mm separation on all poles.
lIf the radiator is installed in a bathroom or
shower room, it must be protected with a
residual current device (RCD) with a rated
residual current not exceeding 30 mA.
Optional Extras
A (min) 135 135 135 135 135 135 135
A (max) 160 160 160 160 160 160 160
B (min) 101 254 508 762 812 1016 1219
B (max) 152 305 558 812 863 1066 1270
Length (mm) 400 550 800 1050 1100 1300 1500
Electrorad Digi-Line Single Panel (refer to figure 2)
C 135 205
D 90 163
Height (mm) 300 500
A 160 160 160 160 160 160 160 160 160 160
B 101 203 355 508 660 711 965 1016 1320 1727
Length (mm) 400 500 650 800 950 1000 1250 1300 1600 2000
Electrorad Digi-Line Double Panel (refer to figure 2)
C 135 205
D 90 163
Height (mm) 300 500
lThis product is splash resistant with an
IP44 rating. This must be considered when
installing in a location containing a bath or
shower, as defined by BS 7671.
lThe radiator may be positioned in zone 2
(figure 4) of the bathroom, in so far as no
operating controls (button, switch, etc.) are
in reach of persons in the bath or under
the shower.
lNB: If the radiator is supplied with a
3 pin plug, then this should NOT be
installed in any bathroom zone.
FIXING
lMark out the distance between the brackets
and the positions for the screw holes as
shown in figure 2 and the dimension tables
at the top of page 7, and ensure the safety
clips are used (see figure 3).
Figure 2.
Figure 3.
Figure 1.
Min.100mm
Min.100mm
Min.100mm
Step 1 Step 2
POSITIONING
lThe radiator must be positioned horizontally,
the right way up on the wall in order for it to
function correctly. Never switch the radiator
on in any other position as this will damage
the electrical element.
lThe radiator must be positioned according
to the applicable standards and the
minimum distances as specified in figure 1
should be carefully observed.
lThe radiator must not be located
underneath an electric socket.
Zone 1 Zone 2
Zone 2
Zone 0
OUTSIDE ZONES
3m
2.25m
0.6m
0.6m
Figure 4.
Safety Clip-on Brackets
RF Programmer + Touch E3
Electrorad Digi-Line radiators can be used
as a stand alone radiator. The radiator has
a built in radio frequency receiver which
can be used with an RF Programmer or
Touch E3. Please ask for more details.

09
Electrorad Digi-LineElectrorad Digi-Line
08
6.0 Warranty
The product is covered by a 10 years warranty
except for the electrical and electronic
components that are covered by a 2 years
warranty.
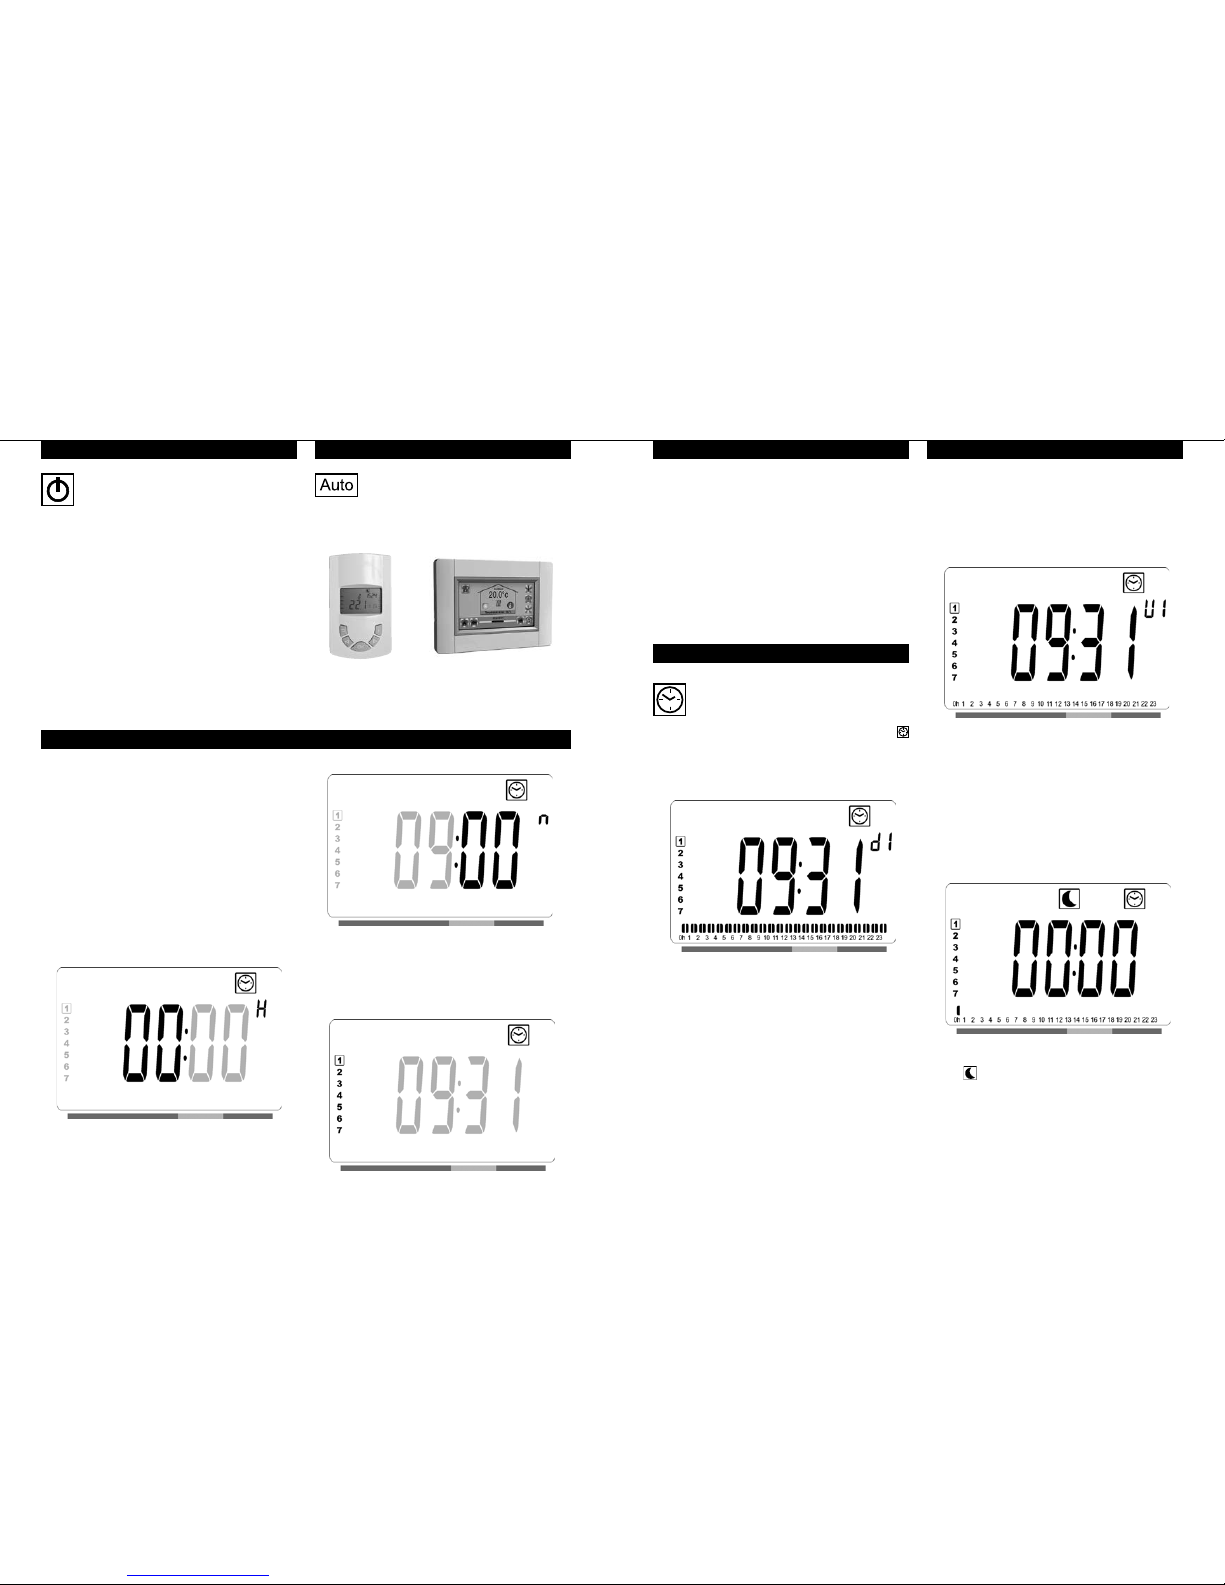
7.0 Operating Instructions
7.1 Display
The electronic thermostat has an LCD display
specially designed for the regulation of the
electrical radiator. It will optimise energy
consumption and increase comfort levels.
Features:
lDisplay with backlight
lWireless RF programmer options (see
separate instructions)
lTimed override function.
5.0 Waste Disposal According to The WEEE Directive (2012/19/EU)
Waste disposal according to
the WEEE Directive (2012/19/
EU). The symbol on the
product label indicates that
the product may not be
handled as domestic waste,
but must be sorted separately. When it
reaches the end of its useful life, it shall be
returned to a collection facility for electrical
and electronic products. By returning the
product, you will help to prevent possible
negative effects on the environment and
health to which the product can contribute if
it is disposed of as ordinary domestic waste.
For information about recycling and collection
facilities, you should contact your local
authority/municipality or refuse collection
service or the business from which you
purchased the product. Applicable to countries
where this Directive has been adopted.
Note: The radiator has a soft start feature built into the control software such that full
power is not applied at power up, whether it is the first time the radiator is switched on
or whenever the radiator loses power by switching it off. The software gradually increases
power from zero to full power over a 20 minute period.
7.2 Behaviour Indicator
7.3 Keyboard
Keys:
< = Left Navigation Key
> = Right Navigation Key
+ = Plus Key
- = Minus Key
OK
= Validation Key
8.3 Frost Protection Mode
Use this mode if you want to protect
your system against freezing when
leaving the property for extended
periods.
By pressing (+) or (-) keys, the reduced
setting temperature starts to blink and can be
adjusted.
8.1 Manual Comfort Mode
Manual working mode, the comfort
setting temperature will be followed
all the time. By pressing the (+) or (-)
keys, the comfort setting temperature starts to
blink and can be adjusted.
This temperature will also be used when
following the weekly schedule on the
programmer (if applicable).
8.2 Manual Reduced Mode
Manual working mode, the reduced
setting temperature will be followed
all the time. By pressing (+) or (-) keys,
the reduced setting temperature starts to blink
and can be adjusted.
The reduced temperature is intended to be
used during the night or for short periods of
time when not in the room/property.
This temperature will also be used when
following the weekly schedule on the
programmer (if applicable).
WEEE NO: WEE/HD0506VZ
1. Operating mode menu (active mode is framed).
2. Front panel temperature limit, Parameters
number if icon “3” is displayed or selected
programme number.
3. Installation parameter indicator.
4. “Key lock” function indicator.
5. “Room temperature” indicator.
6. Display zone for temperatures,
parameters, or time.
7. “Heating demand” indicator.
8. “Behaviour” indicator or programme
information bar.
9. “Mode” indicator in “Automatic” mode.
10. Day of week indicator.
11. “RF connection” indicator (with RF clock or
Touch E3).
12. Hand icon.
13. “Window open” function indicator.
13 1
8
2
3
5
6
7
4
11
12
10
9
8.0 Working Mode Definition
How to change the working mode:
lUse the navigation keys left (<) or right (>)
to display the working mode line.
lMove the frame cursor on the desired
working mode and press (OK) to enter in
the operating mode you have chosen.
This is the bar at the bottom of the LCD
display that gives a visual indication of how
much energy the current temperature setting
is using i.e.
red = high
orange = medium
green = low energy consumption
As you increase the temperature setting, the
behaviour indicator “bar”, in section 8 of the
LCD display, will increase in length.
The opposite applies when decreasing the
temperature setting.
NOTE: The behaviour indicator is replaced
by the programme information bar when in
Automatic mode.
• The day values, in section 10 of the LCD display,
will blink. Adjust the day value by pressing the
“+” or “-” keys, then confirm by pressing the
“OK” key.
• The “Comfort” mode or previously selected
operating mode screen will appear.
NOTE: If the time is not set within 60 seconds,
the “Comfort” or previously selected operating
mode screen will appear.
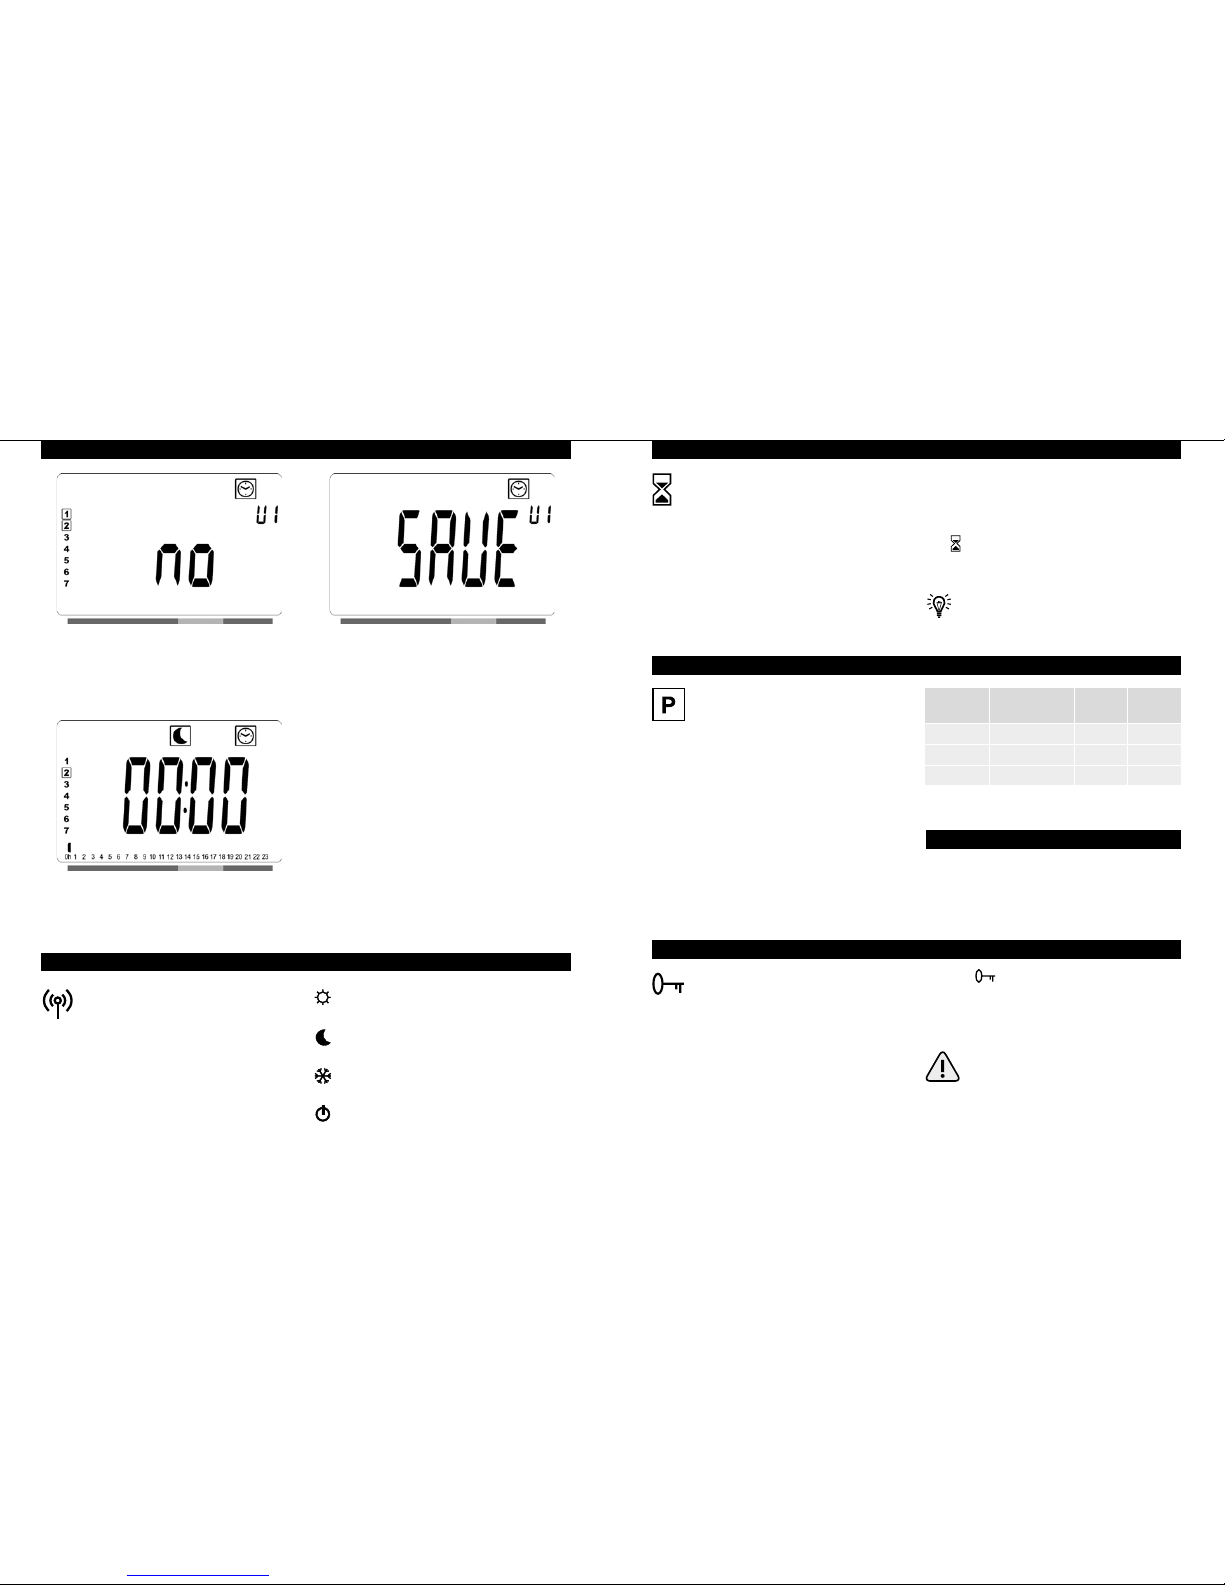
NOTE: Once saved, the user defined
programmes are not lost in the event of a power
cut. However, the time will reset to 00:00 and
day 1 when the power returns, if not set, so the
product may not heat at the expected times.
lUse the “+” or “-” keys to select a user
definable programme, U1 to U4, to be
modified, then press and hold the “OK”
key for 3 seconds.
NOTE: If a user defined programme has already
been created and saved, it will be overwritten
when the newly defined user programme is
saved.
11
Electrorad Digi-LineElectrorad Digi-Line
10
8.4 Standby Mode
lIn this mode the radiator is
switched off.
lThe radiator will no longer receive signals
from the RF programmer or Touch E3 (if
applicable).
lAt any time, press any key to view the
measured room temperature.
lAttention: In this mode, your radiators
may freeze in very cold weather. Please
be aware, if there is no heating in your
property then your pipes could freeze. For
protection of the product and property in
very low temperatures, we recommend the
‘frost protection’ mode is used.
8.5 Automatic Mode
This mode is only to be used when
paired to the timings/settings of the
RF programmer or Touch E3 (if
applicable).
8.7 Programme Selection Mode
• When first powered on, the digital control
enters into time setting mode.
• Time setting mode can also be entered into by
pressing the “OK” key for 3 seconds while in
any of the heating modes.
NOTE: If power is lost, from a power cut or
the product is switched off, even just for a few
seconds, the time and day setting will be lost.
NOTE: If connected to an RF programmer or
the Touch E3, it is not possible to enter into the
time setting mode.
• The hour value will blink. Adjust the hour value
by pressing the “+” or “-” keys, then confirm
by pressing the “OK” key.
8.6 How To Set The Time (cont...)
8.6 How To Set The Time
8.8 Defining a User Programme
NOTE: If connected to an
RF programmer or the Touch E3,
it is not possible to enter into the
programme selection mode as the clock
symbol is made unavailable.
Selecting a Programme
lUse the “+” or “-” keys to select one of
the preset programmes, d1 to d9 (see
page 21), or one of the user definable
programmes, U1 to U4. The programme
number will blink. The programme sequence
for the current day is displayed along
the bottom of the screen. Press the “OK”
key to confirm the programme to be
followed.
lWhen confirmed, the control will return
to Automatic.
• The minute value will blink. Adjust the minute
value by pressing the “+” or “-” keys, then
confirm by pressing the “OK” key.
lThe above screen will be shown, where
the symbol, the time value 00:00, and
the time segment in the programme
information bar along the bottom of the
screen will blink continuously.

13
Electrorad Digi-Line
8.8 Defining a User Programme (cont...)
lUse the “+” or “-” keys to adjust the time
at which the first Reduced period will end.
lAs the time indexes, the blinking segment
on the programme information bar will
move horizontally along the time scale
according to the time value.
lPress the “OK” key to confirm the time
at which the mode will change over from
Reduced to Comfort. The symbol will
start to blink instead of the symbol,
signifying the start of this Comfort period.
lUse the “+” and “-“ keys to adjust the
time at which the first Comfort period
will end. The segments in the programme
information bar will populate to show the
Comfort period.
lPress the “OK” key to confirm the time
at which the mode will change over from
Comfort to Reduced. The symbol will
start to blink instead of the symbol,
signifying the start of this Reduced period.
lUse the “+” or “-” keys to adjust the time
at which this Reduced period will end.
lUse the “+” and “-“ keys to adjust the time
at which this Reduced period will end. The
segments in the programme information
bar will populate to show the Comfort
period.
lPress the “OK” key to confirm the time
at which the mode will change over from
Reduced to Comfort. The symbol will
start to blink instead of the symbol,
signifying the start of this Comfort period.
lPress the “OK” key to confirm the time
at which the mode will change over from
Comfort to Reduced. The symbol will
start to blink instead of the symbol,
signifying the start of this Reduced period.
lIf more than two Comfort periods are
required, repeat the previous steps.
lWhen all Comfort periods have been
defined, use the “+” key to advance
beyond the time “23:30”. The above screen
will then be shown, asking if the programme
that has just been defined for that day is to
be copied to the next day.
lTo copy the programme onto the next day,
press the “OK” key. Press the “OK” key for
any further days the programme is to be
copied over to.
8.8 Defining a User Programme (cont...)
Electrorad Digi-Line
12
15
Electrorad Digi-LineElectrorad Digi-Line
14
8.8 Defining a User Programme (cont...)
lIf a different programme is to be defined
for the next day, press the “+” or “-” key
until the word “no” is displayed. Press the
“OK” key to confirm.
lWhen all of the days have been defined, the
word “SAVE”will be displayed. To save the
programme, press the “OK” key to confirm.
lIf the programme is not to be saved, so that
any previously user defined programme is
not overwritten, press the left “” arrow
key. The screen will revert back to the
Programme Selection screen.
lThe day number will increment to the
next day and the time will be set back
to “00:00”.
8.9 Wireless Programmer
If a Wireless programmer is paired,
the thermostat will follow the set
programme.
A Wireless clock signal will be shown by the
flashing symbol.
The thermostat will follow the comfort
temperature value.
The thermostat will follow the reduced
temperature value previously set.
The thermostat will follow the frost
protection setting temperature.
The thermostat is turned OFF.
Careful: In this mode, the pipes in the
property can freeze.
8.11 Power Settings
To set the power of the front
heating panel choose between:
When considering the permanent use of
the radiator at 60°C or 75°C maximum, the
correction factor from the table (right) should
be applied for the output.
E.g. A 1000 Watt single panel programmed
for a maximum surface temperature of 75°C
will deliver maximum 700 Watts. A 1000 Watt
double panel programmed for a maximum
surface temperature of 60°C will deliver
maximum 800 Watts. These values should be
considered when selecting the number and type
of panels to cover the calculated heatlosses.
8.12 Sensor
Please Note: The thermostat sensor is located
at the bottom of the radiator and will only
read the room temperature and not the actual
temperature from the radiator.
1 ~60°C Max ~0.55 ~0.80
2 ~75°C Max ~0.70 ~0.90
3 ~90°C Max 1 1
Setting*
Surface
Temperature
Single
Panel
Double
Panel
*Please refer to Section 7.1 Display, point 2 as to where
this will be shown on the display.
9.0 Key Lock Function
Use this function to prevent any
changes of the settings (in a childs
room, public area…etc.).
lTo activate the Key Lock function, first
press and maintain the validation key (OK)
and then press simultaneously on the left
(<) and right (>) key.
lThe logo will be displayed on the
screen.
lRepeat the same procedure to unlock the
keyboard.
Note: The Key Lock function is
available in all operating modes.
The Timer mode allows the set
temperature and heating period to be
adjusted for a specific time.
This function should only be used to override
the programmed settings.
lFirst adjust the desired setting temperature
with (+) or (-). Press (OK) to start the
function (default value 19°C).
lThen, adjust the duration in hours “H”
if below 24H, then in day “D” with (+)
or (-). Press (OK) to validate (adjustable
1 Hour to 44 days).
The logo will blink and the number of hours
/days left is displayed until the end of the
period.
To stop the Timer function before the
end, set the duration period to “no” with
the (-) key.
8.10 Timed Override Mode
17
Electrorad Digi-LineElectrorad Digi-Line
16
The radiator is equipped with a
“window open” function. This function
will switch the radiator from any active
mode to “Frost Protection” mode when an
open window is detected (room temperature
drops by more than 2°C in less than 30
minutes). The window open icon will start
to blink and continue to blink as long as the
function is active. To return to the previous or
automatic mode push the “OK” key twice. If
no manual intervention has been detected,
the radiator will check automatically, after
30 minutes, if the room temperature has
increased (window has been closed) and if
so, return automatically to the previous or
automatic operating mode.
10.0 Window Open Function
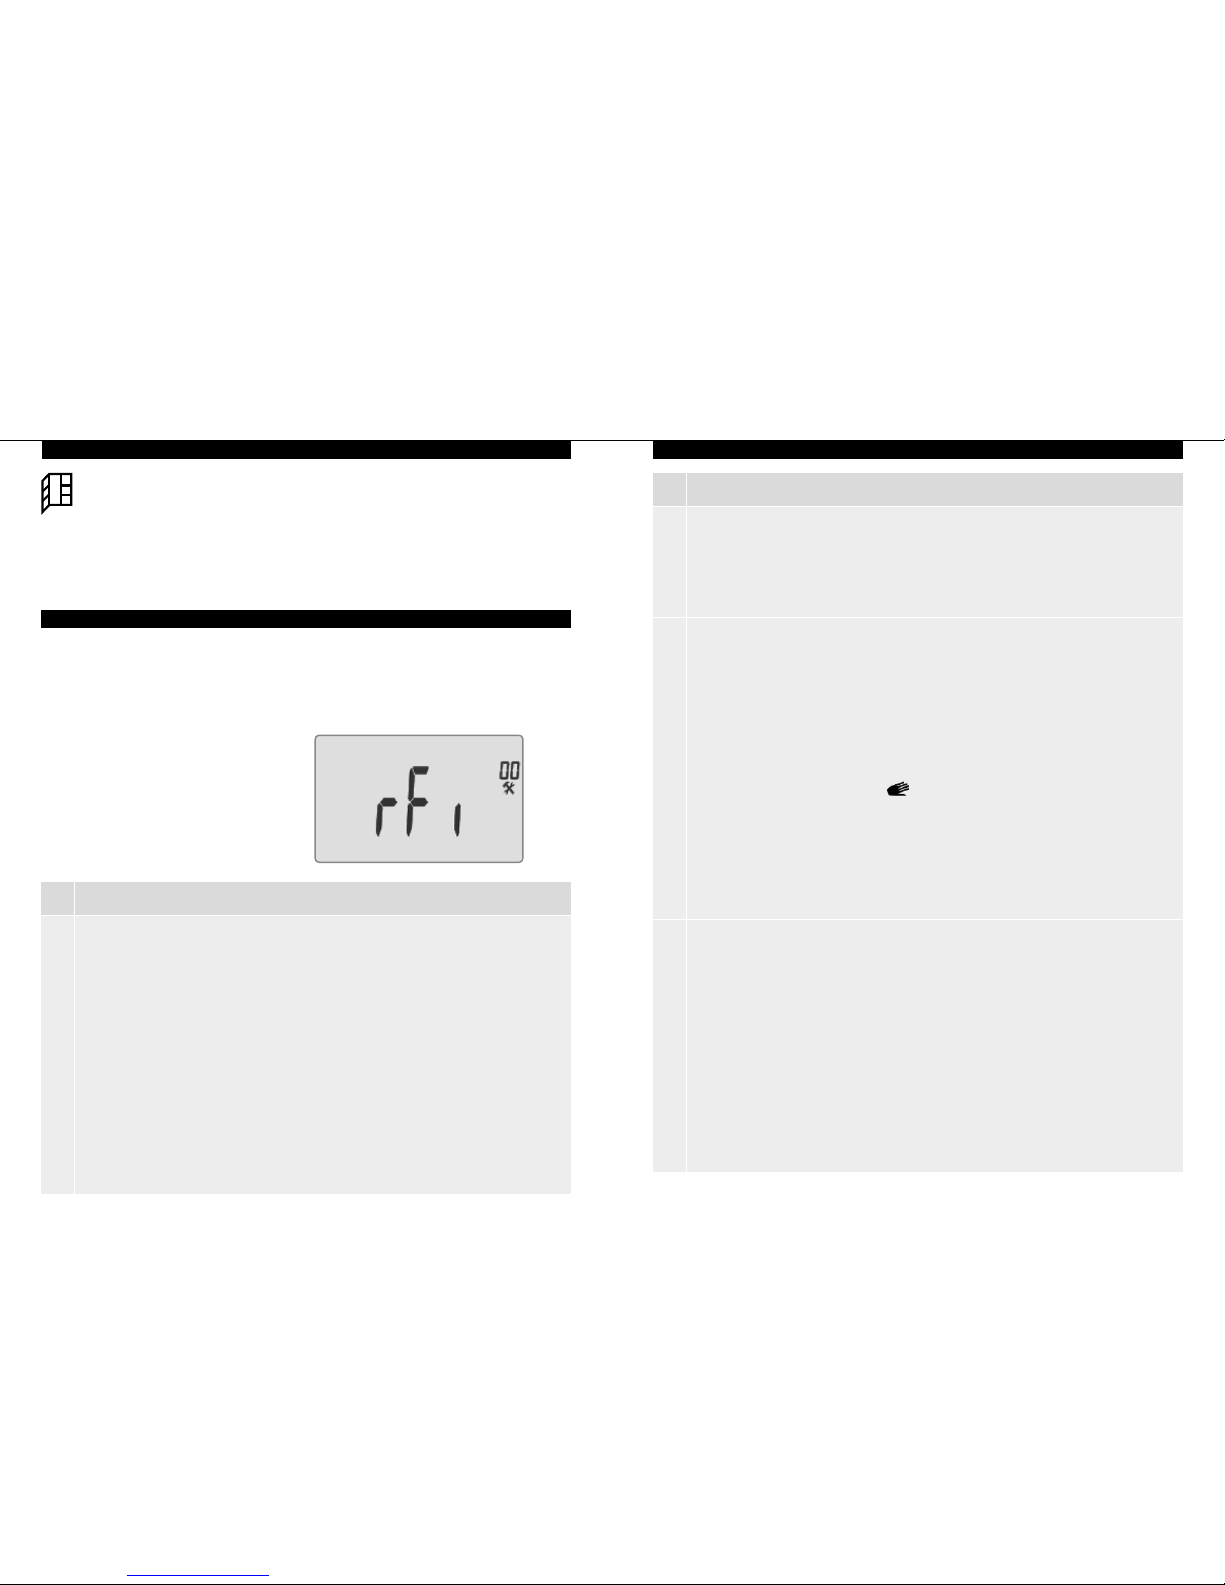
11.0 Parameter’s Menu
Your thermostat has a parameter’s menu.
In order to enter this menu, press and hold
the validation key (OK) for 6 seconds. At 3
seconds, the clock setting screen will appear,
but continue to hold the ‘OK’ key for the
whole 6 second period until, in section 3 of
the LCD display, and ‘rFi’ is displayed on the
screen. Then the parameter menu will appear
and the first menu screen will be displayed
(see opposite).
Parameters can be selected using the
navigation keys (<) or (>). Once the parameter
is chosen, toggle the value with the (OK)
key, modify it with (+) or (-) and confirm your
adjustment with (OK).
To leave the parameter menu, choose the
parameter « End » and press (OK).
N° Default value & other possibilities
00 rF i: Wireless Radio initialization (pairing)
Press “OK” to enter this initialization sequence.
Select with “+” or “-“ the radio communication type and confirm by pressing the
“OK” key:
• rF.un: unidirectional communication - the digital thermostat only receives orders
from an RF programmer.
• rF.bi: bidirectional communication with an Touch E3.
The digital thermostat communicates state and power consumptions to the
Touch E3.
Then the backlight will switch off and the digits will cycle showing that the digital
thermostat is waiting for a radio link signal from an RF programmer or Touch E3 to
be received (press “” to cancel radio initialization). When the radio link signal is
received, pairing is saved, then it will return to Auto mode.
NOTE: Pairing between the devices can be very quick where cycling of the digits
may not be seen.
N° Default value & other possibilities
01
02
03
dEG : Type of Degrees Displayed
Press “OK” to enter this parameter. Select with “+” or “-” and confirm by pressing
the “OK” key:
°C = Celsius
°F = Fahrenheit
__._ : Calibration of the Internal Probe
The calibration must be done after 1 day working with the same setting
temperature in accordance with the following description:
Put a thermometer in the room at 1.5m distance from the floor (like the thermostat)
and check the real temperature in the room after 1 hour.
When you enter the calibration parameter screen the actual temperature value is
displayed.
To enter the value shown on the thermometer, use the “-“ or “+” keys to enter the
real value. At this point the hand icon, in section 12 of the LCD display, will be
displayed and the value will blink. Press the “OK” key to confirm and save. If you
need to erase a calibration already saved use the “-“ or “+” keys to alter the value,
even just by 1°C , then press the left “” navigation key. The hand symbol will
disappear and the factory calibrated temperature reading will be displayed.
NOTE: Only the heating elements (including slave radiators) managed by the
thermostat must be used during the calibration process. Do not have a secondary
heat source in the same room for a period of 24 hours before hand.
SrC : Sequential Control of Front and Back Panel
NOTE: This feature is only applicable to double panel radiators.
Press “OK” to enter this parameter. Select with “+” or “-”and confirm by pressing
the “OK” key:
no: Sequential control function disabled (Front=Back).
YES: Sequential control function enabled. Heat output is prioritised to the front
panel to maximise radiant heat. Thus, the “back” heating element will activate if the
temperature is one degree below the set point, acting as a booster.
NOTE: The rear panel temperature can be considerably lower than the front panel
when this function is enabled.
11.0 Parameter’s Menu (cont...)
19
Electrorad Digi-LineElectrorad Digi-Line
18
N° Default value & other possibilities
04
05
06
07
Software Version
Displays the software version of the digital thermostat.
Wind : Open Window Detection
(the text “U
–ind” is displayed)
Press the “OK” key to enter this parameter. Select with “+” or “-” and confirm by
opressing the “OK” key:
no: open window detection function disabled.
YES: open window detection function enabled. The , in section 13 of the LCD
display, is constantly displayed. This function will switch the radiator from any active
mode to “Frost Protection” mode when an open window is detected (room
temperature drops by more than 2°C in less than 30 minutes). The open window
icon will start to blink, and continue to blink as long as the function is active.
To return to the previous or automatic mode, press the “OK” key twice. If no
manual intervention has been detected, the radiator will check automatically if
the room temperature has increased (window has been closed) and if so, return
automatically to the previous or automatic operation mode.
ItCS : Adaptive Start
Press the “OK” key to enter this parameter. Select with “+” or “-” and confirm by
opressing the “OK” key:
no: adaptive start function disabled. Heating up to reach the Comfort set
temperature will start at the programmed time.
YES: adaptive start function enabled. Heating up will start at the predicted optimal
time to reach the Comfort set temperature at the programmed time.
NOTE: Heating start times will vary for each heating period when this function
is enabled.
SLA : Master/Slave Set-up
Set this function to ‘no’ for normal operation.
11.0 Parameter’s Menu (cont...)
N° Default value & other possibilities
08
09
CLr : Factory Setting
Press and hold the “OK” key for 6 seconds to reset Set point temperatures and all
user parameters in this menu to factory default settings.
NOTE: Pairing with the RF programmer or Touch E3 will be lost.
The screen will go blank, the LCD screen will illuminate and all segments will be
displayed for a few seconds, then disappear, before displaying the software version.
The product will then enter into time setting mode. If the time is not set within
60 seconds, the time will be set to the default values of 00:00 and Day 1. The
“Comfort” mode screen will appear.
End : Exit the Parameter Menu
Press the “OK” key to exit installation parameter menu and return to
normal operation.
11.0 Parameter’s Menu (cont...)
12.0 Technical Characteristics
Environmental:
Operating temperature
Shipping and storage temperature
Electrical protection
Setting temperature range:
Comfort
Reduced
Frost Protection
Power Supply
Norms and directives:
Your thermostat was designed in
accordance with the following European
norms and directives:
-10°C - +50°C
-30°C to +70°C
Class 1 - IP44
Between 5.5°C and 30°C must be
higher than reduced mode setting
Between 5°C and 19°C must be less
than comfort mode setting
Between 0.5°C and 10°C
230Vac +/- 10% 50Hz
ECO Directive 2009/125/EC
2006/95/CE - Low Voltage
2004/108/CE - EMC
EN60335-1 - Heaters
R&TTE 1999/5/CE - RF
2002/95/CE - RoHS
21
Electrorad Digi-LineElectrorad Digi-Line
20
13.0 Troubleshooting & Solution
Q: My Thermostat doesn’t work.
lCheck the power supply.
lContact your installer.
A:
Q: My Thermostat shows an Error message “Err” blink on the display.
The text “Err” flashes.
Error detected on the internal sensor.
lContact your installer or seller.
A:
Q: My Thermostat seems to work correctly but the heating doesn’t work correctly.
lIs there a window open next to the radiator that is not heating?
Check the settings in Parameter 05 (on page 18).
lContact your installer.
A:
Q: The front heating panel is cooler than the back panel.
lCheck the power settings as indicated in section 8.11 (on page 15).
A:
Q: My Thermostat seems to work correctly but the temperature in the room
is not in accordance with the programme.
lCheck the Clock.
lThe difference between Comfort & Reduced temperature is too high.
lProceed with a calibration of internal probe (see parameter 02 on page 17).
A:
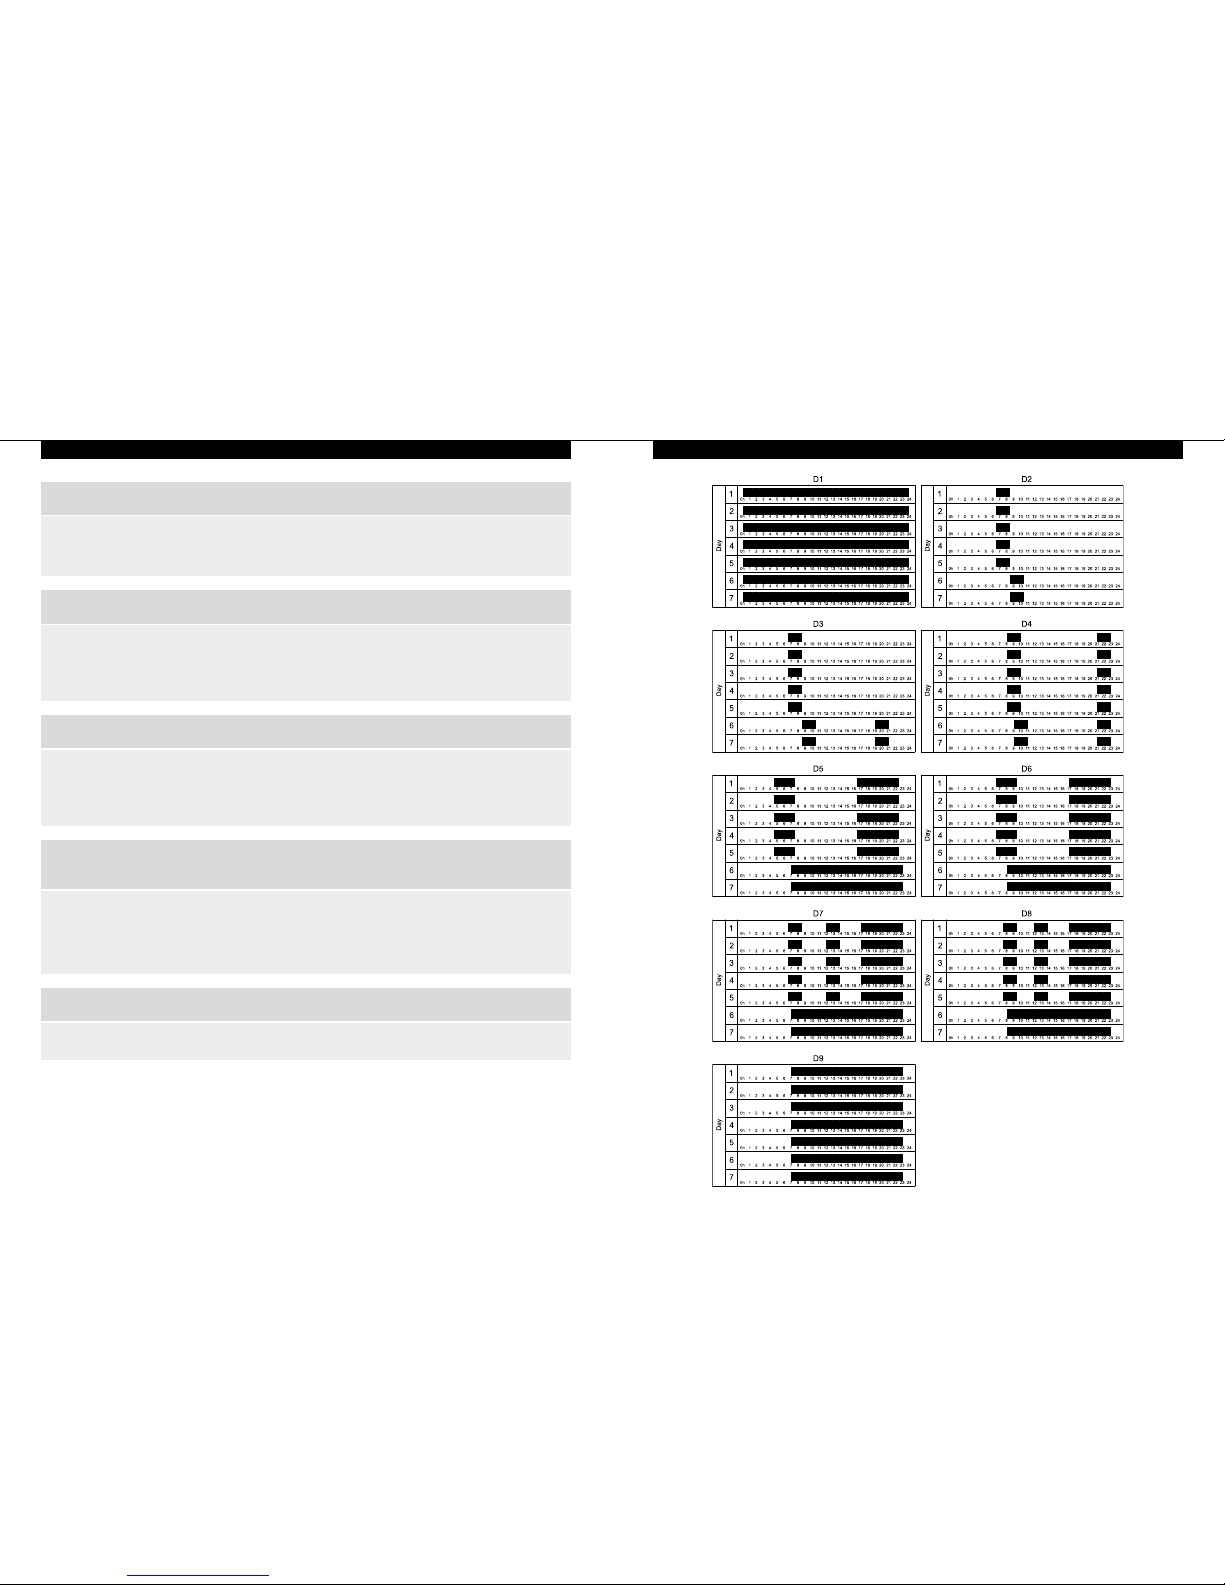
14.0 Preset Programmes
23
Electrorad Digi-LineElectrorad Digi-Line
22
15.0 Eco Directive Characteristics
Model identifier(s): DExxxxxx or DExxxxxxP where “x” may be any character.
Item Symbol Value Unit
Heat Output
Nominal heat output where "xxxxxx" = 30SC40 Pnom 0.25 kW
Nominal heat output where "xxxxxx" = 30SC80,
50SC55, 30DX50, or 50DX40 Pnom 0.50 kW
Nominal heat output where "xxxxxx" = 30SC110,
50SC80, 30DX80, or 50DX50 Pnom 0.75 kW
Nominal heat output where "xxxxxx" = 30SC150,
50SC105, 30DX100, or 50DX65 Pnom 1.00 kW
Nominal heat output where "xxxxxx" = 50SC130,
30DX130, or 50DX80 Pnom 1.25 kW
Nominal heat output where "xxxxxx" = 30DX160
or 50DX95 Pnom 1.50 kW
Nominal heat output where "xxxxxx" = 30DX200
or 50DX125 Pnom 2.00 kW
Minimum heat output (indicative) Pmin N.A. kW
Nominal heat output where "xxxxxx" = 30SC40 Pmax,c 0.25 kW
Nominal heat output where "xxxxxx" = 30SC80,
50SC55, 30DX50, or 50DX40 Pmax,c 0.50 kW
Nominal heat output where "xxxxxx" = 30SC110,
50SC80, 30DX80, or 50DX50 Pmax,c 0.75 kW
Nominal heat output where "xxxxxx" = 30SC150,
50SC105, 30DX100, or 50DX65 Pmax,c 1.00 kW
Nominal heat output where "xxxxxx" = 50SC130,
30DX130, or 50DX80 Pmax,c 1.25 kW
Nominal heat output where "xxxxxx" = 30DX160
or 50DX95 Pmax,c 1.50 kW
Nominal heat output where "xxxxxx" = 30DX200
or 50DX125 Pmax,c 2.00 kW
Auxiliary electricity consumption
At nominal heat output EImax 0.00 kW
At minimum heat output EImin N.A. kW
In standby mode EISB <0.001 kW
Item Unit
Type of heat output, for electric storage local space
heaters only
Manual heat charge control with integrated thermostat N.A.
Manual heat charge control with room and/or outdoor
temperature feedback N.A.
Electronic heat charge control with room and/or outdoor
temperature feedback N.A.
Fan assisted heat output N.A.
Type of heat output/room temperature control
Single stage heat output and no room temperature control No
Two or more manual stages, no room temperature control No
With mechanic thermostat room temperature control No
With electronic room temperature control No
Electronic room temperature control plus day timer No
Electronic room temperature control plus week timer Yes
Other control options
Room temperature control, with presence detection No
Room temperature control, with open window detection Yes
With distance control Yes
With adaptive start control Yes
With working time limitation No
With black bulb sensor No
Contact details ELECTRORAD UK LTD Unit 1, Clayton Park, Clayton Wood Rise, West Park, Leeds, LS16 6RF
15.0 Eco Directive Characteristics (cont...)
Table of contents


