argon audio Stream 3 MK2 User manual

w w w . a r g o n a u d i o . c o m
1
Stream 3MK 2
Argon Audio is a Danish audio company founded over 20 years ago with a clear goal:
to deliver high quality products at value-for-money prices. Today, all Argon Audio
products are designed and engineered in Denmark and carefully crafted to deliver a
level of performance that punches way above their respective price classes –and
always with a Scandinavian design aesthetic.
Congratulations with your Stream 3 MK2, may it bring you years of enjoyment.

w w w . a r g o n a u d i o . c o m
2
Stream 3MK 2
Table of Contents
1. Introduction......................................................................................................................................3
1.1 Safety.................................................................................................................................................................... 3
1.2 Features................................................................................................................................................................ 3
1.3 Carton contents ................................................................................................................................................... 3
1.4 External resources ............................................................................................................................................... 3
1.5 Conventions used in this manual........................................................................................................................ 3
2. Controls, connectors and display.......................................................................................................4
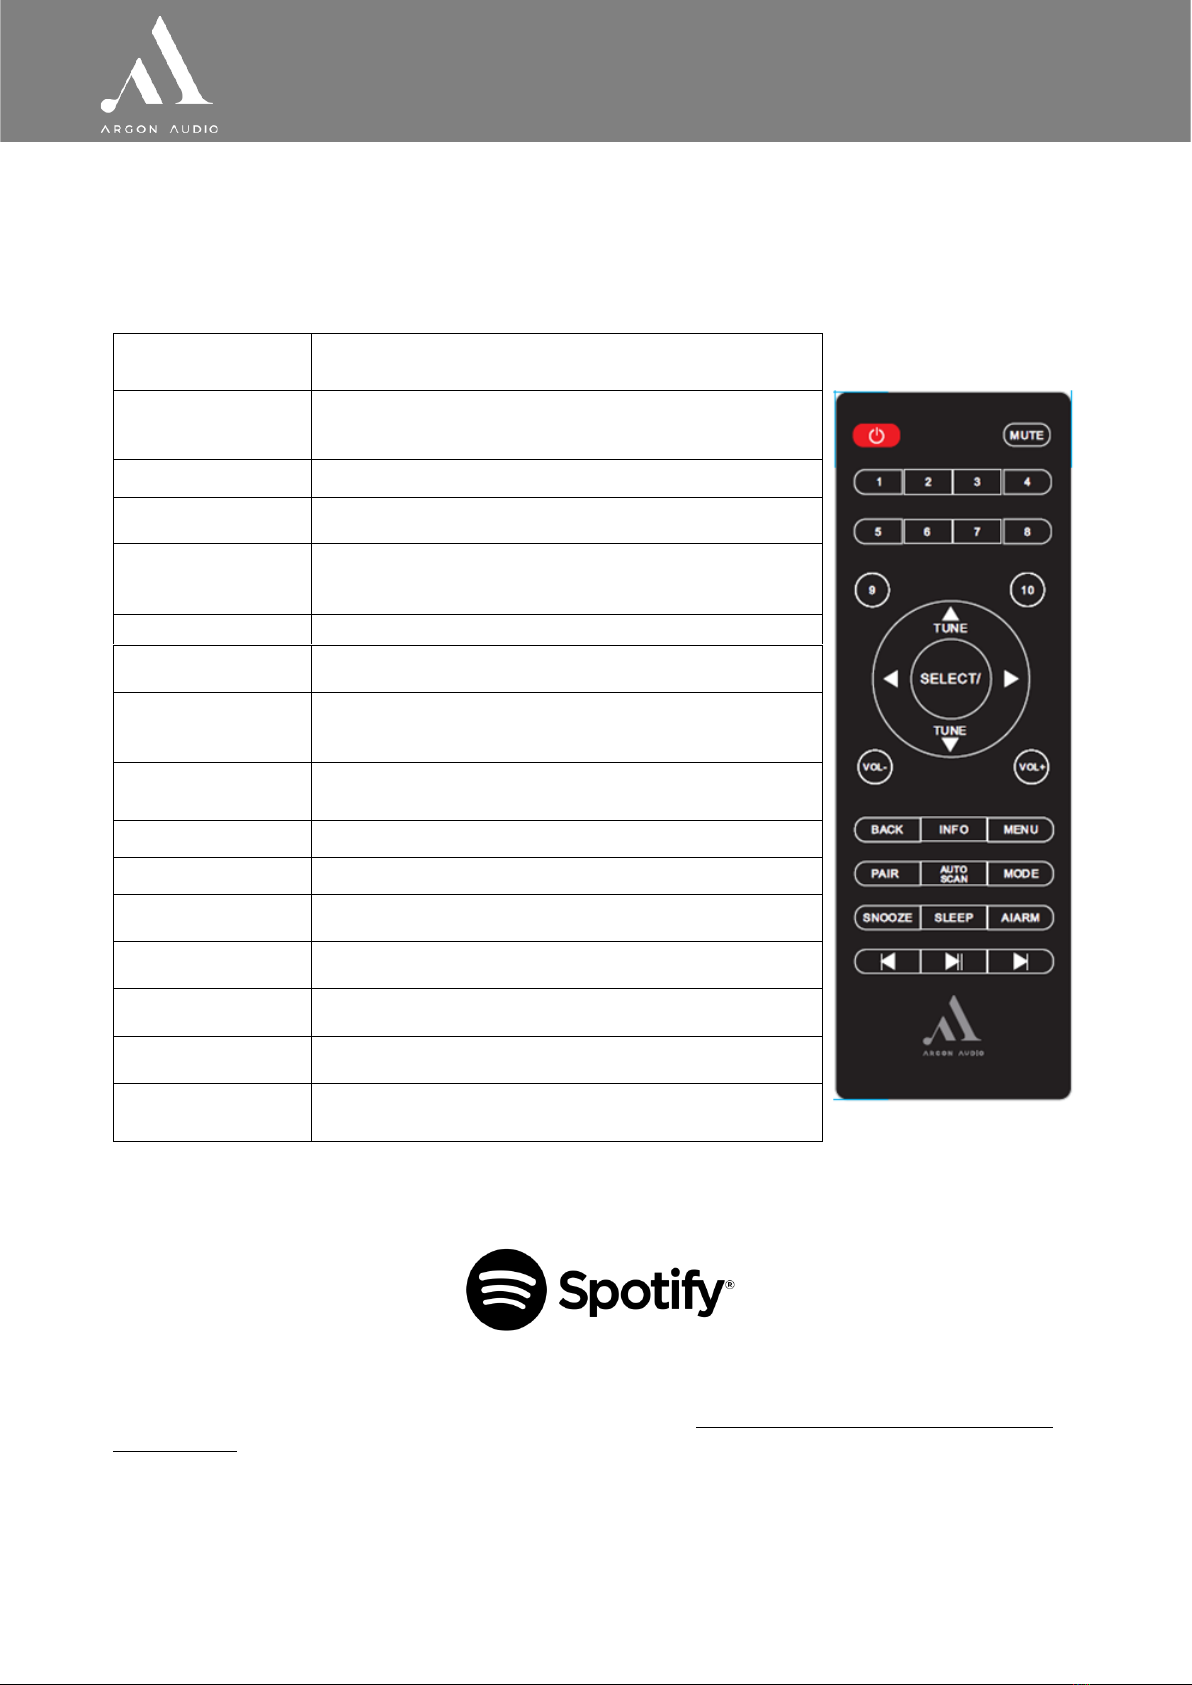
2.1 Main controls ....................................................................................................................................................... 4
2.2 Spotify Connect Control and playback ............................................................................................................... 4
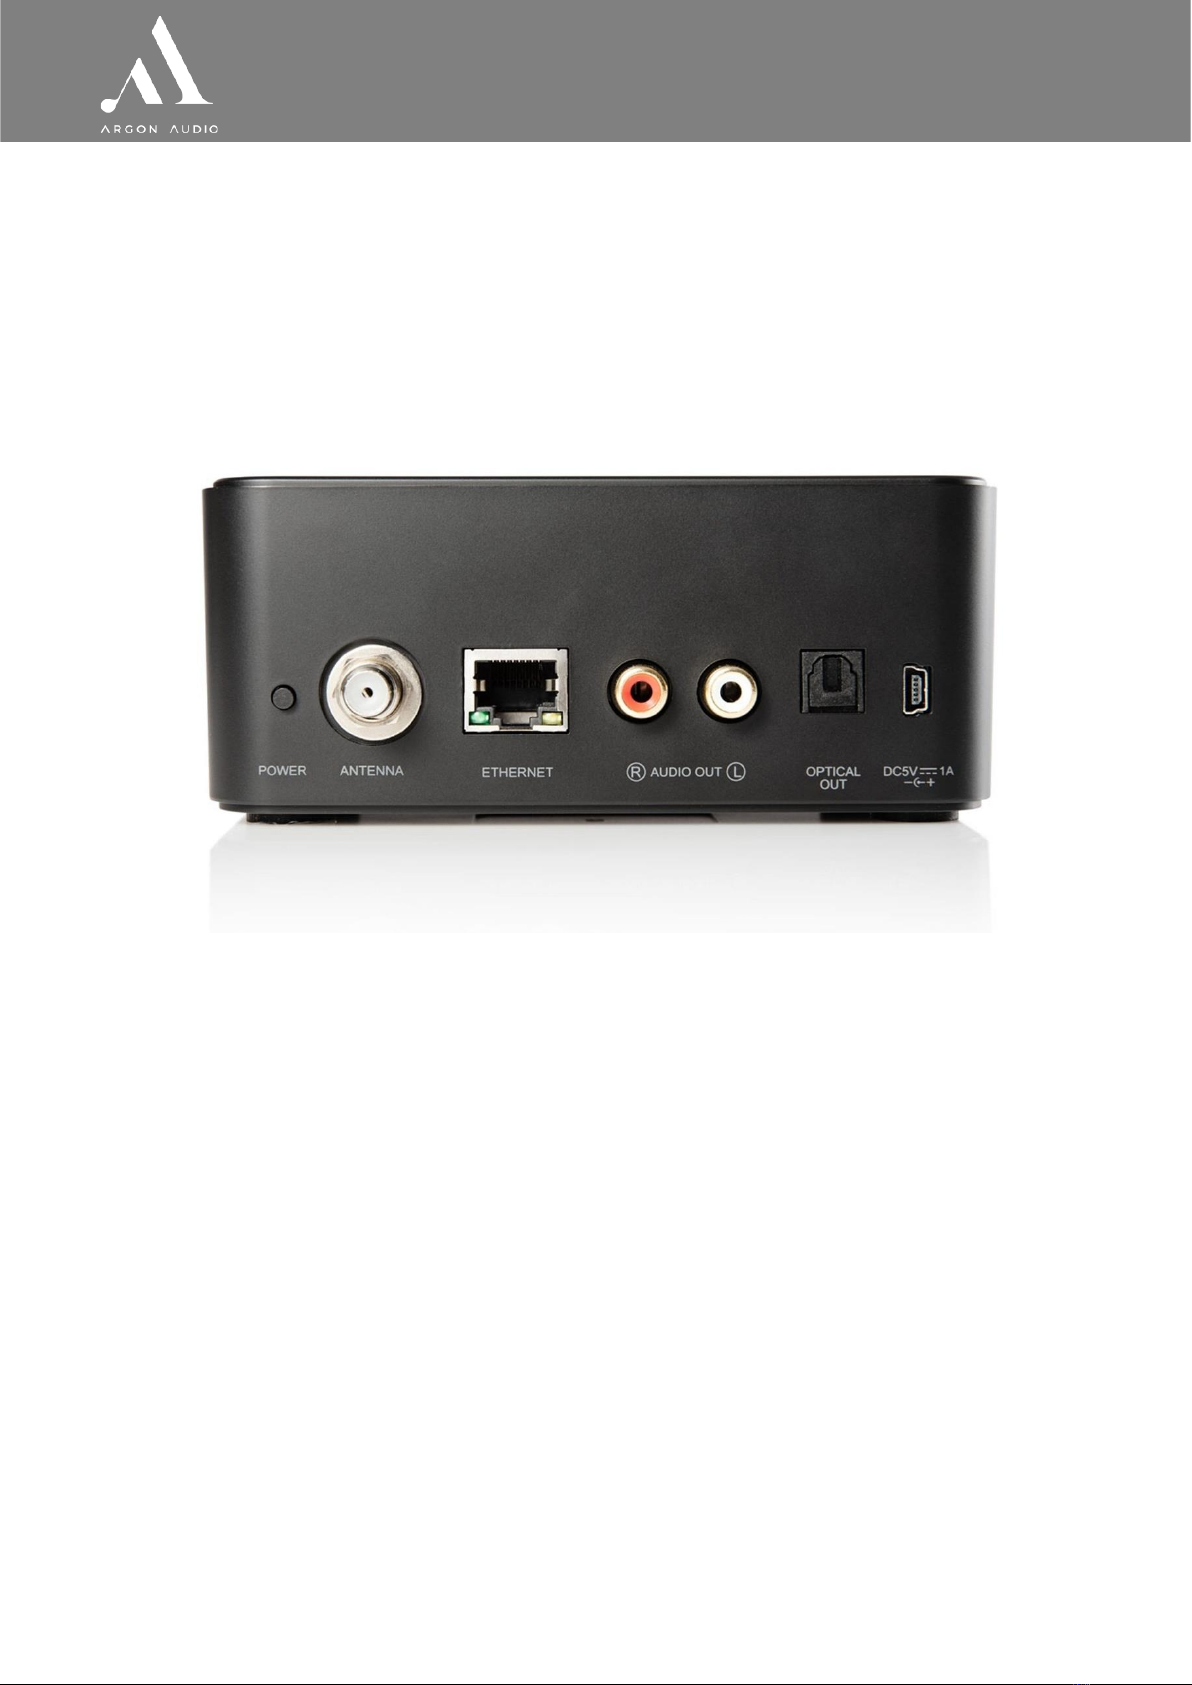
2.3 Connectors ........................................................................................................................................................... 5
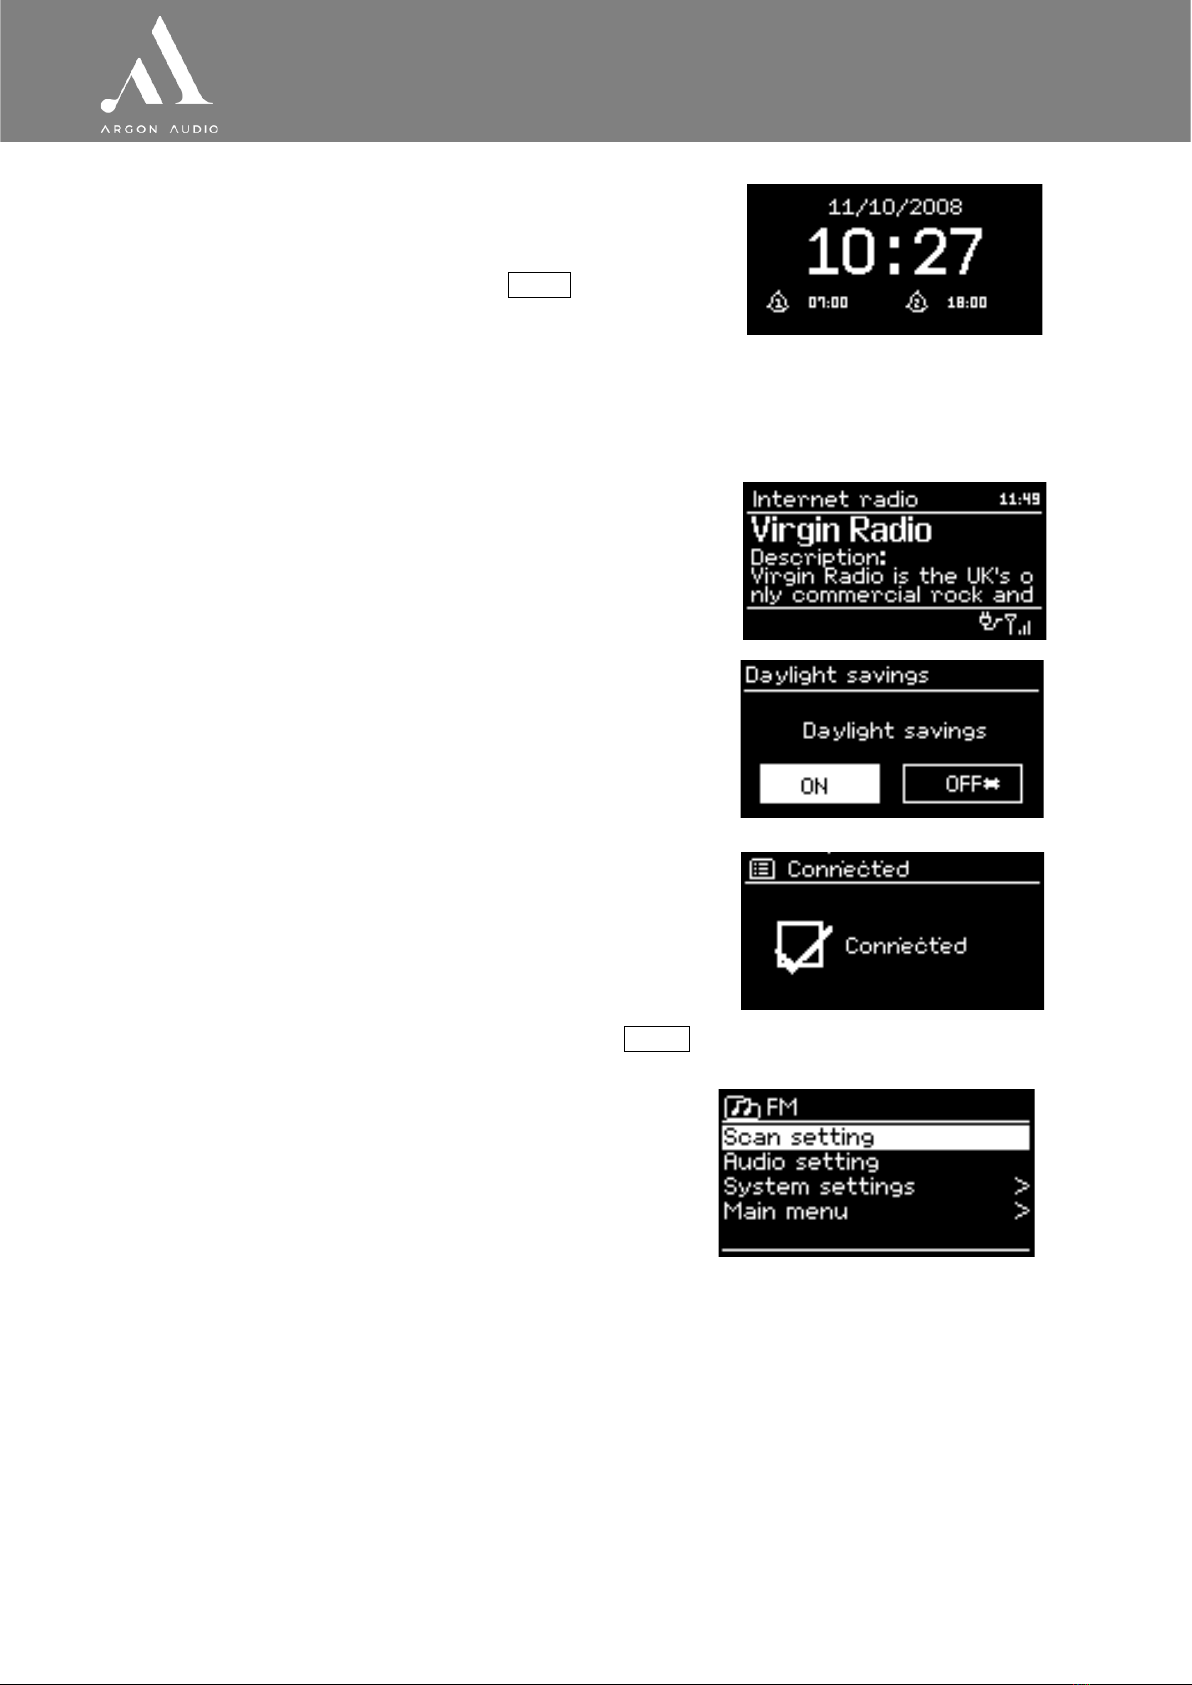
2.4 Screen................................................................................................................................................................... 5
3. Getting started..................................................................................................................................7
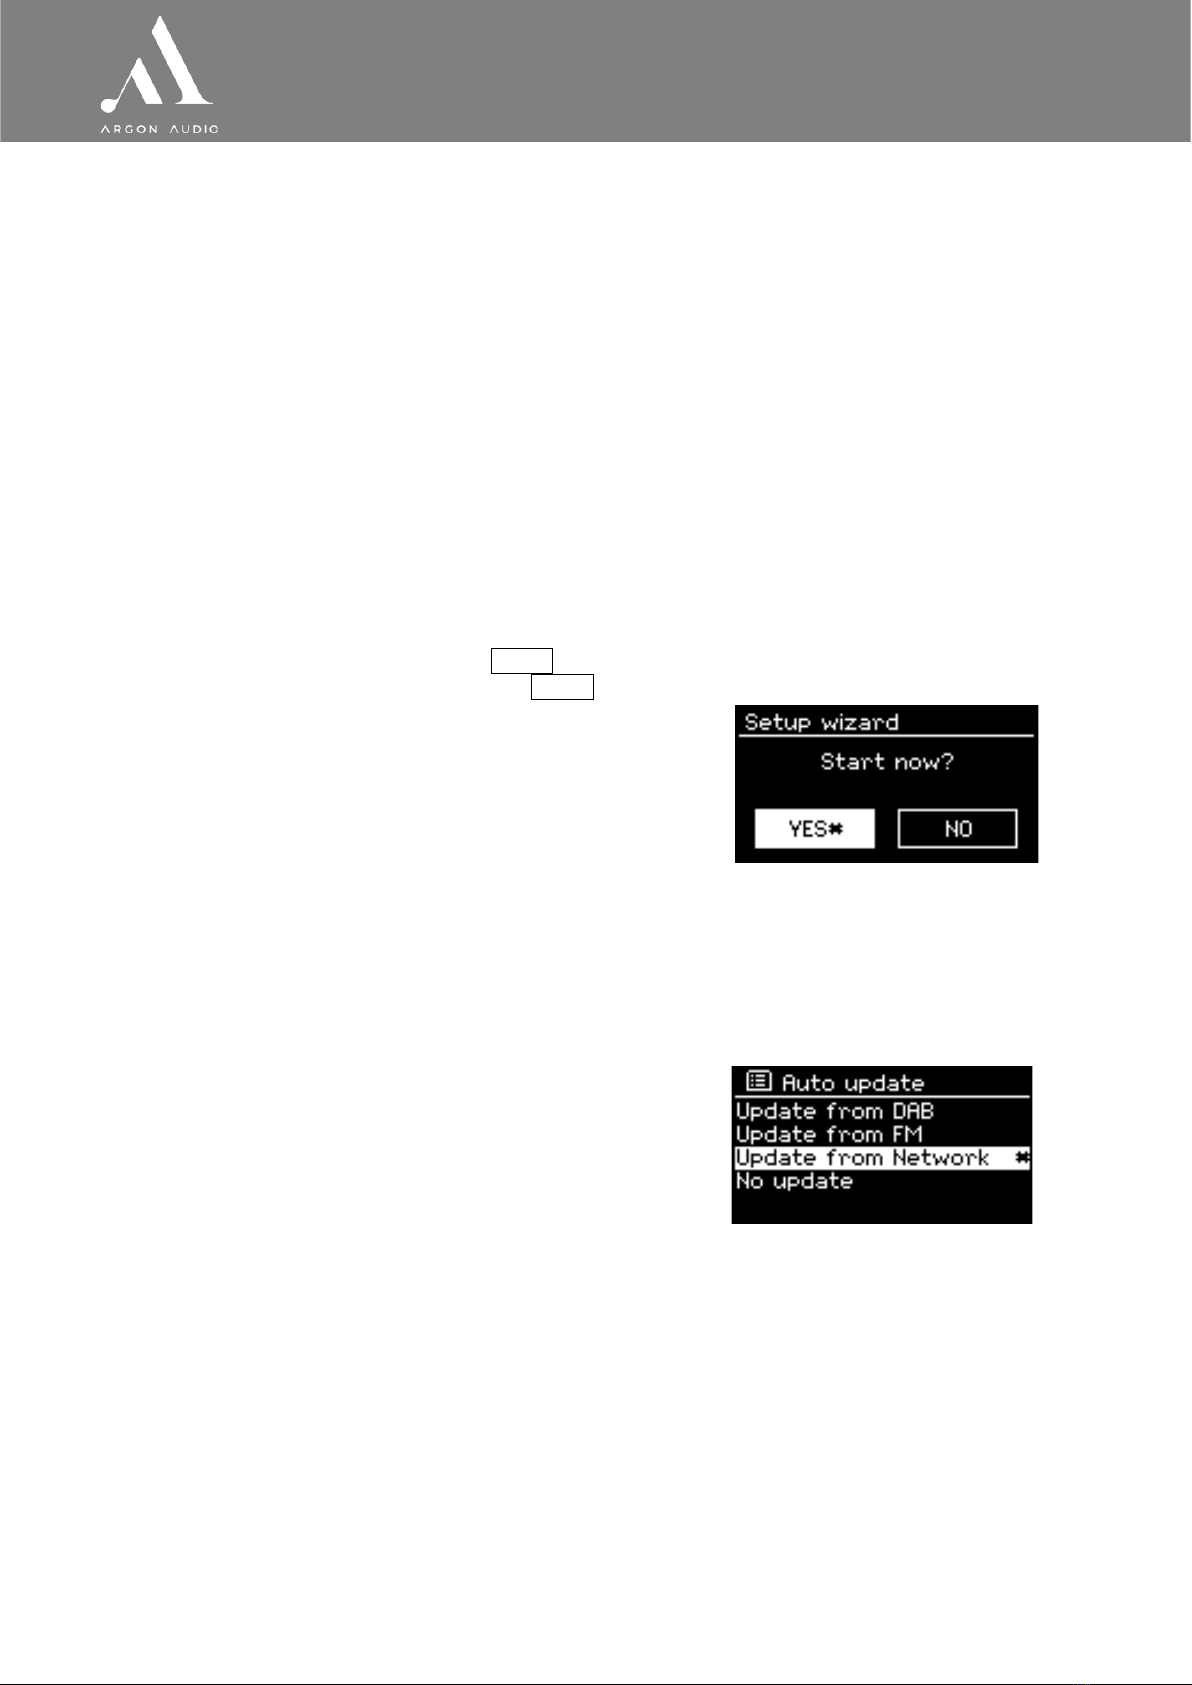
3.1 Setup wizard......................................................................................................................................................... 7
3.1.1 12/24 hour display ...............................................................................................................................................7
3.1.2 Auto-update (time) ...............................................................................................................................................7
3.1.3 Network.................................................................................................................................................................8
4. Setup................................................................................................................................................8
4.1 Equaliser............................................................................................................................................................... 8
4.2 Streaming audio quality....................................................................................................................................... 9
4.3 Network ................................................................................................................................................................ 9
4.4 Language.............................................................................................................................................................. 9
4.5 Factory reset ........................................................................................................................................................ 9
4.6 Software update................................................................................................................................................... 9
4.7 Setup Wizard ........................................................................................................................................................ 9
4.8 Info ..................................................................................................................................................................... 10
4.9 Backlight............................................................................................................................................................. 10
5. Internet Radio/Podcast mode..........................................................................................................10
5.1 Last listened....................................................................................................................................................... 10
5.2 Station List ......................................................................................................................................................... 10
5.2.1 <Local area> - dependent on radio device’s location, for example: Denmark ................................................10
5.2.2 Search .................................................................................................................................................................10
5.2.3 Location ..............................................................................................................................................................11
5.2.4 Popular................................................................................................................................................................11
5.2.5 Discover ..............................................................................................................................................................11
5.3 Now Playing information ................................................................................................................................... 11
5.4 Presets................................................................................................................................................................ 11
6. DAB radio mode..............................................................................................................................11
6.1 Scanning for stations......................................................................................................................................... 12
6.2 Selecting stations .............................................................................................................................................. 12
6.3 Presets................................................................................................................................................................ 12
6.4 Now playing information ................................................................................................................................... 12
6.5 Settings............................................................................................................................................................... 12
6.5.1 Dynamic range compression.............................................................................................................................12
6.5.2 Station order .......................................................................................................................................................12
7. FM radio mode................................................................................................................................13
7.1 Selecting stations .............................................................................................................................................. 13
7.2 Presets................................................................................................................................................................ 13
7.3 Now playing information ................................................................................................................................... 13
7.4 Settings............................................................................................................................................................... 13
8. Alarms and sleep ............................................................................................................................14
8.1 Alarms ................................................................................................................................................................ 14
8.2 Sleep ................................................................................................................................................................... 14
9. Inactive standby..............................................................................................................................14
10. Troubleshooting and error messages ............................................................................................15
10.1 Error messages................................................................................................................................................ 15
10.2 Troubleshooting............................................................................................................................................... 16

w w w . a r g o n a u d i o . c o m
3
Stream 3MK 2
1. Introduction
1.1 Safety
Safety Instructions
Please store this instruction manual for future reference.
•Do not use this product near water or moisture. Clean only with a dry cloth. Unplug this product from the wall outlet before
cleaning.
•Place the unit on a solid surface.
•Do not put it in a closed bookcase or a cabinet that may keep air from flowing through its ventilation openings.
•Do not install near any heat sources, such as radiators, heat registers, stoves or other appliances that produce heat.
•Protect the power cord from being walked on or pinched, particularly at plugs and the point where they exit from the product.
•Servicing is required when the product has been damaged. Do not attempt to service this product yourself. Opening or
removing covers may expose you to dangerous voltages or other hazards. Please contact the manufacturer to be referred to
an authorized service center near you.
•To prevent risk of fire or electric shock, avoid over loading wall outlets, extension cords, or integral convenience receptacles.
•Do not let objects or liquids enter the product.
•Use proper power sources. Plug the product into a proper power source, as described in the operating instructions or as
marked on the product.
1.2 Features
This guide describes how to use the Argon Audio Stream 3 MK2 internet radio, an advanced but easy-to-use Wi-Fi
connected audio system with the following modes:
•DAB+/FM broadcast radio covering local digital and analogue radio stations
•Internet Radio with access to over 20,000 stations, ‘Listen again’ broadcasts
•Podcasts with access to global podcasts
•Spotify Connect playback and control via the Spotify app
•Bluetooth - streaming and control from a Bluetooth Smart device
Stream 3 MK2 also provides the following features:
•Large 2.7 inch color display for easy control and clear information display
•Remote control from an Android or iOS Smart Device, using Spotify
•Sleep/snooze
•Multiple languages
1.3 Carton contents
We have during production and packing carefully checked and inspected the unit. After unpacking, please check for
any damage from transport. We recommend that you keep the original carton box and packing material for any
future shipping.
In the carton box you will find
•Argon Audio Stream 3 MK2
•DC5V 1A power adapter
•Quick Start Guide
•Antenna cable and RCA connection cable
•Remote control
1.4 External resources
To operate Stream 3 MK2, the following external resources are needed:
•A power source (100-240 V mains supply)
•A wireless (Wi-Fi) or wired (LAN) network with appropriate permissions and
•An iOS or Android device (for using control apps or Spotify)
1.5 Conventions used in this manual
Button (press) Physical button on the remote
Option (select) Menu option shown on the display
Name Menu, screen or other name

w w w . a r g o n a u d i o . c o m
4
Stream 3MK 2
2. Controls, connectors and display
2.1 Main controls
The Stream3M is fully and only controlled from the remote control. There are no operating controls on
Stream3M itself.
[1] Some buttons have alternate functions depending on whether they are pressed quickly or held down.
2.2 Spotify Connect Control and playback
Use your phone, tablet or computer as a remote control for Spotify. Go to spotify.com/connect to learn how.
The Spotify Software is subject to third party licenses found here: https://www.spotify.com/connect/third-
party-licenses
Notice: When you stop playback on your Spotify device, Stream 3 MK2 will show “no media” in the display.
To get back to Internet Radio, DAB etc., you need to press the MODE button on the Stream 3 MK2.
Remote
Buttons
Function/usage
Power
Red button top left - Standby: Turn on or back to
standby mode (showing clock and date). Cancels sleep
function.
MUTE
Press to mute or unmute the sound
Buttons 1-10
Presets to stores stations: Press for the Preset
recall/Save menu. Hold to save a preset.
Arrow
TUNE/SELECT
Press to scroll through a menu or station list. The
chosen option is highlighted in reverse text (dark
characters on a white background). Press to select.
VOL+/-
Turn to adjust the volume up or down
BACK
Return to previous screen. In play mode, this button may be used to return
the last track list or station list
INFO
View more information about the station or track
playing. Press again to cycle through further information
screens then return to the normal Now playing screen
MENU
Show menu for the current mode. Press again to show
Now playing screen.
PAIR
Press to pair a Bluetooth device
AUTO SCAN
Press to scan stations in DAB or FM mode
MODE
Cycle through the modes: Internet Radio, Music player,
DAB, FM, Bluetooth
SNOOZE
Press Sleep/snooze: When playing, standby after a set
time
SLEEP
Set time interval for the Stream3 to turn off
automatically
ALARM
Enters alarm wizard, turns off alarm (when alarm is
sounding) and toggles between alarms in standby.
Skip/play/pause
Symbol buttons at the bottom of the remote. Skip, stop
or play in Music player mode.

w w w . a r g o n a u d i o . c o m
5
Stream 3MK 2
2.3 Connectors
As shown below Stream 3 MK2 has connectors (from left to right) for the following:
•Power button
•DAB/FM antenna
•Ethernet/LAN cable to router
•RCA/Line out (for external amplifier)
•Optical output for digital connections
•DC power in
2.4 Screen
The screen shows various menus, dialogues and displays, as described below.
There are basically six types of displays:
•Standby (clock)
•Splash (mode)
•Now playing
•Dialogue
•Error/Information
•Menu
When text is too long to fit on the screen, it is first shown truncated, then, after a few seconds,
slowly scrolls so that you can read it all.

w w w . a r g o n a u d i o . c o m
6
Stream 3MK 2
The Standby screen shows the time, date and any active
alarm times.
As you cycle through the play modes using Mode ,
Stream 3 MK2 shows a splash screen for each mode.
After one second, Stream 3 MK2 enters the selected
mode and tries to start playing the last station or track
that was playing in that mode. If this is not possible,
Stream 3 MK2 tries to connect to the selected source by
scanning for stations, networks, or prompting for user
input as appropriate.
Now playing screens show information about the audio
source and track now playing, where available.
Dialogue screens are shown to allow the user to change
settings. They vary in complexity from simple Yes/No
options up to the scrollable network password input
screen.
As with menus, the selected item is shown with a white
background.
Dialogue screens mark the current setting with an
asterisk (*).
Error/Information screens give specific messages for a
few seconds, then change automatically to another
screen.
Menus
Stream 3 MK2 has basically three types of menu. Use the Select control to step through and select options.
A scroll bar on the right of the screen shows if there are further options above or below those visible.
Each mode has a Mode menu, with options specific to that mode.
For example, the FM mode menu has just two options:
Scan setting and Audio setting.
In addition, each mode menu has two final options:
System settings > and Main menu >.
The ‘>’ indicates options leading to further menus.
The System settings menu allows access to system settings and information such as network,
time, language and software update. Menus with more options than will fit on one screen have a
scroll bar to the right.
The Main menu allows access to all modes plus sleep and timer functions.
Some menus, for example the System settings menu, have several submenus.

w w w . a r g o n a u d i o . c o m
7
Stream 3MK 2
3. Getting started
Although the Stream 3 MK2 is sophisticated, getting started is simple. To play DAB or FM radio or Bluetooth
audio, all you need is a power source (a 100-240V mains supply).
For Internet-connected modes such as Internet radio or Spotify Connect, you also need an internet
connection.
To set up the Stream 3 MK2:
1. Place Stream 3 MK2 on a suitable shelf or table
2. Connect the power adaptor between Stream 3 MK2 and the mains supply.
3. To receive broadcast radio (DAB and FM), plug in the supplied antenna cable.
The setup wizard starts.
3.1 Setup wizard
When Stream 3 MK2 is started for the first time, it runs through a
setup wizard to configure settings for date/time and network.
Once this has finished, the system is ready to use in most modes.
Note: To change these settings later, select Menu > System
settings >. To run the setup wizard again, select Menu > System
settings > Setup wizard.
Select Yes to start the setup wizard.
If you choose No, the next screen asks if you would like to run the
wizard next time Stream 3 MK2 is started. The system then starts
without configuring time/date and network settings and enters
the Main Menu.
Note: If power is removed while the wizard is in progress, the
wizard will run again next time Stream 3 MK2 is started.
3.1.1 12/24 hour display
To change between 12 and 24 hour display, select Set 12/24 hour and then select your preference.
3.1.2 Auto-update (time)
Auto-update works with data sent over DAB, FM or the Internet. The
clock is only updated when in a corresponding mode, so it is best to
select a mode you use regularly.
DAB and FM use time signals broadcast with
radio transmissions.
Network uses a time signal sent from the Frontier Silicon Internet
radio portal when in any network-connected mode.
1. Select Update from DAB, Update from FM, Update from Network or No update.
2. If you are updating from the network, set your time zone.
3. If your country uses daylight saving, the automatically updated time from the network may be
wrong by one hour. When daylight savings are in effect (during the winter), turn on the Daylight
savings option to rectify this.
Note that if you are updating the time from DAB or FM, the Daylight savings option has no effect on the
clock’s time.

w w w . a r g o n a u d i o . c o m
8
Stream 3MK 2
Stream 3 MK2 will auto-update from the selected source when time information is available.
Manual set
If you set No update, the wizard now prompts you to set the time and date manually.
The date and time are displayed as dd-mm-yyyy and hh:mm AM/PM with
the first value, dd, active (flashing).
Adjust each value with the Select control. As each value is set, the next
value becomes active and flashes.
3.1.3 Network
Stream 3 MK2 is compatible with all common network protocols and encryption methods.
To connect Stream 3 MK2 to your network, you need a Wi-Fi wireless router, together with password key (if
set).
Select WLAN region/country > Wi-Fi network
(SSID), and then select a network from the list.
If the network is open (non-encrypted), Stream 3 MK2 connects
without any further ado; see Completion below.
Standard encrypted network
To enter the network’s key (password), use the Select
control to move the cursor through the characters and
select.
As each character is selected, the key is built up near the
top of the display.
There are three options accessible by turning Select
back before the first characters (0123…)
–Backspace, OK and Cancel.
Completion
Stream 3 MK2 tries to connect to the selected network. If
connecting fails, Stream 3 MK2 returns to a previous screen to try
again. If the network connection is lost, Stream 3 MK2
automatically tries to reconnect.
4. Setup
4.1 Equaliser
Several preset EQ modes are available; including a user-defined
setting. To adjust the EQ, select Menu > System settings >
Equaliser or press the eq-button.
You can then choose from a variety of preset modes or create your
own, with custom bass, treble and loudness settings.

w w w . a r g o n a u d i o . c o m
9
Stream 3MK 2
4.2 Streaming audio quality
•Low quality
•Normal quality
•High quality
Select the required level of audio quality for the available streaming services. The actual bit rate for each
level depends on the service being used. The currently set quality level is indicated with an asterisk.
4.3 Network
Stream 3 MK2 remembers the last four wireless networks it has connected to, and automatically tries to
connect to whichever one of them it can find.
You can see the list of registered networks through Menu > System settings > Network >
Network profile >. From here you can delete unwanted networks by turning and pressing Select then
confirming delete Yes.
There are also other options for viewing and manually altering network settings from Menu > System
settings > Network. Users experienced with networking may find these options useful for diagnosing and
fixing network problems.
4.4 Language
The default language is English. To change, select Menu > System settings > Language > then select your
preferred language. Please restart the radio after changing languages.
4.5 Factory reset
A factory reset resets all user settings to default values, so time/date, network configuration and presets are
lost. However, the radio’s current software version is maintained.
To perform a factory reset, select Menu > System settings >Factory reset Proceed > Yes.
4.6 Software update
From time to time, Argon Audio may make software upgrades available with bug fixes and/or additional
features. You can either check manually, or set Stream 3 MK2 to check periodically automatically (this is the
default). If Stream 3 MK2 detects that newer software is available, it asks if you want to go ahead with an
update. If you agree, the new software is then downloaded and installed. After a software upgrade, all user
settings are maintained.
CAUTION: Before starting a software upgrade, ensure that Stream 3 MK2 is plugged into a stable mains
power connection. Disconnecting power during a software update may permanently damage the unit.
To turn automatic checking on or off, select Auto-check setting.
4.7 Setup Wizard
This allows you to run the Setup wizard at any time. The wizard guides you through the essential settings
in the following order:
1. Date/Time –Set format
2. Auto update –select clock update source or No Update
3. Set Time/Date (this step is only needed if the ‘No Update’ option is selected in Auto update)
4. Network wizard automatically runs
Once you are connected to a network the wizard is completed.

w w w . a r g o n a u d i o . c o m
10
Stream 3MK 2
4.8 Info
Shows details of the current system including:
•SW Version: Software version number
•Radio ID: Unique code used to identify this particular radio device
•Friendly name: (name by which the radio is identified on a network).
4.9 Backlight
You can adjust the backlight of the radio to your liking, with settings for when the radio is on and in operation
(Operation Mode) and when the radio is off (Standby Mode).
For Standby Mode, you can also adjust Timeout, meaning the time it will take before the LED display will dim
to the selected Standby Level.
5. Internet Radio/Podcast mode
Stream 3 MK2 can play thousands of radio stations and podcasts from
around the world though a broadband Internet connection.
When you select Internet radio mode, Stream 3 MK2 contacts the Internet
radio portal to get a list of stations, organised into different categories
like Country, Popular and Genre. Once you select a station, Stream 3 MK2
connects directly to that station.
To enter Internet Radio mode, either press Mode until the display shows
Internet Radio or select Menu > Main menu > Internet Radio.
5.1 Last listened
Presents a list of (up to) the last ten Internet Radio stations that have been selected.
5.2 Station List
The Station list is organised into various categories and search facilities:
•<Local area> - dependent on radio device’s location, for example: Denmark
•Search
•Location
•Popular
•Discover
5.2.1 <Local area> - dependent on radio device’s location, for example: Denmark
Presents a sub-menu for local area stations. The names and types of categories are dependent on local
network information, for example a radio located in Denmark would have a main title ‘Denmark’ and display
local stations, DR stations, Genres and/or stations from a specific city. Choose the required category and
either a further list of sub-categories is shown, or (if there are no further sub-categories) the available
stations for the chosen category are listed.
5.2.2 Search
You can also search through Internet broadcasts for stations or podcasts with particular keywords in their
title.
To search, select Menu > Search. Enter a keyword by selecting characters in turn, then OK. The search entry
screens are similar in operation to the Wi-Fi passphrase entry screen.

w w w . a r g o n a u d i o . c o m
11
Stream 3MK 2
5.2.3 Location
To select an Internet broadcast from a particular location, select Menu > Location >.
Select a continent from the menu and a list of countries available is presented, select a country and the
available internet radio stations are presented. Choose a radio station from the list to tune to that station.
5.2.4 Popular
Presents a list of the most popular internet radio stations from around the world.
5.2.5 Discover
Allows you to select from a list of stations defined by either their origin (Country), Genre (style of music) or
language. Navigate through the category options, once you have made your selection a screen confirms your
selected category and the number of stations within that category. To see the list, select the option showing
the number of available stations.
5.3 Now Playing information
While the stream is playing, the screen shows its name and description. If artist and track information is
available, this is also shown. To view further information, press Info.
Each time you press Info, another set of information is displayed, cycling through the following details:
•Slogan (default; where available)
•Language/Location
•Codec and sampling rate
•Playback buffer
•Today’s Date.
5.4 Presets
Presets are stored in the radio and cannot be accessed from other radios. To store an Internet radio preset,
press and hold Preset until the display shows the Save preset screen. Select one of the presets to save the
currently playing station. Up to 10 presets are possible.
To select a preset, press Preset briefly, then select one of the listed preset stations. When a preset station
is playing, it shows Pn(P1, P2 etc.) in the bottom of the screen.
Note: Operation of presets is identical for Internet radio, DAB and FM –but the preset lists are
separate for the different sources.
6. DAB radio mode
DAB radio mode receives DAB/DAB+ digital radio and displays
information about the station, stream and track playing.
To enter DAB mode, either press Mode until the display shows:
DAB Radio or select; Menu > Main menu > DAB.

w w w . a r g o n a u d i o . c o m
12
Stream 3MK 2
6.1 Scanning for stations
The first time you select DAB radio mode, or if the station list is
empty, Stream 3 MK2 automatically performs a full scan to see what
stations are available. You may also need to start a scan manually
to update the list of stations for one of the following reasons:
•Available stations change from time to time.
•If reception was not good for the original scan
(for example the antenna was not up), this may result in
an empty or incomplete list of available stations.
•If you have poor reception of some stations (burbling),
you may wish to list only stations with good signal strength.
To start a scan manually, select Menu > Scan.
Once the scan is complete, the radio shows a list of available stations.
To remove stations that are listed but unavailable, select Menu > Prune invalid.
6.2 Selecting stations
To listen to or change a station, turn the Select control to view a list of stations and press to select. Once
selected, the station plays and the screen shows information about the station, track or show as broadcast.
6.3 Presets
To store a DAB preset, press and hold Preset until the display shows the Save preset screen. Select one of
the 10 presets to save the currently playing station.
To select a preset, press Preset briefly, then select one of the listed preset stations. When a preset station
is playing, it shows Pn(P1, P2 etc) in the bottom right of the screen.
6.4 Now playing information
While the stream is playing, the screen shows its name and DLS (Dynamic Label Segment) information
broadcast by the station giving real-time information such as programme name, track title and contact
details. Stereo broadcasts are indicated with an icon at the top of the screen. To view further information,
press Info .
Each time you press Info , another set of information is displayed, cycling through DLS text, programme
type, ensemble name/frequency, signal strength/error rate, bit rate/codec/channels and today’s date.
6.5 Settings
6.5.1 Dynamic range compression
Some DAB broadcasts offer dynamic range compression (DRC). This feature allows radios to compress the
dynamic range of the output audio stream, so that the volume of quiet sounds is increased, and the volume
of loud sounds is reduced. This can be useful if you are listening to music with a high dynamic range in a
noisy environment (for example, classical music while cooking).
To change the DRC of the Stream 3 MK2, select Menu >DRC, and then DRC high, DRC low or DRC off.
6.5.2 Station order
You can choose the order of the DAB station list to be either Alphanumeric, Ensemble or Valid. Ensemble lists
groups of stations that are broadcast together on the same ensemble, for example BBC or South Wales local.
Valid lists valid stations first, alphanumerically, then off-air stations.
To change station order, select Menu > Station order > then Alphanumeric, Ensemble or Valid.

w w w . a r g o n a u d i o . c o m
13
Stream 3MK 2
7. FM radio mode
FM radio mode receives analogue radio from the FM band and displays
RDS (Radio Data System) information about the station and show (where
broadcast).
To enter FM mode, either press Mode until the display shows FM Radio
or select Menu > Main menu > FM.
7.1 Selecting stations
To find a station, press Select . The frequency display starts to run up as Stream 3 MK2 scans the
FM band. Alternatively, you can scan up or down by pressing and holding the >> or << buttons
or tune manually with quick presses, or by turning the Select control.
7.2 Presets
To store an FM preset, press and hold Preset until the display shows the Save preset screen.
Select one of the 10 presets to save the currently playing station.
To select a preset, press Preset briefly, then select one of the listed preset stations. When a preset
station is playing, it shows Pn(P1, P2 etc) in the bottom right of the screen.
7.3 Now playing information
While an FM station is playing, the screen shows one of the two following sets data:
•If RDS information is available, by default the service name (i.e. station name) is displayed.
You can cycle through further RDS information by pressing Info . Each time you
press Info , another set of information is displayed, cycling through RDS radio text,
RDS programme type, frequency and today’s date.
•If no RDS information is available, the currently tuned frequency is shown.
7.4 Settings
Scan settings
By default, FM scans stop at any available station. This may result in a poor signal-to-noise ratio (hiss) from
weak stations. To change the scan settings to stop only at stations with good signal strength,
select Menu > Scan setting > Strong stations only? > Yes.
Audio settings
By default, all stereo stations are reproduced in stereo. For weak stations, this may result in a poor signal-to-
noise ratio (hiss). To play weak stations in mono, select Menu > Audio setting > FM weak reception: Listen
in mono only > Yes.

w w w . a r g o n a u d i o . c o m
14
Stream 3MK 2
8. Alarms and sleep
As well as a clock/calendar, there are two versatile wake-up alarms with snooze facility, and a sleep function
to turn the system off after a set period. Each alarm can be set to start in a particular mode.
8.1 Alarms
To set or change an alarm, either press: Alarm or select Menu > Main menu > Alarms.
Select the alarm number (1 or 2) then configure the following parameters:
•Enable: on/off > Frequency: Daily, Once, Weekends or Weekdays,
•Time
•Mode: Buzzer, Internet radio, DAB, FM
•Preset: Last listened or 1-10,
•Volume: 0 –max.
To activate the new settings, scroll down and select Save.
The screen shows active alarms with an icon at the bottom left.
At the set time, the alarm will sound. To temporarily silence it, press Snooze .
You can change the snooze period with the Select control if you like. The
radio returns to standby for the set period, with the silenced alarm icon
flashing.
8.2 Sleep
To set the sleep timer, select Menu > Main menu > Sleep then choose from Sleep OFF, 15 MINS, 30 MINS,
45 MINS or 60 MINS.
Once you select a sleep period, the system returns to the main menu. Press Menu to return to the Now
playing screen.
9. Inactive standby
Stream 3 MK2 comes with an automatic standby function. If the product is not operated for a set amount of
hours, it can automatically go into standby. This applies also if the product is playing music.
To activate or change this feature, do the following:
1. Choose “Menu”
2. Go to “System settings”
3. Scroll down to “inactive standby” and press select
4. Choose your preferred setting and press select

w w w . a r g o n a u d i o . c o m
15
Stream 3MK 2
10. Troubleshooting and error messages
10.1 Error messages
Message
Description
Example
Failed to connect
Correct key entered,
but router rejects
request
MAC filtering enabled on
router
Format error
Cannot recognise
file format -
independent of
network
Received .wma, but found
that the stream wasn’t
WMA when trying to
decode
Network error
Problem past router -
incorrect data being
received from
network
Data obtained from server
is unreadable.
Network not ready
Problem with
connection to router
Router switched off
Network timeout
Problem past router -
no response being
received from
network
Streaming IR station and
suddenly station becomes
unavailable
Service not available
(DAB)
No DAB reception
Update failed
Software upgrade
failed

w w w . a r g o n a u d i o . c o m
16
Stream 3MK 2
10.2 Troubleshooting
Problem
Cause
Solutions
PRODUCT: the product
turn off by itself
Automatic inactive standby
function activated
See page 14
FM: Hiss
Low signal strength
Check/move antenna
DAB:
burbling/intermittent
cut-out
Move radio
Rescan local (high-strength) stations only
For DAB, check local coverage
DAB: ‘No stations
available’ message
Low signal strength
As above then rescan stations.
Cannot connect to
network
Network down
Check that network is working between a
computer and the router
Router restricts access to listed
MAC addresses
Obtain the Stream 3 MK2 MAC address
from Menu > System settings > Network >
View settings and add to router list.
Insufficient Wi-Fi signal strength
Check distance to router; see if a computer
can connect to the network in this location
Unknown encryption method
Change encryption method on router.
Stream 3 MK2 supports WEP, WPA and
WPA2
Unusual network configuration
Setup network manually through Menu >
System settings > Network > Manual
settings
Firewall preventing access
Check the following ports are open on the
router: UDP and TCP ports 80 and 123;
DNS port 53.
Cannot connect to
Internet
Internet connection down
Check that Internet is working for a
computer connected to the same network
Firewall preventing access
Check the following ports are open: UDP
and TCP ports 80 and 123;
DNS port 53.
Some Internet radio stations may require
additional ports to be opened.
Cannot play particular
Internet radio station
Station not broadcasting,
overloaded or insufficient
bandwidth.
Try other stations; try listening on computer
via Internet radio portal website; try later.
Station broadcasting using
unknown codec.
Link out of date.
Table of contents
Other argon audio Radio manuals

argon audio
argon audio DAB1 User manual

argon audio
argon audio iNet3+v2 User manual

argon audio
argon audio iNet 1 User manual

argon audio
argon audio INET6+ User manual

argon audio
argon audio iNet2+ User manual

argon audio
argon audio RADIO2 User manual

argon audio
argon audio Radio1 User manual

argon audio
argon audio DAB4+ User manual