Arista ARP-5500AX-E01 Series User manual

This manual is a user guide for ARP-5500AX-E01 Series waterproof industrial panel
computer. It includes detailed description about how to install and operate the product.
Arista Corporation recommends users to read through the entire manual and follow
instructions to avoid any kind of obscurity in using the product. For any questions or
support, please call us at 1.877.827.4782 Monday through Friday 8:00am to 5:00PM
Pacic Time.
Publication date: 2017/02/06
Version No.: V1.6
USER MANUAL
Talk to us. We listen.
ARP-5500AX-E01 Series Waterproof Industrial Computer
ARP-5515AX-E01 ARP-5517AX-E01 ARP-5519AX-E01
ARP-5521AX-E01 ARP-5542AX-E01

2
Product safety precautions
Important: Read all the contents of this instruction manual carefully before
using the ARP-5500AX-E01 Series waterproof industrial panel computer.
Read this document before installation,configuration and operation of this equipment.
Users are required to familiarize with all the information and applicable standards prior to
using this manual. This manual should be saved for future reference and use.
• Relative humidity: 25%~80%
• Storage temperature: -20oC to 60oC(-4F to 140F)
• Operation temperature: 0~50oC(32F to 122F)
• Unplug the unit when not in use for an extended period of time.
• Consult a service technician if the ARP-5500AX-E01 Series waterproof industrial
panel computer does not operate normally when you have followed the instructions in
this manual.
• Do not attempt to repair this product yourself. Always get a qualified service
technician to carry out adjustments or repairs.
• Do not place heavy objects on the unit.
• For any reason a power cord is used, it should be certified by local and national
standards and used under guidance of authorized technician.
• Never use a faulty power cord with this unit. Please contact the manufacturer or
nearest authorized repair service right away for a replacement if damaged power
cord is received.
• The power supply cord is used as the main disconnect device. Ensure that the socket
outlet is easily accessible after installation.
• Overloaded AC outlets, extension cords, frayed power cords, and broken plugs are
extremelydangerous.Theymay,andcan,resultinanelectricalshockorrehazard.
Call an authorized service technician for any replacements.
• Hands must be dry when plugging the power cord into an AC outlet to prevent
electrical shock. Do not damage the power cord by disassembling, bending, pulling
orexposingittoheatasitmaycauseareorelectricalshock.
• Make sure to completely insert the power plug into an AC outlet. Insecure
connectionscancausere.
• Ensure that the power source is grounded correctly.
• Unplug the unit if cleaning is needed. The unit may be wiped with a dry or slightly
dampclothwhenthepoweriso.

3
Contents
Product safety precautions..............................................................................................2
Contents.............................................................................................................................3
Chapter 1 Welcome .........................................................................................................4
Features............................................................................................................................................4
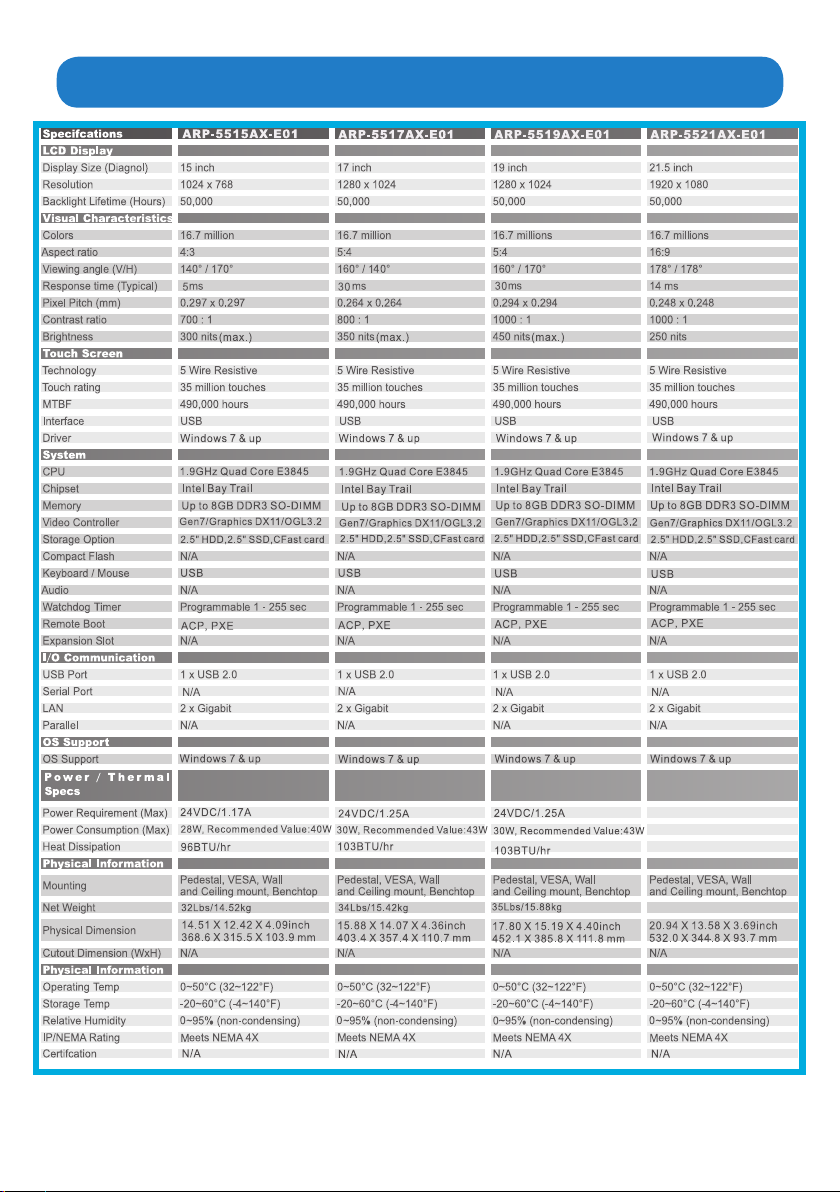
Product specications....................................................................................................................5
Unpacking........................................................................................................................................7
Chapter 2 Basics.................................................................................................................8
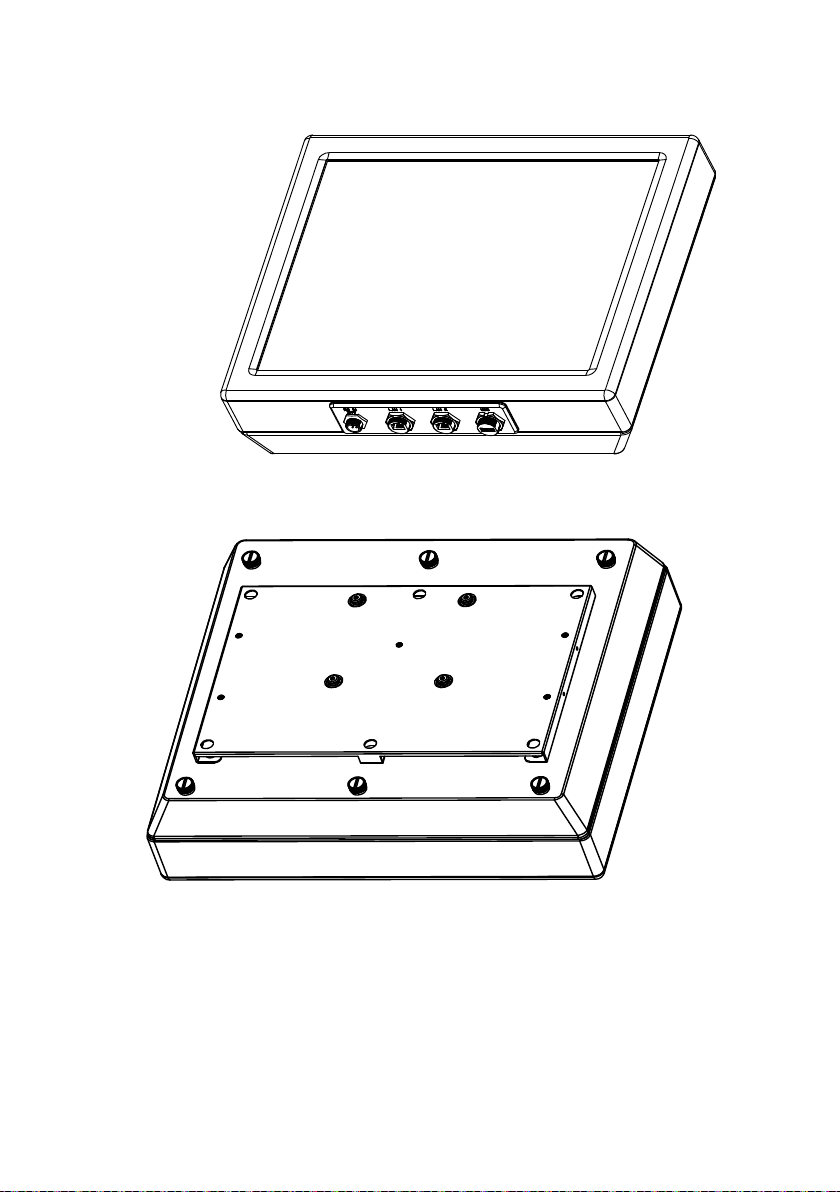
Product Overview.......................................................................................................8
Conguration.................................................................................................................................14
Physical dimensions ....................................................................................................................15
Chapter 3 Connections ...................................................................................................16
Mounting the computer..................................................................................................................17
Connecting to keyboard or mouse..............................................................................................28
Connecting to network............................................................................................28
Connecting the power supply.............................................................................29
Chapter 4 Driver Installation............................................................................................31
Chipset device driver.....................................................................................................................31
Display driver...................................................................................................................34
LAN driver................................................................................................................................38
Audio driver...............................................................................................................40
Chapter 5 Settings...........................................................................................................42
Installing the eGalaxTouch Utility.................................................................................................42
Using the eGalaxTouch Utility.....................................................................................................43
Chapter 6 BIOS Setup.......................................................................................................45
Introduction....................................................................................................45
Entering the setup..............................................................................................46
Main Menu...........................................................................................48
Advanced Menu.............................................................................................49
Chipset Menu.....................................................................................56
Security Menu.................................................................................................59
Boot Menu................................................................................................60
Save&Exit Menu.........................................................................................61
Chapter 7 Appendix.........................................................................................................62
Care and Maintenance ................................................................................................................62
Product Limited Warranty............................................................................................................63
Disposal and Recycling Information.............................................................................68
Disclaimer and Copyright Notice................................................................................................68
Contents

4
res
• 15”, 17”, 19”,21.5”, 42” industrial waterproof display, 1024 x 768 (15”),1280 x
1024(17”,19”),1920 x 1080 (21.5”, 42”) resolution
• Stainless Steel Enclosure
• 5-Wire Resistive Touch or Tempered Glass
• Intel 1.9GHz E3845 Quad Core Atom CPU
• 8GB DDR3 SO-DIMM Memory
• Dual Gigabit LAN
• WiFi Connectivity (Optional)
• Supports 3G/4G SIM card wireless network
• 1 x 2.5” SATA HDD
Chapter 1 Welcome
ARP-5500AX-E01 Series of waterproof industrial panel computers are completely sealed
and water-resistant.
ARP-5500AX-E01 Series operates at 24VDC input, it packs Intel
1.9GHz E3845 Quad Core Atom CPU and up to 8GB memory into compact, slim and
fully sealed stainless steel enclosure. The water-proof connectors provides access for
dual Gigabit Ethernet ports and one USB port. ARP-5500AX-E01 Series is available in 5
dierentsizesofLCDdisplay,15”,17",19”,21.5"and42".Theresistivetouchscreencan
be operated with or without gloves. The WiFi option extends connectivity at the location
where wire networking is not available, moreover, it also supports 3G/4G SIM card
wireless network.Supports 3G/4G SIM card wireless network
Features

5
Product specications

6

7
ARP-5500AX-E01 Series
waterproof panel computer x1
Unpacking
AC power cable x1
DIN-Rail AC/DC power supply x1
DC power cable x1
Open the package and inspect items carefully to make sure no item is damaged and all
items listed are present in the package.

8
Product Overview
Chapter 2 Basics
USB port
DC-IN 24V power jack RJ45 LAN port
Front Side
Rear
Bottom

9
Side
Bottom
ARP-5515AP-E01

10
ARP-5517AP-E01

11
ARP-5519AP-E01

12
ARP-5521AP-E01

13
ARP-5542AP-E01
Power indicator

14
Thereisalabellocatedonthebackoftheunitthatshowstheserialnumberandconguration.
Theserialnumberisunique,andthecongurationindicatesoptionstheunitisbuiltwith.
Thecongurationisgivenintwoparts:themodelnumberandtheorderinformation.
Model number
The model number can be parsed as follows:
Formoredetailedtechnicalinformation,includingcongurationlayout,pleasecontactArista
customer support at (510) 226-1800, ext. 400
Conguration
21 21-inch display size
Mounting Type Mounting Size
DS 003
CM
WM 002
VM 001
TM 000
19-inch
17-inch
Wall Mount
Common use
Benchtop stand
Ceiling Mount
Pedestal Mount
VESA Mount 15-inch
Display Size
21
42
19
17
15
21-inch
42-inch
19-inch
17-inch
15-inch Motherboard
E01 Intel E3845 1.91GHz
Quad Core ATOM
CPU,up to 8GB DDR3
SO-DIMM
Conguration
007
CPU: E3845 ATOM CPU
Memory: 4GB DDR3
Touch screen: 5 Wire Resistive
Enclosure: Stainless Steel
Remote Boot: ACP Enable
Power Supply:110/220VAC
Input DIN-Rail

15
The diagrams below show the physical dimensions of the ARP-5500AX-E01 Series
waterproof industrial panel computer.
Physical dimension
L
L1
WW2
W1
D
D1
ARP-5515AX-E01 ARP-5517AX-E01 ARP-5519AX-E01 ARP-5521AX-E01 ARP-5542AX-E01
L368.5mm/14.51inch 403.3mm/15.88inch 452.1mm/17.80inch 532.0mm/20.94inch
1089.0mm/42.87inch
W299.8mm/11.80inch 341.8mm/13.46inch 370.8mm/14.60inch 329.8mm/12.98inch 682.0mm/26.85inch
D104.0mm/4.09inch 110.8mm/4.36inch 111.8mm/4.40inch 93.7mm/3.69inch 136.1mm/5.36inch
L1 319.4mm/12.57inch 319.4mm/12.57inch 319.4mm/12.57inch 431.0mm/16.97inch 450.0mm/17.72inch
W1 42.6mm/1.68inch 63.7mm/2.51inch 78.2mm/3.08inch 57.7mm/2.27inch 116.2mm/4.57inch
W2 207.4mm/8.17inch 207.4mm/8.17inch 207.4mm/8.17inch 207.4mm/8.17inch 449.6mm/17.70inch
D1 89.0mm/3.50inch 95.8mm/3.77inch 96.8mm/3.81inch 78.7mm/3.10inch 121.1mm/4.77inch

16
Connectors are located at the bottom of ARP-5500AX-E01 Series industrial computer
Warning! Make sure your computer is grounded at all times, it should
be on the same ground as any other equipment connected to its
communication ports.
Chapter 3 Connections
This section describes connections/connectors available on the ARP-5500AX-E01 Series
waterproof industrial panel computer.
Connectors

17
Mounting the computer
1. VESA Mounting
“VESA FDMI Standard” stands for Video Electronics Standards Association Flat Display
Mounting Interface Standard. The ARP-5500AX-E01 Series waterproof industrial panel
computer needs to be mounted on a VESA-compliant arm or bracket. And holes are pre-
drilled on the back of it.
As shown in the gure below, please follow these steps to mount the computer.
• Step 1: Place the metal mounting plate on the back of the ARP-5500AX-E01 Series
waterproof industrial panel computer, and align holes on the mounting plate with holes
on the computer.
• Step 2: Use a screwdriver to tighten the six “#8-32UNC”sizedscrewstoxthemetal
mounting plate on the computer(Generally, the metal mounting plate is pre-installed on the
back of the ARP-5500AX-E01 Series waterproof industrial panel computer.).
• Step 3: Place the metal board on the VESA bracket, and tightly bolt four screws to the
VESA bracket and metal board.
• Step 4: Place the VESA bracket with the metal board on the wall or board, and align
holes on the VESA bracket with holes on the wall or board.
• Step 5: UseascrewdrivertotightenscrewsandxtheVESAbracketonthewallor
board.
• Step 6: Mount the display onto the wall or board through the metal mounting plate and
VESA bracket. Ensure that the computer is securely situated onto the wall or board.
This section outlines how to mount the ARP-5500AX-E01 Series waterproof industrial panel
computer. There are five methods available: VESA Mounting, Wall Mounting, Benchtop
Stand Mounting, Pedestal Mounting and Ceiling Mounting. Users may choose any of the
vemountingmethodstosuittheirneeds.
Mounting
plate
Step1
Step2
Step3
Step4 Step5
Step6
Metal
board
VESA
Bracket Wall or board
Screws

18
Physical dimensions for VESA mounting
L
L1
WW2
W1
D
D1
ARP-5515AX-E01 ARP-5517AX-E01 ARP-5519AX-E01 ARP-5521AX-E01
L368.5mm/14.51inch 403.3mm/15.88inch 452.1mm/17.80inch 532.0mm/20.94inch
W299.8mm/11.80inch 341.8mm/13.46inch 370.8mm/14.60inch 329.8mm/12.98inch
D104.0mm/4.09inch 110.8mm/4.36inch 111.8mm/4.40inch 93.7mm/3.69inch
L1 319.4mm/12.57inch 319.4mm/12.57inch 319.4mm/12.57inch 431.0mm/16.97inch
W1 42.6mm/1.68inch 63.7mm/2.51inch 78.2mm/3.08inch 57.7mm/2.27inch
W2 207.4mm/8.17inch 207.4mm/8.17inch 207.4mm/8.17inch 207.4mm/8.17inch
D1 89.0mm/3.50inch 95.8mm/3.77inch 96.8mm/3.81inch 78.7mm/3.10inch

19
VESA Mounting for ARP-5542AX-E01 only
As shown in the gure below, please follow these steps to mount the display.
• Step 1: Place two VESA mounts on the back of the ARP-5542AX-E01 Series
waterproof industrial panel computer, and align holes on VESA mounts with the holes
on the display.
• Step 2: Use a screwdriver to tighten the eight “M8” sized screws to fix the VESA
mounts on the industrial panel computer.
• Step 3: Place one wall bracket on the wall or board, and align holes on the bracket
with holes on the wall or board.
• Step 4: Useascrewdrivertotightenscrewsandxthewallbracketonthewallor
board.
• Step 5: Mount the ARP-5542AX-E01 industrial panel computer onto the wall or board
through the VESA mount and wall bracket.
VESA
Mounts Step1
Step2
Step3 Step4
Step5
Screws

20
2. VESA mounting
Model Number Mounting
ARP-5542BP-AX 100 x 400mm/3.94 x 15.75 inch
400mm
15.75"
100mm
3.94"
400mm
15.75"
This manual suits for next models
5
Table of contents
Other Arista Industrial PC manuals