Aristel DKP30 User manual

1
Arista Systems Corporation
HANDSET USER GUIDE
MODEL: DKP30 or DKP50
Table of Contents
KEY TELEPHONE LAYOUT.............................................................................................2
ANSWERING CALLS .........................................................................................................4
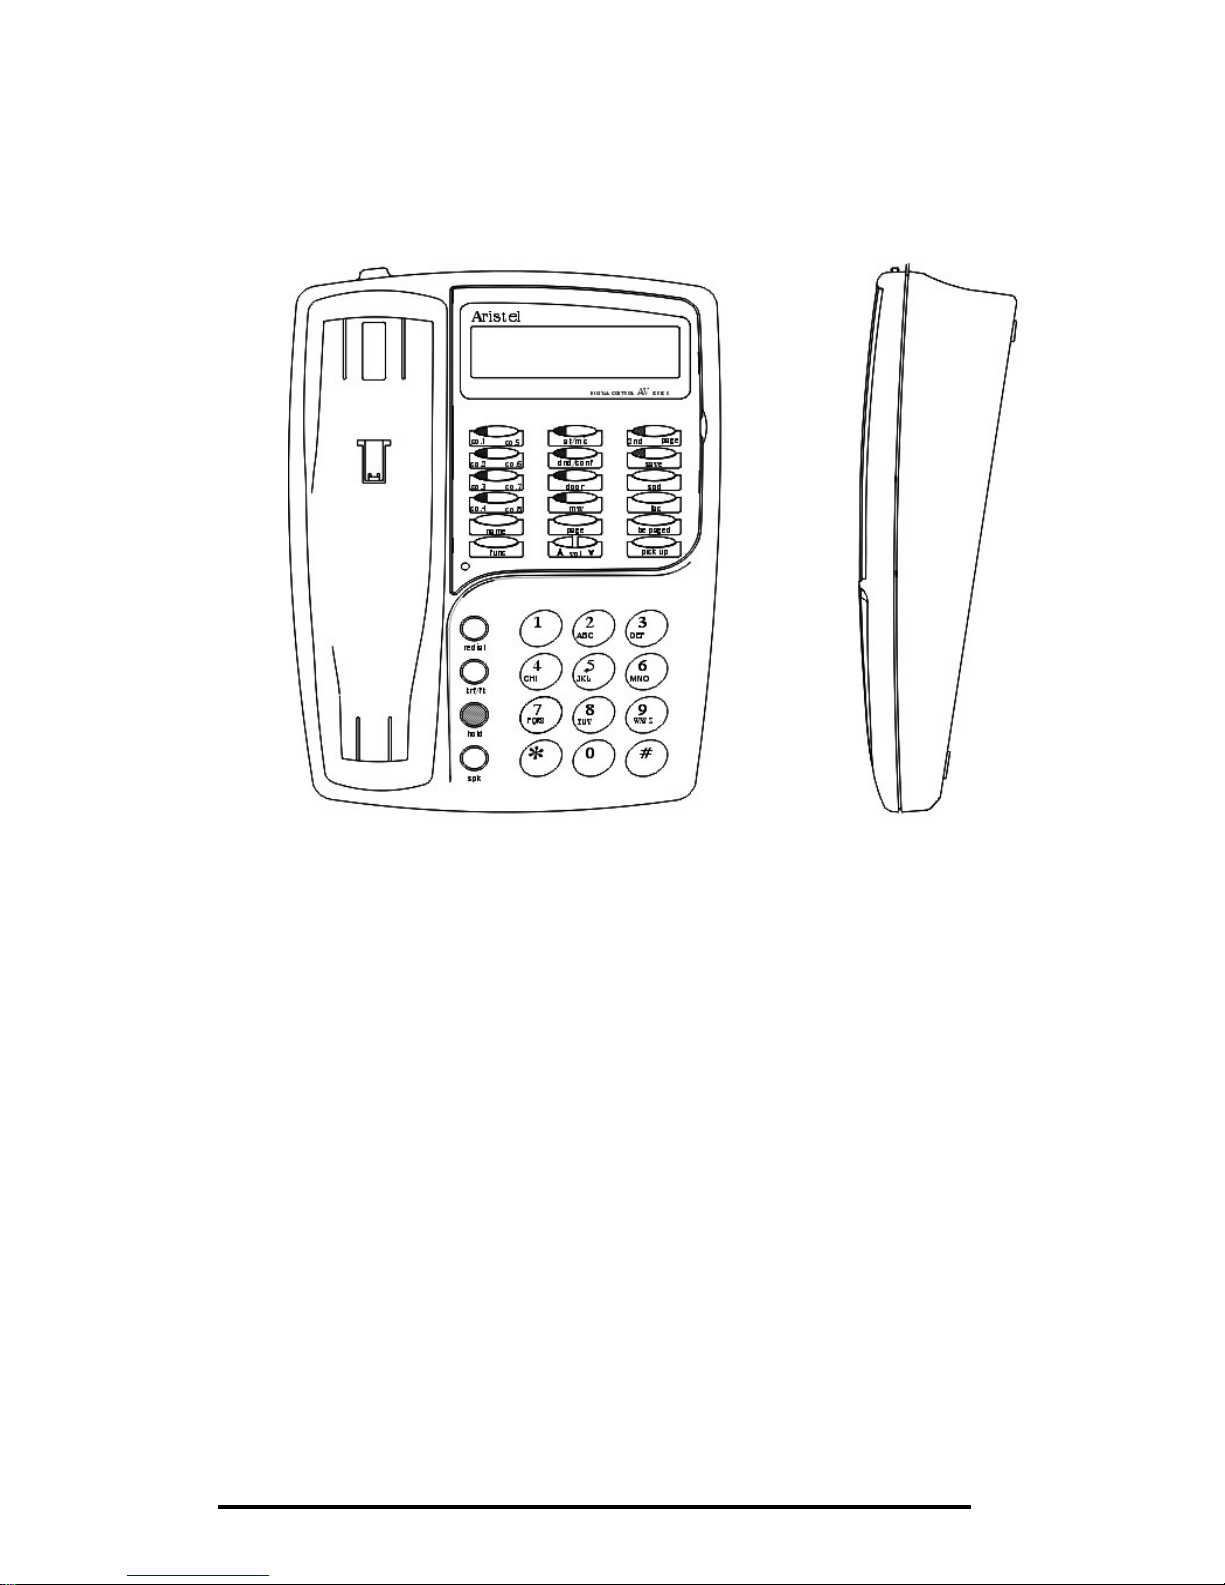
AUTOMATIC COACCESS................................................................................................ 10
BABY MONITORING..........................................................................................................4
BACKGROUND MUSIC ......................................................................................................4
CALCULATOR FUNCTION...................................................................................................4
CALL FORWARD..............................................................................................................5
CALL FOLLOW ME...........................................................................................................5
CALL TRANSFER.............................................................................................................5
CHANGING SIGNAL..........................................................................................................6
CONFERENCE CALLS.......................................................................................................6
DATE/TIME SETTING........................................................................................................7
DAY SWITCH/NIGHT SWITCH.............................................................................................6
DO NOT DISTURB............................................................................................................7
DOOR PHONE.................................................................................................................7
FIRE ALARM ...................................................................................................................7
FORCED ACCOUNT CODE(S).............................................................................................7
HOLD CALL....................................................................................................................7
INDIVIDUAL ALARM/MORNING CALL (CONSOLE ONLY)...........................................................8
INTERCOM CALL..............................................................................................................8
LOCK/UNLOCK YOUR TELEPHONE......................................................................................8
MESSAGE TEXT..............................................................................................................9
MUTE.......................................................................................................................... 10
NON ENFORCED ACCOUNT CODE(S)................................................................................ 10
OUTGOING CALL........................................................................................................... 10
PAGING ....................................................................................................................... 11
PICK UP...................................................................................................................... 11
REDIAL........................................................................................................................ 12
RELEASE CALL...............................................................................................................4
RETRIEVE NORMAL CALL FROM HOLD.............................................................................. 13
SPEED DIAL................................................................................................................. 13
STATION OPERATION HELP LIST...................................................................................... 14
VOLUME/FREQUENCY CONTROL (STATIC CONTROL)........................................................... 14
VOLUME/FREQUENCY CONTROL (DYNAMIC CONTROL)........................................................ 15
DSS BUTTON LAYOUT ................................................................................................. 16

2
Arista Systems Corporation
KEY TELEPHONE LAYOUT
For Model DKP50 Series
Features:
1.Hook
2.Handpiece Wall Mount Clip
3.Speaker
4.Function Keys
5.Quick Reference Card
6.Handsfree Microphone
7.Dial Keypads
8.DSS Keys
9.Handset Cord Jack
10. Table/Wall Mount Bracket
11. Line Cord Jack
12. MW lamp
13. LCD Display
1
2
3
45678
9
10
00
11
12
13

3
Arista Systems Corporation
For Model DKP30 Series
Features:
1. Hook Switch
2. Handpiece Wall Mount Clip
3. Speaker
4. Handset Cradle
5. Dial Keypad
6. Microphone
7. Function Keys
8. DSS Keys
9. LCD Display
10. Line Cord Jack

4
Arista Systems Corporation
Answering Calls
•Lift handset or press [SPK] button on handsfree
models.
Answering Intercom Calls•Lift handset or press [SPK] of [MIC] button on
handsfree models.
Automatic CO Access
Off Hook •Lift handset and press [9] or [0] (depending on
programming).
•Dial required telephone number.
On Hook •Press [9] or [0]; or press [SPK]+[9] or[0].
•Dial required telephone number.
CO Access through DSS •Handset on/off hook.
•Press any defined CO DSS button.
•Dial required telephone number.
Baby Monitoring
(On a handsfree Models) •Lift handset or press [SPK] (on a handsfree)..
(Room to be Listened)
•Dial [#]+[51]. (Room to Listen From)
•Ring that extension number.
To Cancel •Press [SPK] on listened phone.
Note: 1. Once the function is enabled, the
monitoring station’s microphone will be
turned on. When it is called, it will not
ring but the calling station will hear any
activity in the immediate area.
2.The monitoring station’s microphone is
activated when the function is initiated.
Background Music
To Start •Press [#].
To Cancel •Press [#] or [SPK].
Calculator Function
(DKP-50 Display Models Only)
•Press [CAL] button to start/cancel calculator
function.
Functions: [+] (Plus) located on [REDIAL]button
[-] (Minus) located on [SPD] button

5
Arista Systems Corporation
[X] (Multiply) located on [FUNC] button
[ ÷] (Divide) located on [Trf/Fl] button
[﹦] (Equal) located on [HOLD] button
[.] (Decimal) located on [*] button
[C] (Clear Digit) located on[#] button
Caller ID Search
•Off hook.
•Press FN92 function key (refer to Programming
Manual Zone 500).
•Press [3] to search the caller number backwardly
or Press [6] to search the caller number
forwardly.
Call Forward
General •From own station: (Handset on Hook) Press
[CFW] button or [FUNC]+[2]+[*CF
Code]+[Destination Station
Number].
Call Forward Codes: [1] Call Forward All
[2] Call Forward Busy
[3] Call Forward No Answer
[4] Call Forward Busy No Answer
[5] Call Follow Me
[6] Call Forward External
To Cancel •From own station: Press[CFW] or
[FUNC]+[2]+[1]+[Own Station Number].
Call Follow Me •From other station: Press[CFW] button or
[FUNC]+[2]+[5]+[Own Station Number].
To Cancel •From other station: Press[CFW] or
[FUNC]+[2]+[1]+[Own Station Number].
Call Transfer
Unannounced Transfer •Lift handset.
•Press [HOLD].
•Dial transferred station number.
•Press [TRF/FL].
•Replace handset.
Announced Transfer •Lift handset.
•Press [HOLD].

6
Arista Systems Corporation
•Dial transferred station number.
•Wait for answer, then press [TRF/FL].
•Replace handset.
Changing Signal
Voice to Ring or Ring to Voice
•During Intercom call, press [*]to change signal.
Conference Calls
(Maximum of Three (3) Parties)
Supervised •Lift handset.
•Dial Party A.
•Place Party A on hold.
•Dial Party B.
•Press [CONF/DND].
Unsupervised •Lift handset.
•DialCOParty A.
•Place Party A on hold.
•Dial CO Party B.
•Press [CONF/DND]button twice.
•Replace handset.
Get back to the conference
Press CO DSS button
Press [CONF/DND].
Note: A supervised conference becomes
unsupervised when the supervisor leaves the
conference. The conference supervisor can
re-access an unsupervised conference by
pressing [CO DSS] + [CONF/DND]. During
unsupervised conferences, outside parties have a
3-minute limit for conversation. Pressing [#]
when the 3-limit warning tone sounds will increase
the limit by a further 3 minutes.
Day Switch/Night Switch
(Must be in Manual Mode)
Night Switching •Press [FUNC]+[TRF/FL]+[TRF/FL]+[SPK].
Day Switching •Press [FUNC]+[TRF/FL]+[TRF/FL]+[SPK].
Auto/Manual Switching (Console Only)
•Press [FUNC]+[TRF/FL]+[*] to toggle from Auto
to Manual mode.

7
Arista Systems Corporation
Date/Time Setting
(Console Only) •Press [FUNC]+[9]+[#].
•Enter 00 for item.
•Set Date/Time:
[MM]+[DD]+[YY]+[DW]+[hh]+[mm]or
[DD]+[MM]+[YY]+[DW]+[hh]+[mm]
(depending on EPROM Version).
•Press [SAVE]+[SPK].
[MM] Month =01 ~ 12
[DD] Day = 01 ~ 31
[YY] Year = 00 ~ 99
[DW] Day of Week = 01 ~ 07 (Monday = 01)
[hh] Hour = 00 ~ 23
[mm] Minute = 00 ~ 59
Do Not Disturb •Press [CONF/DND] to enable or disable.
Note: [CONF/DND] LED will flash when Do Not
Disturb is enabled.
Door Phone
Call Door Phone •Press [SPK]+[#]+[6]+[1] (for Door 1),
or [SPK]+[#]+[6]+[2] (for Door 2)
or
•Press [DOOR] button on DSS panel to talk to
Door 1.
Door Lock Release •While on door phone call, press [0] to release
door lock.
Fire Alarm
Turning Off •Press [SPK] while alarm is ringing.
•Press [#]+[5]+[2].
Forced Account Code(s)
•Press [Forced Account Code] key or
[FUNC]+[1], then on entry of account number,
system will automatically access a free CO line.
Hold Call
Normal Call Hold •Lift handset and answer call.
•Press [HOLD].
•Replace handset.

8
Arista Systems Corporation
Exclusive Call Hold •Lift handset and answer call.
•Press [HOLD]twice.
•Replace handset.
Individual Alarm/Morning Call
Individual Station Alarm •Press [FUNC]+[REDIAL]+[Alarmed Station
Number].
•Set Time and Duration: *[hh]+[mm]+[Duration].
•Press [SAVE].
[hh]Hour = 00 ~ 23
[mm] Minute = 00 ~ 59
[Duration] = 01 ~ 99 (99 = Morning Call)
Note: If the Duration is not 99, then the Morning
Call function will become Alarm function.
Own Station Alarm (Must be a Display Handset)
•Handset on Hook.
•Press [FUNC]+[9]. If it is the Console, press
[FUNC]+[9]+[9].
•Set Time and Duration: *[hh]+[mm]+[Duration].
•Press [SAVE]+[SPK].
Note: If the Duration is not 99, then the Morning
Call function will become Alarm function.
Intercom Call
Normal Call •Lift handset or press [SPK].
•Dial Station Number or press DSS button.
Intercom Hot Line Call •Refer to Programming ManualZone 508.
•Lift handset or press [SPK].
Call Operator •Lift handset or press [SPK].
•Press [0] or [9] (depending on programming).
Hot Line Call Operator •Refer to Programming ManualZone 505 P=4.
•Lift handset or press [SPK].
Lock/Unlock Your Telephone
Lock/Unlock
•Press [FUNC]+[3].
•Key in security number (maximum of 3 digits:
refer to System Administrator’s Manual for
details).

9
Arista Systems Corporation
•Press [SAVE].
Temporary Unlock •Press [FUNC]+[4].
•Key in security number (maximum of 3 digits: this
will provide CO access for one (1) call).
Macro Key Assignment
•Handset on hook.
•Press [FUNC]+[7].
•Press one DSS key from DSS16 ~ DSS25.
This key must be a key that has not already
been programmed as a Function Key in
Programming Zone 500.
•Press keys in sequence.
•Press [SAVE].
To CancelMacro Key •Handset on hook.
•Press [FUNC]+[7].
•Press one DSS key from DSS16 ~ DSS25 that
has already been programmed as a Macro Key.
•Press [REDIAL].
Message Lamp On •Call an internal station which is engaged or does
not answer.
•Press DSS key assigned for[MW] button
programmed in Zone 500.
Answering Message •If the called station is busy, the Message Waiting
lamp On Indicator will flash. After this station is free it
will recall to the station which leaves the
message. Once the leaving message station
answers the recall, these 2 stations can talk to
each other.
•If the called station does not answer, the
Message Waiting indicator will flash. Once the
called station presses the [MW] key and recall to
the station which leaves the message, these 2
stations can talk to each other.
Message Text
Enable •Press [FUNC]+[HOLD].
•Select Message Code *[0 ~ 6].
•Press [SAVE](messages will be displayed on
caller’s display phone).
Message Codes
(depending on EPROM Version):

10
Arista Systems Corporation
TYPEA: TYPE B:
0 In A Meeting 0 Reserved
1 Do Not Disturb 1 Do Not Disturb
2 At Lunch 2 BackAt
3 Will Be Back 3 Not in Office
4 Call 4 Return On
5 Vacation 5 Ring My Mobile
6 Business Trip 6 Call
Disable •Press [FUNC]+[HOLD]+[SPK].
Monitor Refer to Programming Manual Zone 504-ST-02.
•Lift handset and dial number.
•If the station or CO line is busy, press [#].
•During monitoring, the monitoring party can hear
the existing conversation from the two monitored
parties, but the monitored parties cannot hear
the monitoring party.
Mute •Lift handset.
•Press [SPK]to enable/disable Mute function.
Note: Enable Disconnects microphone
Disable Restores microphone if using
Handsfree, use [AT/MIC] button to
mute line.
Outgoing Call
Individual CO Access •Lift handset or press [SPK]+[CO]
•Dial required telephone number
or
•Lift handset or press [SPK].
•Press [#]+[*LR Code].
* Line Representative Codes:
DV-38...................401 ~ 412
DV-96...................401 ~ 416
•Dial required telephone number.
Hot Line Call •Refer to Programming ManualZone 508.
•Press [#]+[5]+[0] to start/cancel this function.

11
Arista Systems Corporation
Override Refer to Programming Manual Zone 504-ST-01.
•Lift handset and dial number.
•If the station or CO line is busy, press [0].
•An override tone will be heard on the overridden
station. During overriding, three parties can
have a conference.
Paging
General Paging •Lift handset.
•Press [#].
•DialPaging Code*.
Paging Codes: 0 = All Internal and External Zone Paging
1= All Internal Zone Paging
2= 2 + Internal Zone Number [1 ~ 8]
3= 3 + External Zone Number [1 ~ 8]
9 = All External Zone Paging
Quick Paging •Lift handset.
•Press [PAGE](pages through all).
PageAnswering •Lift handset.
•Press [#]+[*] or [BE PAGED].
Pick Up
General Pick Up •Lift handset.
•Press [*].
•Insert Pick Up Code*.
Pick Up Codes: 0 = All Zone Pick Up
1= Own Zone Pick Up
2= 2 + Station Zone Number[1 ~ 8]
3= 3 + Ringing Zone Number [1 ~ 8]
4= 4 + CO Number
Quick Pick Up
All Zones •Lift handset.
•Dial ringing station number.
•Press [PICK UP]or press [*] + [0].
Own Zone •Lift handset.
•Press [PICK UP]or press [*] + [1].
Defined Zone •Lift handset.
•Press [PICK UP]or press [*] + [2].

12
Arista Systems Corporation
Defined Station •Lift handset.
•Press [PICK UP]or press [*] + [3].
Defined CO lines •Lift handset.
•Press [PICK UP]or press [*] + [4].
Pick up CO lines •Lift handset.
•Refer to Programming Manual Zone
506-ST-06
Redial
Last Number Redial •Press [REDIAL].
Caller Number Redial •Search the correct caller ID number on display.
•Press [REDIAL].
Auto Redial •Refer to Programming Manual for programming
To Store Numbers of DSS button to Store Numbers function.
•If the called party does not answer, press DSS
button programmed as SAVE (Auto Save) will
show on display handsets).
•A maximum of five (5) telephone numbers can be
stored.
Auto Retry of Busy •(Handset off Hook) Press DSS button+ [SAVE].
Number •(Handset on Hook) Press [SAVE]and system
will automatically retry the same number.
Auto Redial Stored •Refer to Programming Manual for programming
Numbers ofDSS button for Auto Redial Stored Numbers
function.
•Press the DSS button programmed for Auto
Redial of Stored Numbers.
•The numbers will be redialed in order until a
connection is made or thepre-programmed
number of attempts has been reached.
Release Calls
With handset
•Replace handset.
Handsfree
•Press [SPK].
Flash Function •During external call dialing, press [TRF/FL] to
terminate call and retain the same CO line.
DSS CO LED will remain on.

13
Arista Systems Corporation
Retrieve Normal Call From Hold
Internal Call •Lift handset or press [SPK].
•Press [ST]or [Held Station’s Number].
External Call •Lift handset or press [SPK].
•Press [CO] or [#]+[*CO Line Representative
Code].
* Line Representative Codes:
DV-38 401 ~ 412
DV-96 401 ~ 416
Speed Dial
(There are two types of Speed Dial numbers)
System Speed Dial •These numbers can be accessed by any
handset.
Personal Speed Dial •A maximum of 20 numbers can be stored in each
handset:10 numbers = DSS1 ~ DSS10
10 numbers =0 ~ 9
System Speed Dial •Press [FUNC]+[SPD]+[1].
Programming •Enter a 3-digit number [100 ~ 699] (depending
(Console Only) on programming).
•Enter [0]+[0].
•Enter telephone number.
•Press [SAVE] (if Name Speed Dialing enabled,
enter name then press [SAVE]).
•Press [SPK]to end.
Personal Speed Dial •Press [FUNC]+[SPD] (enter [2] if console).
Programming •Press DSS button[DSS1 ~ DSS10] or dial
Speed Dial Number [0 ~ 9].
•Enter telephone number.
•Press [SAVE](if Name Speed Dialing enabled,
enter name then press [SAVE]).
•Press [SPK]to end.
Accessing Stored Speed Dial Numbers
System Speed Dial •Press [SPD].
Operation •Select Speed Dial Code[100 ~ 699] (Code is
dependent upon System Programming).
Personal Speed Dial Operation
•Press [SPD].
•Select Speed Dial Code[0]+[0 ~ 9] or [DSS1 ~

14
Arista Systems Corporation
DSS10] key (as programmed).
Name Speed Dialing (Console Only Operation)
(Refer to System Administrator’s Manual)
•Handset on Hook.
•Press DSS button programmed for Name Speed
Dial.
•Enter the first character of the name.
•Press [DSS1] to confirm entry.
•Press [DSS1] to search backwards, press[DSS2]
to search forward.
•When the desired name is selected, press [SPK]
to run Name SPD function.
Station Operation Help List
(Display Phones Only) •Press [FUNC]+[0].
Note: Pressing [0] when Station Operation
Function name is displayed will operate the same
as Station Operation Function.
Transfer
Direct Transfer •Press [HOLD].
•Dial extension number.
•Press [TRF/FL]button.
Indirect Transfer •Press [HOLD]
•Dial extension number and make sure the called
party answered.
•Press [TRF/FL]button.
Auto Transfer •Press [PAGE]
•Announce the Called Party andmake sure the
called party answered.
•Press [TRF/FL]button.
Volume/Frequency Control(Static Control)
•Press [FUNC]+[8]+[*Code].
•Use indicators on [VOL] button to adjust
volume level/select ringing frequency.
•Press [SAVE].
Codes:
1 = Ringing Volume Level Selection (1 ~ 8 levels)
2= Speaker Volume Level Selection (1 ~ 8
levels)
3= Handset Volume Level Selection (1 ~ 8
levels)
4= Ringing Frequency Selection (1 ~ 9 levels)

15
Arista Systems Corporation
Volume/Frequency Control(Dynamic Control)
Ringing Volume Level •During Ringing, press indicators on [VOL]
button to adjust Volume level
Speaker Volume Level •During hearing audio from speaker, press
indicators on[VOL] button to adjust Volume
level.
Handset Volume Level •During hearing audio from Handset, press
indicators on [VOL] button to adjust Volume
level.

16
Arista Systems Corporation
DSS Button Layout
(DSS For Programming Function)
For DKP50 Series Key Phones
For DKP30 Series Key Phones
DSS9 DSS10 DSS11 DSS12
Door
CONF/DND
AT/MIC
SAVE
M/W Name
FAC Page Internet Pick up 2nd
DSS5 DSS6 DSS7 DSS8 C/AR
DSS1 DSS2 DSS3 DSS4 CAL
DSS11
DSS12
DSS13
DSS14 DSS15
DSS6
DSS7
DSS8
DSS9 DSS10
DSS1
DSS2 DSS3
DSS4 DSS5
This manual suits for next models
1
Table of contents
Other Aristel Handset manuals