Mitel 5602 User manual

IP-DECT System (Global)
5602 Wireless Handset User Guide
MITEL
3300 IP Communications Platform

ii
NOTICE
The information contained in this document is believed to be accurate in all respects but is not warranted
by Mitel Networks™ Corporation (MITEL®). The information is subject to change without notice and should
not be construed in any way as a commitment by Mitel or any of its affiliates or subsidiaries. Mitel and its
affiliates and subsidiaries assume no responsibility for any errors or omissions in this document. Revisions
of this document or new editions of it may be issued to incorporate such changes.
No part of this document can be reproduced or transmitted in any form or by any means - electronic or
mechanical - for any purpose without written permission from Mitel Networks Corporation.
Trademarks
Mitel is a trademark of Mitel Networks Corporation.
Other product names mentioned in this document may be trademarks of their respective companies and
are hereby acknowledged.
5602 Wireless Handset
User Guide
February 2010
®,™ Trademark of Mitel Networks Corporation
© Copyright 2010, Mitel Networks Corporation
All rights reserved

Table of Contents
iii
About Your Phone . . . . . . . . . . . . . . . . . . . . . . . . . . . . . . . . . . . . . . . . . . . . . . . . . . . . . . . . . . . . 1
Elements of Your Handset . . . . . . . . . . . . . . . . . . . . . . . . . . . . . . . . . . . . . . . . . . . . . . . . . . . . . .1
Features and Functions . . . . . . . . . . . . . . . . . . . . . . . . . . . . . . . . . . . . . . . . . . . . . . . . . . . . . . . .2
Contacting Emergency Services . . . . . . . . . . . . . . . . . . . . . . . . . . . . . . . . . . . . . . . . . . . . . .2
Tips for your Comfort and Safety . . . . . . . . . . . . . . . . . . . . . . . . . . . . . . . . . . . . . . . . . . . . . .2
Frequency Range . . . . . . . . . . . . . . . . . . . . . . . . . . . . . . . . . . . . . . . . . . . . . . . . . . . . . . . . . .3
Exposure to Radio Frequency Signals . . . . . . . . . . . . . . . . . . . . . . . . . . . . . . . . . . . . . . . . . .3
Environmental Requirements . . . . . . . . . . . . . . . . . . . . . . . . . . . . . . . . . . . . . . . . . . . . . . . . .3
Chemical Resistance . . . . . . . . . . . . . . . . . . . . . . . . . . . . . . . . . . . . . . . . . . . . . . . . . . . . . . .3
Icons and Text in the Display . . . . . . . . . . . . . . . . . . . . . . . . . . . . . . . . . . . . . . . . . . . . . . . . .3
Keys and Buttons . . . . . . . . . . . . . . . . . . . . . . . . . . . . . . . . . . . . . . . . . . . . . . . . . . . . . . . . . . . . .7
Volume button . . . . . . . . . . . . . . . . . . . . . . . . . . . . . . . . . . . . . . . . . . . . . . . . . . . . . . . . . . . .7
Off hook, and YES key . . . . . . . . . . . . . . . . . . . . . . . . . . . . . . . . . . . . . . . . . . . . . . . . . . . . . .7
On hook, NO, and On/Off key . . . . . . . . . . . . . . . . . . . . . . . . . . . . . . . . . . . . . . . . . . . . . . . .8
C (Clear), and MUTE key . . . . . . . . . . . . . . . . . . . . . . . . . . . . . . . . . . . . . . . . . . . . . . . . . . . .8
MENU Key . . . . . . . . . . . . . . . . . . . . . . . . . . . . . . . . . . . . . . . . . . . . . . . . . . . . . . . . . . . . . . .8
R/Message Key . . . . . . . . . . . . . . . . . . . . . . . . . . . . . . . . . . . . . . . . . . . . . . . . . . . . . . . . . . .8
Handsfree Key . . . . . . . . . . . . . . . . . . . . . . . . . . . . . . . . . . . . . . . . . . . . . . . . . . . . . . . . . . . .8
Navigation Key . . . . . . . . . . . . . . . . . . . . . . . . . . . . . . . . . . . . . . . . . . . . . . . . . . . . . . . . . . . .8
Enter Text and Numbers . . . . . . . . . . . . . . . . . . . . . . . . . . . . . . . . . . . . . . . . . . . . . . . . . . . .9
Customizing Your Phone. . . . . . . . . . . . . . . . . . . . . . . . . . . . . . . . . . . . . . . . . . . . . . . . . . . . . . 10
Volume/Mute Control . . . . . . . . . . . . . . . . . . . . . . . . . . . . . . . . . . . . . . . . . . . . . . . . . . . . . . . . .10
Adjust the Volume During a Call . . . . . . . . . . . . . . . . . . . . . . . . . . . . . . . . . . . . . . . . . . . . . .10
Mute the Microphone During a Call . . . . . . . . . . . . . . . . . . . . . . . . . . . . . . . . . . . . . . . . . . .10
Turn Loudspeaking Function On/Off . . . . . . . . . . . . . . . . . . . . . . . . . . . . . . . . . . . . . . . . . .10
Turn the Ring Signal On/Off . . . . . . . . . . . . . . . . . . . . . . . . . . . . . . . . . . . . . . . . . . . . . . . . .10
Lock/Unlock the keypad . . . . . . . . . . . . . . . . . . . . . . . . . . . . . . . . . . . . . . . . . . . . . . . . . . . . . . .10
Change the Dialing Mode . . . . . . . . . . . . . . . . . . . . . . . . . . . . . . . . . . . . . . . . . . . . . . . . . . . . .10
Send a Dial Tone Pause . . . . . . . . . . . . . . . . . . . . . . . . . . . . . . . . . . . . . . . . . . . . . . . . . . . .11
Making and Answering Calls. . . . . . . . . . . . . . . . . . . . . . . . . . . . . . . . . . . . . . . . . . . . . . . . . . . 12
Make a Call . . . . . . . . . . . . . . . . . . . . . . . . . . . . . . . . . . . . . . . . . . . . . . . . . . . . . . . . . . . . . .12
Receive/end a call . . . . . . . . . . . . . . . . . . . . . . . . . . . . . . . . . . . . . . . . . . . . . . . . . . . . . . . .12
Call Handling. . . . . . . . . . . . . . . . . . . . . . . . . . . . . . . . . . . . . . . . . . . . . . . . . . . . . . . . . . . . . . . . 13

5602 Wireless Handset User Guide
iv
Hold . . . . . . . . . . . . . . . . . . . . . . . . . . . . . . . . . . . . . . . . . . . . . . . . . . . . . . . . . . . . . . . . . . . . . .13
Transfer . . . . . . . . . . . . . . . . . . . . . . . . . . . . . . . . . . . . . . . . . . . . . . . . . . . . . . . . . . . . . . . . . . .13
Conference . . . . . . . . . . . . . . . . . . . . . . . . . . . . . . . . . . . . . . . . . . . . . . . . . . . . . . . . . . . . . . . .13
Answer Call Waiting . . . . . . . . . . . . . . . . . . . . . . . . . . . . . . . . . . . . . . . . . . . . . . . . . . . . . . . . . .13
Callback . . . . . . . . . . . . . . . . . . . . . . . . . . . . . . . . . . . . . . . . . . . . . . . . . . . . . . . . . . . . . . . . . . .14
Call Park . . . . . . . . . . . . . . . . . . . . . . . . . . . . . . . . . . . . . . . . . . . . . . . . . . . . . . . . . . . . . . . . . .14
Call Forward . . . . . . . . . . . . . . . . . . . . . . . . . . . . . . . . . . . . . . . . . . . . . . . . . . . . . . . . . . . . . . . .14
Call Pickup . . . . . . . . . . . . . . . . . . . . . . . . . . . . . . . . . . . . . . . . . . . . . . . . . . . . . . . . . . . . . . . . .15
Do Not Disturb . . . . . . . . . . . . . . . . . . . . . . . . . . . . . . . . . . . . . . . . . . . . . . . . . . . . . . . . . . . . . .15
Direct Page . . . . . . . . . . . . . . . . . . . . . . . . . . . . . . . . . . . . . . . . . . . . . . . . . . . . . . . . . . . . . . . .15
Group Page . . . . . . . . . . . . . . . . . . . . . . . . . . . . . . . . . . . . . . . . . . . . . . . . . . . . . . . . . . . . . . . .15
Loudspeaker Page . . . . . . . . . . . . . . . . . . . . . . . . . . . . . . . . . . . . . . . . . . . . . . . . . . . . . . . . . . .16
Music on Hold . . . . . . . . . . . . . . . . . . . . . . . . . . . . . . . . . . . . . . . . . . . . . . . . . . . . . . . . . . . . . .16
Mobile Extension . . . . . . . . . . . . . . . . . . . . . . . . . . . . . . . . . . . . . . . . . . . . . . . . . . . . . . . . . . . .16
Menu Operation. . . . . . . . . . . . . . . . . . . . . . . . . . . . . . . . . . . . . . . . . . . . . . . . . . . . . . . . . . . . . . 17
Navigate the Menu . . . . . . . . . . . . . . . . . . . . . . . . . . . . . . . . . . . . . . . . . . . . . . . . . . . . . . . . . . .17
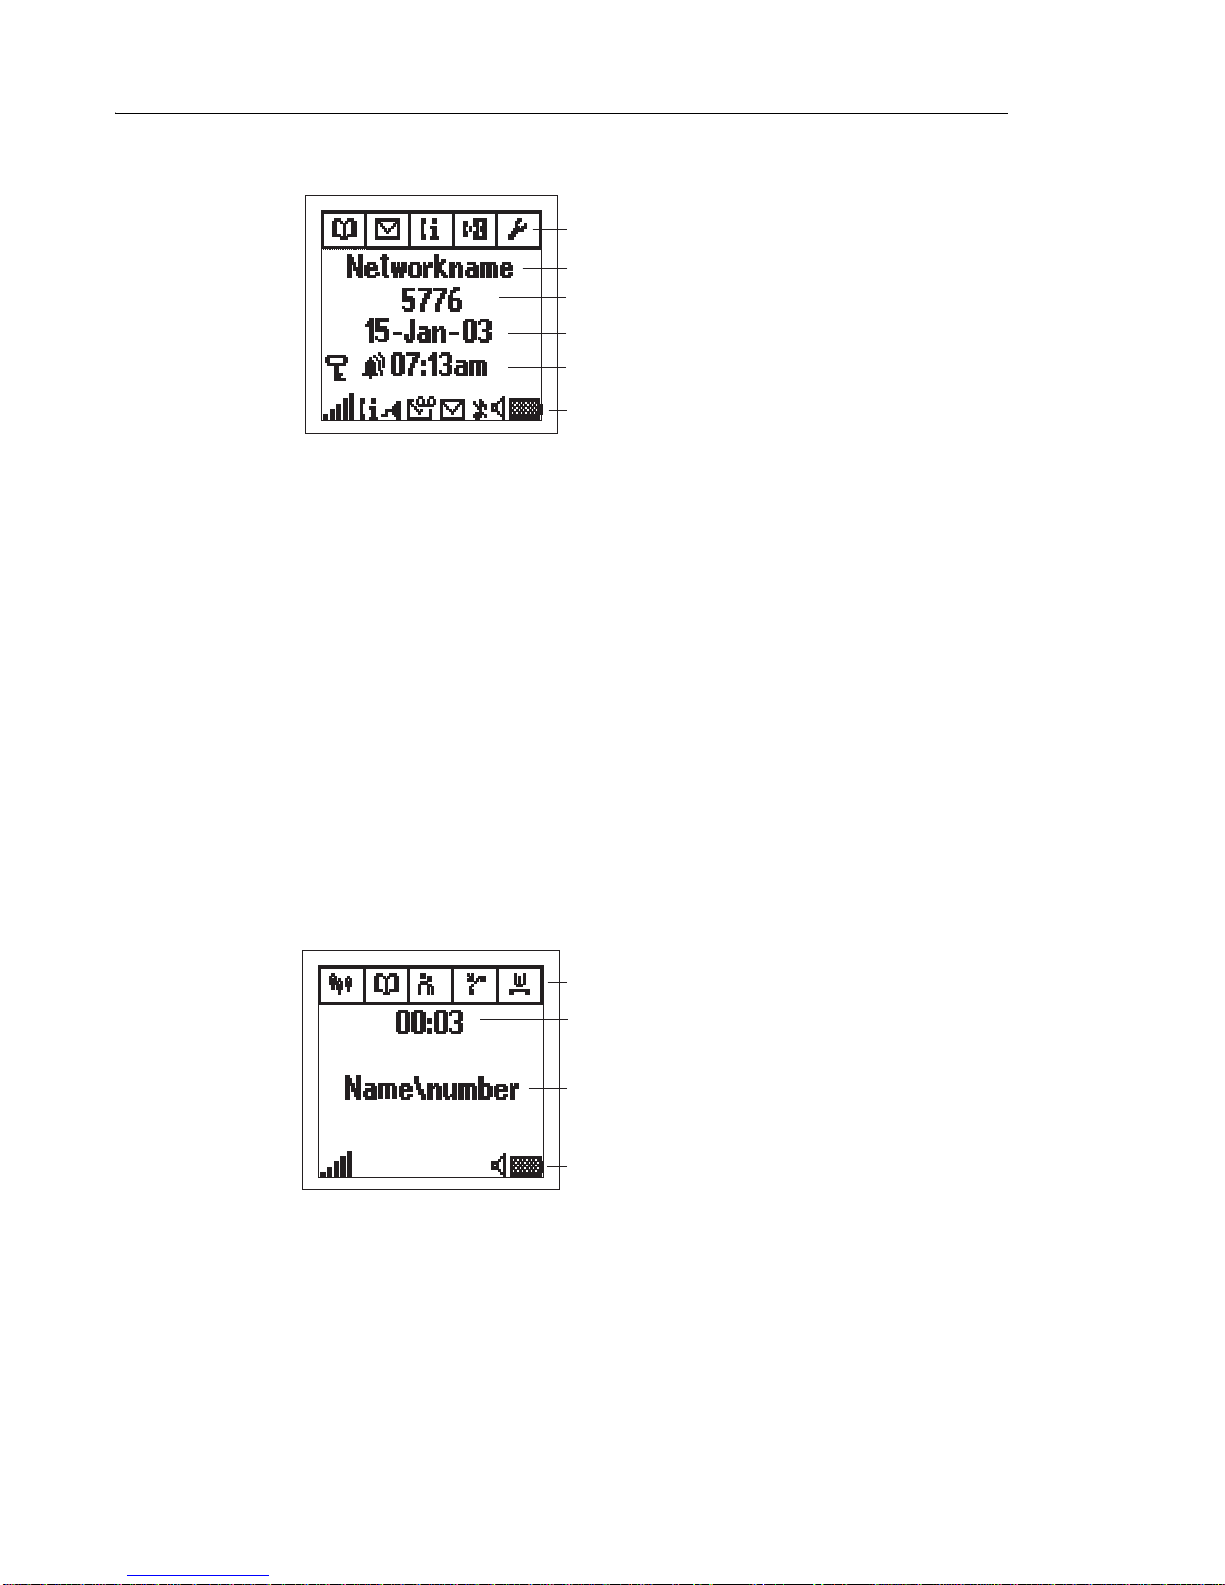
Standby Menus . . . . . . . . . . . . . . . . . . . . . . . . . . . . . . . . . . . . . . . . . . . . . . . . . . . . . . . . . . . . .17
The Phonebook Tab . . . . . . . . . . . . . . . . . . . . . . . . . . . . . . . . . . . . . . . . . . . . . . . . . . . . . .18
Message Tab . . . . . . . . . . . . . . . . . . . . . . . . . . . . . . . . . . . . . . . . . . . . . . . . . . . . . . . . . . . .19
Call info Tab . . . . . . . . . . . . . . . . . . . . . . . . . . . . . . . . . . . . . . . . . . . . . . . . . . . . . . . . . . . . .19
Toolbox Tab . . . . . . . . . . . . . . . . . . . . . . . . . . . . . . . . . . . . . . . . . . . . . . . . . . . . . . . . . . . . .20
Messaging . . . . . . . . . . . . . . . . . . . . . . . . . . . . . . . . . . . . . . . . . . . . . . . . . . . . . . . . . . . . . . . . . . 21
Receive a Text Message . . . . . . . . . . . . . . . . . . . . . . . . . . . . . . . . . . . . . . . . . . . . . . . . . . .21
Read a Stored Text Message . . . . . . . . . . . . . . . . . . . . . . . . . . . . . . . . . . . . . . . . . . . . . . . .21
Write and Send a Text message . . . . . . . . . . . . . . . . . . . . . . . . . . . . . . . . . . . . . . . . . . . . .21
Delete a Text Message . . . . . . . . . . . . . . . . . . . . . . . . . . . . . . . . . . . . . . . . . . . . . . . . . . . . .21
Reply to a Text Message . . . . . . . . . . . . . . . . . . . . . . . . . . . . . . . . . . . . . . . . . . . . . . . . . . .21
Confirm a Manual Acknowledge Request . . . . . . . . . . . . . . . . . . . . . . . . . . . . . . . . . . . . . . .22
Forward a Text Message to Another Telephone . . . . . . . . . . . . . . . . . . . . . . . . . . . . . . . . .22
Call the Sender of the Text Message . . . . . . . . . . . . . . . . . . . . . . . . . . . . . . . . . . . . . . . . . .22
Call a telephone number included in a Text Message . . . . . . . . . . . . . . . . . . . . . . . . . . . . .22
Read the next Text Message . . . . . . . . . . . . . . . . . . . . . . . . . . . . . . . . . . . . . . . . . . . . . . . .22
Voice Mail . . . . . . . . . . . . . . . . . . . . . . . . . . . . . . . . . . . . . . . . . . . . . . . . . . . . . . . . . . . . . . . . .23
Receive a Voice mail . . . . . . . . . . . . . . . . . . . . . . . . . . . . . . . . . . . . . . . . . . . . . . . . . . . . . .23
Check the Voice Inbox . . . . . . . . . . . . . . . . . . . . . . . . . . . . . . . . . . . . . . . . . . . . . . . . . . . . .23
One Key Voice Mail Access . . . . . . . . . . . . . . . . . . . . . . . . . . . . . . . . . . . . . . . . . . . . . . . . .23
Phonebook . . . . . . . . . . . . . . . . . . . . . . . . . . . . . . . . . . . . . . . . . . . . . . . . . . . . . . . . . . . . . . . . .23
Add a New Entry . . . . . . . . . . . . . . . . . . . . . . . . . . . . . . . . . . . . . . . . . . . . . . . . . . . . . . . . . .23

Table of Contents
v
Edit Name/Number . . . . . . . . . . . . . . . . . . . . . . . . . . . . . . . . . . . . . . . . . . . . . . . . . . . . . . . .23
Delete Name/Number . . . . . . . . . . . . . . . . . . . . . . . . . . . . . . . . . . . . . . . . . . . . . . . . . . . . . .24
Calculator . . . . . . . . . . . . . . . . . . . . . . . . . . . . . . . . . . . . . . . . . . . . . . . . . . . . . . . . . . . . . . . . . .24
Sound and Alert Settings . . . . . . . . . . . . . . . . . . . . . . . . . . . . . . . . . . . . . . . . . . . . . . . . . . . . . .24
Adjust the Ringer Volume . . . . . . . . . . . . . . . . . . . . . . . . . . . . . . . . . . . . . . . . . . . . . . . . . . .24
Turn the Vibrator on/off . . . . . . . . . . . . . . . . . . . . . . . . . . . . . . . . . . . . . . . . . . . . . . . . . . . . .24
Set different Ring Signals for Internal Call, External Call and Call Back . . . . . . . . . . . . . . .25
Set Alarm Signal . . . . . . . . . . . . . . . . . . . . . . . . . . . . . . . . . . . . . . . . . . . . . . . . . . . . . . . . . .25
Set different Message Alerts for Mail and Voice Messages . . . . . . . . . . . . . . . . . . . . . . . . .25
Set the Key Sound . . . . . . . . . . . . . . . . . . . . . . . . . . . . . . . . . . . . . . . . . . . . . . . . . . . . . . . .25
Display Settings . . . . . . . . . . . . . . . . . . . . . . . . . . . . . . . . . . . . . . . . . . . . . . . . . . . . . . . . . . . . .25
Backlight . . . . . . . . . . . . . . . . . . . . . . . . . . . . . . . . . . . . . . . . . . . . . . . . . . . . . . . . . . . . . . . .25
Contrast . . . . . . . . . . . . . . . . . . . . . . . . . . . . . . . . . . . . . . . . . . . . . . . . . . . . . . . . . . . . . . . .26
Enable/Disable Popup Info . . . . . . . . . . . . . . . . . . . . . . . . . . . . . . . . . . . . . . . . . . . . . . . . . .26
Time & Date Settings . . . . . . . . . . . . . . . . . . . . . . . . . . . . . . . . . . . . . . . . . . . . . . . . . . . . . . . . .26
Set Time Format . . . . . . . . . . . . . . . . . . . . . . . . . . . . . . . . . . . . . . . . . . . . . . . . . . . . . . . . . .26
Set Date Format . . . . . . . . . . . . . . . . . . . . . . . . . . . . . . . . . . . . . . . . . . . . . . . . . . . . . . . . . .27
Phone Lock settings . . . . . . . . . . . . . . . . . . . . . . . . . . . . . . . . . . . . . . . . . . . . . . . . . . . . . . . . .27
Activate the Phone Lock . . . . . . . . . . . . . . . . . . . . . . . . . . . . . . . . . . . . . . . . . . . . . . . . . . . .27
Deactivate the Phone Lock . . . . . . . . . . . . . . . . . . . . . . . . . . . . . . . . . . . . . . . . . . . . . . . . . .27
Select Answering Mode . . . . . . . . . . . . . . . . . . . . . . . . . . . . . . . . . . . . . . . . . . . . . . . . . . . . . . .27
Change the Menu Language . . . . . . . . . . . . . . . . . . . . . . . . . . . . . . . . . . . . . . . . . . . . . . . . . . .28
In Charger Mode . . . . . . . . . . . . . . . . . . . . . . . . . . . . . . . . . . . . . . . . . . . . . . . . . . . . . . . . . . . .28
Master Reset . . . . . . . . . . . . . . . . . . . . . . . . . . . . . . . . . . . . . . . . . . . . . . . . . . . . . . . . . . . . . . .28
Registration. . . . . . . . . . . . . . . . . . . . . . . . . . . . . . . . . . . . . . . . . . . . . . . . . . . . . . . . . . . . . . . . . 29
Over Air Registration . . . . . . . . . . . . . . . . . . . . . . . . . . . . . . . . . . . . . . . . . . . . . . . . . . . . . . . . .29
Login Users . . . . . . . . . . . . . . . . . . . . . . . . . . . . . . . . . . . . . . . . . . . . . . . . . . . . . . . . . . . . . . . .30
Logout Users . . . . . . . . . . . . . . . . . . . . . . . . . . . . . . . . . . . . . . . . . . . . . . . . . . . . . . . . . . . . . . .30
Operation Notice. . . . . . . . . . . . . . . . . . . . . . . . . . . . . . . . . . . . . . . . . . . . . . . . . . . . . . . . . . . . . 31
Accessibility and Voice Quality . . . . . . . . . . . . . . . . . . . . . . . . . . . . . . . . . . . . . . . . . . . . . . . . .31
Maintenance . . . . . . . . . . . . . . . . . . . . . . . . . . . . . . . . . . . . . . . . . . . . . . . . . . . . . . . . . . . . . . . . 32
Charge the Battery . . . . . . . . . . . . . . . . . . . . . . . . . . . . . . . . . . . . . . . . . . . . . . . . . . . . . . . . . . .32
Desktop Charger . . . . . . . . . . . . . . . . . . . . . . . . . . . . . . . . . . . . . . . . . . . . . . . . . . . . . . . . .32
Replace the Battery . . . . . . . . . . . . . . . . . . . . . . . . . . . . . . . . . . . . . . . . . . . . . . . . . . . . . . .33
Attach the Hinge-type Clip . . . . . . . . . . . . . . . . . . . . . . . . . . . . . . . . . . . . . . . . . . . . . . . . . . . . .33
Attach the Swivel-type Clip . . . . . . . . . . . . . . . . . . . . . . . . . . . . . . . . . . . . . . . . . . . . . . . . . . . .34

5602 Wireless Handset User Guide
vi

About Your Phone
1
About Your Phone
The Mitel 5602 Cordless Handset is a feature-rich handset designed to operate in conjunction
with a DECT base station and the 3300 ICP. It is ideal for users who need mobile voice and
messaging functions.
Elements of Your Handset
1 LED
2 Earpiece
3 Display
4 Headset Connector
5 On/Off, On hook, and NO Key
6 Menu Key
7 Handsfree Key
8 R / Message Key
9 Microphone
10 Mute / C Key
11 Navigation Key
12 YES Key
13 Loudspeaker (on back of handset)
14 Volume Down
15 Volume Up
To turn the phone On or Off, press and hold the NO key for 3 seconds.
Note: The handset may retain small magnetic objects around the mouth cap or ear cap
region.

5602 Wireless Handset User Guide
2
Features and Functions
The 5602 Cordless Handset provides the following features and functions:
Antenna: The antenna is integrated inside the phone.
Display: The full graphic type display is 101 pixels wide and 80 pixels high. The display has
white backlighting that can be switched on/off manually or automatically. Display contrast can
also be changed. See “Display Settings” on page 25.
Loudspeaker:Aseparateloudspeakeronthebackofthephoneprovidesthespeakerfunction.
Microphone: The microphone is on the bottom of the phone.
Headset Connector: The headset connector is used for:
• connecting headsets.
• connecting a data cable for downloading software and other data.
Clip: The belt clip on the back side of the cordless phone, can either be a hinge-type clip
(standard) or a swivel-type clip. See “Attach the Hinge-type Clip” on page 33, or “Attach the
Swivel-type Clip” on page 34. Use the clip to attach the phone to a belt or similar.
Battery:The battery is arechargeableLi-Ionbatteryandisfully charged within fourhours.See
“Replace the Battery” on page 33.The battery is not intended to be charged outside the
telephone or to be frequently exchanged.
Contacting Emergency Services
Thishandset, like any wireless phone,communicatesusing radiosignals. As with anywireless
phone,youmaynotbeabletoestablishaconnectionunderallconditions,therefore,youshould
not rely solely on a wireless telephone for essential, emergency communication. The key lock
feature disables the handset keypad and prevents the accidental dialing of numbers that may
result in nuisance calls. It also prevents accidental calls to emergency services numbers like
911, 999, or 112.
To disable the key lock feature, press the key and then press YES.
Currently, mobile IP phones do not support Enhanced 911 (E911) operation. If emergency
services are required, it is necessary to keep the system administrator and location database
up-to-date.
Tips for your Comfort and Safety
Don't cradle the handset!
Prolonged use of the handset can lead to neck, shoulder, or back discomfort, especially if you
cradle the handset between your ear and shoulder. If you use your phone a lot, you may find
Note: When a battery is connected to the 5602, afull charging cycle is always required.
Failure to do so results in a very early low battery warning.

About Your Phone
3
itmorecomfortabletouseaheadset.Seethesectiononheadsetusageelsewhereinthisguide
for more information.
Protect your hearing
Yourphonehasa controlforadjusting the volumeof the handsetreceiveror headset. Because
continuous exposure to loud sounds can contribute to hearing loss, keep the volume at a
moderate level.
Frequency Range
The handset is a radio transmitter and receiver. When it is on, it receives and sends out radio
frequency (RF) energy. The handset operates on different frequency ranges depending on
market and employs commonly used modulation techniques:
•EU:1880 - 1900 MHz
•USA: 1920 - 1930 MHz
•LA:1910 - 1930 MHz
Exposure to Radio Frequency Signals
This device complies with FCC SAR limit of 1.6 W/kg. The maximum SAR value measured
when used at the ear is 0.067 W/kg. The telephone has also been tested when worn on the
body using belt clip, maximum measured SAR value in this configuration is 0.04 W/kg.
Environmental Requirements
• Only use the handset in temperatures between 0C to +40C (32F to 140F).
• Avoid exposing the handset for direct sunlight or close to other heat sources.
• Keep the handset away from excessive heat and moisture.
• Do not expose the handset to open flame.
• Keep the handset away from strong electromagnetic fields.
Chemical Resistance
The alpha and numeric characters printed on the exterior of the handset have been tested and
found resistant to chipping, fading or wearing off when the handset is treated with common
cleaners and disinfectants or perspiration. The following chemicals have shown no harmful
effect:
• 3% Hydrochloric Acid
• M-alcohol (70% Methylated Ethanol)
• 60% Chlorhexidin 0.5mg/ml
Acetone can be damaging to the plastic casing of the handset and should not be used.
Icons and Text in the Display
All functions and settings available to the user are shown as icons and text in the display. For
more information about menu navigation, see “Menu Operation” on page 17.

5602 Wireless Handset User Guide
4
In standby mode
The top line displays the available menu tabs. In standby mode, the tabs are:
• Phonebook
• Message
• Call Info
• Call Service
• Toolbox
The next four lines are used for information such as the name of the system to which the
cordless phone is connected, the user identity (if supported by the network), and the current
date and time (if NTP settings are configured).
The bottomline (Info row)displays icons that give the user information such as signalstrength,
new messages, missed calls, and battery status. For more information see “Icons” on page 5.
Off hook
The following illustrations are examples of display information during a call.
003
Menu-tabs in standby mode
System information
User identity
(name and/or number)
Date
Key lock, Alarm icon,
and current time
Info row
004
Menu-tabs when off hook
Duration time
Calling party identity
Info row

About Your Phone
5
The top line displays the available menu tabs. When the phone is Off hook, the tabs are:
•3rdparty
• Phonebook
• Ongoing Call
• User Busy
• Call Waiting
The Phonebook and Ongoing Call tabs are always available; the other tabs are
system-dependent. For more information see “Menu tabs” on page 7.
Thesubsequentrowsshowinformationsuchascalldurationtimeandthenameand/ornumber
of the incoming caller (if supported by the network). If redirected line information is available,
the redirected caller identity followed by the “redirected call” icon are displayed.
Thebottomline(inforow)displaysiconsthatgivetheuserinformationasshowninthefollowing
chart:
Icons
Icon Title Description
Signal Strength - visible when the cordless phone is connected to a system. The
number of bars shown in the display depends on the signal
strength.
RIng SIgnal Muted - shown when the MUTE key is pressed and “Mute ringer?” is
selected.
Battery - alwaysshownin the displayin standbymode.Whenthe levelislow
it is time to charge the battery.
Low Battery - shown when the battery has 10% of its capacity left. The icon
flashes when the battery capacity is less than, or equal to, 5%.
Speaker - shown when the loudspeaker is activated.
New message "- indicates that one or more ew text messages have arrived. The
icon remains in the display until all new messages in the inbox are
read.
Voice message - shown when a voice message is waiting.
008
Called party identity
Info row
Redirected caller identity

5602 Wireless Handset User Guide
6
Confirm Message - prompts you to accept or decline a received message.
Old message - indicates that a message has been read.
Keys locked - indicates a locked keypad.
Headset - indicates that a headset is connected to the phone.
Microphone muted - indicates a silenced microphone. This means that the other part in
an ongoing call with you cannot hear you.
Redirected call - indicates that all voice calls and SMS messages are redirected
when the phone is placed in the charger. The redirected caller
identity is displayed beside the icon.
Outgoing call - added to all outgoing calls in the call list.
Answered call - added to all answered calls in the call list.
Missed Call "- added to all missed calls in the call list.
Call info - indicates that there are new missed calls in the call list. The icon
remains in the display until the calls are checked and either called
back or deleted.
Datacable - visible when a datacable is connected to the headset connector on
the phone.
Search phonebook - visible when it is possible to press the key and search for a
name/number in the phonebook.
Icon Title Description

About Your Phone
7
Menu Tabs
*Not supported on Mitel systems.
Keys and Buttons
Some keys have different functions depending on the state of the phone, or the length of time
that you press a key.
Short press = Press and release the key in less than one second.
Long press = Press and hold down the key for longer than one second and then release.
Volume button
The two buttons on the upper left side of the cordless phone (see “Elements of Your Handset”
on page 1) are used for increasing/decreasing the earpiece and speaker volume.
Off hook, and YES key
Menu
tabs Description
The Phonebook menu contains all names/numbers in the personal and the company
phonebook. It is also possible to access a central phonebook from this menu.
The Message menu contains all message handling such as reading, writing, and sending
messages.
The Call info menu contains call lists and call time.
The Call service* menu contains absent handling, and diversion of calls and messages to
another phone.
The Toolbox menu contains a calculator, alarm clock, and personal phone settings such
as changing the ringer volume, selecting language, etc.
The 3rd party* menu contains all functions for calls where a third (or more) part is involved.
The Ongoing call menu contains short-cuts to the message menu and to the call list, and
possibility to change to DTMF signalling mode etc.
In the User busy* menu a call waiting can be initiated if the called person is busy, or a call
back when the called line no longer is busy. This can only be done on internal calls.
In the Call waiting* menu information of the caller can be found if call waiting is initiated
by another party (if this information is available). A call that is waiting can be picked up on
another line while maintaining the first connection.
This key is used for connecting calls and as a confirmation key. A short press in
standby mode opens the call list. Pressing the key for more than 2 seconds calls
the Voice Activated Assistance (VAA) routine if this feature is available.
Always press YES to confirm choices when in menu mode.

5602 Wireless Handset User Guide
8
On hook, NO, and On/Off key
C (Clear), and MUTE key
MENU Key
R/Message Key
Handsfree Key
Navigation Key
This key is used to disconnect calls and to return to previous screens when working in
menu mode. Press the key for more than three seconds to turn the phone on/off.
Press this key in standby mode to mute the ringer signal.
Press this key during a call to mute the microphone.
Press C (Clear) to erase characters entered by mistake.
Press this key in standby mode to open the Phonebook menu.
Press this key when off hook to open the “3rd party” menu.
When you exit a menu using the MENU key, the last-used menu is stored.The next time
the MENU key is pressed, the stored menu opens.
Press this key when the “voice message” icon is displayed to enter your messaging
system and retrieve the voice message.
Note: Use of this feature depends on the network.
Press the Handsfree key to turn the loudspeaker on/off during a call. The key is also
used for connecting an incoming or outgoing call in loudspeaking mode.
Use this key to navigate through menus and when working in text mode. When offhook
and in standby mode, press the Right and Left navigation keys( and to access
menu tabs.)
Press the Up and Down navigation keys ( and ) for moving through menu lists.

About Your Phone
9
Enter Text and Numbers
In standby, and number input mode
• A short press on a key enters the digits “0” - “9” and the characters and #.
• To enter “+” in number input mode, long press key 0.
• Toenterapauseinnumberinput mode, longpressthe -key.Thepauseisdisplayed
as a “-”.
• To delete a character, short press the Ckey.
• To delete all characters, long press the Ckey.
In text input mode
• Press keys 0-9, , or #, to display the first available character on that specific key.
The marked character is selected after a time-out, or when another key is pressed.
• To change to upper/lower case, press the -key before entering the character.
• To add space in the text, short press key 1.
• The first character entered in a message, or when adding/editing a name in the phone-
book, will be an upper level character followed by lower level characters unless the
key is pressed before entering the character.
• To delete a character, short press the Ckey.
• To delete all characters, long press the Ckey.
006
Space 9 ? ! , . : ; " \ < = > ( ) _ 1 A B C a b c å ä æ à ç 2
D E F d e f è é 3 õ
J K L j k l 5
M N O m n o ñ ö ø ò 6
T U V t u v ü ù 8
#
G H I g h i ì 4
P Q R S p q r s ß 7
+ & @ / ¤ % $ £ ¥ § \ ¿ ¡ 0
W X Y Z w x y z 9
R/Message key Handsfree key
π σ
γ
Λ λ
θ ξ ω

5602 Wireless Handset User Guide
10
Customizing Your Phone
Volume/Mute Control
Adjust the Volume During a Call
• Press the "Volume up" button to increase the volume, and the "Volume down" button to
decrease the volume. The phone stores the new volume level.
Mute the Microphone During a Call
• Press the Mute button to disconnect/connect the microphone.The Microphone muted icon
( ) is displayed when the microphone is muted.
Turn Loudspeaking Function On/Off
• Press the "Handsfree key" to turn on/off the loudspeaker. This is possible either before
dialing a number, or during an ongoing conversation.
Turn the Ring Signal On/Off
1. In stand-by mode press the Mute key. You are prompted to Mute/Unmute.
2. Press YES to toggle between ring signal on/off. The “Ring signal muted” icon indicates a
silenced telephone.
Lock/Unlock the keypad
To prevent accidentally pressing keys and making a call, the keys can be blocked by locking
the keypad.
1. In the Toolbox menu, see “Toolbox Tab” on page 20, select Locks and then press YES.
2. Select Key lock and then press YES.
3. Set to Automatic to lock the keypad and confirm the choice by pressingYES. When a call
isreceived the keys willautomatically unlockand be lockedagain 30 seconds afterthe call
is ended.
Unlock the keypad by pressing the key and then pressing YES.
Change the Dialing Mode
If your system normally uses pulse dialingyou can switch betweenlong and short DTMF tones
if required. For some services the standard tones sent by the cordless handset are too short.
In this case the handset must be switched to “Long DTMF”.
Switch to long DTMF tones
1. While calling, select the Ongoing call tab.

Customizing Your Phone
11
2. Select Long DTMF and then press YES.
Switch to short DTMF tones
1. While calling, select the Ongoing call tab.
2. Select Short DTMF and press YES.
Send a Dial Tone Pause
A long press on the -key adds a pause. It is displayed as “-”.

5602 Wireless Handset User Guide
12
Making and Answering Calls
Make a Call
Dial a number
• Dialthecallnumberand pressYES. The name ofthecalledpartyisdisplayedifconnecting
line information is available.
Call a number from the call list (internal calls only)
1. Press YES to open the call list.
2. Step with the Down navigation key and select one of the twenty last received, dialed or
missedcalls.Ifanumberoccursmorethanonce,thelasttime stamptogetherwiththetotal
number of occurrences, is shown. (Note: Time stamp is dependent upon Network Time
Protocol setup. See your administrator for more information.)
3. Press YES to dial. The call list can also be accessed via the Call Info menu.
Quick call by a name in the phonebook
1. Press and hold the key that contains the first character in the name. Use short presses on
the same key to step between the characters, and use the Down navigation key to select
the desired name. For example, to dial the name "Eva", press key 3 (DEF) twice; the first
press shows all names starting with "D" and the second press shows all names starting
with "E". Scroll with the Down navigation key to find the name.
2. Press YES to dial.
Call by a name in the phonebook
1. Enter Phonebook in the menu.
2. Select Call and then press YES.
3. Enter the first character(s) or the whole name (or scroll with the Down navigation key to
find the name).
4. Press YES to dial.
Receive/end a call
• When the signal sounds press YES to answer the call, or press the Handsfree key to
answerthecallinspeakermode.Thename/numberofthecallingpartyisdisplayedifcalling
line information is available.
• Press NO to end the call. Call duration is shown in the display.
Note: Onlyinternalnumberscallscanbe calledfromthecall list. Externalnumbersmust
be dialed.

Call Handling
13
Call Handling
Hold
1. During a call, press the Rkey to put the call on hold.
2. Press the Rkey again to retrieve the call.
Transfer
Blind Transfer
1. During the call, press the Rtwice key to put the call on hold.
2. Dial the number to which you want to transfer the call.
3. Press NO to transfer the call.
Supervised Transfer
1. During the call, press the Rkey to put the call on hold.
2. Dial the number to which you want to transfer the call.
3. Wait for an answer, announce the transfer, and then press NO to hang up and connect the
other two parties.
To terminate the transfer and return to the held call, press the R key and then press 1.
Conference
To conference with another party during an active call:
1. Put the active call on hold. (Press the Rkey.)
2. Dial the number of the third party with whom you want to conference.
3. Press the Rkey twice to put the third party on hold.
4. Enter the feature access code for Conference Call.
5. Press the Rkey again to start the conferenced call.
Answer Call Waiting
While on a call, you hear a call waiting beep.
1. Press the Rkey and then press 2to answer the incoming call.
2. Press the Rkey and then press 2to swap the calls.

5602 Wireless Handset User Guide
14
Callback
Callback lets you request that the system notify you when a busy extension has become free.
1. Dial the feature access code for Callback and then press YES.
2. Listen for re-order tone and then hang up.
Your extension will ring when the called extension becomes free and automatically dials the
extension back.
Call Park
The Call Park feature allows you to place a call in a special hold state.You can then retrieve
the call from any extension in the system.
To park an active call:
1. Press the R/Message key to place the call on hold.
2. Dial the Call Park feature access code immediately followed by the directory number on
which to park the call and then press YES.
3. Inform the called party of the waiting call.
To retrieve a parked call:
1. Press YES to go off hook.
2. Dial the Call Park - Retrieve feature access code immediately followed by the directory
number on which the call is parked, and then press YES.
Call Forward
To set Call Forwarding:
1. Press YES to go offhook.
2. Enter the feature access code for the Call Forwarding mode you want to use, followed
immediately by the extension number to which you want to forward. (For example, if *62*
is your FAC for Call Fwd - Busy, and you want to forward calls to extension 1234, then
press *62*1234.)
3. Press YES.
To cancel Call Forwarding:
1. Enter the feature access code for Call Forwarding - Cancel and then press YES.
2. When you hear a dial tone, press NO to hang up. Forwarding is cancelled.
Other manuals for 5602
1
Table of contents
Other Mitel Handset manuals