ARMORDILLO CR X User manual

IMAGE IS FOR REFERENCE,
SHOWN WITH ADDITIONAL ACCESSORIES
CR X Chase Rack
STOP
Verify part and application is correct before proceeding.
If missing part or damage item please customer service directly.
Monday - Friday 9am-6pm PST (909)895-4522
We strongly recommend reading through the installation
guide before installation.
1/2020 4100 REV2
ARMORDILLO RECOMMENDS PROFESSIONAL INSTALLATION ON ALL THEIR PRODUCTS
WARNING: When working on ,under or around vehicle exercise caution. If working without a lift check vehicle owners manual for correct jacking points.
Always wear safety glasses and ensure a safe working area. Serious injury or death could occur if safety measures are not followed.
PERIODICALLY CHECK TO ENSURE ALL FASTENERS ARE TIGHT AND ALL STRUCTURAL COMPONENTS ARE SOUND
CARE
To protect your investment, wax this product after installing. Regular waxing is recommended to add a protective layer over the
finish. Do not use any type of polish or wax that may contain abrasives, that could damage the finish.
For stainless steel: Aluminum polish may be used to polish small scratches and scuffs on the finish.
Mild soap may be used to clean bull guard.
For color finishes: Regular waxing is recommended to add a protective layer over the finish.
Mild soap may be used to clean the bull guard.
ARMORDILLO products are designed as decorative accessories and should not be relied upon as protection for the vehicle or passengers. Buyers assume all
risk and liability whatsoever resulting from installation and use of ARMORDILLO products. ARMORDILLO assumes no liability for injury, loss, incidental or
consequential damages in the event of an accident.
ARMORDILLO guarantees the original purchaser a LIMITED 5 YEAR WARRANTY from data of purchase against manufactured defects in materials,
workmanship and finish under normal use. This excludes damage resulting from road hazards, debris, product misuse, improper installation, impairments from
accidents, neglect, shipping or product modification. This warranty applies only to new products and is limited to the repair or replacement of ARMORDILLO
products. Warranty does not included cost of removal, installation, labor, freight, inconvenience, or consequential damage. Original purchaser must return
defective merchandise to the original place of purchase and must provide the proof of purchase.
21912 Garcia Ln, Walnut, CA 91789 (909) 895-4522
WWW.ARMORDILLOUSA.COM [email protected]

Socket size
Grade 8.8/8.9
Grade 10.9
Hardware Reference Chart
M6 M8 M10 M12 M14 M16
10mm
102ft.lbs.
144ft.lbs.
13mm
20ft.lbs.
30ft.lbs.
17mm
50ft.lbs.
72ft.lbs.
19mm
70ft.lbs.
1t40ft.lbs.
22mm
110ft.lbs.
165ft.lbs.
24mm
175ft.lbs.
225ft.lbs.
PARTS LIST:
Driver Side Panel 1 Passenger Side Panel 1
Middle Section 1 6
M10 Washer 6
M8 Lock Washer
6
6
M10 Nutsert/Rivet Nut
6
M10x35mm Button
Head Bolt
M10 Lock Washer
M8x20mm Button
Head Bolt M8 Hex Nut
M8 Washer
6
12
6
LEVEL OF DIFFICULTY: EASY
Parts
INSTALLATION TIPS:
1) REMOVE CONTENTS FROM BOX, VERIFY ALL PARTS LISTED ARE PRESENT AND
FREE OF DAMAGE. READ AND UNDERSTAND ALL INSTRUCTIONS BEFORE
ATTEMPTING INSTALLATION.
2) TWO PERSON WILL BE REQUIRED WHEN MOUNTING AND ALIGNING CHASE
RACK.
3) USING PROPER TOOLS WILL IMPROVE THE QUALITY OF THE INSTALL AND
REDUCE INSTALLATION TIME.
4) ANTI-SEIZE LUBRICANT IS HIGHLY RECOMMEND TO USED ON ALL STAINLESS
STEEL FASTENERS TO PREVENT DAMAGE TO THE THREAD AND GALLING.
PERIODICALLY CHECK TO ENSURE ALL FASTENERS ARE TIGHT A ND ALL STRUCTURAL COMPONENTS ARE SOUND
Armordillo USA warrants this product to be free of defects in material and/or workmanship at the time of retail purchase by the original
purchaser. If the product is found to be defective, We may repair or replace the product at their option, when the product is returned, prepaid,
with proof of purchase. Alteration to, misuse of, or improper installation of this product voids the warranty. We liability is limited to repair or
replacement of products found to be defective, and specifically excludes liability for incidental
TOOL REQUIRED
SIZE DESCRIPTION
3/16”-7/16”
Drill Bit/Step Drill bit
13 & 17mm
Socket/Wrench
5/16”
Allen Wrench/Socket
M10
Nutsert/Rivet nut Tool
Utility Knife
Drill
INSTALL TIME: 60-90 MIN.
IF YOU ARE HESITANT TO UNDERTAKE
THIS TASK ON YOUR OWN, CONTACT AN AUTHORIZED
INSTALLER FOR ADDITIONAL ASSISTANCE
SAFETY GLASSES AND GLOVES SHOULD BE WORN AT
ALL TIME WHILE INSTALLING THIS PRODUCT.
1/2020 4100 REV2
21912 Garcia Ln, Walnut, CA 91789 (909) 895-4522
WWW.ARMORDILLOUSA.COM [email protected]

READING INSTRUCTIONS THOROUGHLY AND COMPLETELY BEFORE BEGINNING INSTALLATION.
WE ARE NOT RESPONSIBLE FOR ANY DAMAGE OR FAILURE RESULTING FROM IMPROPER INSTALLATION.
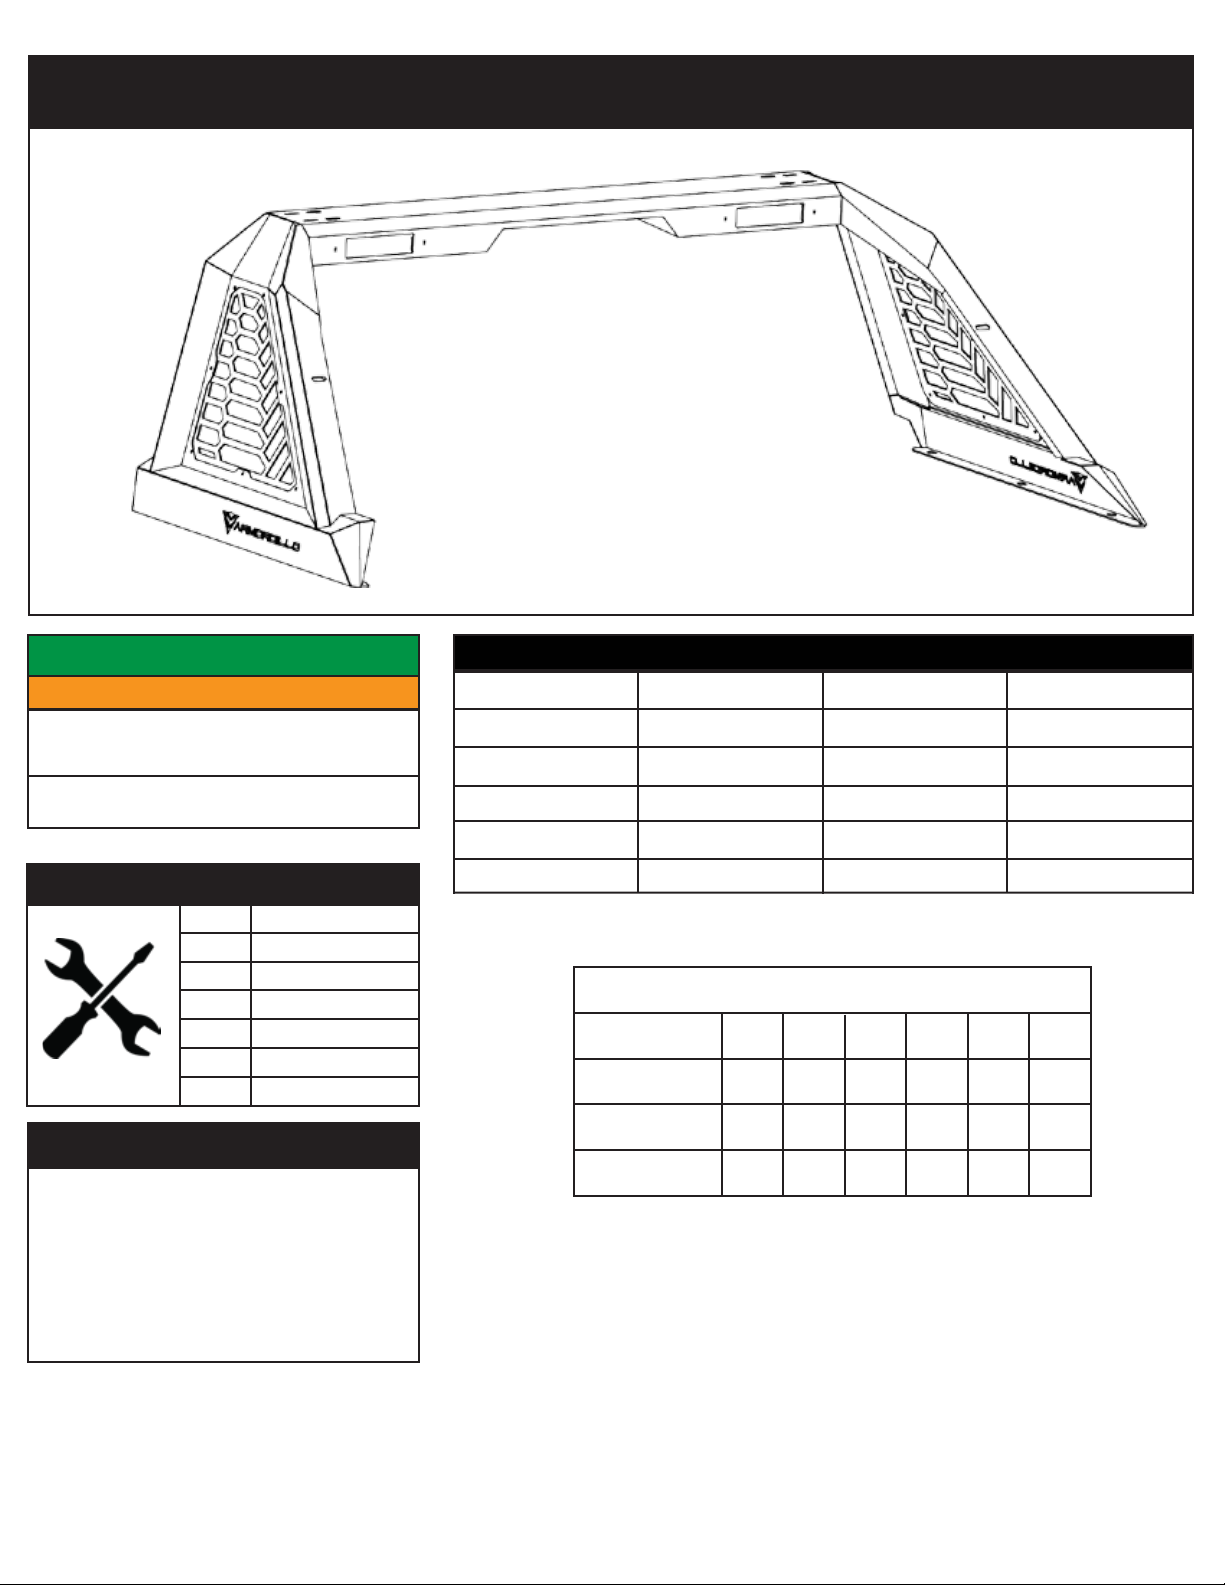
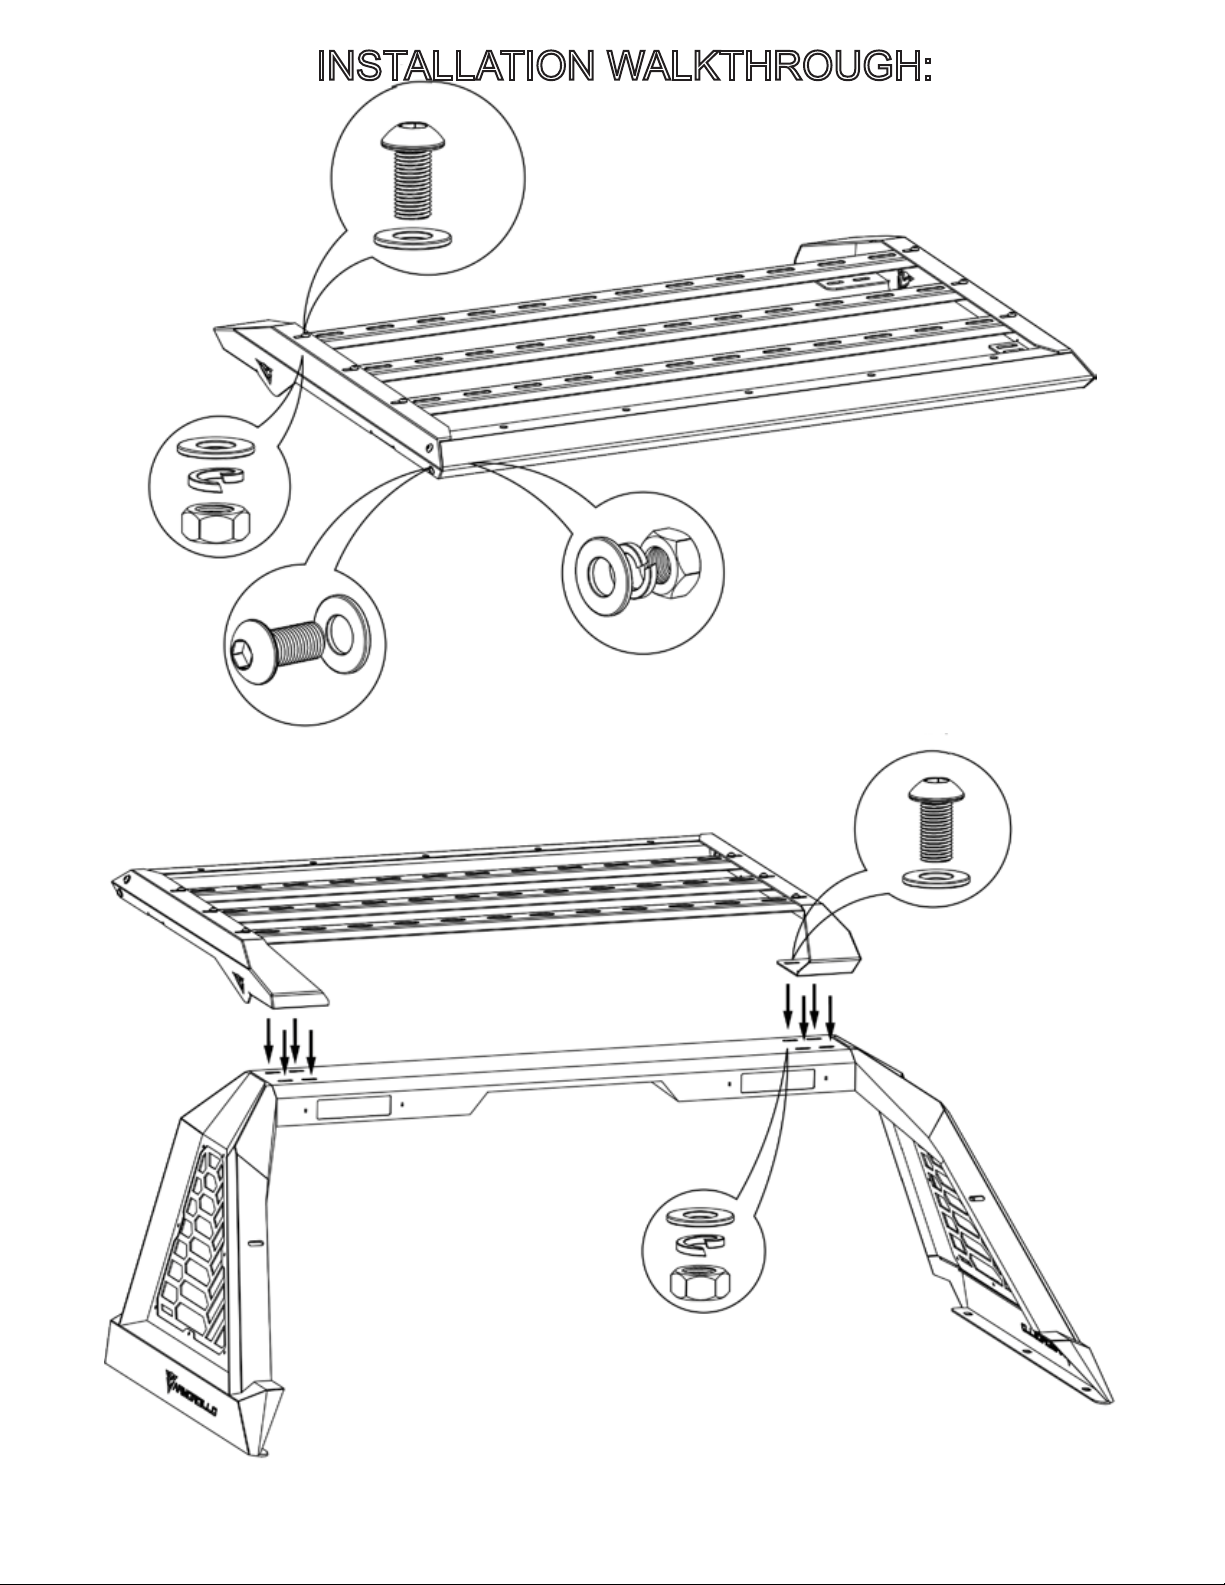
1) Lay out the parts on protected surface to prevent damage to the chase rack finish. Locate the
mount point on the Driver side panel and middle section, Connect the driver side panel and middle
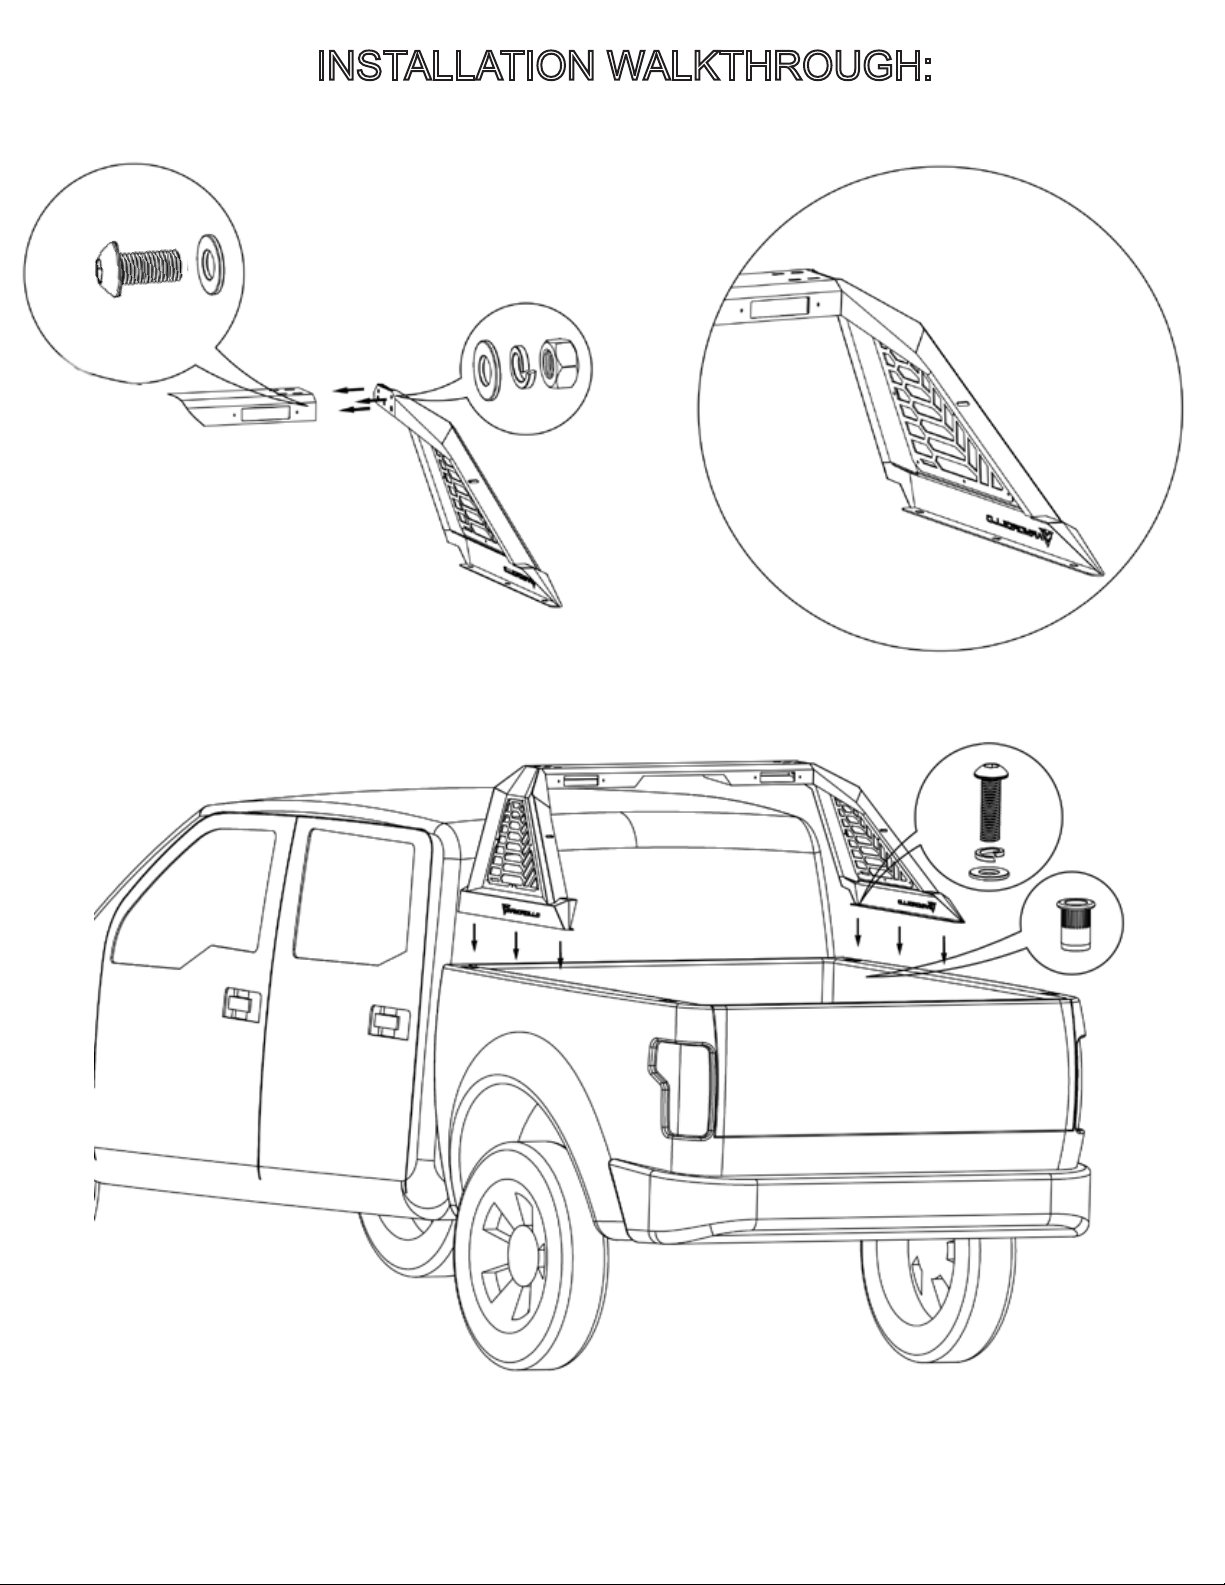
section as shown with provided hardware by placing (3) M8X25mm button head bolt and (3)M8
Washer thru the hole on the driver side panel attaching it to the middle section panel with (3) M8
washer, (3) M8 lock washer and (3) M8 Hex nut and repeat for Passenger side panel. After the
panels are attached you will tighten hardware to 30 ft. lbs.
2) Carefully place the assemble chase rack on to the bed of the truck and adjust it to desire position.
Once the chase rack is placed in desire position check to see if the 3 mount points on each side of
the bed cap is interfering with anything underneath the bed cap, may need to remove bed cap to
confirm. After confirming there is nothing behind the mount point, mark the holes, remove the chase
rack from the truck and use a 3/16" drill bit to start a pilot hole and working your way up to 7/16" drill
bit.
NOTE: Allow the nutsert/rivet nut to be snug with drilled hole.
3) Once the holes are drilled out, check to make sure the nutsert/Rivet Nut fit sung into the hole.
Use a nutsert/Rivet Nut tool to expand the nut in drilled hole, failure to fully expand the nutsert/rivet
nut will not hold the bolts in place.
NOTE: It is recommend to trim the hole to allow the nutsert/rivet nut to sit flush with the bed before
expanding the nutsert/rivet nut into place. If you do not have the tool you may still be able to attach
the nutsert/Rivet to the vehicle, but it is strongly recommend to use the Nutsert/Rivet nut tool.
To Install nutsert/rivet nuts without a tool you will need the following.
1) M10 Bolt that is about 1.5" in length. (Not Included)
2) Oversize nut, bigger than the bolt thread
3) Washer
4) 2 open wrench, one for the oversize nut and the other for the bolt.
After placing the nutsert/rivet nut in the hole, you will thread on the bolt with the oversize nut and
washer. Using the wrench for the oversize nut to hold it in place as you tighten the bolt it will expand
the nutsert/rivet nut tighten it in place. HIGHLY RECOMMEND SEARCHING VIDEO ON METHOD
BEFORE ATTEMPTING TO INSTALL NUTSERT/RIVET NUT WITHOUT TOOL, THIS IS A GEN-
ERAL GUIDE.
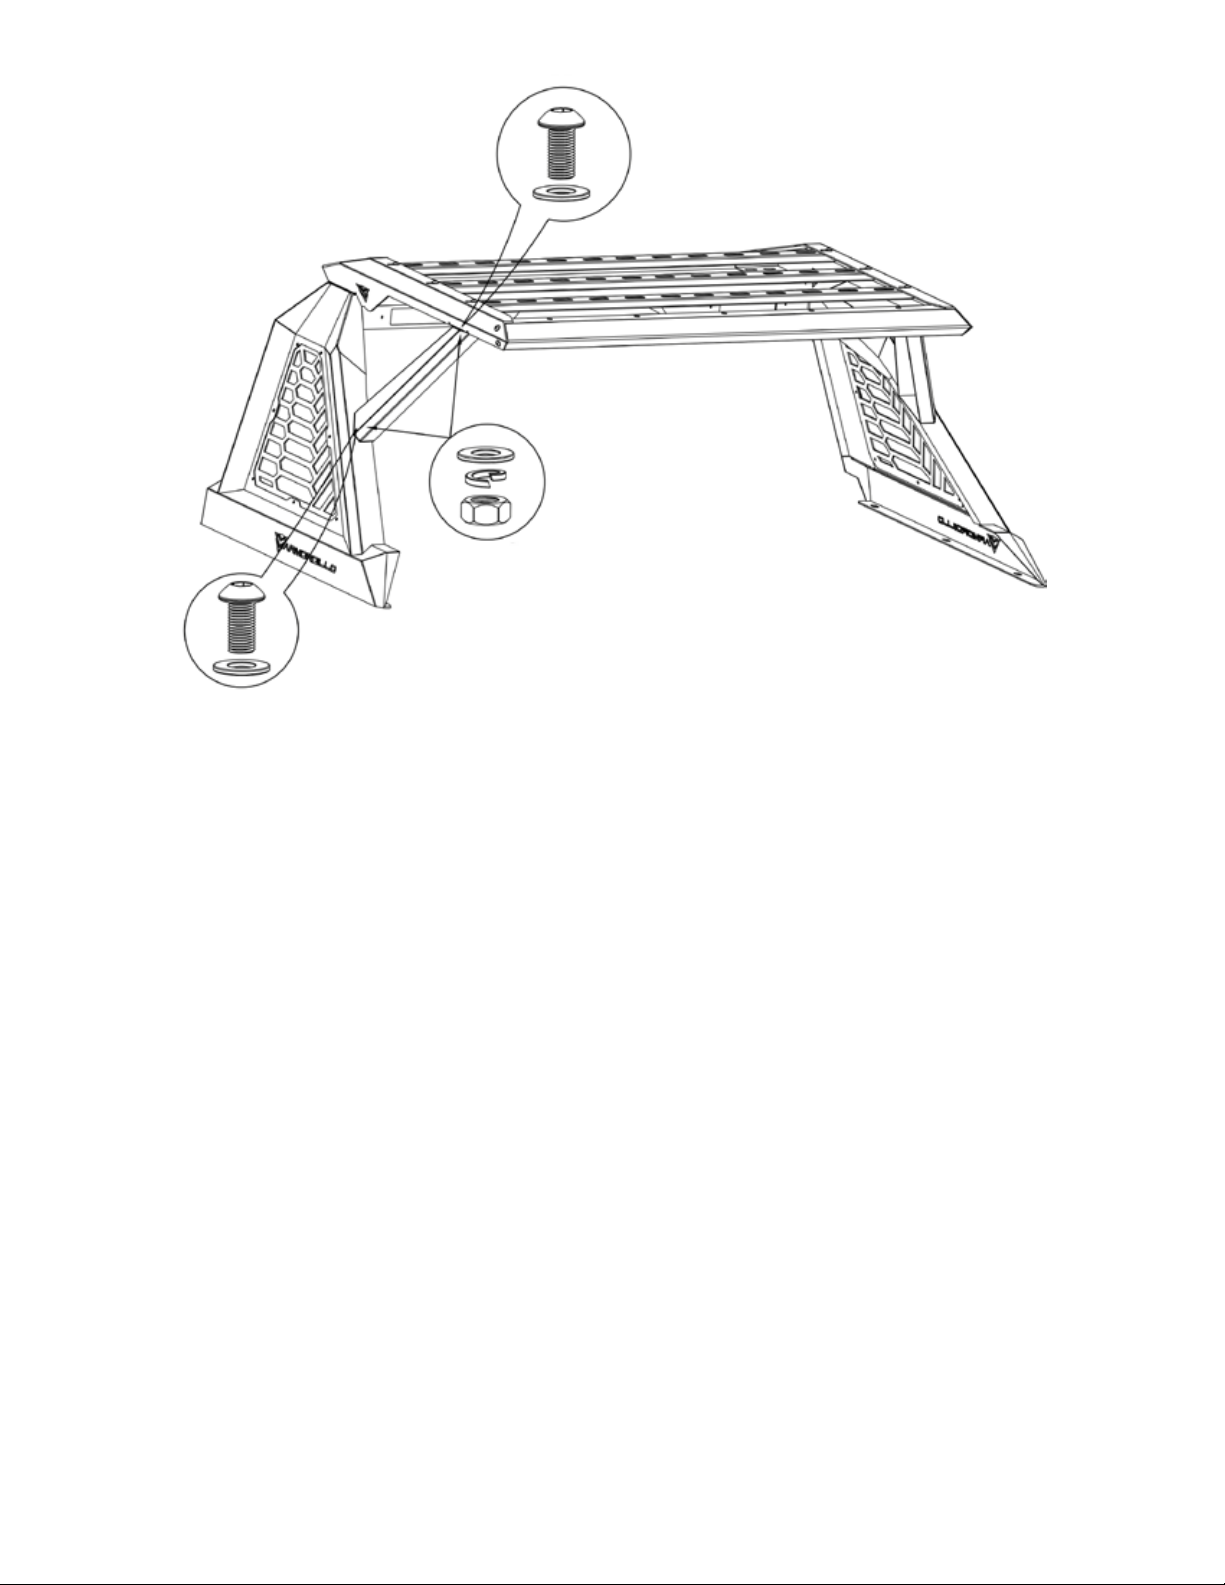
4) After nutsert/rivet nut is installed on the bed cap place the chase rack on the bed and adjusted
into desire location to attached chase rack. Attached the chase rack with the supplied hardware (6)
M10x35mm hex button bolt, (6) M10 Lock washer, (6) M10 washer, tighten hardware to 50 ft. lbs.
5) Do periodic inspections to the installation to ensure all hardware is secure and tight.
INSTALLATION WALKTHROUGH:
1/2020 4100 REV2
21912 Garcia Ln, Walnut, CA 91789 (909) 895-4522
WWW.ARMORDILLOUSA.COM [email protected]

INSTALLATION WALKTHROUGH:
1/2020 4100 REV2
21912 Garcia Ln, Walnut, CA 91789 (909) 895-4522
WWW.ARMORDILLOUSA.COM [email protected]
M8 Button Head
M10 Button Head

IMAGE IS FOR REFERENCE,
SHOWN WITH ADDITIONAL ACCESSORIES
CR X Chase Rack - Roof Rack
STOP
Verify part and application is correct before proceeding.
If missing part or damage item please customer service directly.
Monday - Friday 9am-6pm PST (909)895-4522
We strongly recommend reading through the installation
guide before installation.
1/2020 4200 REV2
ARMORDILLO RECOMMENDS PROFESSIONAL INSTALLATION ON ALL THEIR PRODUCTS
WARNING: When working on ,under or around vehicle exercise caution. If working without a lift check vehicle owners manual for correct jacking points.
Always wear safety glasses and ensure a safe working area. Serious injury or death could occur if safety measures are not followed.
PERIODICALLY CHECK TO ENSURE ALL FASTENERS ARE TIGHT AND ALL STRUCTURAL COMPONENTS ARE SOUND
CARE
To protect your investment, wax this product after installing. Regular waxing is recommended to add a protective layer over the
finish. Do not use any type of polish or wax that may contain abrasives, that could damage the finish.
For stainless steel: Aluminum polish may be used to polish small scratches and scuffs on the finish.
Mild soap may be used to clean bull guard.
For color finishes: Regular waxing is recommended to add a protective layer over the finish.
Mild soap may be used to clean the bull guard.
ARMORDILLO products are designed as decorative accessories and should not be relied upon as protection for the vehicle or passengers. Buyers assume all
risk and liability whatsoever resulting from installation and use of ARMORDILLO products. ARMORDILLO assumes no liability for injury, loss, incidental or
consequential damages in the event of an accident.
ARMORDILLO guarantees the original purchaser a LIMITED 5 YEAR WARRANTY from data of purchase against manufactured defects in materials,
workmanship and finish under normal use. This excludes damage resulting from road hazards, debris, product misuse, improper installation, impairments from
accidents, neglect, shipping or product modification. This warranty applies only to new products and is limited to the repair or replacement of ARMORDILLO
products. Warranty does not included cost of removal, installation, labor, freight, inconvenience, or consequential damage. Original purchaser must return
defective merchandise to the original place of purchase and must provide the proof of purchase.
21912 Garcia Ln, Walnut, CA 91789 (909) 895-4522
WWW.ARMORDILLOUSA.COM [email protected]

Socket size
Grade 8.8/8.9
Grade 10.9
Hardware Reference Chart
M6 M8 M10 M12 M14 M16
10mm
102ft.lbs.
144ft.lbs.
13mm
20ft.lbs.
30ft.lbs.
17mm
50ft.lbs.
72ft.lbs.
19mm
70ft.lbs.
1t40ft.lbs.
22mm
110ft.lbs.
165ft.lbs.
24mm
175ft.lbs.
225ft.lbs.
PARTS LIST:
Driver Side Panel 1 Passenger Side Panel 1
Cross Bars 3 1
M8x20mm Button
Head Bolt
22M8 Lock Washer
22
22
2
Front Trim Panel
M8 Hex Nut
Bumper Vibration
Dampeners
M8 Washer 44
Suppot Bar 2
LEVEL OF DIFFICULTY: EASY
Parts
INSTALLATION TIPS:
1) REMOVE CONTENTS FROM BOX, VERIFY ALL PARTS LISTED ARE PRESENT AND
FREE OF DAMAGE. READ AND UNDERSTAND ALL INSTRUCTIONS BEFORE
ATTEMPTING INSTALLATION.
2) TWO PERSON WILL BE REQUIRED WHEN MOUNTING AND ALIGNING CHASE
RACK.
3) USING PROPER TOOLS WILL IMPROVE THE QUALITY OF THE INSTALL AND
REDUCE INSTALLATION TIME.
4) ANTI-SEIZE LUBRICANT IS HIGHLY RECOMMEND TO USED ON ALL STAINLESS
STEEL FASTENERS TO PREVENT DAMAGE TO THE THREAD AND GALLING.
PERIODICALLY CHECK TO ENSURE ALL FASTENERS ARE TIGHT A ND ALL STRUCTURAL COMPONENTS ARE SOUND
Armordillo USA warrants this product to be free of defects in material and/or workmanship at the time of retail purchase by the original
purchaser. If the product is found to be defective, We may repair or replace the product at their option, when the product is returned, prepaid,
with proof of purchase. Alteration to, misuse of, or improper installation of this product voids the warranty. We liability is limited to repair or
replacement of products found to be defective, and specifically excludes liability for incidental
TOOL REQUIRED
SIZE DESCRIPTION
13mm
Socket/Wrench
5/16”
Allen Wrench/Socket
INSTALL TIME: 60-90 MIN.
IF YOU ARE HESITANT TO UNDERTAKE
THIS TASK ON YOUR OWN, CONTACT AN AUTHORIZED
INSTALLER FOR ADDITIONAL ASSISTANCE
SAFETY GLASSES AND GLOVES SHOULD BE WORN AT
ALL TIME WHILE INSTALLING THIS PRODUCT.
1/2020 4200 REV2
21912 Garcia Ln, Walnut, CA 91789 (909) 895-4522
WWW.ARMORDILLOUSA.COM [email protected]

READING INSTRUCTIONS THOROUGHLY AND COMPLETELY BEFORE BEGINNING INSTALLATION.
WE ARE NOT RESPONSIBLE FOR ANY DAMAGE OR FAILURE RESULTING FROM IMPROPER INSTALLATION.
1) Lay out the parts on protected surface to prevent damage to the chase rack finish. Assemble the
rack as shown by identify the side panel, front panel, and cross bars.
2) Located the 3 mount point on top of the side panels, Attached the (6) M8 x 20mm button head
bolt with (6) M8 washer to the top of the side panels. gently thread on the (6) M8 Washer, (6) M8
lock washer and (6) M8 hex nut on the bottom of the side panel, DO NOT TIGHTEN OR FULLY
THREAD THE HARDWARE ON AT THIS TIME.
3) Locate the front panel and attach it to the side panel as shown with the provide hardware. (2)M8 x
20mm button head bolt and (2) M8 washer on the outside of side panel. Connecting it with(4) M8
washer, (4)M8 lock washer, (4) M8 Hex nut.
4) With the front panel and side panel attached the item should like an "U" shape. The ends of the
cross bar has open slots that you will slide into the hardware that were gently thread on to the top of
the side panel.
5) With the Rack assembly you have a option of over the cab configuration or over the bed.
Over the Cab configuration
i) Install the (2) vibration dampers on the rack and place it over the cab.
ii) Once it is place over the cab connect the roof rack portion to the base rack with the provided
hardware (8) M8 Button head but, (16) M8 Washer, (8) M8 Lock washer, and (8) M8 Hex Nut. and
tighten hardware
iii) After the roof rack and chase rack is connect adjust the damper so roof rack will be level.
Over the Bed configuration
i) Attach the roof rack portion to the base rack with the provided hardware (8) M8 Button head but,
(16) M8 Washer, (8) M8 Lock washer, and (8) M8 Hex Nut. and tighten hardware
ii) Connect the support bar from the chase rack to the roof rack with the provide hardware (4) M8
Button head but, (8) M8 Washer, (4) M8 Lock washer, and (4) M8 Hex Nut. and tighten hardware
6) Do periodic inspections to the installation to ensure all hardware is secure and tight.
INSTALLATION WALKTHROUGH:
1/2020 4200 REV2
21912 Garcia Ln, Walnut, CA 91789 (909) 895-4522
WWW.ARMORDILLOUSA.COM [email protected]

INSTALLATION WALKTHROUGH:
1/2020 4200 REV2
21912 Garcia Ln, Walnut, CA 91789 (909) 895-4522
WWW.ARMORDILLOUSA.COM [email protected]

1/2020 4200 REV2
21912 Garcia Ln, Walnut, CA 91789 (909) 895-4522
WWW.ARMORDILLOUSA.COM [email protected]

Wiring Information
WARNING
This is meant for informational purposes only! DO NOT ATTEMPT ANY WIRING OF ANY KIND if you lack the knowledge
and understanding required. Otherwise personal injury and/or death as well as property damage or loss could occur.
Electricity is dangerous and can cause personal injury or DEATH as well as other property loss or damage if not used
properly. If you have any doubts what so ever about performing do-it-yourself electrical work, PLEASE do the seek
QUALIFIED SPECIALIST to perform the work for you. NEVER WORK WITH LIVE VOLTAGE. Always disconnect the
power source before working with electrical circuits. When performing electrical work, ALWAYS READ AND FOLLOW
THE MANUFACTURERS INSTRUCTIONS AND SAFETY GUIDELINES.
By utilizing the information given, YOU are expressly holding us HARMLESS FOR ANY PROPERTY DAMAGE, PER-
SONAL INJURY AND/OR DEATH, OR ANY OTHER LOSS OR DAMAGE THAT MAY RESULT FROM YOUR ACTIONS.
1/2020 4200 REV2
21912 Garcia Ln, Walnut, CA 91789 (909) 895-4522
WWW.ARMORDILLOUSA.COM [email protected]
Table of contents
Other ARMORDILLO Automobile Accessories manuals
Popular Automobile Accessories manuals by other brands

Metra Electronics
Metra Electronics AW-333GM installation instructions

Dometic
Dometic CoolAir SP950C installation manual

Webasto
Webasto 300101 Installation & operation manual

walser
walser 16000 Instructions for use

Tyredog
Tyredog TDA-4C quick start guide

Black Horse Off Road
Black Horse Off Road 7G048806SS installation instructions