ARRI CCM-1 User manual

QUICK START GUIDE

14

TABLE OF CONTENTS
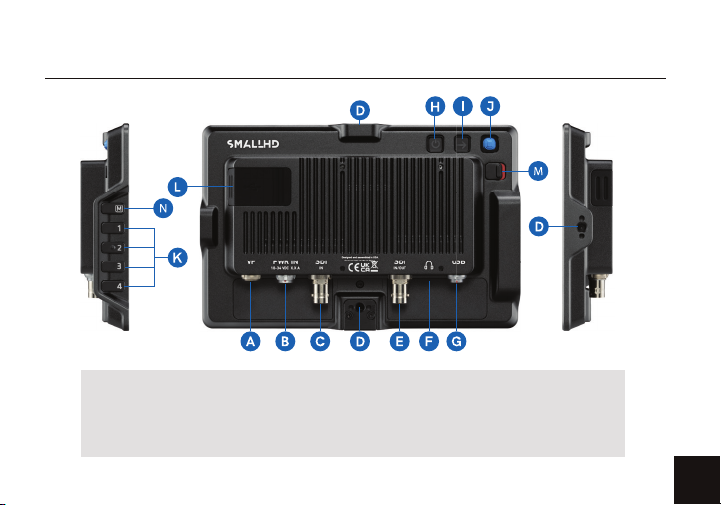
Physical Properties...................................4
Power and Connect...................................6
Mounting Options.....................................6
ARRI Sunhood................................
..........
7
ARRI MAC-1.............................................8
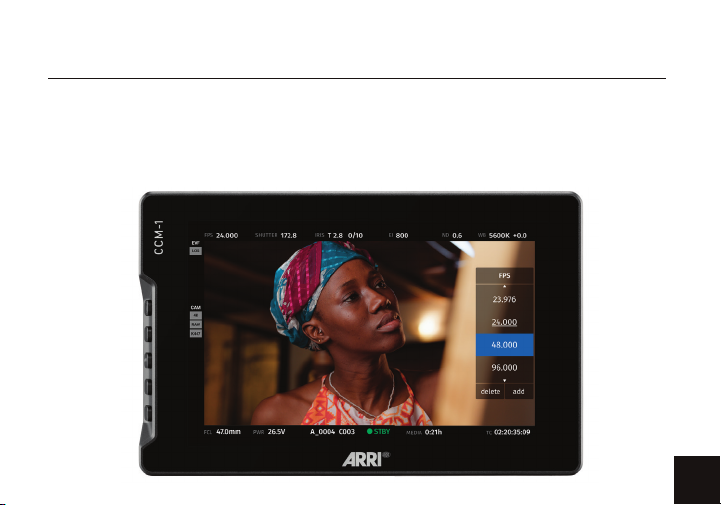
ARRI Camera Control................................9
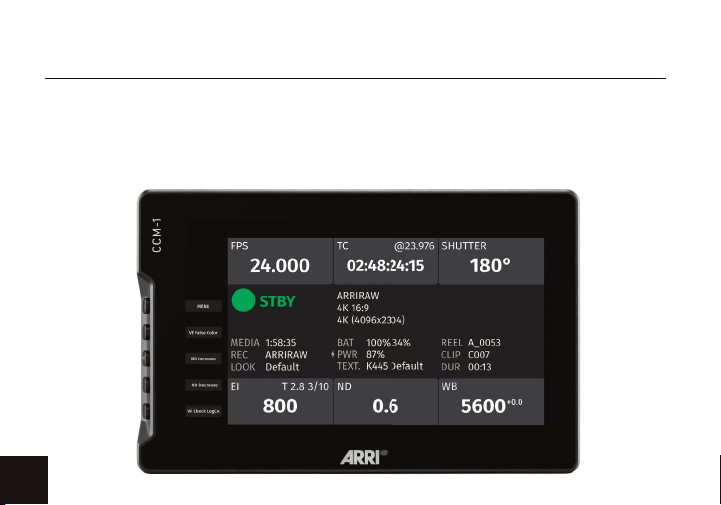
PageOS Overview....................................13
Additional Resources...............................22

14
PHYSICAL PROPERTIES
Front
Rear
4

5
Rear RightLeft
A: VF
B: PWR IN
C: SDI IN
D: ARRI Pin-Lock ¼"Interface
(bottom, rear, right side, top)
E: SDI In/Out
F: Headphone
G: USB Locking Connector 5-Pin
H: Power Button
I: Back Button
J: Joystick
K: User Buttons
L: USB-C Slot
M: Lock Slider
N: Menu Button
PHYSICAL PROPERTIES

POWER AND CONNECT
MOUNTING OPTIONS
¼"- MOUNTING POINTS
POWER
SIGNAL
There are 4x ARRI Pin-Lock ¼"mechanical interfaces to secure the monitor to
a camera or rig (bottom, rear, right side, top).
Power your monitor with your VF cable or a power cable.
Video signals via 3G-SDI up to 1080p60.
When powering with VF cable only your monitors max brightness will be 100nits.
When powering with power cable max brightness will be 1300nits.
6

7
This foldable sunhood for the Camera Control Monitor CCM-1 can be mounted to the CCM-1 without
any tools, the side aps and the top ap hold together magnetically. The outside material is strong
and durable, the inside microber material protects the display and prevents reections. The sunhood
protects the display of the CCM-1 even when folded.
ARRI FOLDABLE SUNHOOD

ARRI MONITOR ARM FOR CAMERA MAC-
The two-axis MAC-1 monitor arm allows for rapid positioning of the CCM-1 without aecting the
horizon relative to the camera. The MAC-1 features an adjustable friction system for one-handed
repositioning and inserts for dierent mounting standards (1/4"ARRI Pin-Lock and SmallHD Pins).
8

9
ARRI CAMERA CONTROL
INTERACTIVE OVERLAYS
Status Components
A live image with interactive status components allows quick access to the most frequently
adjusted settings. Changes occur in real time and can be viewed live instead of changing
between a menu and the image.

ARRI CAMERA CONTROL
HOME SCREEN
The familiar HOME screen has been updated for the larger CCM-1 display and shows all relevant
camera information at a glance. Touching one of the ve main exposure parameters will take users
to a live image where they can make adjustments with a real-time preview. On the left, an overview
of the user button assignments are shown.
10

11
ARRI CAMERA CONTROL
CLASSIC MENU
The CCM-1 oers access to the complete camera menu for access to all camera settings.
The menu[1] can be controlled with touch or physical keys and oers the same, intuitive
layout as the MVF-2.
[1]Menu Button
Menu Button

14
ARRI CAMERA CONTROL
PLAYBACK CONTROL
Improved playback control is accessed via the menu or a user button.
An extended clip list can be viewed during playback and includes a
handy metadata display.
12

13
PageOS OVERVIEW
The PageOS interface allows users to congure and assign specic image-analyzing tools and/
or features to up to eight customizable pages. Users can access those tools by navigating to the
corresponding page on the monitor, instead of enabling or disabling features individually.
GENERAL LAYOUT
Pages View
The ‘Pages View’ oers a zoomed-out perspective
of all congured pages, allowing organization and
naming to ensure the most ecient overall setup.
Monitor Settings
The settings page will allow you to adjust a wide
range of global monitor settings.

14
BASIC NAVIGATION
Touchscreen
PageOS has an easy-to-navigate touchscreen that
works just like your smartphone.
Joystick
Use the joystick to navigate the Pages menu:
Pinch to zoom
Swipe left and right between custom pages
Slide your nger down for a view of all
your preset pages
LEFT or RIGHT -- to change Pages
DOWN -- Enter Page View mode
UP -- Zoom or Exit Page View mode
Swipe all the way left to access your deep
settings menu (Calibration, Proles, etc)
Button press or depress selects highlighted items
PageOS OVERVIEW
14

15
User Buttons
Press and hold to program these custom user buttons
as shortcuts.
PageOS OVERVIEW
PAGES
Add
To create a new page from either a fresh workspace,
a premade template, or a specic utility, navigate
to the right-hand side of the Pages View. Select the
New Blank Page option and then choose which type
of page you would like to add, or create a custom
one from scratch.
Delete
Zoom out and navigate to the page you would like to delete,
push down with your joystick to select the delete option, or
if using touch just press the delete button and then conrm.
Back Button
Click to close or navigate back/exit.

14
ADJUSTING TOOLS
Tap your screen while on any page to reveal the toolbar, then
select the tool you want to activate. To adjust the custom
settings of that tool press the arrow that appears next to the
name of the tool, this will take you to a submenu that will
show your adjustment options for that specic tool.
PageOS OVERVIEW
Add New Tool to a Page
Tap your screen while on any page to reveal the toolbar.
Press the plus sign that appears on the left side of
the page.
Select the tool you want to add to that page.
You will be presented with an option to add to
that specic page or to add the tool to all pages.
If you choose to add it to all pages that tool will
be present on every single page, whereas if you
just select single page it will be conned to the
page you are currently on.
16

17
PageOS OVERVIEW
SETTINGS: FEED
SETTINGS: DISPLAY
Input Config
Select an input to display the image present on
SDI 1, SDI 2, or VF
Backlight
Select a backlight level that suits your viewing
environment to maximize contrast and viewability.
Appearance
Apply sharpening to the video data, if desired.
Calibration
Calibration ensures chrominance and luminance
accuracy that can be relied upon for critical
color decisions.

14
SETTINGS: CONTROLS
SETTINGS: CAPTURE
Volume
Adjust the audio output level for the headphone jack
Image Capture
Congure the Image Capture tool to help facilitate shot
matching or for automatic thumbnail creation upon
pressing Record.
Interlace
These options control how interlaced footage is
displayed.
Image Rotate
Image Rotate options enable upside-down mounting
-- or enable Mirroring for when the monitor must
face the subject.
Image Gallery
Browse the Image Gallery to review the images on your
removable media.
PageOS OVERVIEW
18

19
PageOS OVERVIEW
SETTINGS: INTERFACE
Pixel Zoom
Congure the default zoom levels for Pixel Zoom to
‘punch in’ to a desired amount when spot-checking a
particular shot.
Status Display
Enable and congure the Status Display to get info on
various monitoring-related data such as battery life and
frames per second.
UI Lock
Once enabled, pressing and holding on the touchscreen
for ve seconds will lock the UI. Repeating the process
will unlock the UI.
Language
Change the language of the internal menu system.

14
SETTINGS: USER
Backdrop
Enable a customizable backdrop for when the
monitor is not displaying a signal.
Monitor ID
Set a custom name for your monitor, to make it
more easily recognizable.
Date Time
Setting the correct Date & Time will ensure that
captured images get an accurate timestamp.
Power
Power-related options, such as auto recovery.
P r o fi l e s
Save or load the entire monitor’s conguration to
a USB Drive, great for keeping consistent settings
across several monitors.
PageOS OVERVIEW
20
Other manuals for CCM-1
2
Table of contents
Other ARRI Media Player manuals