Arrow YH-120 User manual

12
Part # Item Part # Item Part # Item
1 Gun Housing 9 Pressure Control Knob Spring 20 Nozzle - Straight
2 Gun Housing Cap 10 Coil Spring 20A Nozzle - Adjustable
3
Inductor Coil (220V/50Hz, Coil Only) 11 Coil Pin 21 Solvent Jar
4
Trigger Switch Assembly 12 Gun Housing Screws (2 pcs) 22 Suction Pipe With Filter
5A
I Core 13 Pump Cylinder 23 Conical Screw
5B E Core with Coil 14 Piston 24 Connector Block
5C Coil Full Set (E Core + Coil + I Core) 15 Piston Spring 25 Hook
5D E Core Only 16 Coil Locking Pin 26 Overflow Insert
6 Electric Wire 17 Delivery Valve Cone 27 Jar Washer
7 Buffer Nut 18
Delivery Valve Spring 28 Coil Bush
8 Pressure Control Knob 19 Swirl Head (17, 18, 19 Form a Set) 29 Switch Locking Ring
TEXTILE CLEANING SPRAY GUNS
PARTS LIST FOR YH-120

12
TEKSTİL LEKE TEMİZLEME
TABANCALARI
YH-120 İÇİN PARÇA LİSTESİ
Parça # Ürün Parça # Ürün Parça # Ürün
1
Tabanca Gövdesi 9Bas ınç Kontrol Düğmes i Yayı 20 Düz Uç
2
Tabanca Gövdesi Kapağı 10 Bobi n Yayı 20A Ayarlı Uç
3
Elektrik Kondansatörü 11 Bobi n Pimi 21 İlaç Haznes i
(220V/50Hz, Yalnızca Kondansatör) 12 Tabanca Gövdesi Vi da ları (2 Adet) 22 Filtreli İlaç Emme Borusu
4
Çalıştırma Düğmesi 13 Pompa Silindiri 23 İlaç Borusu Aya r Vi da sı
5A
I Göbek (Çekirdek) 14 Piston 24 Konektör Bl oğu (El ektrik Devresi)
5B
Bobinli E Göbek (Çekirdek) 15 Piston Yayı 25 Kanca (Kabl o Tutucu)
5C
Bobin Takımı (E Göbek + Bobin + I Göbek) 16 Bobi n Kil i tleme Pimi 26 Taşma Ek Parçası
5D
Yalnızca E Göbek 17 Bes leme Suba bı Haznes i 27 Hazne Yıkayıcı
6
Elektrik Kablosu 18 Bes leme Suba bı Yayı 28 Bobi n Kova nı
7
Tampon Somunu 19 Döner Ba şlık 29 Düğme Kilitl eme Halkas ı
8
Basınç (Hız) Kontrol Düğmesi (17, 18, 19 Bi r Takım oluşturur)

SERIAL NO. STICKER :
DEALER DETAILS :
Refer Page No. 10 for List of FREE SPARES

TEXTILE CLEANING SPRAY GUNS
Product Introduction
Our Textile Cleaning Spray Guns are hand held equipment
capable of spraying cleaning solvents at high pressure through
specially designed nozzles. These assemblies run on electricity
and consume very low wattage. The solvent is sprayed by pressure
developed by vacuum and eliminates the requirement of a
separate air compressor attachment. The usage is simple and
convenient. The design of the product allows the user to vary the
spray velocity along with the solvent outflow thereby making it
highly economical and giving it a wide spectrum of usage.
Product Usage
Our Textile Cleaning Spray Guns have primarily been developed
for spot removal of dirt, oil stains and other spots from textile
fabrics and garments, mainly at the manufacturing stage. Solvents
are sprayed at high pressure and velocity at the dirt spots, helping
to shoot the dirt out from the fabric thereby removing the stains,
without damaging the fabric. The spray velocity can be adjusted
by the user, making it highly versatile in usage, as different fabrics
require different levels of pressure to enable them to be cleaned
without any damage.
The versatility of our Textile Cleaning Spray Guns allows for a
wide spectrum of uses. The product can be used in areas like
cleaning of textile fabrics, in the printing industry for cleaning of
typesets and rollers, electronic industry for cleaning of PCBs,
manufacturing industry for cleaning areas of machines which are
not easily accessible, electronic/electrical industry for contact
cleaning (with the power switched off), hair wigs industry / wig
shops for cleaning of hair bases, for spraying pesticides on plants,
rocks, stone slabs, tiles cleaning etc.
With a view of making continuous improvements, the manufacturer
reserves the right to make changes in the technical construction of
the unit, without any prior information.
The user can contact the manufacturer/dealer for any further
information on the product.
Page 1 of 18 Page 18 of 18

Product Models
Our Textile Cleaning Spray Guns are available in four models as
detailed below:
1. CM 11 – This Spray Gun is designed in highly buffed
aluminium alloy housing for rugged usage. This comes with a
straight spray nozzle, which delivers a straight-line spray, which
makes it more ideal for thick and medium woven fabrics where
the spray velocity required is on the higher side. This is more
suited for application in areas where fewer type of fabrics are to
be cleaned.
2. CM 11A – This spray Gun is also similar to the construction of
the CM11, with a change of nozzle. This comes equipped with an
Adjustable nozzle, thereby giving the user a twin adjustment of
the spray pressure and velocity, one on the spray gun itself, and
the other, on the nozzle. This gives the Gun a much finer control
of the spray pressure and velocity, making it suitable for all type
of fabrics from delicate and fine fabrics to thick and closely
woven fabrics. The pressure adjustment on the nozzle is done in
a step less movement also allowing the user to control the
solvent outflow and area of spray.
3. CM 16 – This Spray Gun is designed in Glass Filled Nylon
Plastic body, in attractive body colour. The construction is light
weight but highly resistant to impact and heat. This model comes
equipped with a nozzle delivering straight-line spray as in the
CM11, with the areas of usage also being similar to that of the
CM11.
4. CM 16A – This Spray Gun is similar to CM16, but is fitted
with the Adjustable Nozzle. The design of the nozzle remains
same as that used in the CM11A, thereby giving it the same area
of usage as that of the CM11A, but of lighter weight due to the
change in body construction material.
Page 17 of 18 Page 2 of 18

Model:
Volts:
Watts:
Frequency:
Solvent
Insulation Class
Switch
Weight
(Dry / With Solvent)
Rated Usage/Rest time
Fuse
Solvent Jar Capacity
Current Rating
Replaceable glass fuse 5x20mm, 800 mA
Press to on / Release to off type
Solvent suitable for the application other than
flammable solvents.
Class I
TS11/TS11A
600 mA
TS16/TS16A
500 mA
CM 11 / CM 11A
750 ml
CM 16 / CM 16A
650 ml
CM 11 / CM 11A
1.5 / 2.1 Kgs
CM 16 / CM 16A
1.2 / 1.7 Kgs
15 seconds/30 seconds
CM 16A
50 Hz
220V AC 220V AC
40 Watts60 Watts
CM 11 CM 11A CM 16
PRODUCT SPECIFICATION
Usage of Solvents
Our Textile Cleaning Spray Guns are meant to be used with any
solvent suitable to the application, and also, the solvent being
permitted to be used by the law governing the country.
It is not recommended to use the unit for spraying flammable
materials.
Do not use the unit for spraying water.
Types of Nozzles
STRAIGHT NOZZLEADJUSTABLE NOZZLE
Page 3 of 18 Page 16 of 18

12
TEXTILE CLEANING SPRAY GUNS
OWNER’S USAGE MANUAL
Arrow Spray Guns have been designed using the best of
materials to give the user a long trouble free and safe usage.
Please read the following instructions fully and carefully
before use. Please keep this manual close to the unit in case of
requirement of specific information relating to use or safety.
Arrow Textile Cleaning Spray Guns are primarily designed to
use suitable solvents as the solvent material. Please check the
availability of the same in your area.
Our Textile Cleaning Spray Guns deliver a solvent spray of high
pressure and velocity and as such necessary precautions have to
be followed in handling the unit.
Pre Usage Precautions
1. Please check the voltage rating marked on the unit and
check its compatibility with the voltage rating in your
area before plugging in the equipment. For e.g. If the
voltage rating marked on the Unit is 220V AC/ 50/60Hz
then the unit is suitable only in areas where the supplied
voltage rating is of 220V AC.
2. Please ensure that the area where the unit is to be used is
well ventilated.
3. Please ensure the absence of other equipment with open
flames or sparks near the area of usage.
4. Please ensure that the unit is used in a no smoking zone.
5. Please ensure that there is a flat surface or a spring
tensioner on which the unit can be kept/hung when not in
use for shorter periods.
Page 15 of 18 Page 4 of 18

Usage Directions:
1. Plug in the unit into a suitable power socket. The unit is
usually supplied with a electric wire (Part no.6) of
around 3 meters length giving the user enough
maneuverability.
2. Unscrew the solvent jar (part no.21) from the unit and fill
it with the required solvent. Screw the solvent jar back
into the housing tightly to prevent spillage. Before filling
the solvent jar, ensure that the solvent jar is free from any
loose dirt/objects, which can enter the system and
damage the unit.
3. DO NOT RUN THE UNIT WITHOUT SOLVENT,
AS THIS CAN CAUSE SERIOUS DAMAGE TO
SOME OF THE COMPONENTS IN THE UNIT.
4. In the case of CM11 and CM16 models, remove the
protective plastic cap from the nozzle by pulling it out,
before usage. Switching on the unit without removing
this cap can cause damage to the unit and injury to the
user. Please keep the cap carefully for later usage.
5. For cleaning Textiles, sort out the fabrics to be cleaned
into thick/closely woven, medium woven, light/loose
woven fabrics. The spray pressure has to be adjusted to
suit different fabrics. For cleaning any other items,
please select the spray velocity as needed to clean that
item.
6. Turn the pressure-control knob (Part no. 8) at the back of
the unit clockwise by around one turn to set it to a initial
low pressure setting. Do not close it fully.
7. Point the unit away from the user or any other person or
animal standing nearby, before switching on the unit.
Failure to do so can seriously injure the person/animal.
8. It is recommended that the spray velocity be checked by
spraying in open air before actual usage on any item to
determine the spray velocity setting required. The spray
can be adjusted as needed and then the unit can be used
for cleaning the items.
Page 5 of 18 Page 14 of 18

3. The spray is inconsistent.
Check if the nozzle has been blocked by contaminants /
foreign objects. If yes, clear the blockage by using
compressed air or by gently removing the object by use of
a wire brush or nozzle cleaner (spare provided). Be
careful not to damage the orifice of the nozzle, as this will
render it useless. If there are no contaminants and still the
spray is inconsistent, then the nozzle will have to be
replaced with a new one. Contact the nearest Service
Center for supply of a new nozzle.
4. The unit is on, but there is no vibration. Instead there is a
humming sound.
Open the cylinder and check if the piston is seized. If yes,
gently remove the piston, clean the cylinder and the piston
and assemble back.
For any other problem please contact the Manufacturer
/nearest Service Centre for Repairs and Assistance.
9. Keeping the unit upright, point the nozzle towards the
fabric/item to be cleaned and switch on the gun by
pressing the trigger switch(part no.4). The trigger
switch is of the press to on/release to off type. The unit
can be switched off by removing the finger from the
switch.
10. The unit normally takes a few seconds to prime and
begin to spray the solvent.
11. The unit vibrates while in operation and this is the
normal working condition. A certain degree of sound is
also generated.
12. If the unit does not spray the solvent, turn the pressure-
control knob anticlockwise.
13. Once the unit begins to spray the solvent, adjust the
spray pressure by adjusting the pressure control knob
clockwise/anticlockwise. Turning the knob
anticlockwise increases the pressure and is more
suitable for thick fabrics, while turning the knob
clockwise, decreases the pressure, and is more suitable
for lighter fabrics.
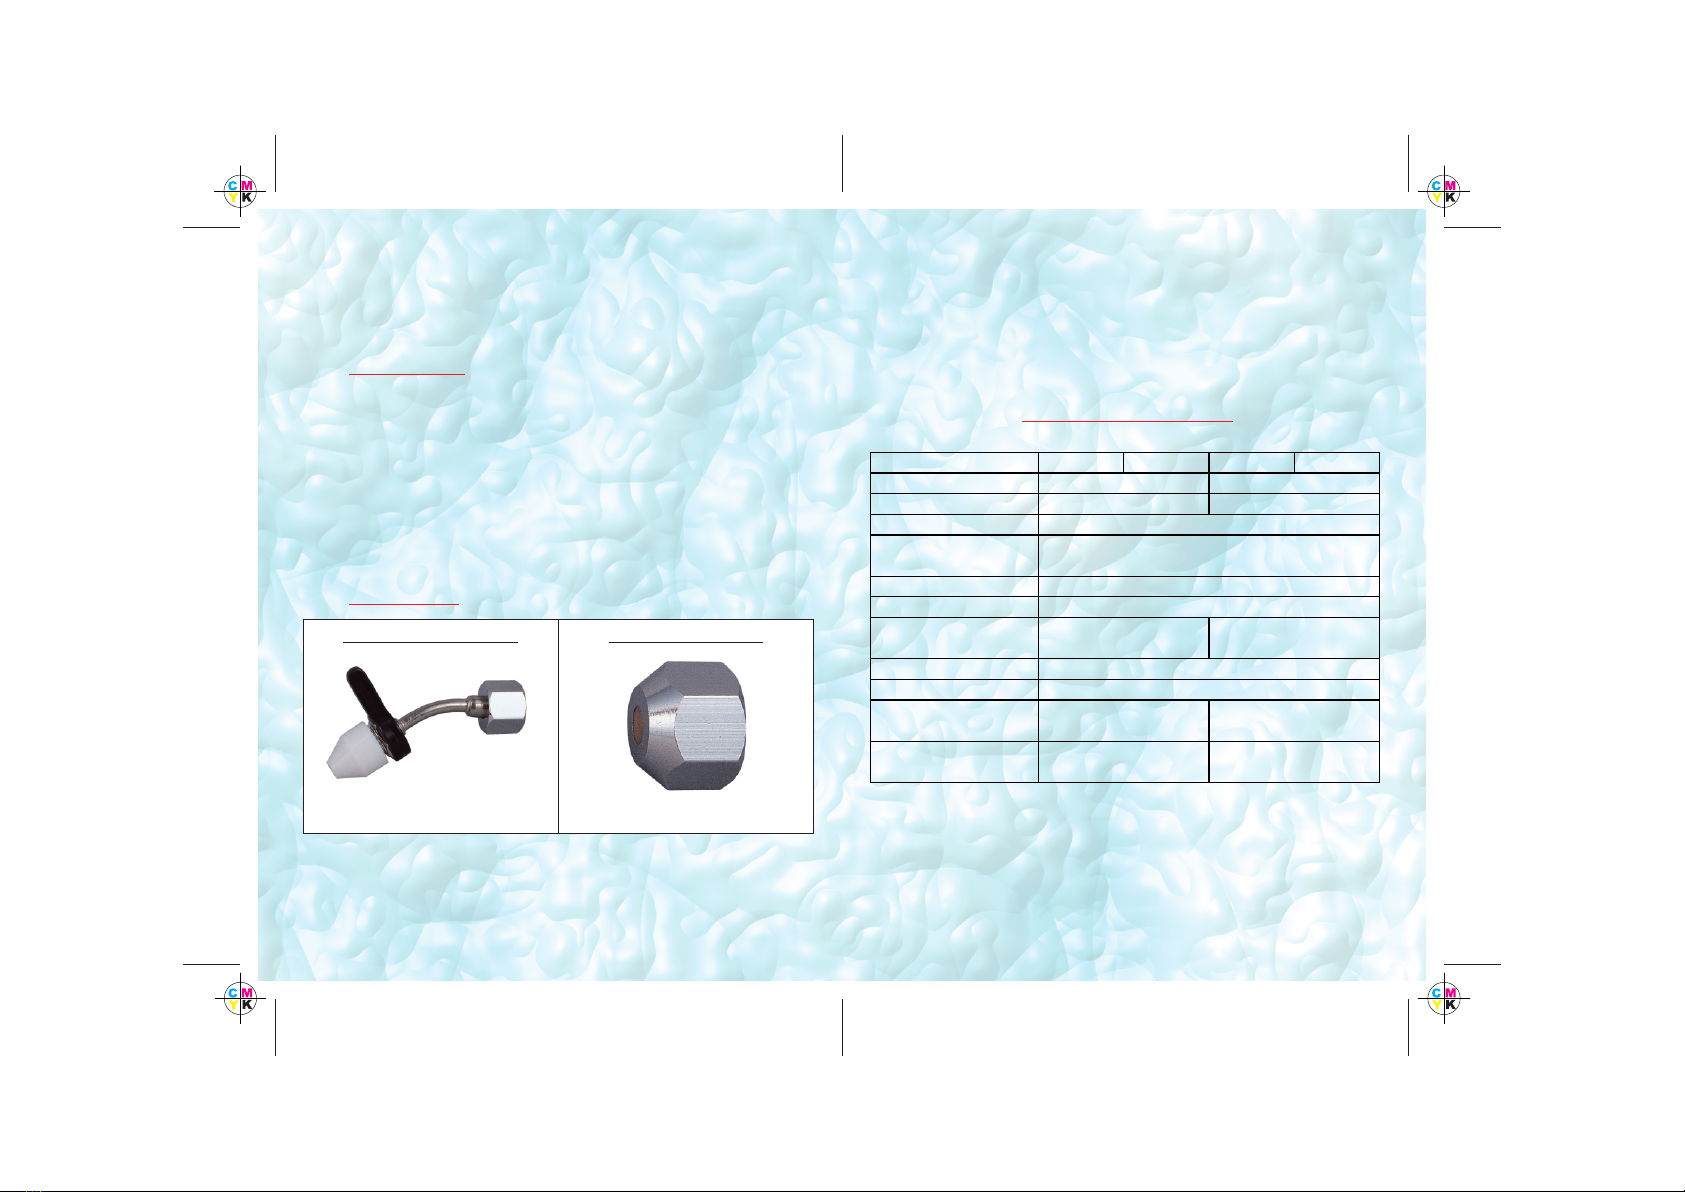
14. If the unit is fitted with the adjustable nozzle (in models
CM11A and CM16A only), the spray velocity and
spread can be further adjusted by turning the
adjustment knob on the nozzle. The nozzle is capable
of delivering a fine mist spray to a piercing straight-
line spray, by making suitable adjustments.
15. Maintain a distance of between 5-40 centimeters
between the nozzle and the fabric/item depending on
the type and thickness of the fabric, nature of item,
nature of spot/stain, and pressure adjusted.
16. Rinse out the dirt stain/clean the item by spraying the
solvent in a circular manner moving from outside of
the stain/dirt patch to the inside.
17. Once the stain has been removed, release the trigger
switch to switch off the unit.
Page 13 of 18 Page 6 of 18

Usage Precautions
1. Use the unit in a well ventilated area free from open flames/sparks.
2. High pressure is developed in the unit. Point the unit away from the
user or any other person/animal. Failure to do so can cause serious
injury to the person/animal.
3. Proper pressure setting is essential while using the unit. Improper
pressure setting can damage the fabric or cause inefficient cleaning.
4. Do not keep the unit in any tilted position when not in use especially
when the jar is filled with the solvent to avoid spillage of the solvent.
5. Do not drop the unit. This may cause the unit to be damaged. If the
unit is dropped by accident, please check the unit thoroughly
including the electrical connections for any loose contacts before
further usage. If found to be damaged please do not use the same and
have it repaired at the nearest service center.
6. Switch off the socket power switch before unplugging the unit.
7. It is recommended to avoid running the unit continuously non-stop.
A rest time for the unit is recommended at regular intervals to
prolong the working life of the unit.
8. Do not use the unit with the nozzle pointing skywards.
9. Do not use the unit for spraying only water as this may cause some of
the parts to wear out faster.
10. Do not clean the unit with any flammable solvents.
11. Do not spray any solvent/material where the hazard is not known.
Consult the solvent manufacturer’s product literature for more
usage information.
Product Troubleshooting
Remove the plug from the socket before carrying out any
adjustment, servicing or maintenance on the unit.
1. Unit does not switch on.
Check if Electric cord is plugged in. If not, then plug in.
Check if the unit’s voltage rating is the same as the voltage
rating in your area.
Check if the fuse in the unit has blown. If Yes, then replace
with a new fuse (as described in Product Maintenance
section)
2. Unit does not spray solvent.
Check if solvent has been filled into the jar. If not, then fill
in solvent.
Check if the nozzle cap has been removed. If not, remove
it. (In CM11 and CM16 only)
Check if the suction pipe is tightened properly. If not,
screw it tight (do not over tight)
Check if the pressure adjustment knob is turned in fully. If
yes, then turn it anticlockwise.
Check if the Delivery Valve set is damaged. If yes, replace
with spare provided. (Part No.17,18,19)
Remove the cylinder and check if the Piston Spring is
broken. If yes, replace with the spare provided.
Page 7 of 18 Page 12 of 18

Transportation and Storage
Each unit is packed in an individual carton box and held tight in
the box using EPS (Thermocole) molded supports to prevent the
unit from being damaged during transit. Please keep the box and
the thermocole supports safely to enable the unit to be repacked
by the user and transported to a different place if needed.
The unit can be stored for shorter periods in the open after usage.
If it is required to be stored for longer periods, it is recommended
to either repack the unit in the original packing or pack it in a
protective plastic cover. Please ensure that the solvent jar has
been totally emptied and the remaining solvent in the gun
sprayed out before storage.
Product Maintenance
Remove the plug from the socket before carrying out any
adjustment, servicing or maintenance on the unit.
1. Keep the electric wire properly secured to avoid damage
due to abrasion.
2. After usage of the unit for the day, open the solvent jar
and empty the solvent. Spray out the remaining solvent
from the system.
3. In model CM11 and CM11A, lightly oil the unit through
the oil hole (part no.27) located at the top of the unit near
the adjusting roller (Part No.11). Do not use more than 2-
3 drops of oil. Regular machine oil can be used.
4. Fuse Replacement: The unit is provided with a
replaceable glass fuse of size 5x20mm of 800mA rating.
If the fuse needs replacement, gently lift out the fuse
assembly from the housing. The fuse holder and the cap
are held together with a rubber sleeve. Slide out the
sleeve. Remove the fuse holder cover from the fuse
holder and pry open the fuse. Check if the fuse is blown.
If the fuse is blown, then replace the fuse with the spare
provided/new one. Fit back the assembly in the manner
removed. Please do not remove the fuse assembly by
pulling at the wires as this could cause the wire leads to
work loose.
Page 11 of 18 Page 8 of 18

5. Remove the Pump cylinder (Part No.13) at regular
intervals for cleaning. Lightly oil the piston (part no. 14)
with regular machine oil, before fitting it back into the
cylinder. The cylinder can be removed in the following
manner:
a) Unplug the unit from the electric socket.
b) Unscrew the nozzle (part no. 20 or 20A) and
remove it. Also remove the Delivery valve set
(part No.17,18,19) and keep safely for later
usage. Change the Delivery Valve set if it is
worn out.
c) Unscrew the solvent jar (part no.21) and loosen
the suction pipe (part no.22) by turning it
anticlockwise.
d) Unscrew the brass Conical screw (part no.23) at
the top of the unit.
e) Pull out the pump cylinder (part no.13) from the
housing.
f) Remove the Piston spring (part no.15) and the
Piston (part no.14) and clean all the parts
removed.
g) If the Piston spring (part no.15) is worn
out/broken, replace the same with the spare
provided.
h) Assemble back the components in the manner
they have been removed.
6. If any parts are worn out due to wear and tear, the same
can be ordered from the nearest service center. Please
refer to the enclosed parts list for ordering the required
items.
User Safety Instructions
1. Use the unit in well ventilated area. The solvents used
could cause breathing hazards and irritation to the eyes in
the event of improper ventilation. Usage of breathing
masks/protection goggles/ear plugs/proper exhaust
equipment is recommended.
2. Proper clothing should be used and the solvent spray
should never be sprayed on to a person’s body. This can
cause serious injury and skin irritations. If skin irritation
occurs, clean with warm water and soap. If the problem
persists, consult a doctor.
3. The unit generates vibrations during use. Usage of
protective padded hand gloves is recommended for user
safety and comfort.
4. The unit generates heat during use. Usage of protective
padded hand gloves is recommended for user safety and
comfort.
Packing Contents
This pack contains the following:
1. 1 no. Textile Cleaning Spray Gun (CM11 / CM11A /
CM16 / CM16A), fully fitted and ready for use.
2. 1 no. 1.5mm Allen key for maintenance (only in CM11
and CM11A- to unscrew the Allen grub screw (part
no.28) to enable the Front body to be removed)
3. 1 no. Piston Spring spare. (part No.15)
4. 1 no. Delivery Valve Set spare.(part No.17,18,19)
5. 1 no. Replaceable Glass Fuse 5x20mm, 800mA rating.
6. 1 no. Nozzle Cleaner
7. 1 copy of User’s Manual.
Page 9 of 18 Page 10 of 18


Table of contents