ArtFox Pixel Blinder Bar User manual

Pixel Blinder Bar
User Manual
Please read the instructions carefully

1A
TABLE OF CONTENTS
1.
Safety Instructions .......................................................................................................... 2
2.
Technical Specifications .................................................................................................. 3
3.
Accessories ..................................................................................................................... 4
4.
Installation ...................................................................................................................... 4
5.
How to set the unit ......................................................................................................... 5
5.1
Control Panel ................................................................................................................ 5
5.2
Main Functions .............................................................................................................. 6
6.
How to control the unit .................................................................................................... 6
6.1
Master/Slave Built-in Functions ..................................................................................... 7
6.2
DMX Controller .............................................................................................................8
6.3
ArtNet ............................................................................................................................. 9
6.4
DMX Channel ................................................................................................................ 9
7.
Trouble shooting ............................................................................................................ 10
8.
Fixture Cleaning ........................................................................................................... 10

2A
1. Safety Introductions
WARNING
Please keep this User Manual for future consultation. If you sell the fixture to another
user, be sure that they also receive this instruction booklet.
The equipment is in good condition when leaving the factory. Please operate according to
the user's manual.
Unpack and check carefully there is no transportation damage before using the fixture.
This lamp is only suitable for indoor dry place use.
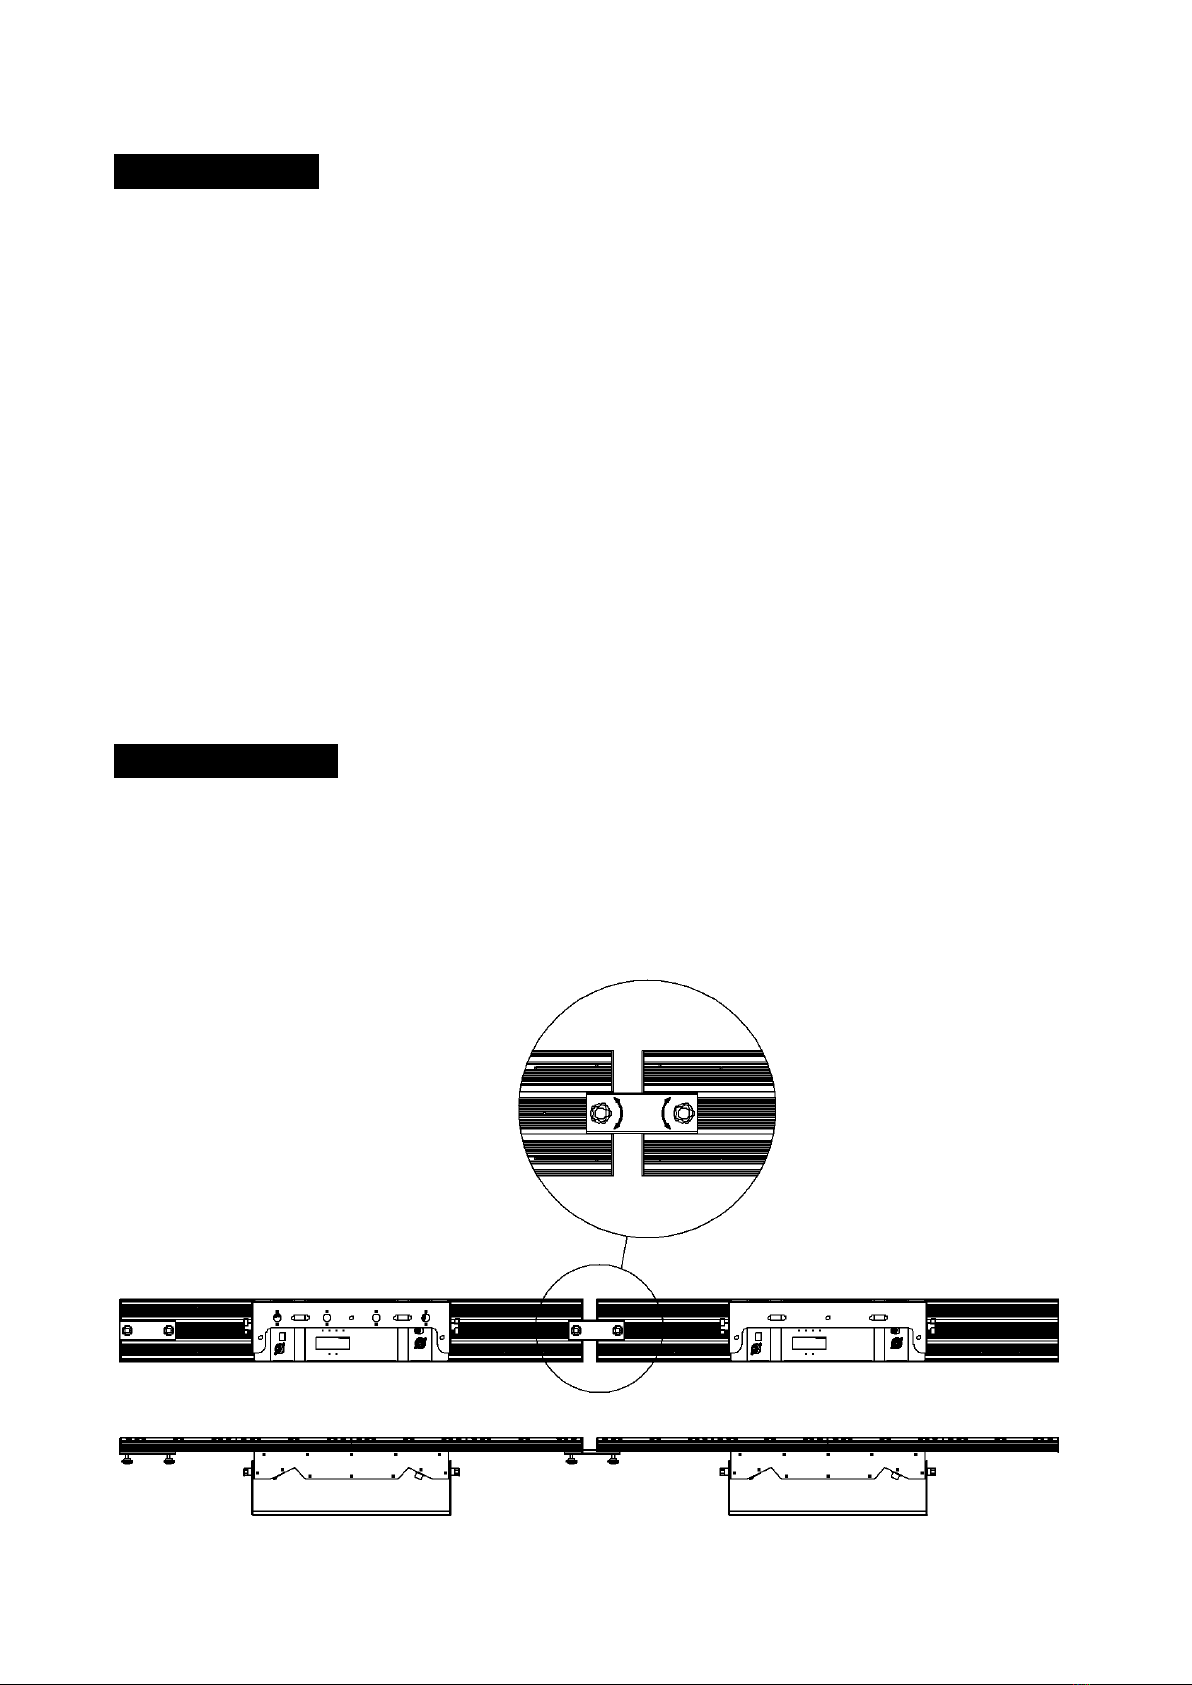
Installation and operation of lamps should be carried out by professionals.
The unit must be installed in a location with adequate ventilation, at least 50cm from
adjacent surfaces. Be sure that no ventilation slots are blocked to avoid overheating when
the lamp is running.
Make sure the power supply voltage is in line with the required power supply voltage
before operation.
It’s important to ground the yellow/green conductor to earth in order to avoid electric shock.
Maximum ambient temperature is Ta : 40℃. Don’t operate it where the temperature is
higher than this
Do not connect the device to any dimmer pack.
A small amount of smoke or odor may appear when the new lamp is working and will
disappear after 15 minutes.
Do not put combustible goods beside the device when it is running, in case of fire risk.
Please carefully check whether the power cable is damaged before opening the lamp. If
there is any damage, please replace it immediately.
Unit surface temperature may reach up to 85℃. Don’t touch the housing bare-hand during
its operation. Turn off the power and allow about 15 minutes for the unit to cool down
before replacing or serving.
Avoid flammable liquid, water or metal to enter the interior of the device, to avoid electric
shock or fire. If any foreign body enters the lamp, please cut off the power immediately.
Avoid operating in dirty and dusty environment, and clean and maintain lamps regularly.
Do not touch any wire during operation and there might be a hazard of electric shock.
Avoid winding the power cable to other wires.
Please read the instructions carefully which includes important
information about the installation, operation and maintenance.

3A
In the event of serious operating problem, stop using the fixture immediately.
Do not open the lamp twice.
There are no user serviceable parts inside the fixture. Do not open the housing or attempt
any repairs by yourself.
Never try to repair the fixture by yourself. Repairs carried out by unskilled people can lead
to damage or malfunction. Please contact the nearest authorized technical assistance
center. Always use the same type spare parts.
Please cut off the power when the fixture is not in use or maintained for a long time.
Please use the original packing material when it needs to be transported again.
To prevent or reduce the risk of electrical shock or fire, do not expose the fixture to rain or
moisture.
Do not look directly at the LED light beam while the fixture is on.
Due to the magnifying type lens, please keep the lens out of contact with direct sunlight.
Direct sunlight can cause heat to build up inside of the unit, which will seriously damage unit.
2. Technical Specifications
Voltage:
AC 100~240V,50/60Hz
Power Consumption: 100W
Light Source: 24 x 3W 120xSMD5050
Specification of Safety Tube: LEDs T3.15Amp
Beam Angle: 4°
Dimension: 1000 x 115 x155mm
Net Weight:
5.78Kgs

4A
3. Accessories
Standard Accessories:
1. 1.5m POWERCON Power Cable x 1pc
2. 1.5m CAT5e Ethernet cable x 1pc
Selectable Accessories
1. 1.5m POWERCON Power Connection Cable
4. Installation
Assemble the units as the below picture:

5A
5.1 Control Panel
1.
Display Panel:Display menu of various functions;
2.
Buttons:
MENU Go to menu selection
DOWN Go to the next option
UP Go back to the previous option
ENTER Confirm the selected function
3.
LED
DMX Flash DMX Signal Connected
ArtNet Fast Flash ArtNet Signal Connected
4.
Power input: connect the power supply;
5.
Power output: connected to the next unit;
6.
Insurance tube(T3.15Amp):Protect lamp from damage caused by excessive current
or short circuit;
7.
3-Pin DMX Input:Connect the fixture and the controller with 3-Pin XLR DMX Cable,
and input the DMX signal.
8.
3-Pin DMX Output: Connect the next unit with 3-Pin XLR DMX Cable, and outoput
the DMX signal.
9.
NUTR RJ45 Input/Output:Control the fixture with software through connecting the
ArtNet network.
5. How to set the unit

6A
5.2 Main Functions
To select any functions, press MENU button until the required one is shown on the display.
Select the function by ENTER button and the display will blink. Use DOWN and UP button
to change the mode. Once the required mode has been selected, press ENTER button to
setup or it will automatically return to the main functions without any change after idling 1
minute. Back to the functions without any change press MENU button.
The main functions are shown below:

6B
DMX Address
Press the MENU button up to when the DMX Address is shown on the display. Pressing
the ENTER button and the display will blink. Use the DOWN and UP button to change the
DMX 512 address. Once the address has been selected, press the ENTER button to
setup or automatically exit menu mode without any change after 1minute. Back to the
previous functions without any change press the MENU button.
Network Settings
SelectNetwork Settings and press ENTER to confirm.Use the DOWN and UP button to
chooseIP Addr, Subent Mask, Net Subnet Unive or MAC Addr. Once the address has
been selected, press the ENTER button to setup,Use the DOWN and UP button to set up
the value,and press ENTER button to save after setting.
Channel Mode
Press the MENU button up to when the Channel Mode is shown on the display. Pressing
the ENTER button, Use the DOWN and UP button to select the 7CH / 28CH / 32CH /
384CH,press the ENTER button to setup.
M/S Mode
Select M/S Mode and press ENTER to confirm. Use UP/DOWN button to select
automatic or manual mode, and press ENTER button to save.Press MENU button to
return to the previous MENU or wait for 1 minute to exit MENU mode automatically.
Splice Set
Select Splice Set and press ENTER to confirm. Use UP/DOWN button to select 1-1(1
Unit) 、 1-2(2 units)or 2-2(4 units),and press ENTER button to save. Press
MENU button to return to the previous MENU or wait for 1 minute to exit MENU mode
automatically.
Auto Mode
Select Auto Mode and press ENTER to confirm. Use UP/DOWN button to select show 1 /
show 2…Show 5,and press ENTER button to save.
Firmware Version
Select Fixture time and press ENTER to confirm. The current software version of the
machine is displayed on the screen.Press MENU button to return to MENU mode.

7A
6. How to Control the Unit
You can operate the unit in three ways:
1. By master/slave built-in preprogram function
2. By DMX controller
3. By ARTNET
6.1 Master/Slave Built In Preprogrammed Function
By linking the units in master/slave connection, the first unit will control the other units to
give an automatic, sound activated, synchronized light show.
6.2 DMX Controller
Using universal DMX controller to control the units, you have to set DMX address from 1
to 512 channel so that the units can receive DMX signal.
Using universal DMX controller to control the units, you have to set DMX address from 1
to 512 channel so that the units can receive DMX signal.
Press the MENU button up to when the DMX Address is showing on the display. Pressing
ENTER button and the display will blink. Use DOWN and UP button to change the
DMX512 address. Once the address has been selected, press and keep ENTER button
pressed up to when the display stops blinking or storing automatically 8 seconds later. To
go back to the functions without any change press the MENU button again. If you use
please refer to the following diagram to address your DMX512 channel for the first 4 /2
units.
Channel Mode
Unit 1
Addr
Unit 2
Addr
Unit 3
Addr
Unit 4
Addr
7 CH 1 8 15 23
28 CH 1 29 57 85
32 CH 1 33 65 97
384 CH 1 385

8A
6.3 ArtNet
Using multimedia software to control lamps through ArtNet, you must first select the 384
channel mode in the menu.Then confirm that the Eth-Net address is consistent with the
multimedia server.If MAC addresses conflict, use random addresses.
6.4 DMX Channel
Channel Mode:

9A

9B

9C
7. Trouble shooting
Following are a few common problems that may occur during operation. Here are some
suggestions for easy troubleshooting:
A. The fixture does not work, no light
1. Check the connection of power and main fuse.
2. Measure the mains voltage on the main connector.
Not responding to DMX controller
1. DMX LED should be on. If not, check DMX connectors, cables to see if link properly.
2. If the DMX LED is on and no response to the channel, check the address settings and
DMX polarity.
3. If you have intermittent DMX signal problems, check the pins on connectors or on PCB of
the fixture or the previous one.
4. Try to use another DMX controller.
5. Check if the DMX cables run near or run alongside to high voltage cables that may cause
damage or interference to DMX interface circuit.
Some fixtures don’t respond to the easy controller
1. You may have a break in the DMX cabling.
2. Check the LED for the response of the master/ slave mode signal.
No response to the sound
1. Make sure the fixture does not receive DMX signal.
2. Check microphone to see if it is good by tapping the microphone.
One of the channels is not working well
1. The stepper motor might be damaged or the cable connected to the PCB is broken.
2. The motor’s drive IC on the PCB migh to ubte of condition.

10A
8. Fixture Cleaning
The cleaning of internal must be carried out periodically to optimize light output. Cleaning
frequency depends on the environment in which the fixture operates: damp, smoky or
particularly dirty surrounding can cause greater accumulation of dirt on the fixture’ s optics
Clean with soft cloth using normal glass cleaning fluid.
Always dry the parts carefully.
Clean the external optics at least every 20 days. Clean the internal optics at least every
30/60 days
Table of contents
Other ArtFox Dj Equipment manuals

ArtFox
ArtFox Beam Wash 19QX User manual

ArtFox
ArtFox Power Shine 14QX User manual

ArtFox
ArtFox LED Spot 300W User manual

ArtFox
ArtFox SKY BEAM 9R User manual

ArtFox
ArtFox MONSTER SPOT User manual

ArtFox
ArtFox KingWash 7QX User manual

ArtFox
ArtFox Matrix Hybrid CMY User manual

ArtFox
ArtFox SparkX User manual

ArtFox
ArtFox Magic 3D User manual

ArtFox
ArtFox SHINE BAR 18Q User manual
Popular Dj Equipment manuals by other brands

Chauvet Professional
Chauvet Professional RDM2go user manual

Goclever
Goclever ASSCMR instruction manual

Future light
Future light DJ-COLOR 200 user manual

American DJ
American DJ Image 250 User instructions

ADJ
ADJ Encore Profile 1000 Color User instructions

Chauvet
Chauvet ROGUE R1 BEAM WASH Quick reference guide