manuals.online logo
Brands
  1. Home
  2. •
  3. Brands
  4. •
  5. Artweger
  6. •
  7. Shower Cabin
  8. •
  9. Artweger Lifeline Mobil User manual

Artweger Lifeline Mobil User manual

Other manuals for Lifeline Mobil

1

Other Artweger Shower Cabin manuals

Artweger 360 WALK IN 9WTS3 Series User manual

Artweger

Artweger 360 WALK IN 9WTS3 Series User manual

Artweger Lifeline Mobil User manual

Artweger

Artweger Lifeline Mobil User manual

Artweger 360 User manual

Artweger

Artweger 360 User manual

Artweger 360 9R F 9 Series User manual

Artweger

Artweger 360 9R F 9 Series User manual

Artweger TwistLine 5TR0 Series User manual

Artweger

Artweger TwistLine 5TR0 Series User manual

Popular Shower Cabin manuals by other brands

Insignia INS3000 installation manual

Insignia

Insignia INS3000 installation manual

RIHO BALTIC B309 manual

RIHO

RIHO BALTIC B309 manual

SANIKU DKA/EL-EC 0041 Assembly instructions

SANIKU

SANIKU DKA/EL-EC 0041 Assembly instructions

AM.PM BLISS Assembly instructions

AM.PM

AM.PM BLISS Assembly instructions

Samo B0980 Assembly instruction

Samo

Samo B0980 Assembly instruction

AM.PM BLISS SQUARE Assembly instructions

AM.PM

AM.PM BLISS SQUARE Assembly instructions

glass 1989 nonsolodoccia home 140/90 manual

glass 1989

glass 1989 nonsolodoccia home 140/90 manual

AM.PM ADMIRE STEAM CABIN A Assembly instructions

AM.PM

AM.PM ADMIRE STEAM CABIN A Assembly instructions

Cello Ice 70x90 instruction manual

Cello

Cello Ice 70x90 instruction manual

agape FLAT D E1P Instructions for installation

agape

agape FLAT D E1P Instructions for installation

OVE OWS-103 Installation and user guide

OVE

OVE OWS-103 Installation and user guide

Linie Tarifa installation guide

Linie

Linie Tarifa installation guide

US HORIZON SORRENTO Series Assembly instructions

US HORIZON

US HORIZON SORRENTO Series Assembly instructions

Arblu PERSEO ANGOLO Q-R 2SL+1LF Assembling instructions

Arblu

Arblu PERSEO ANGOLO Q-R 2SL+1LF Assembling instructions

ELEGANT SPR870 quick start guide

ELEGANT

ELEGANT SPR870 quick start guide

RIHO SCANDIC NXT X101 installation manual

RIHO

RIHO SCANDIC NXT X101 installation manual

Aquadart Rolla 8 installation instructions

Aquadart

Aquadart Rolla 8 installation instructions

Arblu DEDALO PLUS NICCHIA 1AB+1LF Assembly instructions

Arblu

Arblu DEDALO PLUS NICCHIA 1AB+1LF Assembly instructions

manuals.online logo
manuals.online logoBrands
  • About & Mission
  • Contact us
  • Privacy Policy
  • Terms and Conditions

Copyright 2025 Manuals.Online. All Rights Reserved.

DEM ENDKUNDEN ZU ÜBERGEBEN!
TO BE HANDED TO CUSTOMER!
A REMETTRE AU CLIENT!
TE OVERHANDIGEN AAN
DE EINDVERBRUIKER!
1
-MONTAGEANLEITUNG
DREITEILIGER ECKEINSTIEG
-ASSEMBLY INSTRUCTIONS
TRIPLE CORNER ENTRY
-NOTICE DE MONTAGE
ENTRÉE D’ANGLE À 3 PANNEAUX
-MONTAGEVOORSCHRIFT
3-DLG‘E HOEKINSTAP 11543 2_2012
LIFELINE
mobil
Benötigtes Werkzeug
Tools needed
Outillage necessaire
Benodigd gereedschap
2
Montageset
Assembly kit
Set de montage
Montageset
2x
8 x
8 x
4,2 x 38 mm
Ø 6 mm
Ø 6 mm
4x
Ø 6 mm
4,2 x 38 mm
4,2 x 50 mm
M5 x 35 mm
4x
Montageset
Assembly kit
Set de montage
Montageset
Montageset
Assembly kit
Set de montage
Montageset
2x
2x
2x
2x
LIFELINE
mobil
Montageset
Assembly kit
Set de montage
Montageset
2
3
1
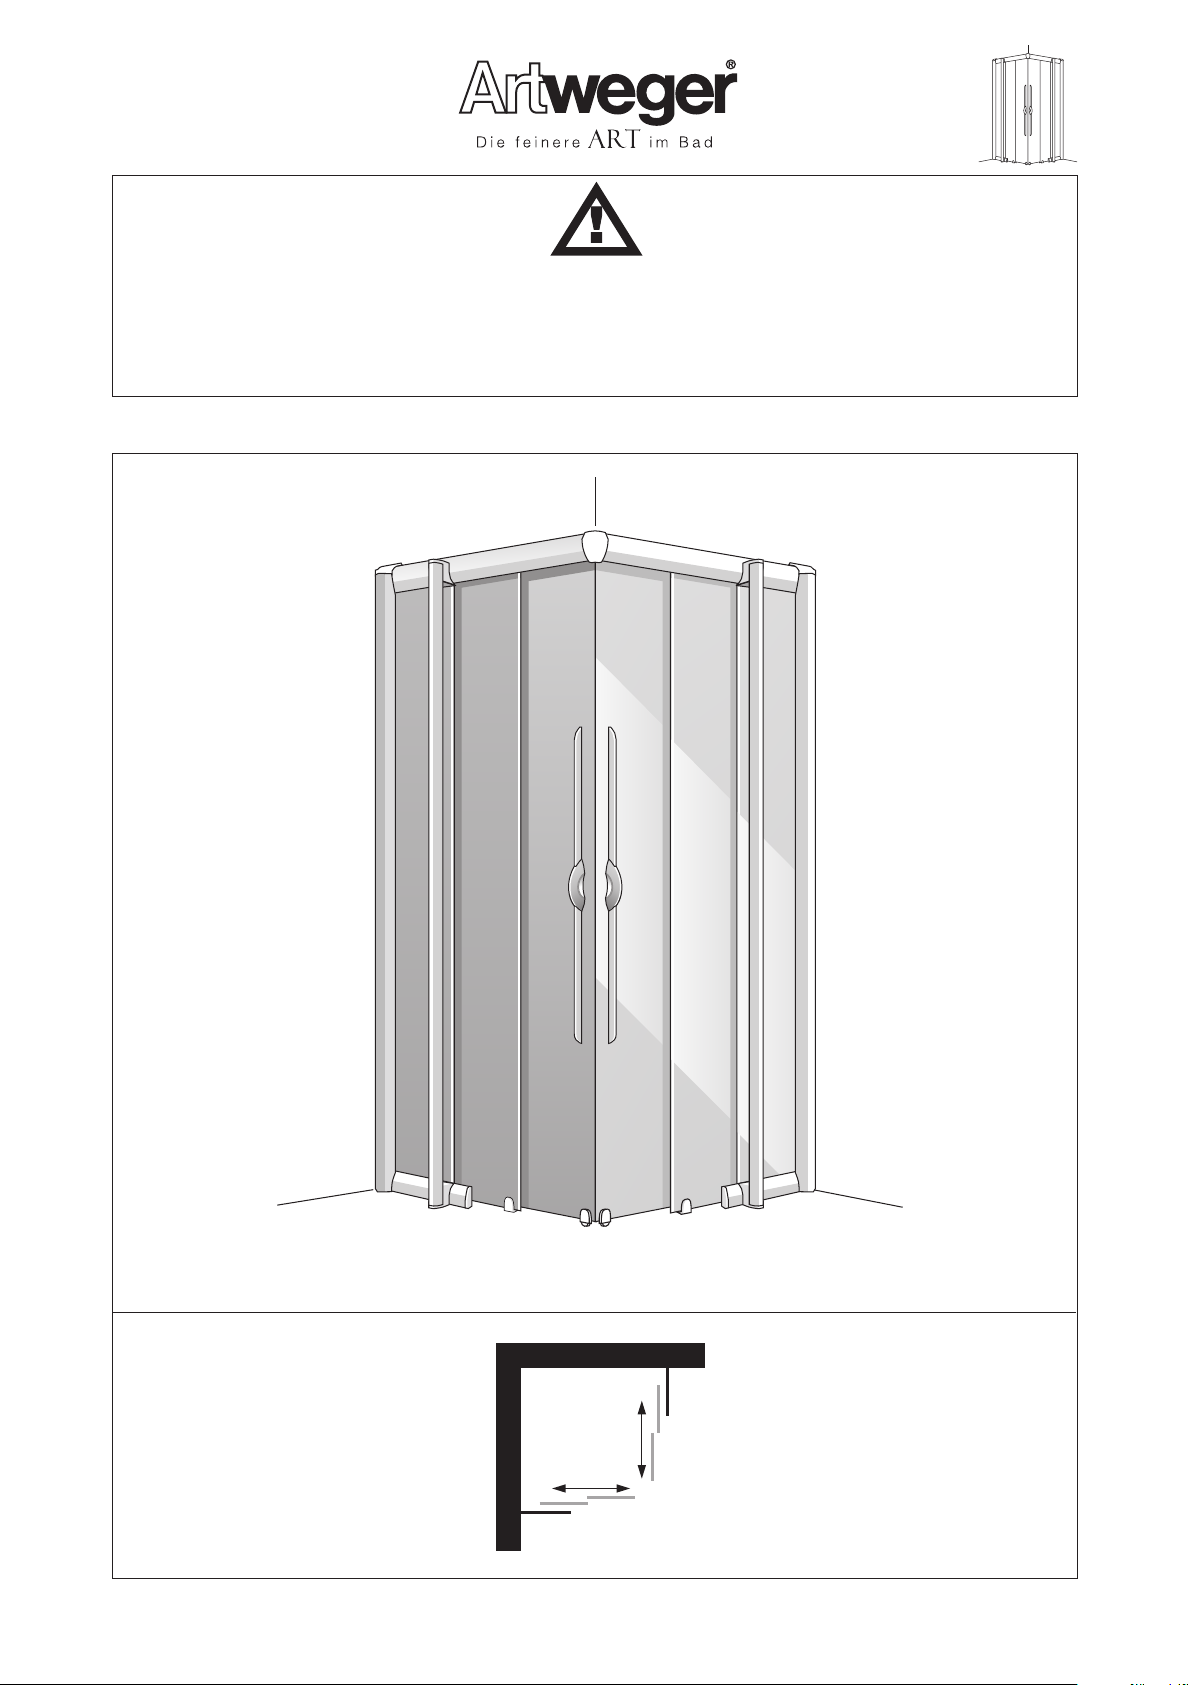
Achtung: Prüfen Sie vor Beginn
der Montage die Größe Ihrer
Duschabtrennung (EINBAUMASS).
Attention: Before assembly check
the size of your shower enclosure
(INSTALLATION MEASUREMENT).
Attention: Avant de débuter le
montage, contrôlez la dimension de votre
paroi de douche
( MESURES POUR MONTAGE )
Let op: kontroleert u voor montage
de grootte van uw douchekomb.
(INBOUWMAAT).
LIFELINE
mobil
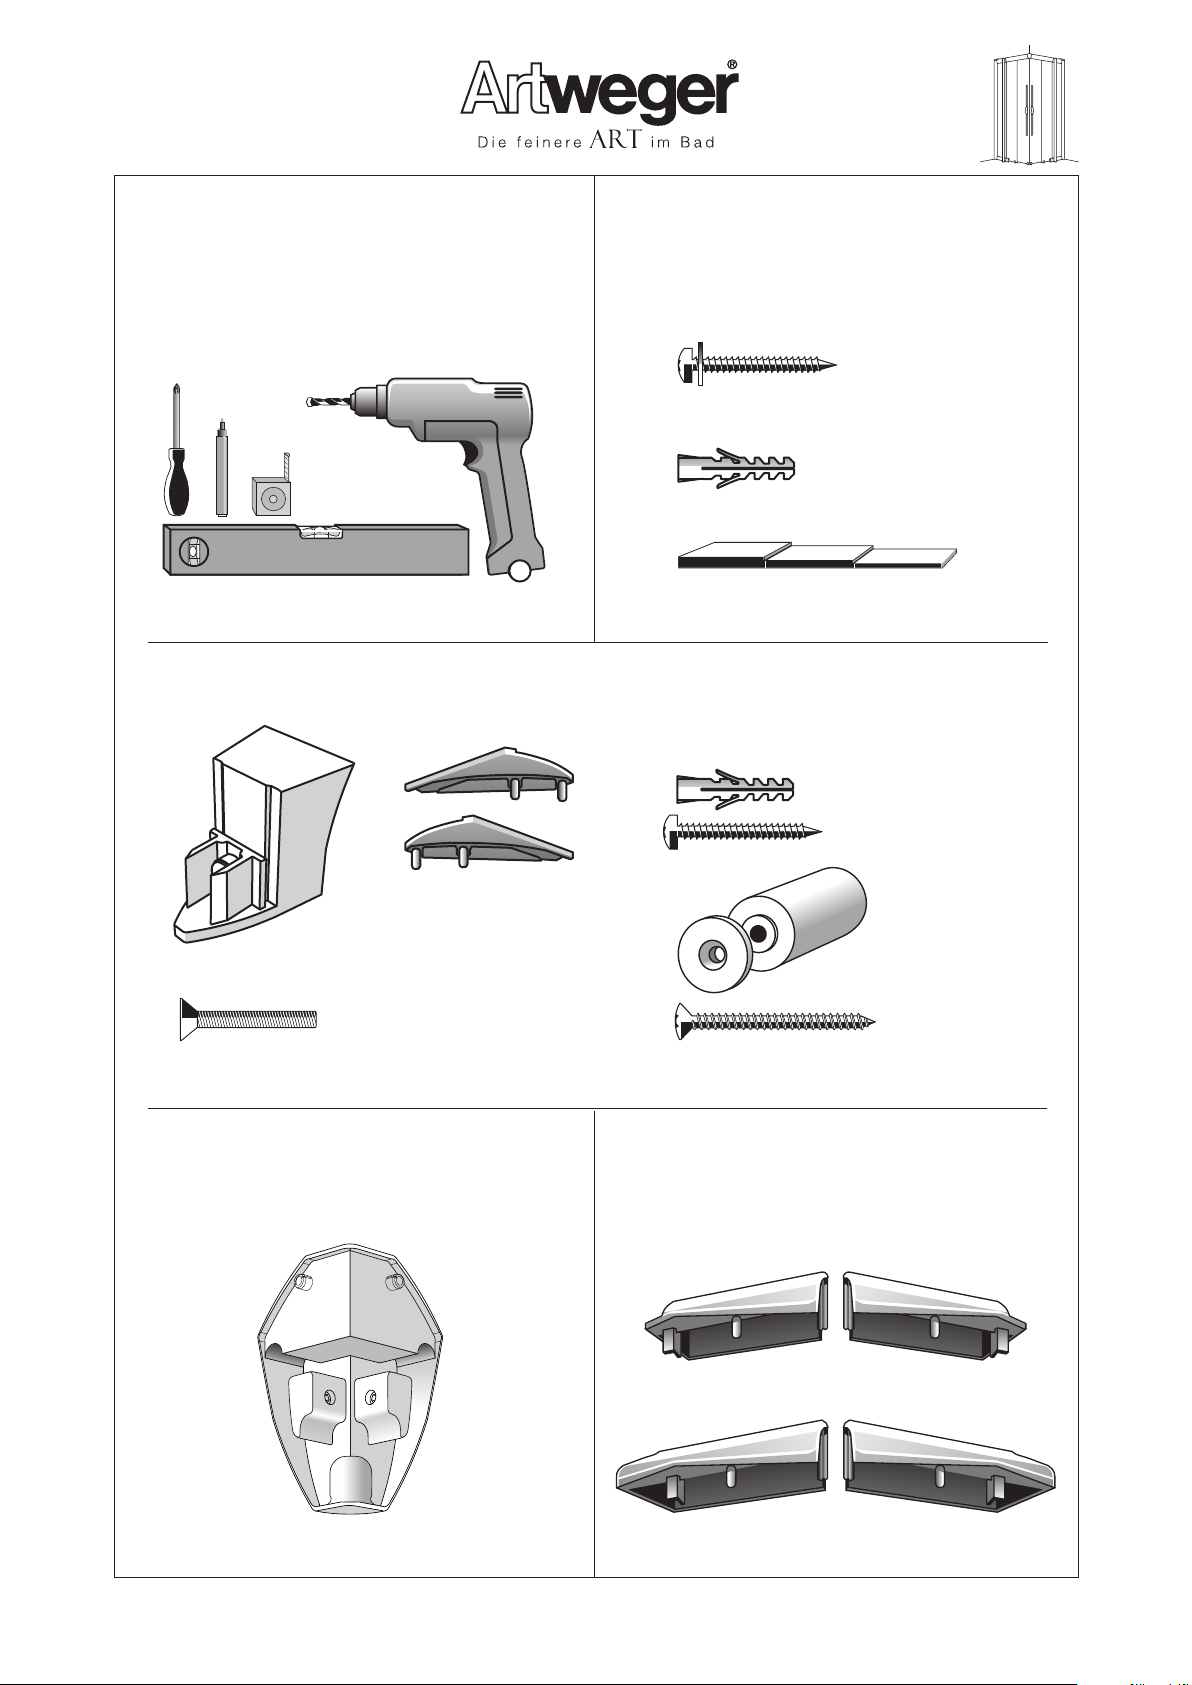
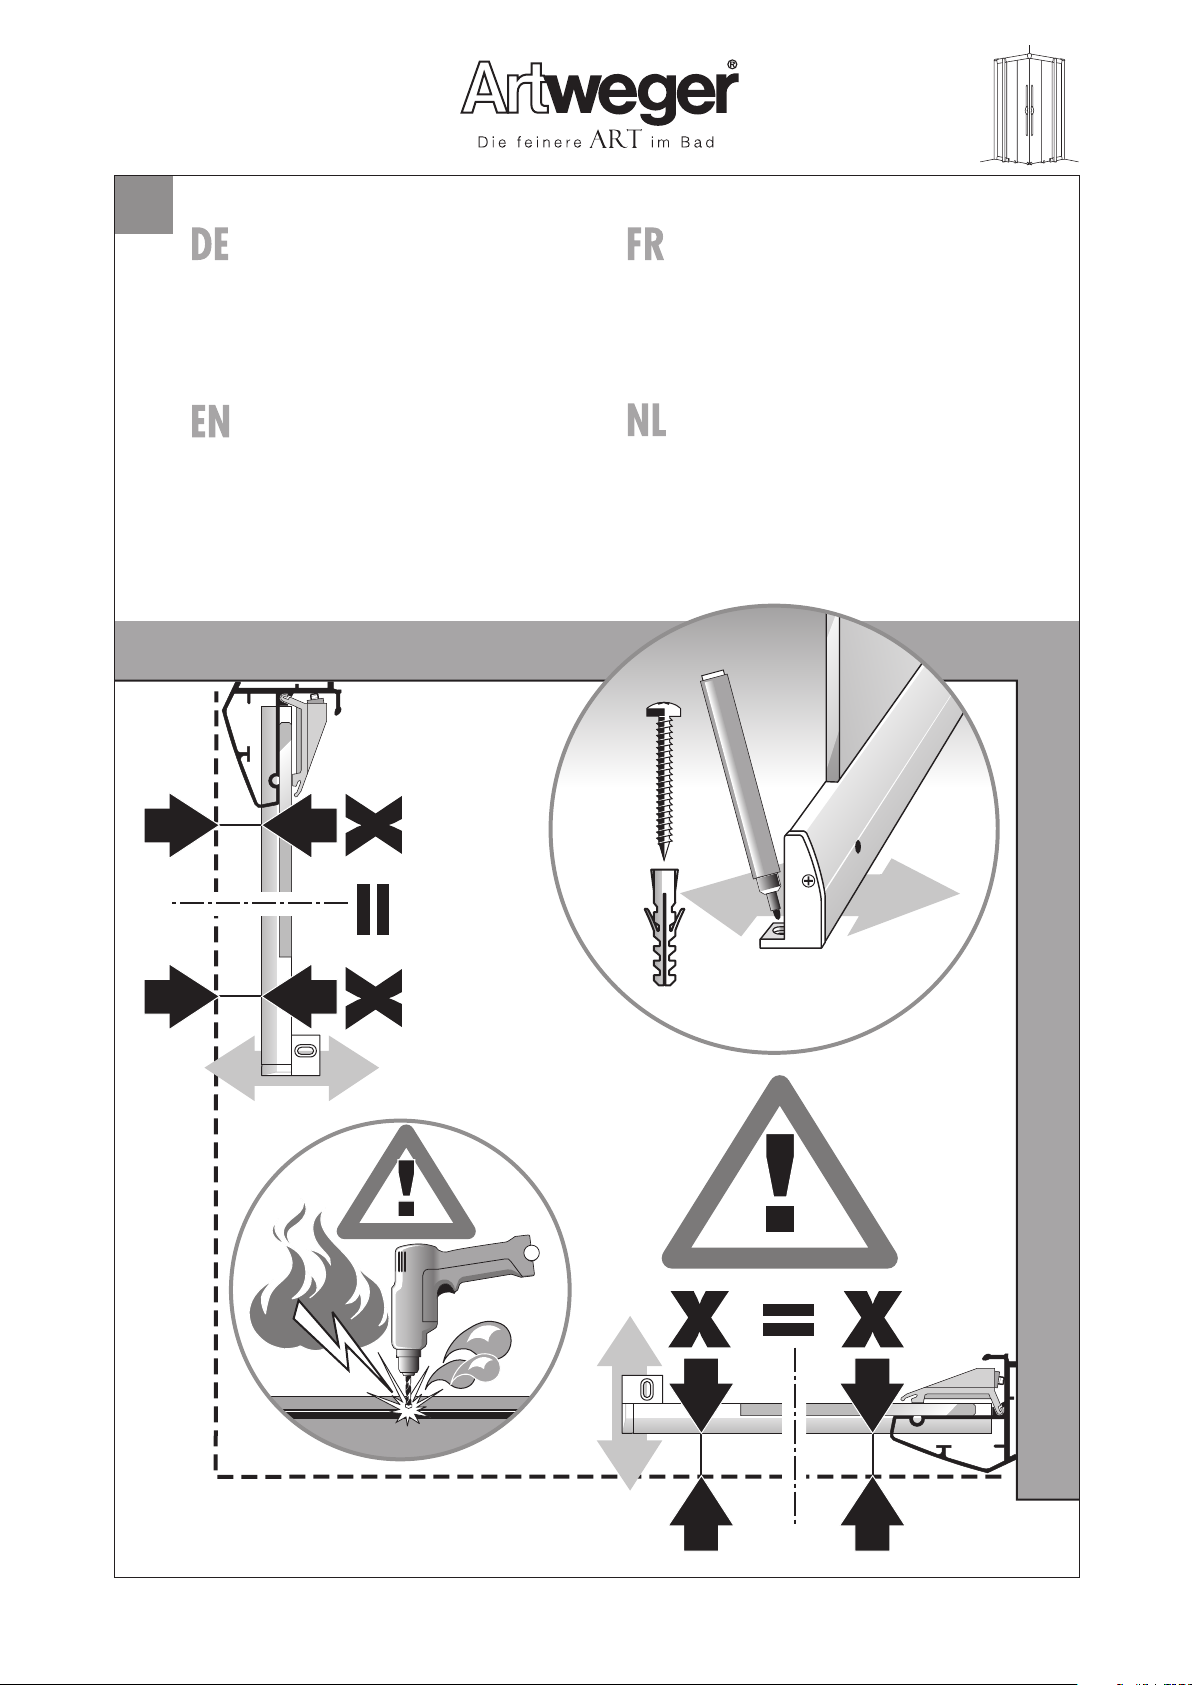
Boden und Wände mit Wasserwaage
prüfen. Bei schiefem Boden ist eine
einwandfreie Montage nicht möglich,
verwenden Sie in diesem Fall die
beiliegenden Unterlagsplättchen!
Check floor and walls with spirit
level.
Correct installation is not possible if
floor is inclined.
In this case use the enclosed spacing plates!
Contrôlez le sol et les murs àl ’aide
d’un niveau. Si le sol n’est pas
parfaitement plan, un montage correct
est impossible. Dans ce cas, utilisez les
plaquettes de mise à niveau fournies.
Vloer en wanden met waterpas
con-troleren.
Bij schuine vloer is een correcte
montage niet mogelijk.
Gebruik in dit geval de bijgevoegde
onder-legplaatjes.
1,5 mm 3 mm 4,5 mm
4
3
Löcher anzeichnen.
Dübel setzen.
Achtung: Beachten Sie beim Bohren der
Löcher, daß Sie keine Leitungen (Elektro,
Gas, Wasser) beschädigen.
Mark holes.
Set wall plugs.
Attention: When drilling holes do not
damage hidden pipes and wiring.
Marquer les perçages.
Positionner les chevilles.
Attention: faites attention en percant les
trous de ne pas endommager les
tuyauteries (cables électriques,
canalisations de gaz, d´eau, etc).
Gaten aantekenen
Pluggen aanbrengen.
Let op: bij het boren van gaten er op
letten, dat U geen Leidingen (elektro, gas
of water) beschadigt!
Ø 6 mm
8 x
innen
inside
intérieur
binnenkant
innen
inside
intérieur
binnenkant
LIFELINE
mobil
Profile anschrauben.
Screw on brackets.
Fixer les profilés au mur.
Profielen vastschroeven.
1
1
4
5
8x 4,2 x 38 mm
1. Untere Querprofile einschieben.
Detail 1: Querprofil einsetzen!
Detail 2: Querprofile nur sichern -
noch nicht fest anziehen!
1. Insert lower cross brackets.
Detail 1: Insert cross bracket!
Detail 2: Secure cross bracket only - do
not fasten tight!
1. Introduire les profilés
horizontaux en partie basse
Détail 1: Insérer le profilé horizontal!
Détail 2: Seulement sécuriser le profilé
horizontal – ne pas serrer complètement!
1. Onderste dwarsprofielen erin
schuiven.
Detail 1: dwarsprofiel erin zetten!
Detail 2: dwarsprofiel slechts lichtjes
vastzetten - nog niet vast aandraaien!
Ansicht von innen!
View from inside!
Vue de l'intérieur.
Binnenaanzicht!
1
2
LIFELINE
mobil
5
6
7
6
Fixteile einsetzen (Farbstreifen zur
Außenseite) und unten fixieren.
Siehe dazu Bild 7 (Detail 1,2 und 3).
Insert both fixed parts (coloured
strips to outside) and fasten at bottom. See
fig. 7 (detail 1, 2 and 3).
Positionner les deux parties fixes
(bandeau de couleur vers l’extérieur) et
fixer en bas. Voir également croquis 7
(Détail 1,2 et 3).
Beide vaste deele erin zetten
(kleurstrepen naar de buitenzijde) en
onderaan vastzetten. Zie daartoe afb. 7
(detail 1,2 en 3).
Fixieren des Fixteiles:
1 Klemmschieber lockern
2 Klemmschieber zum Fixteil
schieben.
3 Festschrauben.
Fastening the fixed part:
1 Loosen movable clamp.
2 Push clamp toward fixed part.
3 Screw tight.
Fixation de l’élément fixe:
1 Desserrer la pince de serrage.
2 Glisser la pince de serrage vers la partie
fixe.
3 Serrer la vis.
Instellen van het vaste deel:
1 Klem-schuifdelen losmaken.
2 Klem-schuifdelen naar het vast deel
chuiven.
3 Vastschroeven.
Ansicht von innen!
View from inside!
Vue de l'intérieur.
Binnenaanzicht!
Ansicht von innen!
View from inside!
Vue de l'intérieur.
Binnenaanzicht!
LIFELINE
mobil
2
3
1
Ansicht von innen!
View from inside!
Vue de l'intérieur.
Binnenaanzicht!
8
9
7 8
12
3
1 + 2 Beide Querprofile einzeln
von oben einsetzen.
3 Querprofile mit Eckverbinder
verschrau-ben.
1 + 2 Insert both cross brackets
from top.
3 Screw cross brackets to corner
connectors.
1 + 2 Positionner les deux profilés
horizontaux d’en haut.
3 Visser avec les pièces de liaison d’angle.
1 + 2 Beide dwarsprofielen
afzonderlijk van bovenaf erin zetten.
3 Dwarsprofielen met hoekstukjes
verschroeven.
2
1. Beide Fixteile einrichten und
festklemmen.
2. Querprofile links und rechts fixieren.
Reihenfolge beachten!
1. Adjust both fixed parts and clamp
tight.
2. Tighten cross brackets on left and right.
(Note correct order!)
1. Régler les deux éléments fixes et
clipser.
2. Fixer les profilés horizontaux à gauche et
à droite.
(Respecter l’ordre du montage!)
1. Beide vaste delen instellen en
vastklemmen.
2. Dwarsprofielen links en rechts vastzetten.
(op volgorde letten!)
11
22
Ansicht von innen!
View from inside!
Vue de l'intérieur.
Binnenaanzicht!
2
Ansicht von innen!
View from inside!
Vue de l'intérieur.
Binnenaanzicht!
1
LIFELINE
mobil
3
Untere Führungsprofile einrichten und montieren.
ACHTUNG! Achten Sie auf parallelen Abstand!
ACHTUNG! Beachten Sie beim Bohren der Löcher, daß Sie
keine Leitungen (Elektro, Gas, Wasser) beschädigen.
Set and install lower guide pieces.
ATTENTION! Be careful of parallel distance !
ATTENTION! When drilling holes do not damage hidden
pipes and wiring.
Marquez les profilés guides bas et montez.
ATTENTION! Veillez à une distance parallèle!
ATTENTION! Faites attention en percant les trous de ne pas
endommager les tuyauteries (cables électriques,
canalisations de gaz, d´eau, etc).
Onderste geleideprofielen instellen en monteren.
Let u op de evenwijdige afstand !
LET OP bij het boren van gaten er op letten, dat U geen
Leidingen (elektro, gas of water) beschadigt!
10
Ø 6 mm
4,2 x 38 mm
98
LIFELINE
mobil
10
11
M5 x 35 mm
2
1. Adapter auf Anhaltestangen oben und
unten aufstecken.
2. Anhaltestangen mit Türrahmen oben und unten
verschrauben.
3. Distanzstücke in der Mitte montieren.
1. Insert adapters on grab pole at top and
bottom.
2. Screw grab poles and door frame together at top
and bottom.
3. Install spacers in the middle.
1. Enfoncez les adaptateurs en haut et en bas
des barres de maintien.
2. Vissez la barre de maintien sur le cadre de la porte
en haut et en bas.
3. Montez les cales à mi-hauteur.
1. Adapter op steunstangen boven en onder
opzetten.
2. Steunstangen met deurprofielen boven en onder
vastschroeven.
3. Afstandstuk in het midden monteren.
98
LIFELINE
mobil
1
Ansicht von innen!
View from inside!
Vue de l'intérieur.
Binnenaanzicht!
4,2 x 50 mm
3
12
10
13
Detail - Tür unten einhängen.
Detail - hang in door at bottom.
Détail – Insérer porte en partie
basse.
Detail - Deur onderaan erin hangen.
9
Erste Garnitur Türblätter einhängen.
Hang in first set of door panes.
Accrocher la première garniture
d’élements de portes.
Eerste paar deuren erin hangen.
innen
inside
intérieur
binnenkant
LIFELINE
mobil