AS LED Lighting PDL Series User manual

Bewahren Sie diese Anleitung für zukünftige Wartungsarbeiten oder Demontagen auf. Wichtige Informationen zu AS Leuchten sowie
zur Leuchtenwartung und –entsorgung finden Sie im Internet:
www.as-led.de
Keep these instructions for future maintenance work or dismantling.
For important information of AS luminaires and on maintaining and disposing of luminaires, please visit our webpage at:
www.as-led.de
Montageanleitung
Mounting instructions
PDL
AS LED Lighting GmbH
Seeshaupter Str. 2
82377 Penzberg
Tel. +49 (0) 8856 80006-0
Fax +49 (0) 8856 80006-99

PDL Montageanleitung
https://www.as-led.de/ Seite 1von 8Rev. 13.04.2021
Sicherheitshinweise
Diese Anleitung setzt Fachkenntnisse voraus, die einer abgeschlossenen Berufsausbildung im Elektrohandwerk entsprechen!
Arbeiten Sie niemals bei anliegender Spannung an der Leuchte.
Vorsicht-Lebensgefahr!
Die Netzweiterleitung hat außerhalb der Leuchte zu erfolgen.
Nehmen Sie keine Veränderungen an den Anschlussleitungen vor.
Bei Störungen des LED-Moduls wenden Sie sich bitte an uns, da die Module austauschbar sind.
Leitungen nicht auf die Leuchte legen.
Wichtige Hinweise zu elektronischen Betriebsgeräten (EVG)
Eine Neutralleiterunterbrechung im Drehstromkreis führt zu Überspannungsschäden in der Beleuchtungsanlage. Neutralleiter-Trennklemme
deshalb nur spannungsfrei öffnen und vor Wiedereinschalten schließen.
Die maximal zulässige Umgebungstemperatur ta der Leuchte darf nicht überschritten werden. Überschreitung reduziert die Lebensdauer, im
Extremfall droht Frühausfall.
Anschlussleitungen für Steuereingänge dimmbarer EVG (1-10V, Dali, etc.) 230V netzspannungsfest auslegen.
Safety notes
These instructions assume expert knowledge corresponding to a completed professional education as an electrician!
Never work when voltage is present on the luminaire.
Caution –Risk of fatal injury!
The mains forwarding must be carried out outside the luminaire.
Do not make any changes to the connecting cables.
In case of malfunctions of the LED module, please contact us, as the modules are exchangeable.
Do not lay cables on the light.
Important Information Regarding Electronic Control Gear (ECG)
Interference to the neutral conductor in a three-phase system may result in surge-related damage in the lighting installation. Only open neutral
conductor –disconnect terminal when disconnected from power supply and close prior to switching back on.
The maximum admissible ambient temperature taof the luminaire may not be exceeded. Surpassing that temperature reduces the service life
and, in extreme cases, poses risk of early failure.
Use mains cables for control inputs of dimmable ECG (1-10V, Dali, etc.) which are rated for 230V.
Bestimmungsgemäße Verwendung
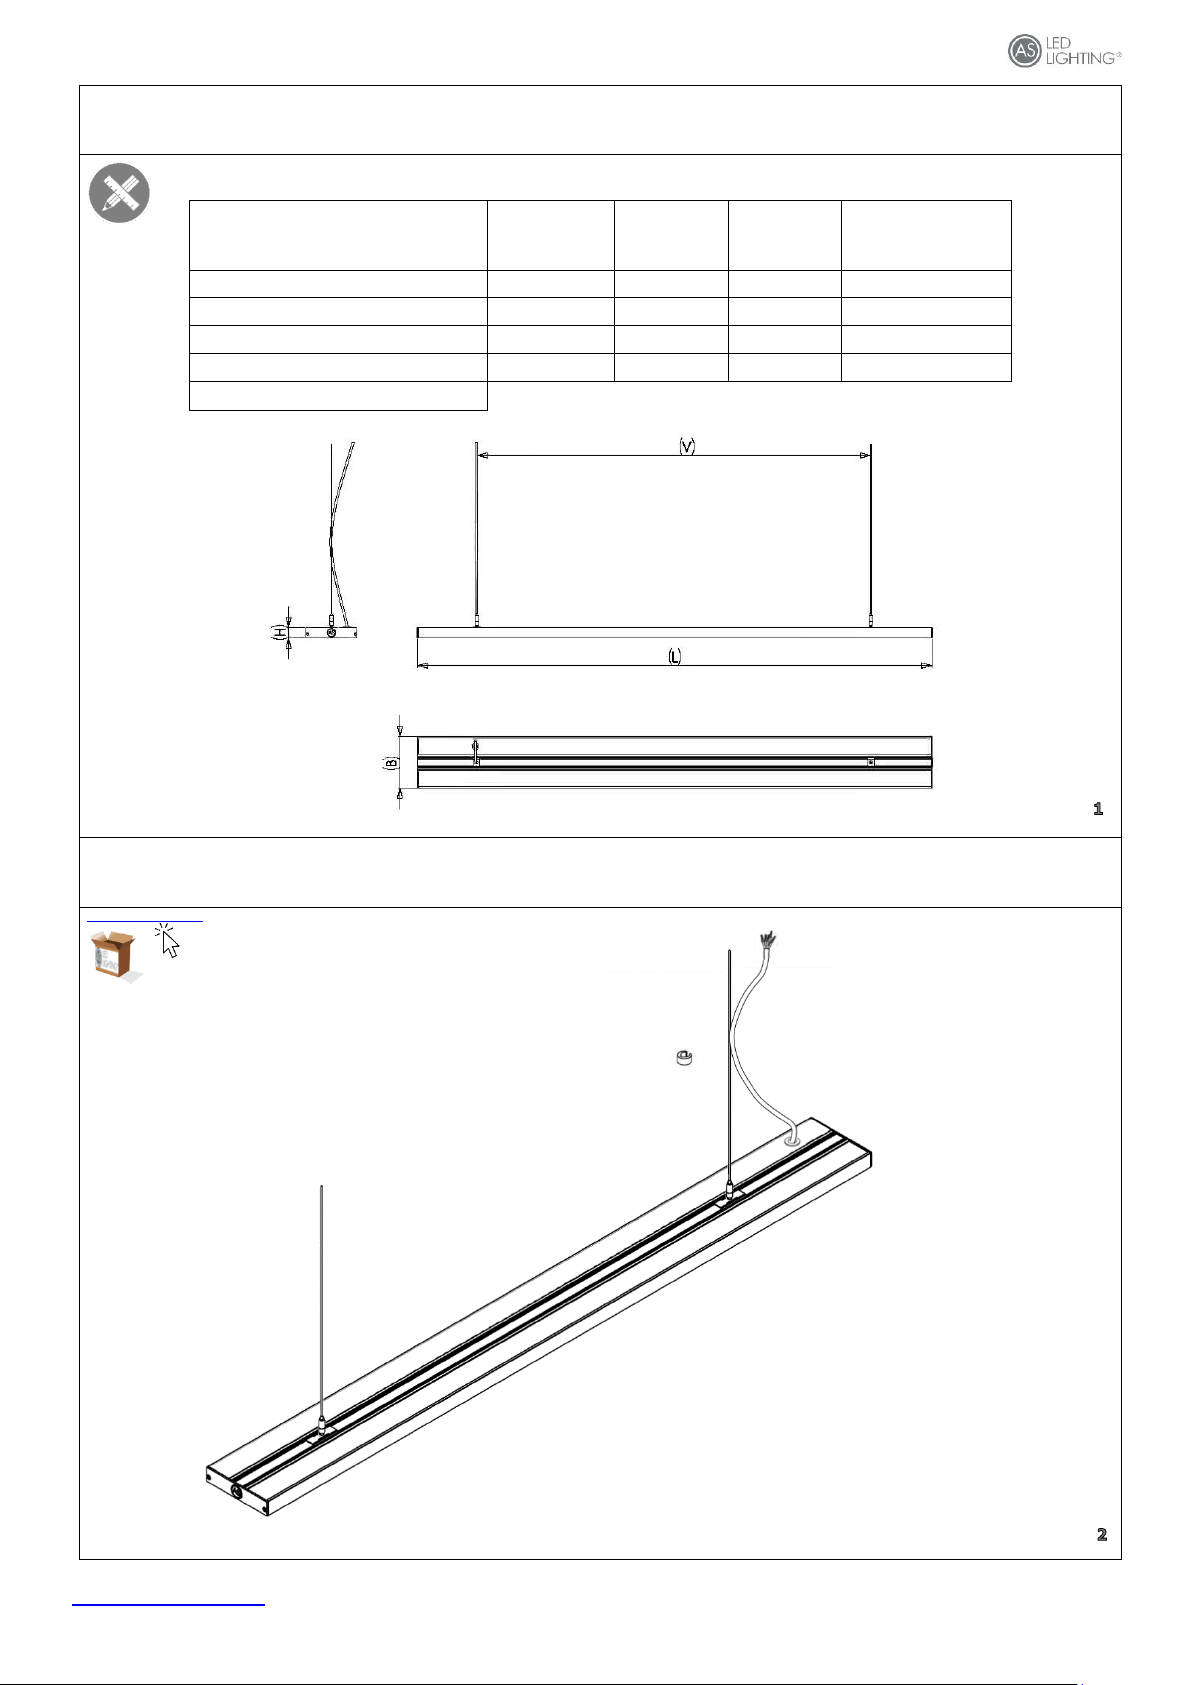
Die Leuchte PDL ist für Innenräume mit der Umgebungstemperatur von -25°C bis +50°C bestimmt.
Die Leuchte nicht mit Dämm- oder Isolationsmaterial abdecken!
Die Leuchte darf nicht auf feuchten und leitenden Untergrund installiert werden.
Um den Gewährleistungsanspruch aufrecht zu erhalten, darf die Leuchte nicht geöffnet werden.
Die Tragfähigkeit der Decke muss durch bauseitige Maßnahmen sichergestellt sein.
Technische Änderungen behält sich die AS LED Lighting GmbH vor.
Der Hersteller übernimmt keine Haftung für Schäden, die durch unsachgemäßen Einsatz entstehen.
Intended use
The PDL luminaire is designed for interiors with ambient temperature from -25°C to +50°C.
Do not cover the luminaire with insulating material!
The light must not be installed on damp or conductive surfaces.
In order to maintain the warranty claim, the luminaire must not be opened.
The load-bearing capacity of the ceiling must be ensured by measures taken by the customer.
AS LED Lighting GmbH reserves the right to make technical changes.
The manufacturer accepts no liability for damage caused by improper use.

PDL Montageanleitung
https://www.as-led.de/ Seite 2von 8Rev. 13.04.2021
Leuchten Typen und Abmessungen
Luminaire types and Dimensions
Modellbezeichnung
L
(mm)
B
(mm)
H
(mm)
V
(mm)
PDL-120015-XXX-04-p-MLH
1202
150
30
500-1150
PDL-120015-XXX-08-p-MLH
1202
150
30
500-1150
PDL-150015-XXX-05-p-MLH
1502
150
30
500-1450
PDL-150015-XXX-10-p-MLH
1502
150
30
500-1450
xxx=830/840/850/865
Lieferumfang PDL-120015-XXX-04-p-MLH /PDL-150015-XXX-05-p-MLH
Scope of delivery PDL-120015-XXX-04-p-MLH /PDL-150015-XXX-05-p-MLH
https://www.as-led.de/
2x
Aluminium Aufhänger
(vormontiert)
Aluminium hanger
(pre-assembled)
Leuchte mit Anschlusskabel
Luminaire with connection cable
1x
2x
Seilsystem
Rope system

PDL Montageanleitung
https://www.as-led.de/ Seite 3von 8Rev. 13.04.2021
Lieferumfang PDL-120015-XXX-08-p-MLH /PDL-150015-XXX-10-p-MLH
Scope of delivery PDL-120015-XXX-08-p-MLH /PDL-150015-XXX-10-p-MLH
https://www.as-led.de/
Lieferumfang Seilsystem
Scope of delivery rope system
https://www.as-led.de/
2x
4x
2x
2x
2x
Kabelclip
Cable clip
Diskus
Discus
Seil 2m mit Kugel
Rope 2m with ball
Kegel
Cone
Rope Fix M5 Vancouver
Leuchte mit Anschlusskabel
Luminaire with connection cable
1x
Seilsystem
Rope system
2x

PDL Montageanleitung
https://www.as-led.de/ Seite 4von 8Rev. 13.04.2021
Löcher in Decke bohren
Drill holes in ceiling
Dübel anbringen
Attach dowels
Seil einführen
Insert rope
Montageseil an der Decke befestigen
Mounting the rope on the ceiling
1
V
Dübel und/oder Schrauben für die Deckenmontage
sind NICHT im Lieferumfang enthalten.
Dowels and/or screws for ceiling mounting are
NOT included in the delivery.
1
1
V
2
2
1
Schraubendurchmesser max.
5mm. Kopfdurchmesser max.
8mm.
Screw diameter max. 5mm.
Head diameter max. 8mm.
3
Montieren Sie beide
Seile an der Decke.
Mount both ropes
on the ceiling.
Dübel und/oder Schrauben für die Deckenmontage
sind NICHT im Lieferumfang enthalten.
Dowels and/or screws for ceiling mounting are
NOT included in the delivery.
1

PDL Montageanleitung
https://www.as-led.de/ Seite 5von 8Rev. 13.04.2021
Rope Fix M5 Vancouver einschrauben für
PDL-120015-XXX-04-p-MLH /PDL-150015-
XXX-05-p-MLH
Screw in the rope fix M5 Vancouver for
PDL-120015-XXX-04-p-MLH /PDL-150015-
XXX-05-p-MLH
Rope Fix M5 Vancouver einschrauben für
PDL-120015-XXX-04-p-MLH /PDL-150015-
XXX-05-p-MLH
Screw in the rope fix M5 Vancouver for
PDL-120015-XXX-04-p-MLH /PDL-150015-
XXX-05-p-MLH
Rope Fix M5 Vancouver einschrauben für
PDL-120015-XXX-08-p-MLH /PDL-150015-
XXX-10-p-MLH
Screw in the rope fix M5 Vancouver for
PDL-120015-XXX-08-p-MLH /PDL-150015-
XXX-10-p-MLH
Rope Fix M5 Vancouver einschrauben für
PDL-120015-XXX-08-p-MLH /PDL-150015-
XXX-10-p-MLH
Screw in the rope fix M5 Vancouver for
PDL-120015-XXX-08-p-MLH /PDL-150015-
XXX-10-p-MLH
1
2
3
Den zweiten Rope Fix M5 Vancouver verschrauben.
Screw the second Rope Fix M5 Vancouver.
4
1
2
3
4
Seilhalter in das vorgebohrte Loch auf der Leuchtenoberseite einschrauben (2x).
Screw the rope holder into the pre-drilled hole on the top of the lamp (2x).

PDL Montageanleitung
https://www.as-led.de/ Seite 6von 8Rev. 13.04.2021
Seil einführen
Insert rope
Höhe beidseitig justieren
Adjust height on both sides
Leuchte an Netz anschließen
Connect the luminaire to the mains
3
Um die Höhe zu verstellen,
den Seilführungs-Stift des
Rope Fix M5 Vancouver nach
unten drücken und dabei das
Seil nach oben ziehen.
To adjust the height press
the rope guide pin of the
Rope Fix M5 Vancouver
down and pull the rope up.
4
4
Befestigen Sie das Kabel mit einem
oder mehreren Kabelclips am Seil.
Attach the cable to the rope with one
or more cable clips.
Seil einführen und bis zur
gewünschten Höhe ziehen.
Insert the rope and pull it to
the desired height.

PDL Montageanleitung
https://www.as-led.de/ Seite 7von 8Rev. 13.04.2021
Anschlussbelegung Buchse (5-polig)
Pin assignments of the socket (5-pole)
Abmantellängen und Abisolierlängen (mm)
Dismantling and Insulation strip lengths (mm)
Belegung
Kabel
Phase L1
L
Braun
Neutralleiter
N
Blau
GND
PE
Grün/Gelb
DALI +
D1
Rot
DALI -
D2
Weiß
Maximale Belastung von Leistungsschutzautomaten für PDL-120015-XXX-08-p-MLH
/PDL-150015-XXX-10-p-MLH
Maximum load of automatic circuit breakers for PDL-120015-XXX-08-p-MLH /PDL-
150015-XXX-10-p-MLH
Sicherungsautomat
C10
C13
C16
C20
B10
B13
B16
B20
Einschaltstrom
Installation Ø
1,5 mm2
1,5 mm2
2,5 mm2
2,5 mm2
1,5 mm2
1,5 mm2
2,5 mm2
2,5 mm2
Imax
Pulsdauer
Anzahl Leuchten
21
28
35
45
13
17
21
27
23A
174µs
Maximale Belastung von Leistungsschutzautomaten für PDL-120015-XXX-08-p-MLH
/PDL-150015-XXX-10-p-MLH
Maximum load of automatic circuit for PDL-120015-XXX-08-p-MLH /PDL-150015-XXX-
10-p-MLH
Sicherungsautomat
C10
C13
C16
C20
B10
B13
B16
B20
Einschaltstrom
Installation Ø
1,5 mm2
1,5 mm2
2,5 mm2
2,5 mm2
1,5 mm2
1,5 mm2
2,5 mm2
2,5 mm2
Imax
Pulsdauer
Anzahl Leuchten
20
26
33
41
12
16
20
26
23,3A
198µs
8,5 –9,5 mm
8.5 –9.5 mm

PDL Montageanleitung
https://www.as-led.de/ Seite 8von 8Rev. 13.04.2021
Installationshinweis
Installation information
Die Lichtquelle/die Module dieser Leuchte sind austauschbar. Wenn die Lichtquelle ihr Lebensdauerende erreicht hat, können die Module ersetzt
werden. Die Lichtquelle dieser Leuchte darf nur vom Hersteller oder einem von ihm beauftragten Servicetechniker oder einer vergleichbaren
Fachkraft ersetzt werden.
The luminaire light source(s) are interchangeable. When the light source has reached its end of life, the modules can be replaced. The light source
of this luminaire may only be replaced by the manufacturer or by a service technician appointed by him or a comparable specialist.
“Vorsicht, Stromschlaggefahr!”
Achtung, gefährliche Spannung > 65Vdc!
Arbeiten an der Leuchte dürfen nur im spannungslosen Zustand durchgeführt werden und
setzen Fachkenntnisse voraus, die einer abgeschlossenen Berufsausbildung im Elektrohandwerk entsprechen!
„Caution, risk of electric shock“
Caution, dangerous voltage> 65Vdc!
Work on the luminaire must only be carried out in a tension - free state.
These instructions assume expert knowledge corresponding to a completed professional education as an electrician!
Nicht zur Abdeckung mit Wärmedämm-Material geeignete Leuchte.
Not suitable for covering with heat-insulating material.
Das Symbol der durchgestrichenen Mülltonne auf Rädern bedeutet, dass das Produkt in der EG einer getrennten Müllsammlung zugeführt
werden muss. Dies gilt für das Produkt und alle mit diesem Symbol gekennzeichneten Zubehörteile. Gekennzeichnete Produkte dürfen nicht
über den normalen Hausmüll entsorgt werden, sondern müssen einer Annahmestelle für das Recycling von elektrischen und elektronischen
Geräten entsorgt werden.
The symbol of the crossed-out wheeled bin means that the product must be sent to a separate waste collection point in the EC. This applies to the product and
all accessories marked with this symbol. Marked products may not be disposed of with normal household waste, but must be disposed of at a collection point
for the recycling of electrical and electronic equipment.
This manual suits for next models
16
Table of contents
Other AS LED Lighting Lantern manuals