ASG BLCA-9010 User manual

OPERATION AND MAINTENANCE MANUAL
ITEM NO.: BLCA-9010
ITEM NO.: BLCA-9020
ITEM NO.: BLCA-9030
ITEM NO.: BLCA-9040
18V BRUSHLESS CORDLESS ANGLE SHUT-OFF WRENCH

1
Icon Instructions
1. 2. 3. 4.
5. 6. 7. 8. 9.
1. Read instruction manual.
6. Do not operate near combustible material.
2. Observe caution and safety notes.
7. Do not disassemble.
3. Recyclable.
8. CE certification.
4. For indoor use only.
5. Do not expose to wet conditions.
Accessories
Item
Quantity
Unit
Suspension Hook Ring Group
1
PCS
Adjusting Wrench
1
PCS
Manual
1
PCS
Torque rings ass’y
1
Package
Waist hook
1
PCS

2
Warning
Read all instructions and make sure the appearance of the device has no damage before use.
Failure to follow all instructions listed below may result in electric shock, fire and/or serious injury.
1. Keep tool in a clean working area away from moisture to decrease the risk of electric shock or
short-circuiting.
2. Be alert to workplace safety
(1) Use the device in a well lit and clean environment.
(2) Keep children and other people away unless the person has been assigned for the task to
avoid the danger of injury.
(3) Do not work with the device in potentially explosive environments in which there are
flammable liquids, gases, dust, or other electrical power tools which create sparks.
(4) Do not use the device if you are tired or under the influence of drugs, alcohol or
medication.
3. Store the device in a safe place when not in use.
4. Always use a screwdriver that is intended for the task you are undertaking. Do not overload or
use it improperly such as drilling or tapping.
5. Dress properly. Do not wear loose clothing or jewelry while operating the tool to avoid danger.
6. By using the device correctly, make sure to hold it firmly with two hands in place before starting
the trigger.
7. Unplug the charger when not in use.
8. Remove the battery from the device when it is not being used.
9. Use only the accessories that are detailed in the operating instructions. The use of others
which are not recommended in the operating instructions may affect the functioning of the
device. It could lead to an increased risk of personal injury as well.
10. To protect parts in gearbox from damage, replace the grease at least once every year.
11. It is necessary for the operators to read and follow up on all of the operating instructions in this
manual. ASG is not responsible for any personal injury that may be caused due to disobeying
these instructions.

3
Types of Protection
▉Over electric current protection
▉Prevent from low power
▉Thermal Protector
▉Stall protection
▉Slow rotation protection
▉Reverse control protection
▉Battery Identification
▉Sleeping mode
Warning
Do not attempt to repair or disassemble this cordless screwdriver, the warranty will be
considered void.
1. This rechargeable screwdriver requires maintenance. Make sure to remove the battery pack
before maintaining or repairing the device by ASG.
2. Do not attempt to disassemble or reassemble the device, as it may result in poor performance
or danger or injury.
3. Do not repair the device with other than genuine ASG replacement parts. Failure to do so may
result in poor performance or danger of injury. The warranty will be considered void.
4. The temperature between 0℃~ 35℃would be an ideal condition of carrying out the tasks with
this device.
Operating instructions
1. Charge the battery in the charging station before first use to make sure the tool operates at its
highest capacity. To ensure operators against injuries, release the Forward/Reverse lever
(pictured below) into the center position to lock the trigger before use.

4
2.
(2.1) The below illustration shows the process of correctly installing & disassembling the
rechargeable battery. The audible beep sound and flash indicates the screwdriver’s battery
is installed correctly and the tool can be operated.
3. .90° Attached angle adjustment.
Insert Battery Steps
(1) Insert the rechargeable battery into the device as shown.
(2) Assembled completely.
Remove Battery Step
Press the release button Follow the arrow direction. Complete removal.
and take it out of the device

5
Operation Instructions
Function Name Table
No.
Description
No.
Description
(1)
Trigger Switch
(6)
Indication light
(2)
Forward/Reverse Lever
(7)
Torque wrench
(3)
LED Light
(8)
Speed adjustment
(4)
Torque Ring
(9)
Wrist strap hole
(5)
S waist hook
(10)
Suspension Ring Accessory
(2)
(8)
(1)

6
Manual / Function
1. Full auto shut-off screwdriver
It stops automatically when the screw has been tightened and reached the set torque.
(1) Trigger switch
The LED lights turn on when the trigger switch has been pressed about one-third down, and then
the screwdriver starts functioning when the switch trigger has been pressed half way down; on the
contrary, it stops when the screw has been tightened or the trigger has been released.
(2) Forward / Reverse switch
When the switch is turned to the right as arrow indicates, the screwdriver will be fastening clock-
wise; Vice versa, when the switch is turned to the left, the screwdriver will be operating counter-
clockwise. As the diagram shows, always set the switch to neutral position when the screwdriver is
not being used.
(3) LED light
While pressing the trigger, the LED lights up automatically.
(4) Torque ring
Use the color torque rings to identify tools set to the same target torque.
(5) Waist hook
The waist hook allows users to carry the device easily by attaching it to their work belt.
(6) Functional light and the status indicator
Whenever the remaining power in the rechargeable battery is less than 20%, the red light will flash,
but the tool is still functional. Once the remaining power is closer to 10% or lower it may result in
poor performance.

7
Functional indicator
OK screwing with preset torque
NG screwing
Beep sound
1 short beep
1 long beep
(7) Torque adjustable
The torque is able to be changed by the following steps
(7.1) Remove the battery from the device or set the rotation
switch to neutral position to prevent the tool from starting
up unintentionally.
(7.2) Open up the torque safety cover cap; follow the illustration
on the right. Insert the torque wrench to adjust your torque
higher or lower.
(7.3) Adjust the torque in two directions (-) for less torque (+)
for more torque.
(7.4) Use an ASG torque tester to confirm your torque setting.
Do not exceed the stop line of the high and low torque when making adjustments shown in diagram
3.

8
(8) Hi/Lo Switch
When the rotating speed needs to be changed, select the switch to Hi for the fastest rotation, and to
Lo for slowest rotation. Tool may not shut off in low speed if the set torque is above 50% of the
maximum torque.
(9) Suspension Ring Accessory
Use suspension ring with a tool balancer to reduce the weight of the tool for the operator.
(1) Take both up and down side cover of suspension ring.
(2) Lock both screws
(3) Close the locking ring
(4) Completed

9
Other Cautions
1. It is recommended to use the tool under 8 hours a day to not overload it.
2. According to operating frequency and torque loaded, we suggest adding lubricating oils in
clutch every 3-6 months, and contact ASG for maintenance.
3. Do not attempt to repair or disassemble this cordless screwdriver without authorization. Always
have the device serviced by ASG in order to have the warranty effective continually.
4. ASG is not responsible for any poor performance or damage caused by customers own
modification of the tool.
5. Chemicals, Acetone, Benzene, Alcohol, Thinner, Ketone, trichloroethylene, etc shall not be in
contact with the surface of the screwdriver in order to prevent chemical damage.
6. Please follow instruction carefully and do not drop or shock the screwdriver.
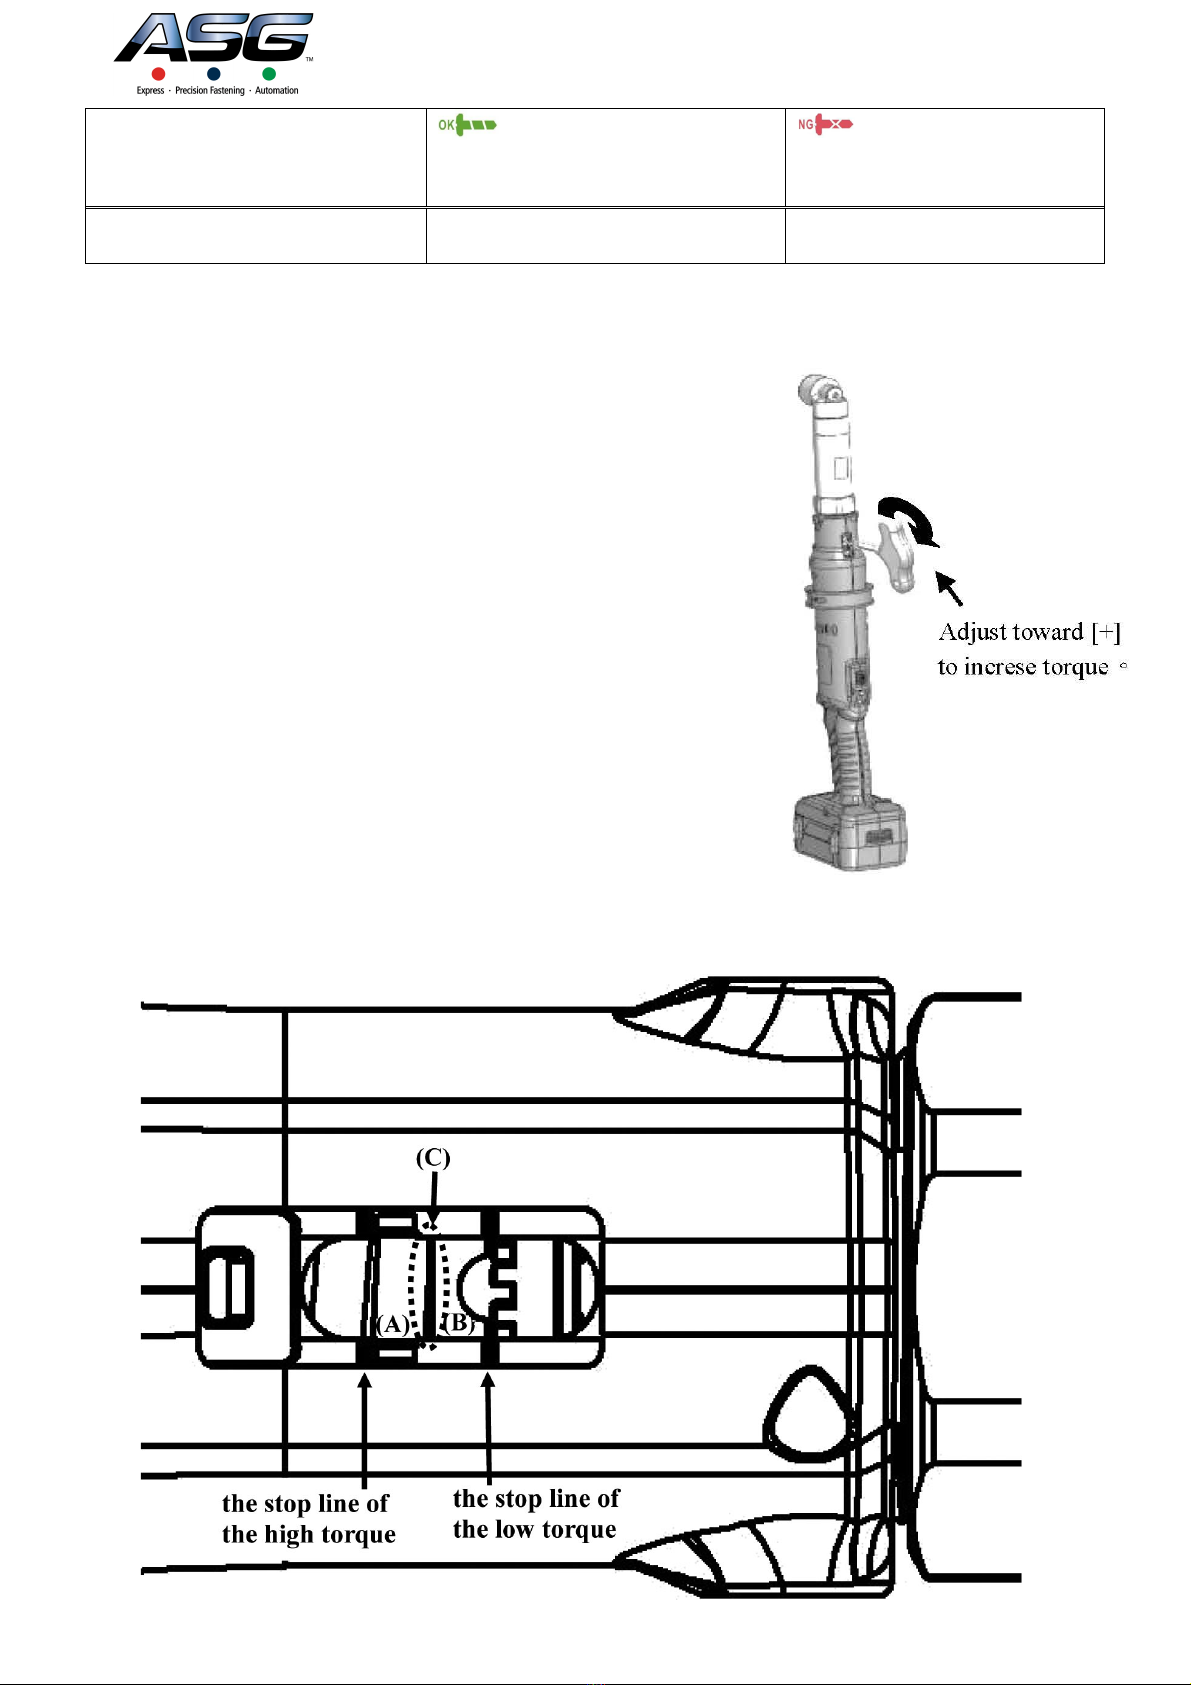
7. Do not turn the Hi/Lo switch during operation in order to cause system malfunction.
8. The device will not be able to function again once the OK/NG indicator/signal hasn’t turned off.
9. During operation, if the switch has been changed accidentally the device will enable its self-
protecting mode and power off. Re-start the tool in this instance.
10. ASG cordless screwdriver torque output is generated by clutch mechanism, and it is applicable
to ISO 6789.
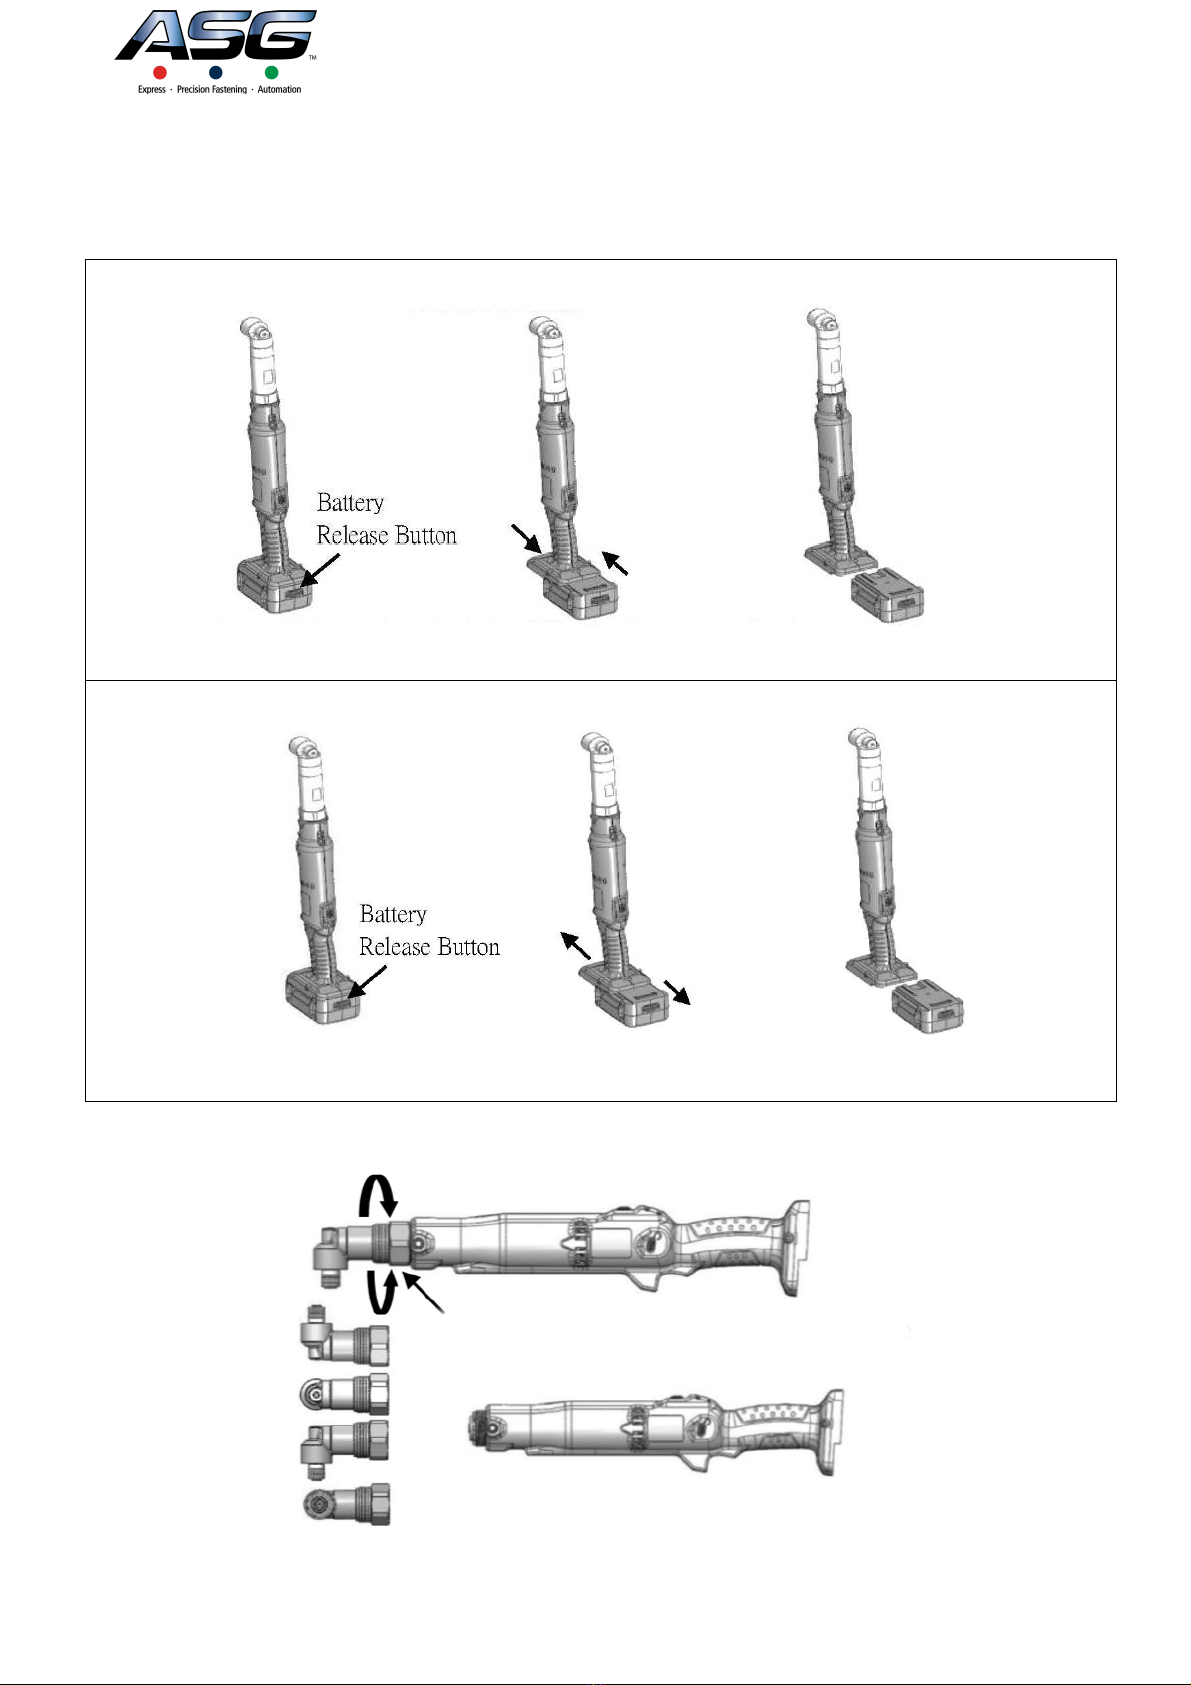
Description of Battery and Charger
1. Choose the suitable battery for your application:
A. BLCA-9010 tool uses the BB-2030 battery
B. BLCA-9020 tool uses the BB-2030 battery
C. BLCA-9030 tool uses the BB-2030 battery
D. BLCA-9040 tool uses the BB-2040 battery
2. Choose the charger for your battery:
A. BB-2030 battery uses the BC-1020 charger
B. BB-2030 battery uses the BC-1040 charger
3. The use of other than genuine ASG batteries or screwdrivers cannot activate the tool due to the
build-in protection system which enforces no charging without the certified part.
4. Please contact ASG customer service for more information.
WARNING Read all safety warnings and all instructions.
Failure to follow the warnings and instructions may result in electric shock, fire and/or
serious injury.

10
Save all warnings and instructions for future reference.
1. Work area safety
A. Keep work area clean and well lit.
Cluttered or dark areas invite accidents.
B. Do not operate power tools in explosive atmospheres, such as in the presence of
flammable liquids, gases or dust.
Power tools create sparks which may ignite the dust or fumes.
C. Keep children and bystanders away while operating a power tool.
Distractions can cause you to lose control.
2.
Electrical safety
A. Power tool plugs must match the outlet. Never modify the plug in any way. Do not use
any adapter plugs with earthed (grounded) power tools.
Unmodified plugs and matching outlets will reduce risk of electric shock.
B. Avoid body contact with earthed or grounded surfaces, such as pipes, radiators,
ranges and refrigerators.
There is an increased risk of electric shock if your body is earthed or grounded.
C. Do not expose power tools to rain or wet conditions.
Water entering a power tool will increase the risk of electric shock.
D. Do not abuse the cord. Never use the cord for carrying, pulling or unplugging the
power tool. Keep cord away from heat, oil, sharp edges or moving parts.
Damaged or entangled cords increase the risk of electric shock.
E. When operating a power tool outdoors, use an extension cord suitable for outdoor
use.
Use of a cord suitable for outdoor use reduces the risk of electric shock.
F. If operating a power tool in a damp location is unavoidable, use a residual current
device (RCD) protected supply.
Use of an RCD reduces the risk of electric shock.
3. Personal safety
A. Stay alert, watch what you are doing and use common sense when operating a
power tool. Do not use a power tool while you are tired or under the influence of
drugs, alcohol or medication.
A moment of inattention while operating power tools may result in serious personal injury.
B. Use personal protective equipment. Always wear eye protection.
Protective equipment such as dust mask, non-skid safety shoes, hard hat, or hearing
protection used for appropriate conditions will reduce personal injuries.
C. Prevent unintentional starting. Ensure the switch is in the off-position before
connecting to power source and/or battery pack, picking up or carrying the tool.
Carrying power tools with your finger on the switch or energizing power tools that have the
switch on invites accidents.
D. Remove any adjusting key or wrench before turning the power tool on. A wrench or a key
left attached to a rotating part of the power tool may result in personal injury.
E. Do not overreach. Keep proper footing and balance at all times.
This enables better control of the power tool in unexpected situations.
F. Dress properly. Do not wear loose clothing or jewelry. Keep your hair, clothing and
gloves away from moving parts.
Loose clothes, jewelry or long hair can be caught in moving parts.
G. If devices are provided for the connection of dust extraction and collection facilities,
ensure these are connected and properly used.
Use of dust collection can reduce dust-related hazards.

11
4. Power tool use and care
A. Do not force the power tool. Use the correct power tool for your application.
The correct power tool will do the job better and safer at the rate for which it was designed.
B. Do not use the power tool if the switch does not turn it on and off.
Any power tool that cannot be controlled with the switch is dangerous and must be
repaired.
C. Disconnect the plug from the power source and/or the battery pack from the power
tool before making any adjustments, changing accessories, or storing power tools.
Such preventive safety measures reduce the risk of starting the power tool accidentally.
D. Store idle power tools out of the reach of children and do not allow persons
unfamiliar with the power tool or these instructions to operate the power tool.
Power tools are dangerous in the hands of untrained users.
E. Maintain power tools. Check for misalignment or binding of moving parts, breakage
of parts and any other condition that may affect the power tool’s operation. If
damaged, have the power tool repaired before use.
Many accidents are caused by poorly maintained power tools.
F. Keep cutting tools sharp and clean.
Properly maintained cutting tools with sharp cutting edges are less likely to bind and are
easier to control.
G. Use the power tool, accessories and tool bits etc. in accordance with these
instructions, taking into account the working conditions and the work to be
performed.
Use of the power tool for operations different from those intended could result in a
hazardous situation.
5. Battery tool use and care
A. Recharge only with the charger specified by the manufacturer.
A charger that is suitable for one type of battery pack may create a risk of fire when used
with
another battery pack.
B. Use power tools only with specifically designated battery packs.
Use of any other battery packs may create a risk of injury and fire.
C. When battery pack is not in use, keep it away from other metal objects, like paper
clips, coins, keys, nails, screws or other small metal objects, that can make a
connection from one terminal to another.
Shorting the battery terminals together may cause burns or a fire.
D. Under abusive conditions, liquid may be ejected from the battery; avoid contact. If
contact accidentally occurs, flush with water. If liquid contacts eyes, additionally
seek medical help.
Liquid ejected from the battery may cause irritation or burns.
6. Service
A. Have your power tool serviced by a qualified repair person using only identical
replacement parts.
This will ensure that the safety of the power tool is maintained.
WARNING Read all safety warnings and all instructions.
Failure to follow the warnings and instructions may result in electric shock, fire and/or
serious injury.
Save all warnings and instructions for future reference.

12
Specifications
Bits Code ~ W: square B: Hex 6.35mm
MODEL (PTA-)
BLCA-9010
BLCA-9020
BLCA-9030
BLCA-9040
INPUT VOLTAGE(DC)
DC 18V
TORQUE
(N.m)
hard joints
3-8
3-6.4
8-15
8-12
12-30
12-24
25-60
Soft joints
Torque adjustment
Internal adjustment
Duty cycle
1.0s ON 4.0s OFF
Unloaded
Speed n0
(r/min)±10%
HI
1200
800
5.0~6.0
850
550
≤8
420
270
≤10
200
130
≤5
LO
Screw size
(mm)
Machine screw
Weight (Kg)
1.9kg
Length (mm)
w/o battery
461 x 92 mm
L x H
Applicable Bit Type
W 3/8"sq
B
W 3/8"sq
B
W 3/8"sq
W ½”sq
Applicable Bit type
This manual suits for next models
3
Table of contents
Other ASG Power Tools manuals