Asuka BK-302 User manual

BK-302/301 Star Vision Driving Recorder
User Manual

2
Table of Contents
I. Product Overview: ....................................................................................................3
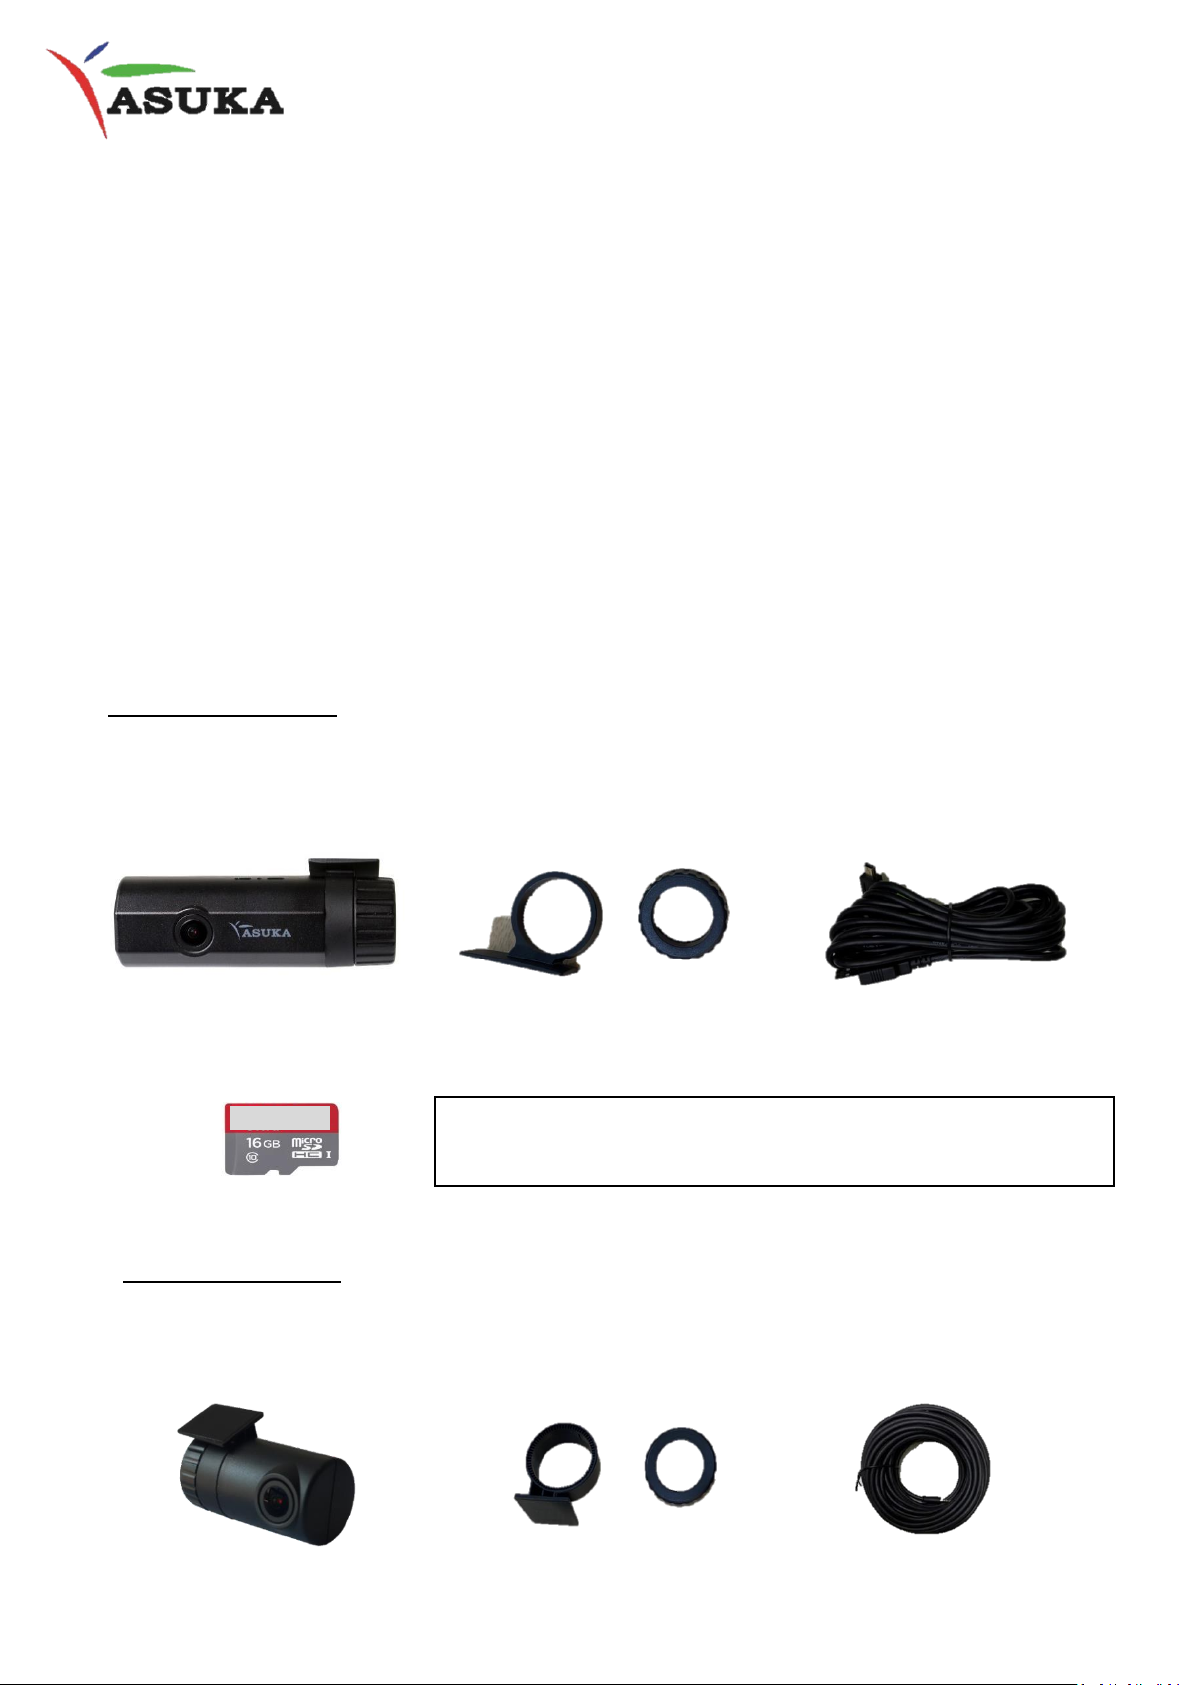
II. Contents of Package: ...............................................................................................3
III. Unit Description:.....................................................................................................4
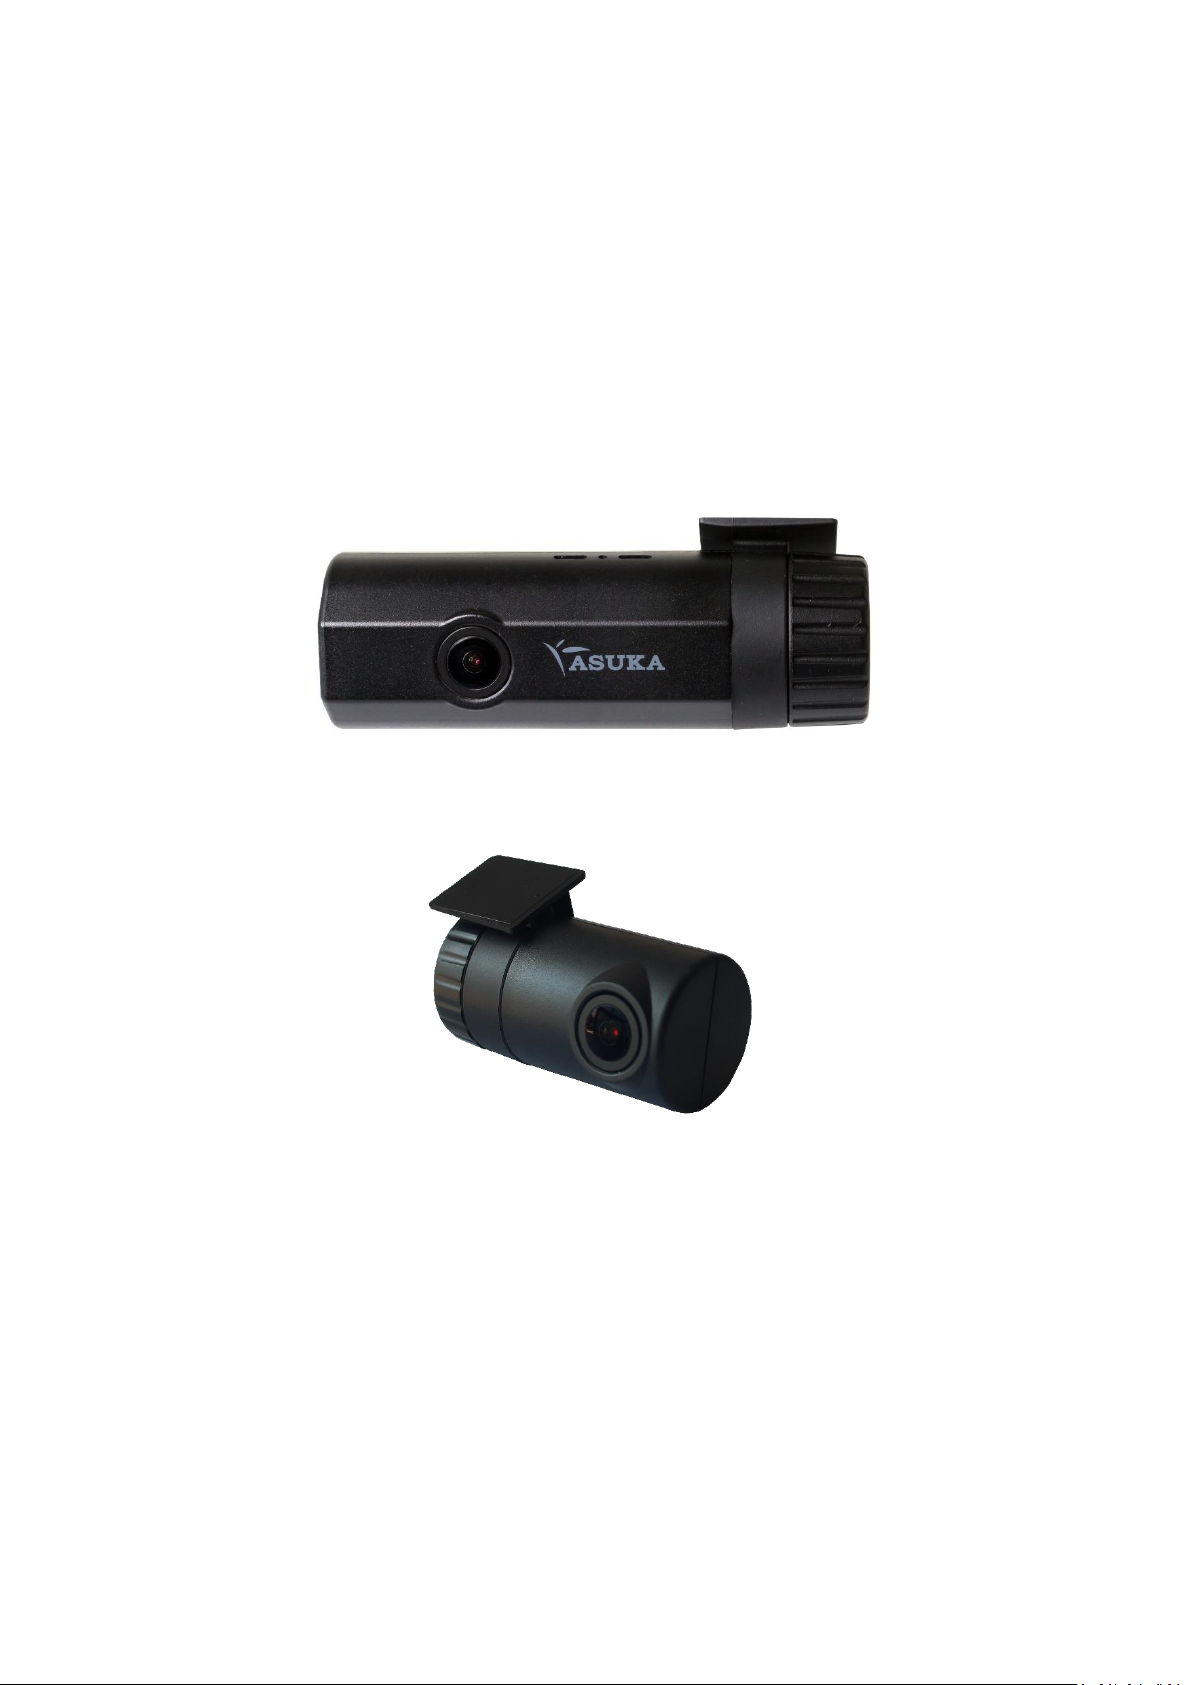
III.1 Main Unit...........................................................................................................4
III.2 Rear Camera (Optional accessory) .....................................................................5
IV. System Overview: ...................................................................................................5
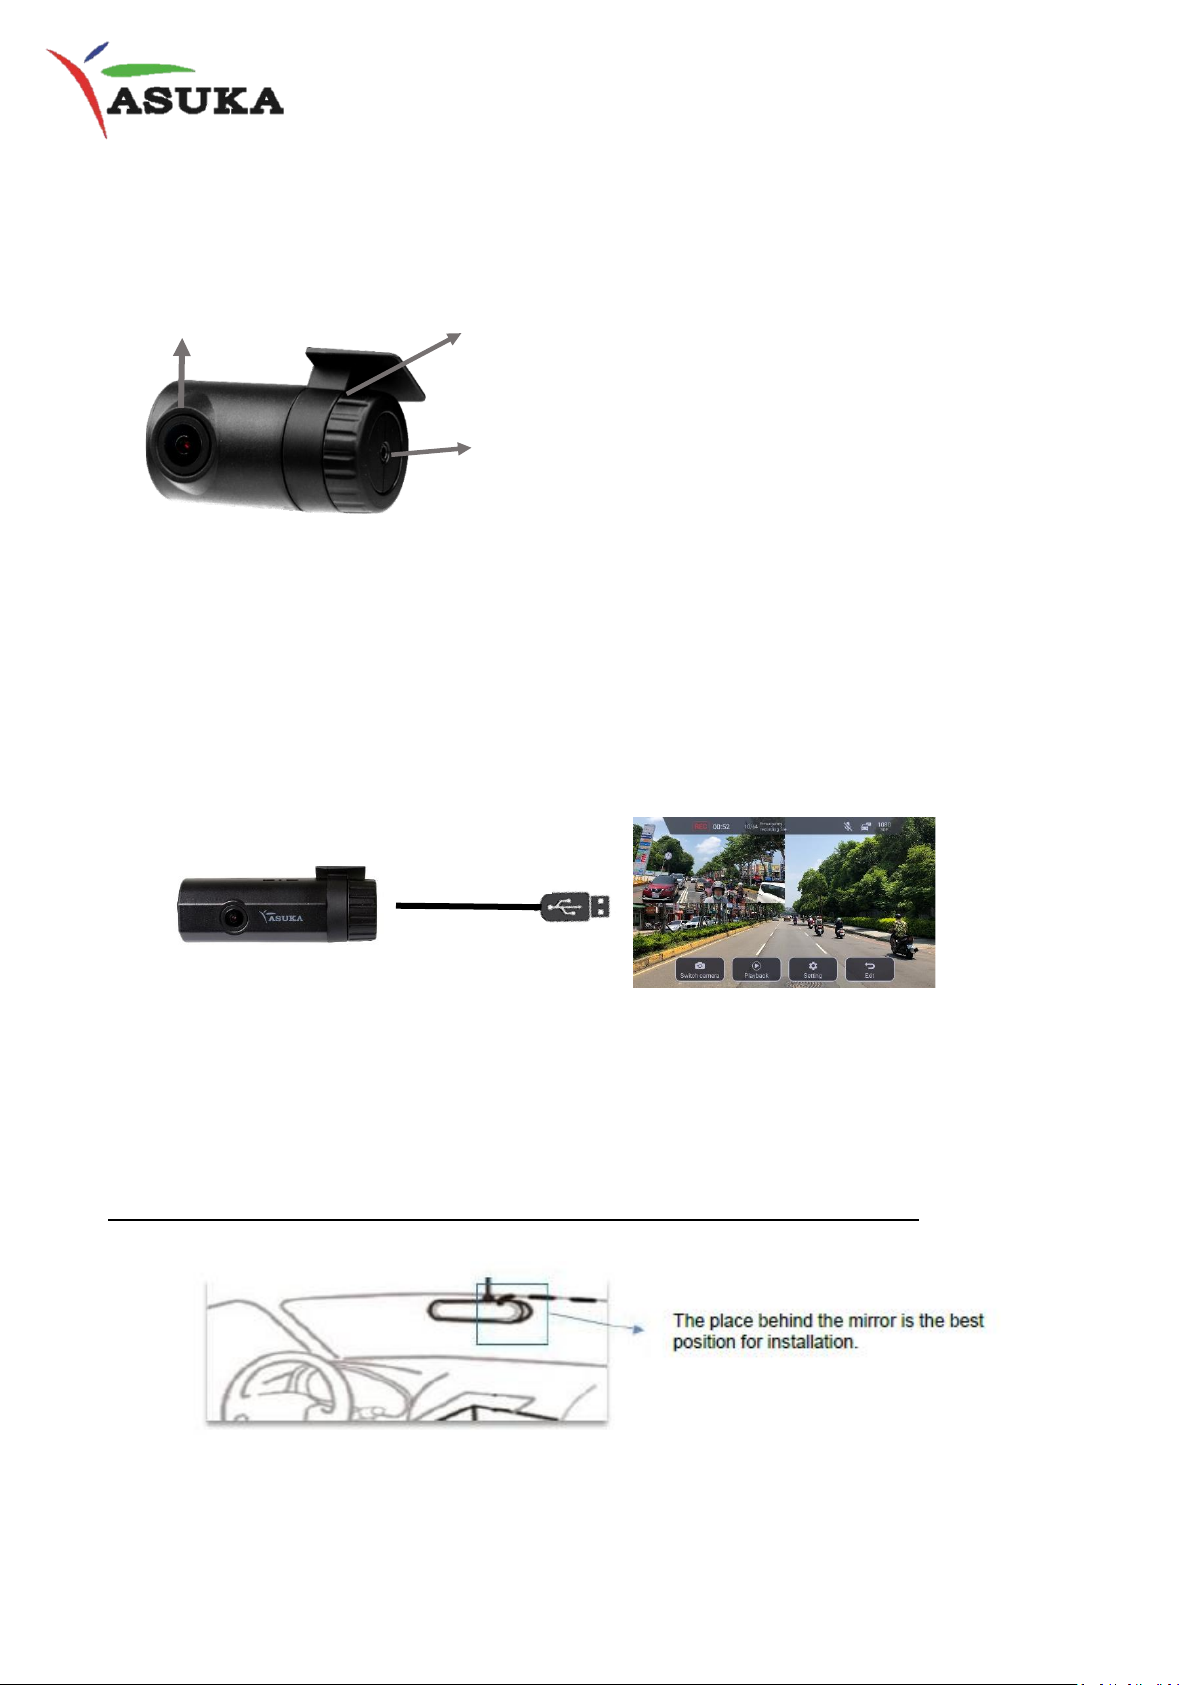
V. Installation:..............................................................................................................5
VI. Installation of the APP: ...........................................................................................7
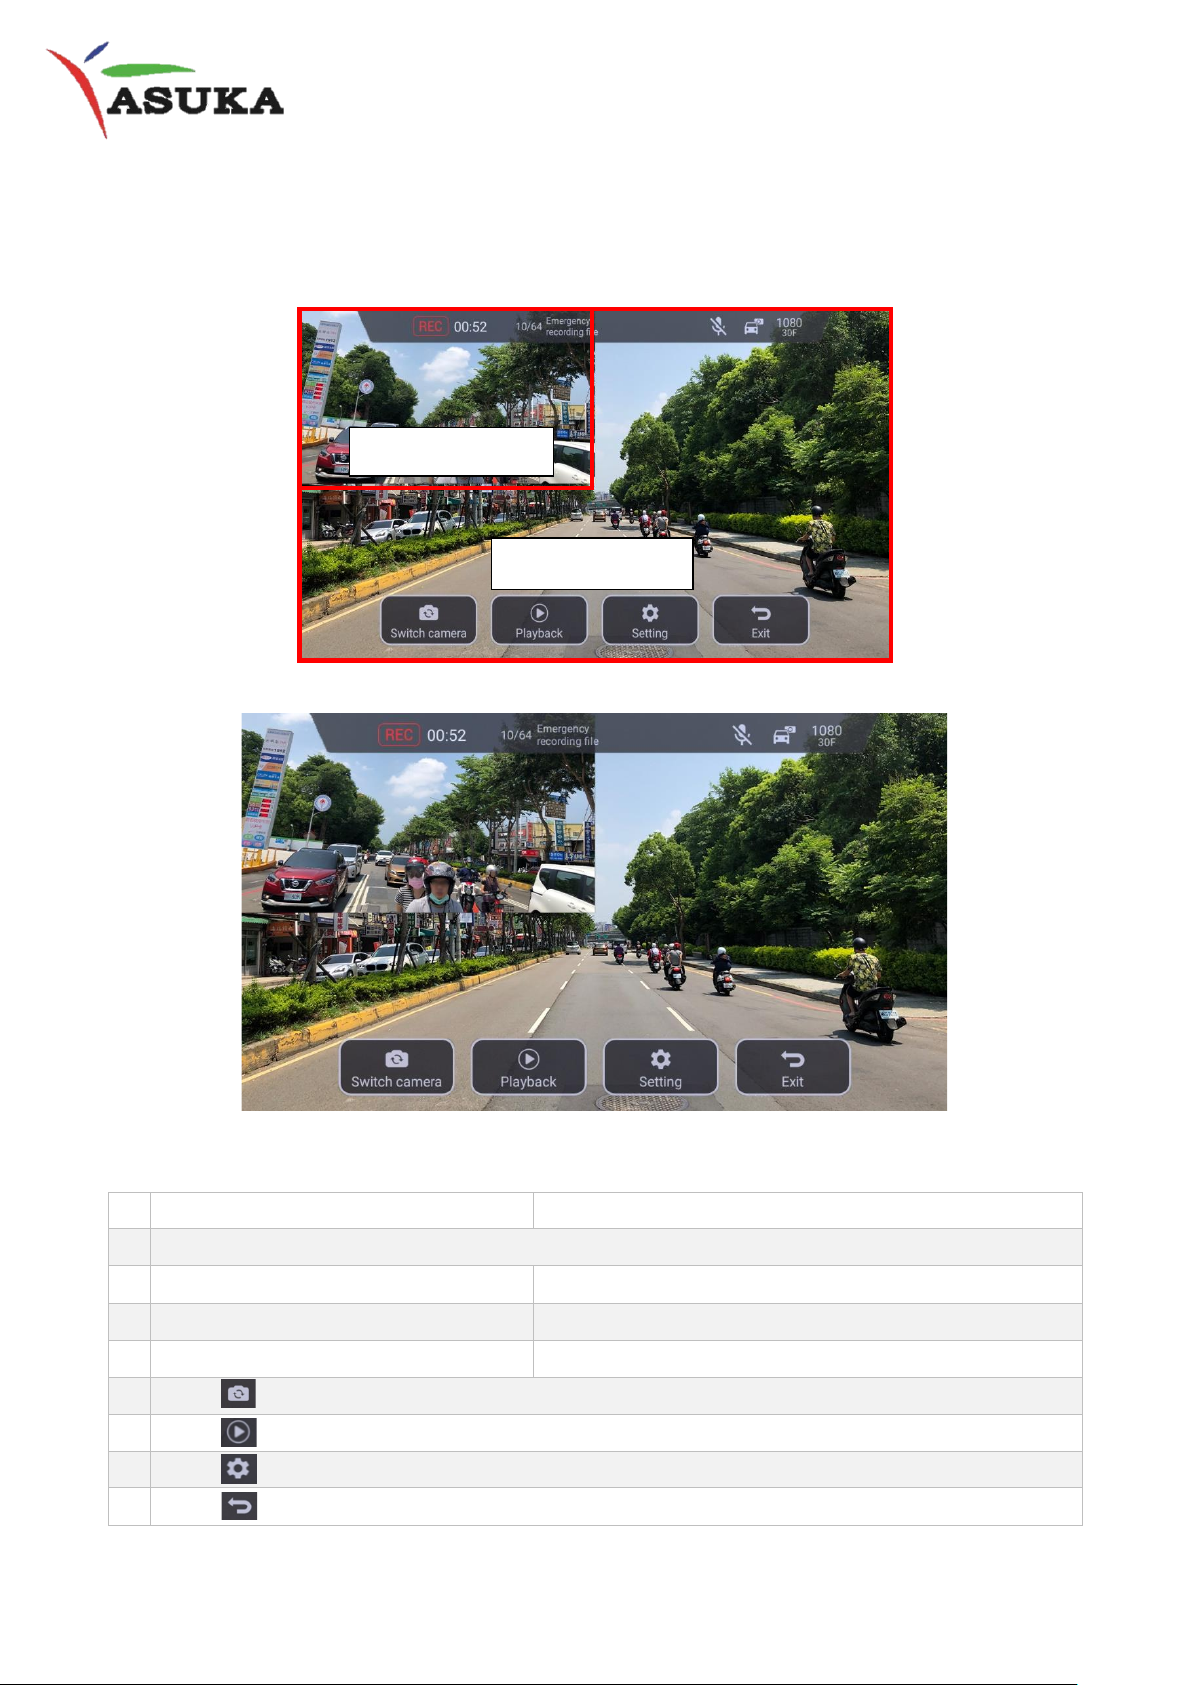
VII. User Interface description .....................................................................................8
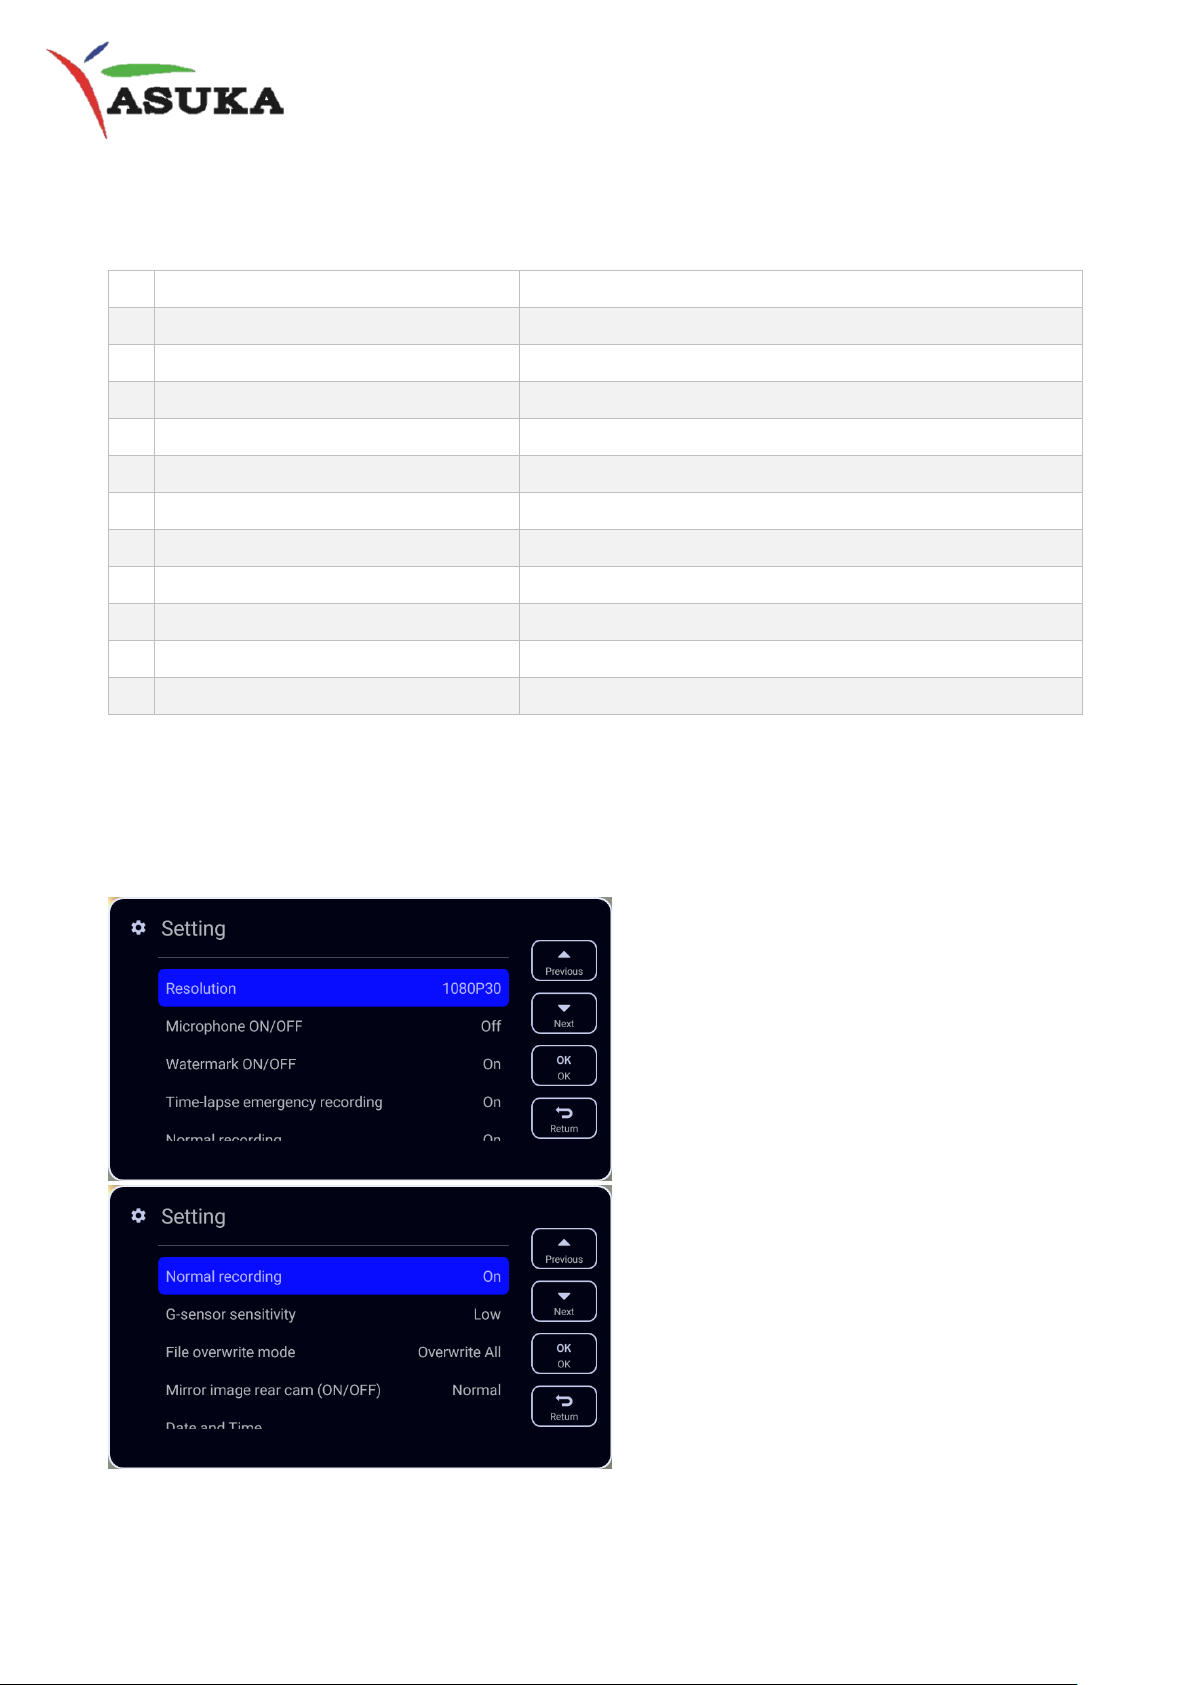
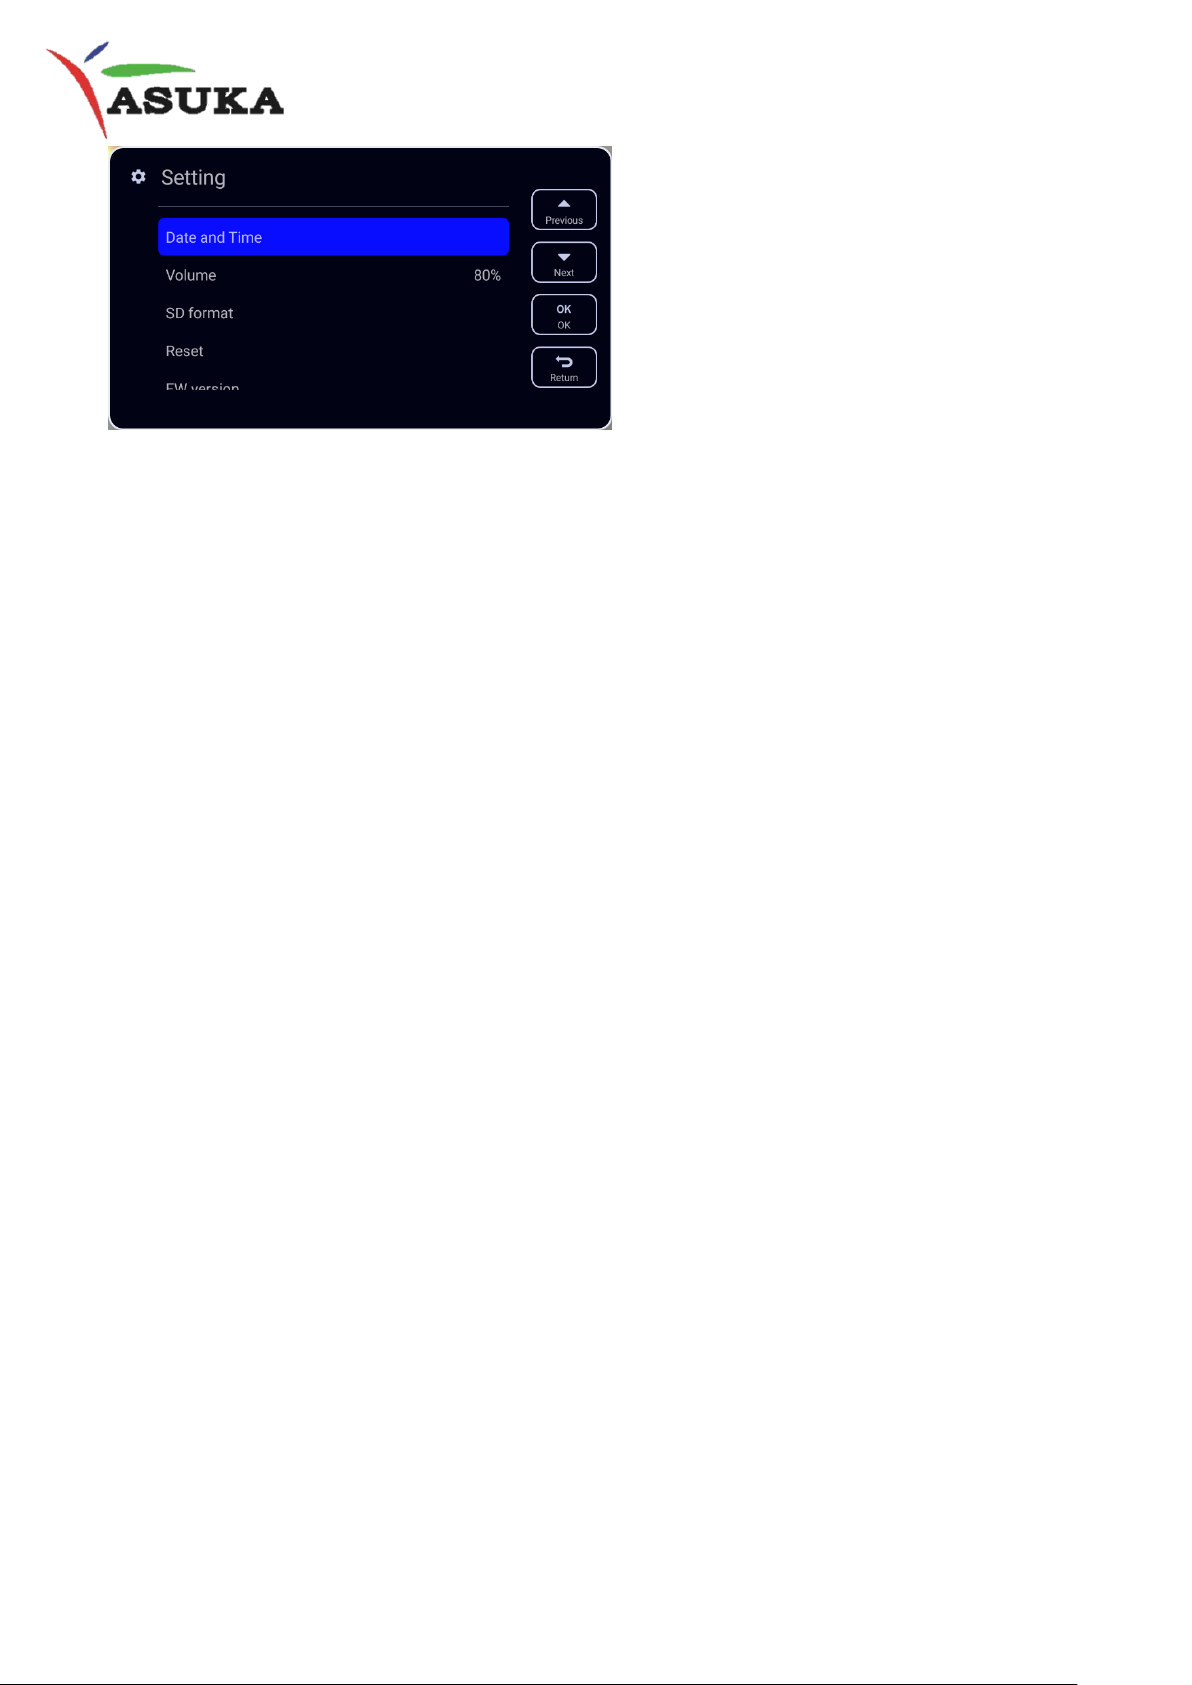
VIII. System Setting:.....................................................................................................9

3
I. Product Overview:
Thanks for choosing BK-301 Star Vision Driving Recorder. BK-301 is a high-
performance automotive driving recorder, offering full HD high resolution at both
front and rear cameras, allowing you to record the evidence of an unexpected
accident. It features with very high dynamic range (HDR) and ultra-high ISO from Sony
Starvis CMOS sensor, rendering it can achieve outstanding day & night recording
performance.
II. Contents of Package:
The package of BK-301 contains the standard accessories as shown below. If you wish
to buy the optional accessories, please contact local distributor for further purchase.
Standard Accessory:
_SD Card
1. Main Unit-
Front Camera
2. Adjustable Stand with
Double-sided Tape
3. Powering & Signal
Cable (Length: 3M)
4. Micro-SD Card
Optional Accessory
1. Rear Camera
2. Adjustable Stand with
Double-sided Tape
3. Rear Camera Signal
Cable (Length: 9M)
Noted: For proper recording operations, the storage of Micro-SD
card must between 16G~64G, above Class 10.

4
Start/Stop Emergency
Recording Mode
Adjustable Stand
Power & A/V port
2-color LED
III. Unit Description:
III.1 Main Unit
Buttons description:
Press for 3 Seconds to format the SD Card
Swift on/off the Sound Recording
Press to turn on the time-lapse recording
LED status indicators:
Red Light On
DVR is powered on.
Blue Light On
Recording in progress.
Blue Light Fast
Flashing
Emergency recording mode.
Blue Light Slow
Flashing
Time-lapse recording mode.
Button Keys
Micro-SD Card slot
Front Lens
Rear Camera input port

5
Rear Lens
Adjustable Stand
Camera output port
III.2 Rear Camera (Optional accessory)
IV. System Overview:
This BK-301 intends to work in adjunction with any in-car head unit that provides USB
port.
The system configuration is illustrated below, in which the BK-301 output is
connected to the USB port of the target head unit.
The USB connector contains wiring for powering, video signal, and command control.
So, no additional wiring is required.
V. Installation:
Step 1. Select a suitable place, clean the target area in the windshield.
Select a suitable place for BK-301 main unit installation.
USB port
(2-Din Display)

6
Windshield
Step 2. Assemble BK-301.
1. Assemble BK-301 first.
2. Remove the yellow paper of double-sided tape and paste it with BK-301.
3. Insert SD memory card.
Step 3. Stick BK-301 on the target area.
Remove the other side of double-sided tape and stick it onto the windshield.
Step 4. Route the Power cable from BK-301 to the head unit.
Note: As the double-sided tape cannot be re-pasted,
please make sure the position before you paste the
stand onto the windshield.
Micro-SD Card slot

7
VI. Installation of the APP:
When interworking with a head unit, an APP is required to set up the playback, and to
control the unit. Please follow the below steps to install the APP.
The APP is called: Drive Recorder. It looks like the following:
Step 1. Download the Drive Recorder APP.
Download the drive recorder APP from ASUKA official website to the USB.
Step 2. Install the APP.
Insert the USB with drive recorder APP, press “download” to install the APP.
Step 3. The APP will be shown on the head unit after installation.
Note: For ASUKA head unit, this app has been
built-in in advance, so there is no need to install.

8
①
②
③
④
⑤
⑥
⑦
⑧
⑨
VII. User Interface description:
1
Current record time
Display length of the current recording.
2
The number of emergency recording file/ Total number of emergency recording files
3
Voice recording indicator
Indicates if voice recording is on or off.
4
Rear camera recording indicator
Indicates if rear camera is connected.
5
Resolution indicator
Display video resolution status.
6
Press to switch front and rear cameras’ view.
7
Press to see the playback.
8
Press to enter the setting page.
9
Press to exit the app.
Back View
Front View

9
VIII. System Setting:
1
Resolution
Set the resolution to: 1080p 30fps; or 720p 30fps.
2
Microphone ON/OFF
Turn voice recording function on/off.
3
Watermark ON/OFF
Turn watermark on/off.
4
Time-lapse emergency recording
Turn time-lapse emergency recording on/off.
5
Normal emergency recording
Turn normal emergency recording on/off.
6
G-sensor sensitivity
Set the collision detection level to High, Middle, or Low.
7
File overwrite mode
8
Mirror image rear cam (ON/OFF)
9
Date & Time
Set the system date and time.
10
Volume
Set the system volume.
11
SD format
Format Micro SD memory card.
12
Reset
Reset all device settings.
In playback mode, you can quickly switch among categories of front camera, rear
camera, and emergency recording files, browse, and select the file to play.

10

11
Features:
1. Suitable for all personal vehicle.
2. Small size, easy installation, and dismount, it does not affect the driver’s line of
sight.
3. Insert the card and power on to start recording without additional operating.
4. Recording driving condition and display on the screen directly.
5. Front view angle approx. 130 degrees. Back view angle approx.. 130 degrees.
6. Micro SD memory card Class 10 or above is recommended.
7. G-sensor sensitivity can be adjusted according to road situations. When detect a
strong shock, system will start emergency recording and keep the files without
being overwritten.
Caution:
1. Do not drop, puncture, or disassemble the device; otherwise the warranty will be
voided.
2. Avoid all contact with water, and dry hands before using.
3. Use the device with care. Avoid pressing hard on the device.
4. For your own safety, do not operate the device while driving.
Warranty:
We provide customers with a warranty of 12 MONTHS from the date of purchase.
Please visit our official website for more details.
This manual suits for next models
1
Table of contents
Popular Automobile Electronic manuals by other brands

Rear view safety
Rear view safety RVS-020813 Product manual & installation instruction

Proxel
Proxel EPS-DUAL Installation instructions & user manual

MUTRADE
MUTRADE ARP Series manual

Sune Technology
Sune Technology SUNE10-GM instruction manual

OPT7
OPT7 QUANTUM ROCK LIGHTS installation guide

USASPEC
USASPEC BT35-HON owner's manual