manuals.online logo
Brands
  1. Home
  2. •
  3. Brands
  4. •
  5. Asus
  6. •
  7. Desktop
  8. •
  9. Asus K30AD User manual

Asus K30AD User manual

ASUS Desktop PC Installation Guide
• Obtain a detailed User Manual from your Windows® desktop or the ASUS support site at http://support.asus.com.
• 請至 Windows® 桌面點選圖檔或連至 http://support.asus.com 獲取詳細的使用手冊。
• 請至 Windows® 桌面點選圖標或連至 http://support.asus.com 獲取詳細的用戶手冊。
• Ein ausführliches Benutzerhandbuch nden Sie in Ihrem Windows®-Desktop oder auf der ASUS Support-Webseite unter http://support.asus.com.
• Vous trouverez le manuel d’utilisation détaillé sur le Bureau Windows® de votre ordinateur de bureau ou sur le site de support d’ASUS sur http://support.asus.com.
• Obtenga un manual de usuario detallado de su escritorio de Windows® o del sitio de soporte de ASUS (http://support.asus.com).
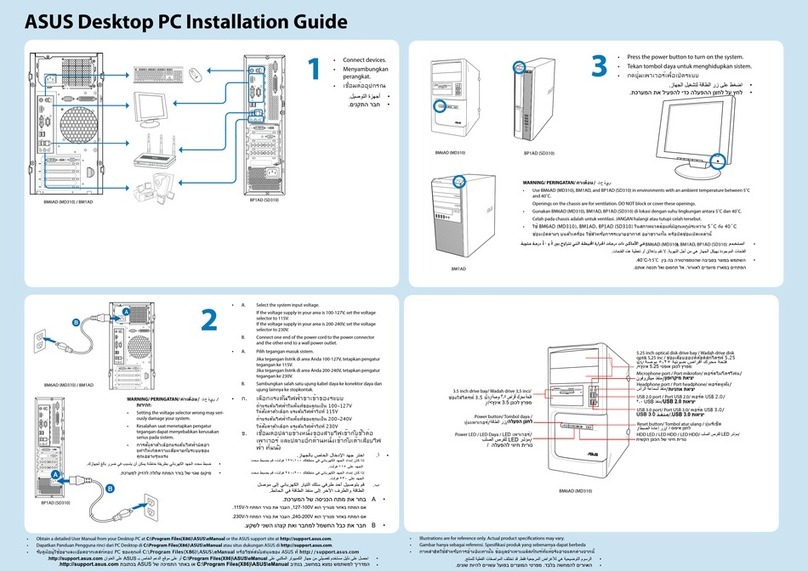
1• Connect the devices.
• 連接裝置。
• 連接設備。
•
Geräte anschließen.
•
Connectez les périphériques.
• Conecte los dispositivos.
• Apparaten aansluiten.
• Collegare le Periferiche
• Ligar dispositivos.
• Menyambungkan perangkat.
• เชื่อมต่ออุปกรณ
2
• A. Select the system input voltage.
If the voltage supply in your area is 100-127V, set the voltage selector to 115V.
If the voltage supply in your area is 200-240V, set the voltage selector to 230V.
B. Connect one end of the power cord to the power connector and
the other end to a wall power outlet.
• A. 選擇系統輸入電壓。
若您所在地區的電壓為 100-127V,請將電壓選擇器調至 115V。
若您所在地區的電壓為 200-240V,請將電壓選擇器調至 230V。
B. 將電源線一端連接至電源連接埠,另一端連接至電源插座。
• A. 選擇系統輸入電壓。
若您所在地區的電壓為 100-127V,請將電壓選擇器調至 115V。
若您所在地區的電壓為 200-240V,請將電壓選擇器調至 230V。
B. 將電源線一端連接至電源接口,另一端連接至電源插座。
• A. Wählen Sie die Systemeingangsspannung.
Falls die Stromversorgung in Ihrer Region 100-127V beträgt, stellen Sie den
Spannungswähler auf 115V ein.
Falls die Stromversorgung in Ihrer Region 200-240V beträgt, stellen Sie den
Spannungswähler auf 230V ein.
B. Verbinden Sie ein Ende des Stromkabels mit dem Stromanschluss
des Computers und das andere Ende mit der Steckdose.
B
A
3• Press the power button to turn on the system.
• 點按電源鍵開啟系統。
• 按下電源鍵打開系統。
• Drücken Sie die Einschalttaste, um das System zu starten.
• Appuyez sur le bouton de mise en route pour allumer
l’ordinateur.
• Presione el botón de alimentación para encender el
sistema.
WARNING /
警告 / 警告
/
AVERTISSEMENT
/
ADVERTENCIA
/
WAARSCHUWING
/
AVISO
/WAARSCHUWING / AVISO /
PERINGATAN
/
คำเตือน
• Setting the voltage selector wrong may seriously damage your system.
• 選擇錯誤的電壓可能會嚴重損壞您的系統。
• Falsche Einstellungen am Spannungswähler kann Ihr System dauerhaft beschädigen.
• Un mauvais positionnement du sélecteur de tension peut sérieusement endommager votre système.
• El sistema podría sufrir graves daños si el selector de voltaje se coloca en la posición incorrecta.
• Als u de spanningsselectie verkeerd instelt, kan dit ernstige schade aan uw systeem veroorzaken.
• Un’errata impostazione del selettore di voltaggio potrebbe danneggiare seriamente il sistema.
• A selecção de uma tensão errada poderá danicar seriamente o seu sistema.
• Kesalahan saat menetapkan pengatur tegangan dapat menyebabkan kerusakan serius pada sistem.
• การตั้งค่าตัวเลือกแรงดันไฟฟ้าผิดอาจทำให้เกิดความเสียหายกับระบบของ คุณอย่างรุนแรง
NOTE / 注意 / 注意 / HINWEIS / REMARQUE / NOTA / OPMERKING /
NOTA / NOTA / CATATAN / หมายเหต
• Illustrations are for reference only. Actual product specications
may vary.
• 圖片僅供參考,實際產品規格可能會有不同。
• Die Abbildungen werden nur zu Referenzzwecken bereitgestellt.
Tatsächlichen Produktspezikationen können variieren.
• Les illustrations ne sont données qu’à titre indicatif. Les spécica-
tions nales du produit peuvent varier.
• Las ilustraciones que contiene este documento deben emplearse
exclusivamente con nes de referencia. Las especicaciones reales
del producto podrían variar.
• De afbeeldingen zijn uitsluitend bedoeld als referentie. De eigenli-
jke productspecicaties kunnen verschillen.
• Le illustrazioni sono puramente indicative. Le speciche del
prodotto potrebbero subire variazioni.
• As ilustrações servem apenas como referência. As especicações
reais do produto podem variar.
• Gambar hanya sebagai referensi. Spesikasi produk yang sebena-
rnya dapat berbeda.
• ภาพสาธิตใช้สำหรับการอ้างอิงเท่านั้น
ข้อมูลจำเพาะผลิตภัณฑ์ที่แท้จริงอาจแตกต่างจากนี้
K30AD
• A. Sélectionnez la tension d’entrée.
Si la tension de votre région est comprise entre 100 et 127V, réglez l’interrupteur sur 115V.
Si la tension de votre région est comprise entre 200 et 240V, réglez l’interrupteur sur 230V.
B. Connectez une extrémité du cordon d’alimentation au connecteur
d’alimentation du châssis et l’autre extrémité à une prise électrique.
• A. Seleccione el voltaje de entrada del sistema.
Si el voltaje de su región es de 100-127 V, establezca el selector de voltaje en 115 V.
Si el voltaje de su región es de 200-240 V, establezca el selector de voltaje en 230 V.
B. Conecte un extremo del cable de alimentación al conector de aliment-
ación, y el otro extremo a la toma de corriente.
• A. Selecteer de spanning voor de systeeminvoer.
Als de spanning in uw gebied 100-127 V is, stelt u de spanningsselector in op 115 V.
Als de spanning in uw gebied 200-240 V is, stelt u de spanningsselector in op 230 V.
B. Sluit één uiteinde van de stroomkabel aan de voedingsconnector en het
andere uiteinde aan een contactdoos.
• A. Selezionare la tensione in ingresso del sistema.
Se il voltaggio del proprio paese è100-127V, impostare il selettore di voltaggio su 115V.
Se il voltaggio del proprio paese è 200-240V, impostare il selettore di voltaggio su 230V.
B. Collegare un’estremità del cavo di alimentazione al connettore
dell’alimentazione e l’altra estremità ad una presa elettrica a muro.
• A. Seleccione a tensão de entrada do sistema.
Se a tensão de alimentação na sua área for de 100-127V, mude o selector de tensão para 115V.
Se a tensão de alimentação na sua área for de 200-240V, mude o selector de tensão para 230V.
B. Ligue uma das extremidades do cabo de alimentação ao conector de
alimentação e a outra extremidade a uma tomada eléctrica.
• A. Pilih tegangan masuk sistem.
Jika tegangan listrik di area Anda 100-127V, tetapkan pengatur tegangan ke 115V.
Jika tegangan listrik di area Anda 200-240V, tetapkan pengatur tegangan ke 230V.
B. Sambungkan salah satu ujung kabel daya ke konektor daya dan ujung
lainnya ke stopkontak.
• ก. เลือกแรงดันไฟฟ้าขาเข้าของระบบ
ถ้าแรงดันไฟฟ้าในพื้นที่ของคุณเป็น 100-127V ให้ตั้งค่าตัวเลือก แรงดันไฟฟ้าไปที่ 115V
ถ้าแรงดันไฟฟ้าในพื้นที่ของคุณเป็น 200-240V ให้ตั้งค่าตัวเลือก แรงดันไฟฟ้าไปที่ 230V
ข. เชื่อมต่อปลายข้างหนึ่งของสายไฟเข้ากับขั้วต่อ เพาเวอร์
และปลายอีกด้านหนึ่งเข้ากับเต้าเสียบไฟ ฟ้า ที่ผนัง
• Verkrijg een gedetailleerde gebruikershandleiding van uw Windows® desktop of van de ASUS-ondersteuningssite op http://support.asus.com.
• Il Manuale Utente è disponibile nel desktop di Windows® e nel sito del supporto ASUS all’indirizzo: http://support.asus.com.
• Consulte o Manual do Utilizador complete a partir do seu ambiente de trabalho do Windows® ou obtenha-o a partir do site de suporte da ASUS em http://support.asus.com.
• Dapatkan Panduan Pengguna secara rinci dari desktop Windows® atau situs dukungan ASUS di http://support.asus.com
• รับคู่มือผู้ใช้อย่างละเอียดจากเดสก์ทอป Windows® หรือไซต์สนับสนุน ASUS ที่ http://support.asus.com
• Use the K30AD in environments with an ambient temperature
between 0˚C and 35˚C.
Openings on the chassis are for ventilation. DO NOT block or
cover these openings.
• 推薦您在操作溫度為 0˚C ~ 35˚C 情況下使用 K30AD。
機殼上的孔是用來通風的,請勿堵塞或蓋住這些通風孔。
• 推薦您在操作溫度為 0˚C ~ 35˚C 情況下使用 K30AD。
機箱上的孔是用來通風的,請勿堵塞或蓋住這些通風孔。
• Verwenden Sie K30AD in Orten mit einer Umgebungstemperatur
zwischen 0˚C und 35˚C.
Önungen am Gehäuse dienen der Belüftung. Diese Önungen
dürfen NICHT blockiert oder abgedeckt werden.
• Utilisez le K30AD dans un environnement dont la température
ambiante est comprise entre 0˚C et 35˚C.
NE PAS bloquer les bouches d’aération du châssis. Veillez à garan-
tir une ventilation optimale pour ce produit.
• Utilice su K30AD en entornos con una temperatura ambiente
entre 0˚C y 35˚C.
Las aberturas de la carcasa son parte del sistema de ventilación
del producto. NO bloquee ni tape estas aberturas.
Microphone port
/
麥克風接頭/ 麥克風接口
/
Mikrofonanschluss
/
Port micro
/
Puerto para micrófono
/
Microfoonpoort
/
Porta Microfono / Porta para
microfone
Port mikrofon /
พอร์ตไมโครโฟน
Power button / 電源按鈕/ 電源按鈕 / Einschalttaste /Bouton de
mise en route / Botón de alimentación / Aan-uit-knop / Pulsante di
accensione / Botão de alimentação / Tombol daya / ปุ่มเพาเวอร
USB3.0 ports / USB 3.0 連接埠 / USB 3.0 接口 / USB3.0-Anschlüsse / Ports
USB 3.0 / Puertos USB3.0 / USB 3.0-poorten / Porte USB3.0 / Portas USB 3.0 /
Port USB 3.0/ พอร์ต USB 3.0
Headphone port
/
耳機接頭/ 耳機接口
/
Kopfhöreranschluss
/
Prise casque
/
Puerto para auriculares
/
Koptelefoonpoort
/
Porta Cue / Porta para
auscultadores /
Port headphone /
พอร์ตหูฟัง
Optical disk drive bay (empty) /
光碟機槽蓋(空)/ 光驅槽蓋(空)
/
Schacht für optisches Laufwerk (leer) / Baie pour lecteur de
disque optique (vide) / Bahía de unidad de disco óptico (vacía) /
Sleuf van optisch schijfstation (leeg)
/
Vano unità ottica (vuoto) /
Compartimento da unidade de disco óptico (vazio) /
tempat drive
disk optik (kosong) /
ช่องเสียบออปติคัลดิสก์ไดรฟ์ (ว่าง)
Card reader slot /
記憶卡插槽 / 存儲卡插槽
/
Speicherkartensteckplatz
/
Fente
pour lecteur de cartes mémoire
/
Ranura para tarjetas de memoria
/ Kaartlezersleuf /
Lettore di schede di memoria / Ranhura para cartões de memória /
Slot kartu memori /
สล็อตใส่การ์ดหน่วยความจำ
• Druk op de aan/uit-knop om het systeem in te
• Premere il pulsante di accensione per accendere il
sistema.
• Prima o botão de alimentação para ligar o sistema.
• Tekan tombol daya untuk menghidupkan sistem.
• กดปุ่มเพาเวอร์เพื่อเปิดระบบ
• Gebruik K30AD in omgevingen met een omgevingstemper-
atuur tussen 0˚C en 35˚C.
De openingen aan het chassis zijn voor ventilatie. Deze openin-
gen mogen NIET worden geblokkeerd of afgedekt.
• Utilizzare K30AD in ambienti con temperatura compresa fra 0˚C
e 35˚C.
NON ostruire o coprire i fori sul telaio, predisposti per la venti-
lazione del sistema.
• Utilize o K30AD em ambientes com temperaturas entre 0˚C e
35˚C.
As aberturas no chassis servem para ventilação. NÃO bloqueie
nem cubra estas aberturas.
• Gunakan K30AD di lokasi dengan suhu lingkungan antara 0˚C
dan 35˚C.
Celah pada chassis adalah untuk ventilasi. JANGAN halangi atau
tutupi celah tersebut.
• ใช้ K30AD ในสภาพแวดล้อมที่มีอุณหภูมิระหว่าง 0˚C ถึง 35˚C
ช่องเปิดต่างๆ บนตัวเครื่อง ใช้สำหรับการระบายอากาศ
อย่าขวางกั้น หรือปิดช่องเปิดเหล่านี้
Q8707 / First Edition / October 2013
Información de seguridad
• Antes de usar este producto, asegúrese de que todos los cables están correctamente conectados. Si detecta algún cable dañado, póngase en con-
tacto con su distribuidor inmediatamente.
• Utilice este producto solamente con el voltaje correcto según lo indica el fabricante.
• Para evitar cortocircuitos y contactos defectuosos, mantenga los restos de papel, los tornillos y objetos similares alejados de los conectores, las ranu-
ras, los terminales y la circuitería.
• Antes de agregar dispositivos al sistema o quitarlos de éste, asegúrese de desenchufarlo de la toma de corriente.
• Aunque las tapas del sistema están diseñadas al detalle para evitar arañazos a los usuarios, tenga cuidado con las puntas y los bordes alados. Pón-
gase uno guantes antes de quitar o volver a colocar las tapas del sistema.
• Si tiene problemas técnicos con el producto, por ejemplo si la fuente alimentación está rota, póngase en contacto con un profesional de servicio
técnico o con su distribuidor. NO intente reparar el producto por sí mismo.
Veiligheidsinformatie
• Zorg dat alle kabels goed zijn aangesloten voordat u dit product gebruikt. Neem onmiddellijk contact op met uw handelaar als u enige kabelschade
detecteert.
• Gebruik dit product alleen met de juiste spanning, zoals door de fabrikant wordt voorgeschreven.
• Om kortsluiting en foute contacten te vermijden, dient u papiersnippers, schroeven en draden uit de buurt van connectors, sleuven, bussen en
circuits weghouden.
• Voordat u aan of van het systeem apparaten toevoegt of verwijdert, dient u te zorgen dat het van de voedingsbron is verwijderd.
• De systeempanelen zijn opzettelijke ontworpen om gebruikers tegen schrammen te beschermen. U moet echter wel uitkijken voor deze scherpe
punten en randen. Doe handschoenen aan voordat u de systeempanelen verwijdert of terugplaatst.
• Als u met dit product technische problemen ondervindt, bijv. de voedingsbron is kapot, dient u contact op te nemen met een bevoegde servic-
emonteur of uw handelaar. Dit product NIET zelf onderhouden.
Informazioni sulla sicurezza
• Prima di utilizzare il prodotto, assicurarsi di aver collegato tutti i cavi. In caso di guasto ai cavi, contattare immediatamente il rivenditore.
• Utilizzare il prodotto soltanto con il corretto voltaggio indicato dal produttore.
• Per evitare cortocircuiti o falsi contatti, tenere pezzetti di carta, viti e li lontani da connettori, slot, prese elettriche e circuiti.
• Prima di aggiungere o rimuovere dispositivi dal sistema, assicurarsi di disinserire la sorgente di alimentazione.
• Le coperture del sistema sono state progettate per proteggere l’utente dai gra,tuttavia è ugualmente necessario prestare attenzione ai proli taglienti. Prima di
rimuovere o rimontare le coperture del sistema, è consigliabile indossare un paio di guanti.
• Nel caso di problemi tecnici con il prodotto, p.e. un guasto all’unità di alimentazione, contattare personale qualicato per l’assistenza o il rivenditore. NON riparare il
prodotto da sè.
Informações de segurança
• Antes de utilizar o produto, certique-se de que todos os cabos estão devidamente ligados. Se detectar danos no cabo, contacte imediatamente com o seu revend-
edor.
• Utilize este produto apenas com a tensão correcta, tal como indicado pelo fabricante.
• Para evitar curto-circuitos e falhas de contacto, mantenha restos de papel, parafusos e agrafos afastados dos conectores, ranhuras, entradas e circuitos.
• Antes de adicionar ou remover dispositivos no sistema, desligue-o da fonte de alimentação.
• Apesar das tampas do sistema terem sido especialmente concebidas para proteger os utilizadores contra ferimentos, tenha cuidado com as extremidades e cantos
aados. Coloque um par de luvas antes de retirar ou substituir as tampas do sistema.
• Se encontrar problemas técnicos com o produto, por exemplo, avaria da fonte de alimentação, contacte um técnico qualicado ou o seu revendedor. NÃO repare
este produto por si próprio.
Informasi keamanan
• Sebelum menggunakan produk ini, pastikan bahwa semua kabel telah tersambung dengan benar. Jika Anda menemukan adanya kerusakan, segera
hubungi agen Anda.
• Gunakan produk ini hanya dengan tegangan yang benar sesuai petunjuk produsen.
• Untuk mencegah hubungan arus pendek dan kerusakan kontak, jauhkan potongan kertas, sekrup, serta benang dari konektor, slot, soket, maupun sirkuit.
• Sebelum menambah atau menghapus perangkat ke atau dari sistem, pastikan Anda telah melepaskannya dari catu daya.
• Penutup sistem dirancang secara khusus untuk melindungi pengguna dari goresan. Namun, Anda harus tetap berhati-hati terhadap ujung atau tepian yang
tajam. Gunakan sarung tangan sebelum memindahkan atau mengganti penutup sistem.
• Jika Anda mengalami masalah teknis pada produk, misalnya catu daya rusak, hubungi teknisi servis berpengalaman atau agen terdekat. JANGAN perbaiki
sendiri produk ini.
ข้อมูลเพื่อความปลอดภัย
• ก่อนการใช้ผลิตภัณฑ์นี้ ให้แน่ใจว่าสายเคเบิลทั้งหมดเชื่อมต่ออย่างถูกต้อง ถ้าคุณพบความเสียหายใดๆ ให้ติดต่อตัวแทนจำหน่าย ทันที
• ใช้ผลิตภัณฑ์นี้ด้วยแรงดันไฟฟ้าที่ถูกต้อง ตามที่ระบุโดยผู้ผลิตเท่านั้น
• เพื่อหลีกเลี่ยงการลัดวงจรหรือการสัมผัสถูกขั้วที่ทำให้เสียหาย ให้เก็บเศษกระดาษ สกรู และเศษลวดต่างๆ ให้ห่างจากขั้วต่อ สล็อต ซ็อกเก็ต
และแผงวงจร
• ก่อนที่จะเพิ่มหรือนำอุปกรณ์เข้าหรือออกจากระบบ ให้แน่ใจว่าได้ถอดปลั๊กอุปกรณ์จากแหล่งจ่ายไฟ
• แม้ว่าฝาปิดของระบบได้รับการออกแบบด้วยความประณีตเพื่อป้องกันไม่ให้เกิดรอยขีดข่วนต่อผู้ใช้ แต่ให้ใช้ความระมัดระวังบริเวณที่เป็น
ปลายแหลม และขอบที่มีคม สวมถุงมือก่อนที่คุณจะถอดหรือใส่ฝาปิดของระบบ
• ถ้าคุณมีปัญหาทางด้านเทคนิคกับผลิตภัณฑ์นี้ เช่น แหล่งจ่ายไฟเสีย โปรดติดต่อช่างเทคนิคบริการที่มีคุณสมบัติ หรือร้านค้าที่คุณซื้อ
ผลิตภัณฑ์มา อย่าซ่อมแซมผลิตภัณฑ์นี้ด้วยตัวคุณเอง
ENERGY STAR is a joint program of the U.S. Environmental Protection Agency and the U.S. Department of Energy helping
us all save money and protect the environment through energy ecient products and practices.
All ASUS products with the ENERGY STAR logo comply with the ENERGY STAR standard, and the power management
feature is enabled by default. The monitor and computer are automatically set to sleep after 15 and 30 minutes of user
inactivity. To wake your computer, click the mouse or press any key on the keyboard.
Please visit http://www.energy.gov/powermanagement for detail information on power management and its benets to the
environment. In addition, please visit http://www.energystar.gov for detail information on the ENERGY STAR joint program.
*Note: Energy Star is NOT supported on Freedos and Linux-based products.
Safety information
• Before using this product, ensure that all cables are correctly connected. If you detect any cable damage, contact your retailer
immediately.
• Use this product only with the correct voltage as instructed by the manufacturer.
• To avoid short circuits and faulty contacts, keep scraps of paper, screws, and threads away from connectors, slots, sockets, and circuits.
• Before adding or removing devices to or from the system, ensure to unplug it from the power source.
• The system covers are elaborately designed to protect users from scratches, but still be careful with those sharp tips and edges. Put on a pair of gloves before remov-
ing or replacing the system covers.
• If you encounter technical problems with this product, e.g. the power supply is broken, contact a qualied service technician or your retailer. DO NOT service this
product yourself.
安全性須知
• 在使用產品之前,請確定所有的排線、電源線都已正確地連接好。若您發現有任何重大瑕疵,請儘速聯絡您的經銷商。
• 請依據廠商指示在正確的電壓下使用本產品。
• 請避免讓紙張碎片、螺絲及線頭等小東西靠近電腦之連接器、插槽、孔位等處,避免短路及接觸不良等情況發生。
• 在安裝或是移除週邊產品時請先關閉電源。
• 電腦的機殼、鐵片大部份都經過防割傷處理,拆裝機殼時最好能夠戴上手套。
• 如果電源供應器或系統已損壞,請不要嘗試自行修復。請將之交給專業技術服務人員或經銷商來處理。
安全性須知
• 在使用產品之前,請確定所有的排線、電源線都已正確地連接好。若您發現有任何重大瑕疵,請儘快聯絡您的經銷商。
• 請依據廠商指示在正確的電壓下使用本產品。
• 請避免讓紙張碎片、螺絲及線頭等小東西靠近電腦的接口、插槽、孔位等處,避免短路及接觸不良等情況發生。
• 在安裝或是移除外圍產品時請先關閉電源。
• 電腦的機箱、鐵片大部分都經過防割傷處理,拆裝機箱時最好能夠戴上手套。
• 如果電源供應器或系統已損壞,請不要嘗試自行修復。請將之交給專業技術服務人員或經銷商來處理。
Sicherheitsinformationen
• Vor Inbetriebnahme des Produkts müssen alle Kabel richtig angeschlossen sein. Bemerken Sie eine Beschädigung, kontaktieren Sie sofort Ihren
Händler.
• Betreiben Sie das Produkt nur mit richtiger Spannung, wie vom Hersteller angewiesen.
• Um Kurzschlüsse und Wackelkontakte zu vermeiden, halten Sie Papierschnipsel, Schrauben und Fäden fern von Anschlüssen, Steckplätzen, Sockeln
und Stromkreisen.
• Beim Anschließen oder Trennen von Geräten an das oder vom System muss das Stromkabel des Systems herausgezogen werden.
• Obwohl das Systemgehäuse sorgfältig entwickelt wurde, um Benutzer vor Kratzern zu schützen, achten Sie auf scharfe Spitzen oder Kanten. Bevor
Sie die Systemabdeckung/das Gehäuse entfernen oder ersetzen, können Sie sich mit ein Paar Handschuhen schützen.
• Falls technische Probleme beim Produkt auftreten wie z.B. defektes Stromkabel, wenden Sie sich an den qualizierten Kundendienst oder Ihre
Verkaufsstelle. Reparieren Sie das Produkt NICHT selbst.
Informations relatives à la sécurité
• Avant d’utiliser le produit, vériez que tous les câbles sont bien branchés et que les câbles d’alimentation ne sont pas endommagés. Si vous relevez
le moindre dommage, contactez votre revendeur immédiatement.
• Veillez à utiliser la tension d’entrée appropriée à votre région et comme indiqué par le fabricant.
• Pour éviter les court-circuits, gardez les clips, les vis et les agrafes loin des connecteurs, des slots, des sockets et de la circuiterie.
• Avant d’ajouter ou enlever des composants, vériez que les câbles d’alimentation sont débranchés
• Malgré le fait que le boîtier de votre ordinateur ai été conçu de sorte à vous protéger contre les éraures, prenez garde de ne pas vous blesser avec
les extrémités pointues du boîtier. Enlez une paire de gants avant de retirer ou replacer les panneaux du boîtier.
• Si vous rencontrez un problème technique avec ce produit (ex : unité d’alimentation endommagée), contactez un technicien qualié ou votre rev-
endeur. Ne réparez PAS ce produit vous-même.
15060-29710000

Other Asus Desktop manuals

Asus PCI/E-P54NP4 User manual

Asus

Asus PCI/E-P54NP4 User manual

Asus EB1030 User manual

Asus

Asus EB1030 User manual

Asus Essentio CP6130 User manual

Asus

Asus Essentio CP6130 User manual

Asus D820MT User manual

Asus

Asus D820MT User manual

Asus PN40 BP116MV User manual

Asus

Asus PN40 BP116MV User manual

Asus P Series User manual

Asus

Asus P Series User manual

Asus V3-M2V890 User manual

Asus

Asus V3-M2V890 User manual

Asus AAEON RTC-1200SK User manual

Asus

Asus AAEON RTC-1200SK User manual

Asus V3-M2NC61S - V Series - 0 MB RAM User manual

Asus

Asus V3-M2NC61S - V Series - 0 MB RAM User manual

Asus V2-P5945G User manual

Asus

Asus V2-P5945G User manual

Asus ET2321 User manual

Asus

Asus ET2321 User manual

Asus BM2230 User manual

Asus

Asus BM2230 User manual

Asus VivoMini VC68 Series User manual

Asus

Asus VivoMini VC68 Series User manual

Asus V-Series P5P43 User manual

Asus

Asus V-Series P5P43 User manual

Asus EeeBox EB1007 User manual

Asus

Asus EeeBox EB1007 User manual

Asus NOVALITE SURF PX10 User manual

Asus

Asus NOVALITE SURF PX10 User manual

Asus Essentio CG1330 User manual

Asus

Asus Essentio CG1330 User manual

Asus BP1AE Owner's manual

Asus

Asus BP1AE Owner's manual

Asus Choromebox CN60 User manual

Asus

Asus Choromebox CN60 User manual

Asus V-Series M2NC61P User manual

Asus

Asus V-Series M2NC61P User manual

Asus EB1501P-B016E User manual

Asus

Asus EB1501P-B016E User manual

Asus T5 Series User manual

Asus

Asus T5 Series User manual

Asus Pundit-S User manual

Asus

Asus Pundit-S User manual

Asus BT1AD User manual

Asus

Asus BT1AD User manual

Popular Desktop manuals by other brands

Inval ET 6015 Assembly Instructions and Warranty

Inval

Inval ET 6015 Assembly Instructions and Warranty

Datapath Vision800-RPSU quick start guide

Datapath

Datapath Vision800-RPSU quick start guide

Lenovo ThinkCentre A61 Käyttöopas

Lenovo

Lenovo ThinkCentre A61 Käyttöopas

Lenovo 3257A9U user guide

Lenovo

Lenovo 3257A9U user guide

ontime CM-1600 user manual

ontime

ontime CM-1600 user manual

Contec IPC-BX/M360C user manual

Contec

Contec IPC-BX/M360C user manual

Promax WPC user manual

Promax

Promax WPC user manual

Tripp Lite WWSS1DWSTAA owner's manual

Tripp Lite

Tripp Lite WWSS1DWSTAA owner's manual

Contec IPC-BX720-AC Series user manual

Contec

Contec IPC-BX720-AC Series user manual

Element14 DIY Pi Desktop user manual

Element14

Element14 DIY Pi Desktop user manual

Blackboxav BBPC-i7 manual

Blackboxav

Blackboxav BBPC-i7 manual

V-tech Creativision instruction manual

V-tech

V-tech Creativision instruction manual

BlueChip VARIOLITE user manual

BlueChip

BlueChip VARIOLITE user manual

Corsair CorsairONE i300 QSG instruction manual

Corsair

Corsair CorsairONE i300 QSG instruction manual

IBM Types 2193 user guide

IBM

IBM Types 2193 user guide

HP Kayak XU Technical reference manual

HP

HP Kayak XU Technical reference manual

Gigabyte BRIX Extreme quick start guide

Gigabyte

Gigabyte BRIX Extreme quick start guide

Lenovo ThinkCentre A62 Guida per l'utente

Lenovo

Lenovo ThinkCentre A62 Guida per l'utente

manuals.online logo
manuals.online logoBrands
  • About & Mission
  • Contact us
  • Privacy Policy
  • Terms and Conditions

Copyright 2025 Manuals.Online. All Rights Reserved.