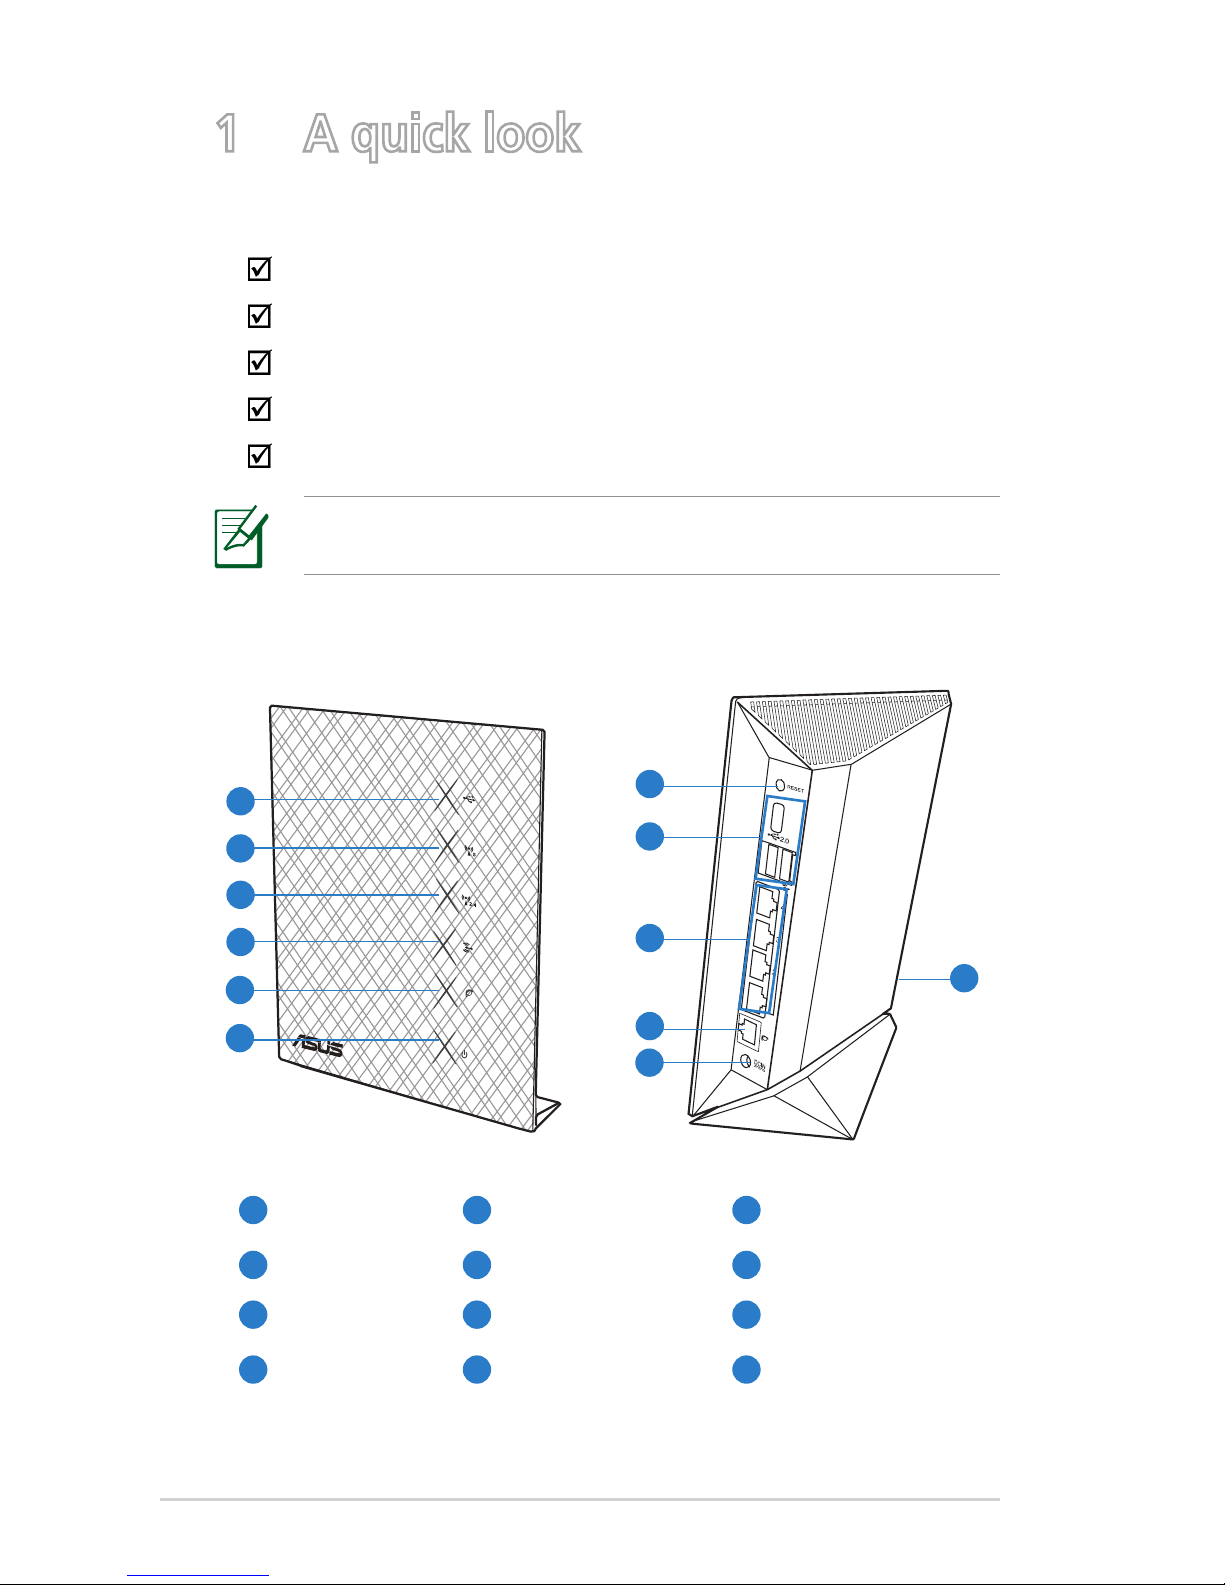
Asus RT-N56U User manual

RT-N56U
Extreme Wireless N Router
Ultra Slim, True Dual Band,
and Gigabit Internet
The ultra-thin and stylish RT-N56U
features a 2.4GHz and 5GHz dual
bands for an unmatched concurrent
wireless HD streaming; built-in ASUS
AiDisk and Download Master that
support HTTP, FTP, SMB, and BT
protocols for uninterrupted download
tasks; a capability to handle 300,000
sessions; and the ASUS Green Network
Technology, which provides up to 70%
power-saving solution.
User Guide
First Edition
June 2010 / E5815

2
Table of contents
1 A quick look
Package contents ...............................................................4
Your wireless router ..........................................................4
Mounting placement .........................................................5
2 Creating your network
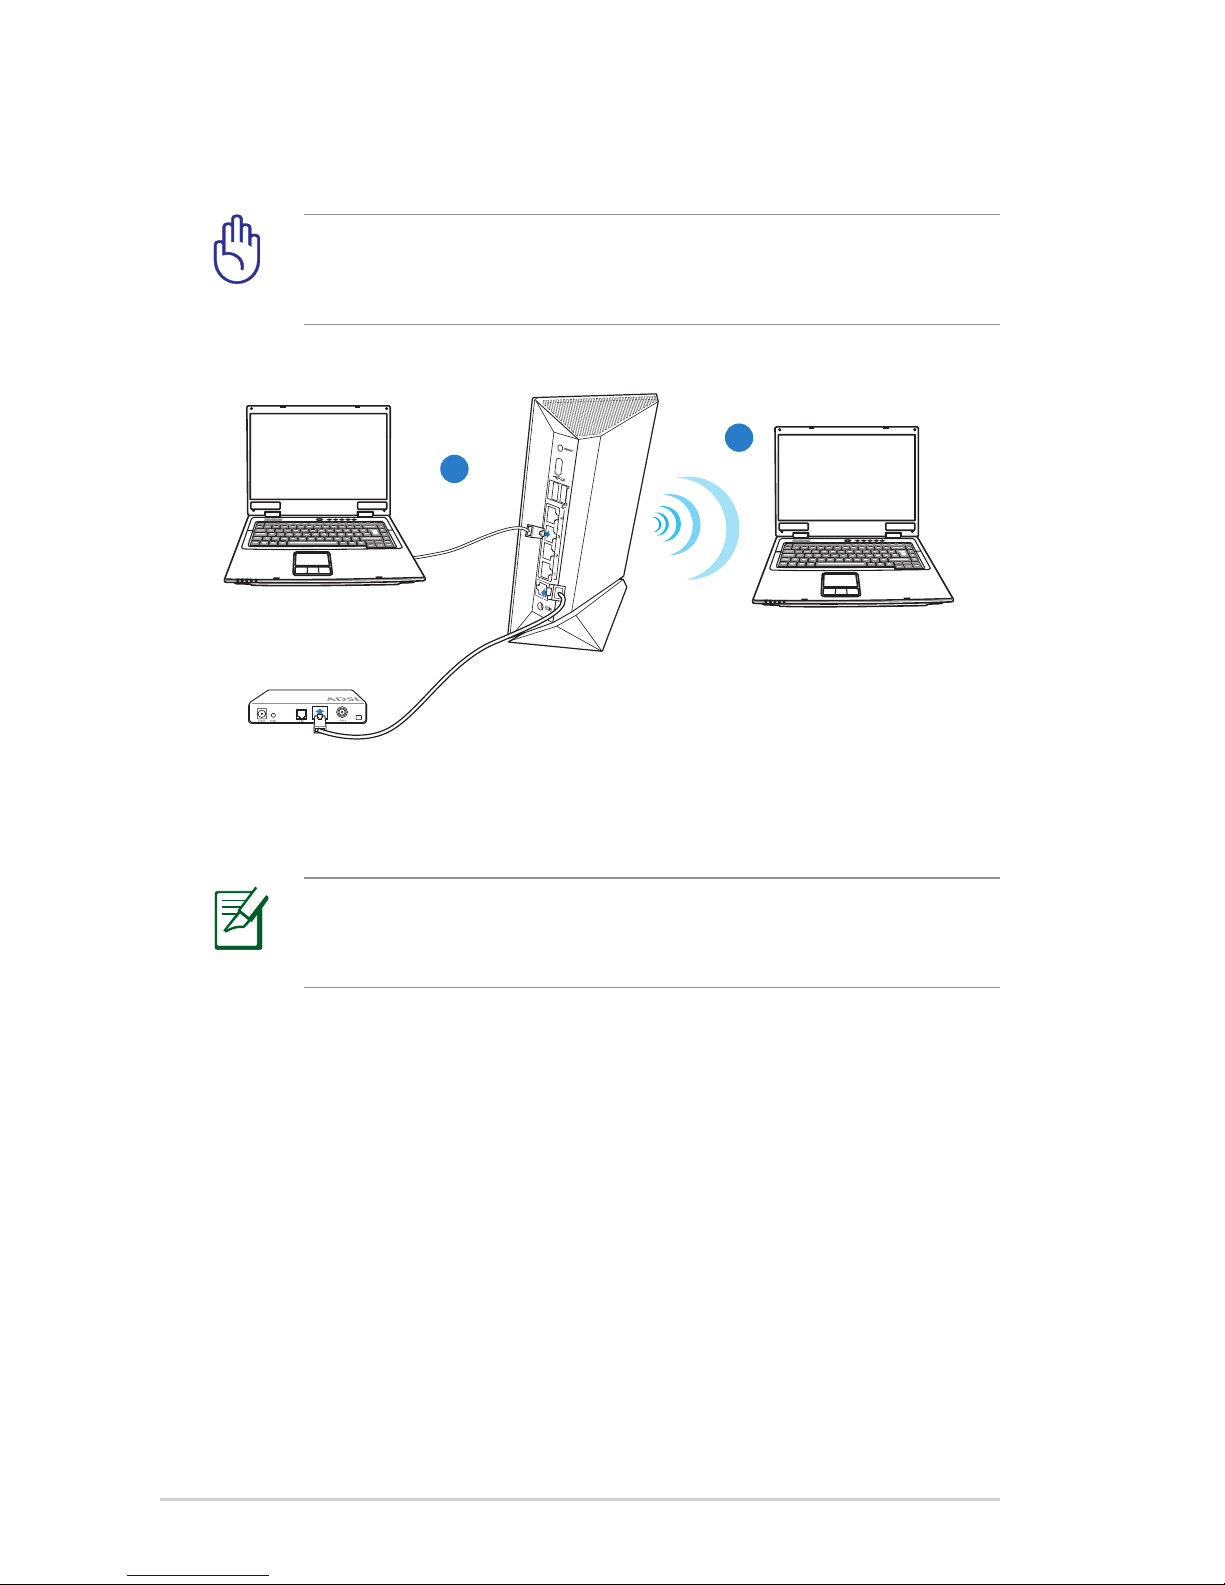
What you need...................................................................6
Before you proceed ...........................................................7
Setting up your wireless router........................................8
Wired connection (A).......................................................8
Wireless connection (B)....................................................9
3 ConguringviathewebGUI
Logging into the web GUI...............................................10
Setting up the Internet connection ................................11
Quick Internet Setup (QIS) with auto-detection..............11
Quick Internet Setup (QIS) without auto-detection.........14
Your ASUS Wireless Router as a 3.5G mobile router.......15
Setting up the wireless security settings .......................17
Managing your network clients .....................................19
Monitoring your USB device...........................................20
Using your router as a UPnP Media Server....................22
Using AiDisk for an FTP Server and
Network Neighborhood setup ..................................23
Managing EZQoS Bandwidth..........................................25
Configuring the Advanced settings................................27
Setting up the DHCP Server...........................................27
Upgrading the firmware ................................................29
Restoring/Saving/Uploading settings ..............................30
Sharing files from a USB storage device .........................31

3
Table of contents
Setting up your network printer ....................................36
4 Usingtheutilities
Device Discovery..............................................................40
Firmware Restoration ......................................................41
Download Master ............................................................42
5 Troubleshooting
Troubleshooting...............................................................46
ASUS DDNS Service..........................................................50
Frequently Asked Questions (FAQs)................................50
Appendices
Notices ..............................................................................52
GNU General Public License ............................................54
REACH...............................................................................63
ASUS Contact information ..............................................64

4
1 A quick look
Your wireless router
1USB LED 5Internet
connection LED 9LAN 1 ~ 4 ports
25GHz LED 6Power LED 10 WAN port
32.4GHz LED 7Reset button 11 Power (DC-In) port
4WAN LED 8USB ports 12 WPS button (on
the right)
Package contents
NOTE: If any of the items is damaged or missing, contact
your retailer.
RT-N56U Wireless Router
Power adapter
Support CD (manual, utilities)
RJ45 cable
Quick Start Guide
5
6
1
2
3
4
11
7
8
9
10
12

5
Mounting placement
NOTES:
• Use only the adapter that came with your package. Using
other adapters may damage the device.
• Specifications:
DC Power adapter DC Input: +19V with max 1.58A current;
+12V with max 2A current
Operating
Temperature 0~40oCStorage 0~70oC
Operating
Humidity 50~90% Storage 20~90%

6
2 Creating your network
What you need
To set up your network, you need one or two computers that
meet the following system requirements:
• Ethernet RJ-45 (LAN) port (10Base-T/100Base-TX/
1000BaseTX)
• IEEE 802.11a/b/g/n wireless capability
• An installed TCP/IP service
• Web browser such as Internet Explorer, Firefox, Safari, or
Google Chrome
NOTES:
• If your computer does not have built-in wireless capabilities,
you may install an IEEE 802.11a/b/g/n WLAN adapter to
your computer to connect to the network.
• With its dual band technology, your wireless router supports
2.4GHz and 5GHz wireless signals simultaneously. This
allows you to do Internet-related activities such as Internet
surfing or reading/writing e-mail messages using the 2.4GHz
band while simultaneously streaming high-definition audio/
video files such as movies or music using the 5GHz band.
• If you are using only one computer with single band
IEEE 802.11b/g/n WLAN adapter, you will only be able to
use the 2.4GHz band.
• If you are using only one computer with dual band
IEEE 802.11a/b/g/n WLAN adapter, you will be able to use
the 2.4GHz or 5GHz band.
• If you are using two computers with both
IEEE 802.11a/b/g/n WLAN adapters, you will be able to use
both 2.4GHz and 5GHz bands simultaneously.

7
Before you proceed
IMPORTANT!
• The Ethernet RJ-45 cables that will be used to connect the
network devices should not exceed 100 meters.
• For the best wireless signal transmission between the
wireless router and the network devices connected to it,
ensure that you:
• Place the wireless router in a centralized area for a
maximum wireless coverage for the network devices.
• Keep the device away from metal obstructions and away
from direct sunlight.
• Keep the device away from transformers, heavy-duty
motors, fluorescent lights, microwave ovens, refrigerators,
and other industrial equipment to prevent signal
interference or loss.

8
Setting up your wireless router
Wired connection (A)
IMPORTANT! Use wired connection in setting up your
wireless router to avoid possible setup problems due to
wireless uncertainty.
NOTE: Your wireless router has an integrated auto-crossover
function, so use either straight-through or crossover cable for
wired connection.
A
B
To set up your wireless router via wired connection:
1. Turn on your wireless router and modem.
2. Using an RJ-45 cable, connect the router’s WAN port to the
modem.
3. Using another RJ-45 cable, connect the router’s LAN port to
your computer’s LAN port.

9
Wireless connection (B)
To set up your wireless router via wireless connection:
1. Turn on your wireless router and modem.
2. Using an RJ-45 cable, connect the router’s WAN port to the
modem.
3. Install an IEEE 802.11a/b/g/n WLAN adapter on your
computer.
NOTES:
• For details on connecting to a wireless network, refer to the
WLAN adapter’s user manual.
• To set up the security settings for your network, refer to the
section Setting up the wireless security settings in this
user manual.
IMPORTANT! If your wireless router supports the 3G
function, you may use a 3.5G USB adapter to turn your
wireless router into a mobile router. For more details, refer to
the section Your ASUS Wireless Router as a 3G mobile
router in this user manual.

10
3 Configuring via the web GUI
Logging into the web GUI
Your ASUS Wireless Router comes with an intuitive web graphics
user interface (GUI) that allows you to easily configure its various
features through a web browser such as Internet Explorer,
Firefox, Safari, or Google Chrome.
To log into the web GUI:
1. On your web browser such as Internet Explorer, Firefox,
Safari, or Google Chrome, manually key in the wireless
router’s default IP address: 192.168.1.1
2. On the login page, key in the default user name (admin) and
password (admin).

11
2. The wireless router’s web GUI launches. Use the web GUI to
configure various wireless settings.
Setting up the Internet connection
Quick Internet Setup (QIS) with auto-detection
The Quick Internet Setup (QIS) function guides you in quickly
setting up your Internet connection.
To use QIS with auto-detection:
1. Launch a web browser such as Internet Explorer, Firefox,
Safari, or Google Chrome.

12
2. The wireless router automatically detects if your ISP
connection type is Dynamic IP, PPPoE, PPTP, L2TP, and
Static IP. Key in the necessary information for your ISP
connection type.
NOTE: The auto-detection of your ISP connection type takes
place when you configure the wireless router for the first time
or when your wireless router is reset to its default settings.
IMPORTANT! Obtain the necessary information about your
Internet connection type from your ISP.
Select your next preferred task from any of these options:
1. Going to Internet: Click to start surfing the Internet
or do Internet-related activities such as chat, or read/
write e-mail messages.
3. Internet connection setup is done.

13
IMPORTANT!
• By default, encryption is disabled and open system
authentication is used in your wireless router. This renders
your network unsecured against unauthorized access and
malicious attacks from hackers.
• We strongly recommend that you set up your wireless
security settings. For more details, refer to the section
Setting up the wireless security settings in this user
manual.
2. Simply Wireless Security Setting: Click to go to
the wireless router’s web graphics user interface (GUI) to
configure your wireless security settings.
3. Advanced Setting page: Click to go to the wireless
router’s Advanced Setting page and configure more
advanced wireless settings.
NOTE: If you choose options 2 and 3, you will need to
log into the web GUI. For more details, refer to the section
Logging into the web GUI in this user manual.

14
Quick Internet Setup (QIS) without auto-detection
To use QIS without auto-detection:
1. Under Internet status, click GO in the Quick Internet Setup
field.
2. Select your connection type from these types of ISP services:
Dynamic IP, PPPoE, PPTP, L2TP, and Static IP.
3. Click Apply all settings to save the settings.
IMPORTANT! Obtain the necessary information about your
Internet connection type from your ISP.

15
Your ASUS Wireless Router as a 3.5G mobile router
Install a 3.5G USB adapter on your wireless router to turn it into
a mobile router to provide a quick Internet connnection access
and sharing for your wireless network clients virtually anywhere.
NOTES:
• The 3.5G USB adapter is purchased separately.
• Your wireless router model may not support the 3G
function.
IMPORTANT! Ensure that you subscribe to a mobile
(3G/3.5G) Internet service. Contact your ISP for more details
about subscribing to this service.
Using a 3.5G USB adapter on your wireless router
To use a 3G adapter on your wireless router:
1. Activate your 3.5G HSDPA USB adapter.
2. Insert your 3.5G USB adapter to your computer’s USB port
and verify if you can access the Internet through the 3.5USB
adapter.
3. Remove the 3.5G USB adapter from your computer.
4. Using an RJ-45 cable, connect your computer to your wireless
router.
5. Insert your 3.5G USB adapter into the USB port at the rear of
the wireless router.
6. Configure the Internet connection settings via the wireless
router’s web GUI.
NOTE: Refer to the next section Setting up the 3.5G
Internet connection settings in this user manual.

16
Setting up the 3.5G Internet connection settings
To set up the 3.5G Internet connection settings:
1. Key in 192.168.1.1 on your web browser.
2. On the login screen, key in the default user name (admin)
and password (admin), then click OK. The wireless router’s
web GUI launches.
3. From the navigation menu, click Network Map > USB_3G_
dongle, and under the HSDPA status, click GO.
You may also click Advanced Setting > USB Application
from the navigation menu.
4. From the HSDPA tab, do the following settings:
• Enable HSDPA: Select Enable.
• 3G/3.5G USB Adapter: Select your 3G USB adapter.
• Location: Select your ISP’s location.
• ISP: Select your ISP.
• APN service (optional): Key in your APN service name.

17
• PIN: Key in the PIN (Personal Identification Number)
code.
• Dial Number: Key in your dial number.
• Username: Key in your username.
• Password: Key in your password.
5. Click Apply, then you are prompted to configure your
wireless network settings such as security settings via the
wireless router’s web GUI.
You may also now surf the Internet or do Internet-related
activities such as chat online or read/write e-mail messages.
IMPORTANT! Obtain the APN service name, PIN code, dial
number, username, and password from your ISP.
Setting up the wireless security settings
To protect your wireless network from unauthorized access, you
need to configure its security settings.
To set up the wireless security settings:
1. Key in 192.168.1.1 on your web browser.
2. On the login screen, key in the default user name (admin)
and password (admin), then click OK. The wireless router’s
web GUI launches.
3. On the Network Map screen, select the System status icon
to display the wireless security settings such as SSID, security
level, and encryption settings.

18
NOTE: You can set up different wireless security settings for
2.4GHz and 5GHz bands.
2.4GHz security settings
5GHz security settings

19
4. On the Wireless name (SSID) field, key in a unique name
for your wireless network.
5. From the Security Level dropdown list, select the encryption
method for your wireless network.
IMPORTANT! The IEEE 802.11n standard prohibits using
High Throughput with WEP or WPA-TKIP as the unicast cipher.
If you use these encryption methods, your data rate will drop
to IEEE 802.11g 54Mbps connection.
6. Key in your security passkey.
7. Click Apply when done.
Managing your network clients
To manage your network clients:
1. Launch the wireless router’s web GUI.
2. On the Network Map screen, select the Client Status icon
to display the information about your network clients.

20
3. In the Priority field under the Client List, you can set the
priority packet for each client as Normal, High, or Low.
4. To block a client’s access to your network, select the client
and click Block.
To restore a client’s access to your network, select the client in
the Blocked client list and click Unblock.
Monitoring your USB device
The ASUS Wireless Router provides two USB 2.0 ports for
connecting USB devices such as a USB storage device and USB
printer, to allow you to monitor the working environment, share
files, and printer with clients in your network.
NOTE: To use this feature, you need to plug a USB storage
device, such as a USB hard disk or USB flash drive, to the USB
2.0 port on the rear panel of your wireless router. Ensure that
the USB storage device is formatted and partitioned properly.
Refer to the ASUS website at http://www.asus.com for the
HD file system support table.
IMPORTANT! You first need to create a user account to
allow other network clients to access the USB device. For
more details, refer to the section Sharing files from a USB
storage device in this user manual.
To monitor your USB device:
1. Launch the wireless router’s web GUI.
Other manuals for RT-N56U
10
Table of contents
Other Asus Network Router manuals

Asus
Asus DSL-N12HP User manual

Asus
Asus DSL-AX82U User manual

Asus
Asus Internet Security Router User manual

Asus
Asus RT-G32 - Wireless Router User manual

Asus
Asus RT-AC1900P User manual

Asus
Asus SP-AC2015 Wi-Fi Connect User manual

Asus
Asus RT-AC56U User manual

Asus
Asus RT-N12B1 User manual

Asus
Asus RT-AC1500G PLUS User manual

Asus
Asus ZenWiFi XD5 User manual

Asus
Asus RT-G32 - Wireless Router User manual

Asus
Asus DSL-AC68R User manual

Asus
Asus XT8 User manual

Asus
Asus 4G-AC53U User manual

Asus
Asus RT-AX6U User manual

Asus
Asus RT-AC3100 User manual

Asus
Asus RT-AC2600 User manual

Asus
Asus 4G-AC55U User manual

Asus
Asus RT-N10LX User manual

Asus
Asus RT-AC750GF User manual