Asus Internet Radio User manual

ASUS Internet Radio
User Manual
1 2 3 4 5
HOME
Volume
Standby/On
AIR

ii ASUS Internet Radio
Contents
Contents ................................................................. ii
Notices................................................................... iv
Welcome................................................................ vi
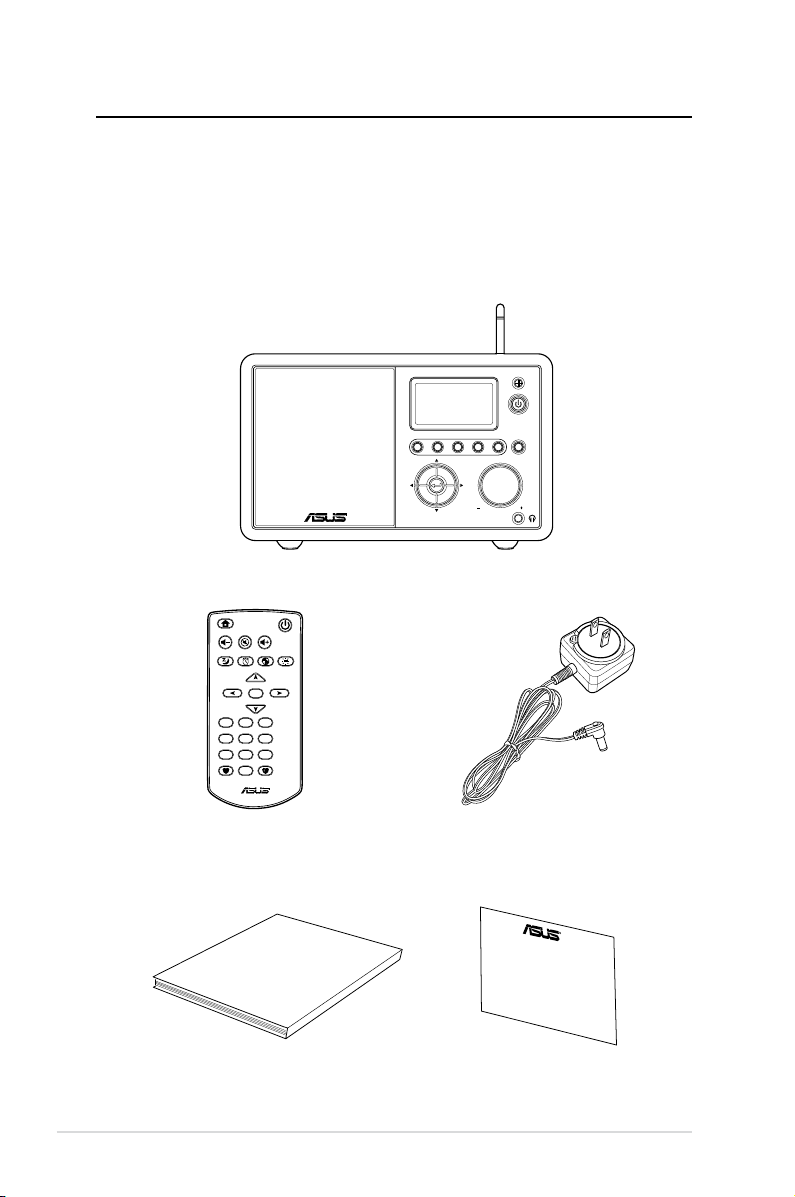
Package contents...............................................................................vi
Overview............................................................................................. vii
Specifications .................................................................................... vii
Getting started ...................................................... 1
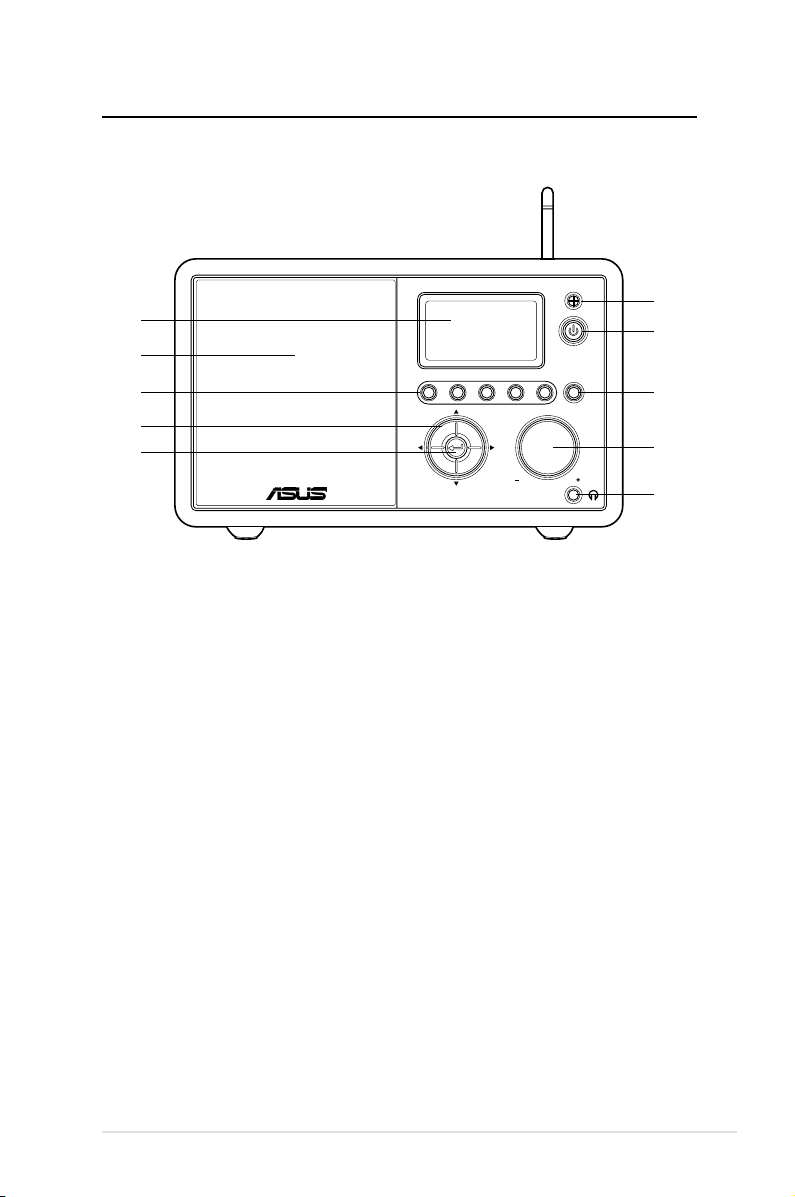
Front view ..............................................................................................1
Rear view................................................................................................2
Using the remote control.................................................................3
Turning on the device .......................................................................4
Language selection............................................................................5
Text entry ...............................................................................................6
Listening to the radio............................................ 7
Searching for a radio station...........................................................7
Searching by genre ......................................................................7
Searching by country/location ................................................7
Searching by station name........................................................8
Connecting to a station ....................................................................9
Adding a station to My Favorite.....................................................9
Adding a currently played radio station...............................9
Adding a radio station from the list ....................................10
Adding a manually entered station.....................................10
Managing My Favorite....................................................................11
Other settings ...................................................... 12
Configuration ....................................................................................12
Network.........................................................................................12
Clock...............................................................................................12

ASUS Internet Radio iii
Alarm..............................................................................................12
Language......................................................................................13
Backlight ....................................................................................... 13
Sleep Timer................................................................................... 13
Buffer..............................................................................................14
Version Update ...........................................................................14
Reset ............................................................................................... 14
Troubleshooting .................................................. 15

iv ASUS Internet Radio
Notices
Federal Communications Commission Interference
Statement
This equipment has been tested and found to comply with the
limits for a Class B digital device, pursuant to Part 15 of the FCC
Rules.These limits are designed to provide reasonable
protection against harmful interference in a residential
installation.This equipment generates, uses and can radiate radio
frequency energy and, if not installed and used in accordance
with manufacturer’s instructions, may cause harmful
interference to radio communications. However, there is no guar-
antee that interference will not occur in a particular
installation. If this equipment does cause harmful interference to
radio or television reception, which can be determined by
turning the equipment off and on, the user is encouraged to
try to correct the interference by one or more of the following
measures:
• Reorient or relocate the receiving antenna.
• Increase the separation between the equipment and receiver.
• Connect the equipment to an outlet on a circuit different from
that to which the receiver is connected.
• Consult the dealer or an experienced radio/TV technician for
help.
This device complies with Part 15 of the FCC Rules. Operation is
subject to the following two conditions:
• This device may not cause harmful interference, and
• This device must accept any interference received including
interference that may cause undesired operation.
FCC Caution:
Any changes or modifications not expressly approved by the
party responsible for compliance could void the user’s authority
to operate this equipment.

ASUS Internet Radio v
IMPORTANT NOTE:
FCC Radiation Exposure Statement
This equipment complies with FCC radiation exposure limits set
forth for an uncontrolled environment.This equipment should beThis equipment should be
installed and operated with a minimum distance of 20cm
between the radiator and your body.This transmitter must not
be co-located or operated in conjunction with any other antenna
or transmitter. IEEE 802.11b or 802.11g operation of this product
in the U.S.A. is firmware-limited to channels 1 through 11.
Industry Canada Statement
Operation is subject to the following two conditions:
• This device may not cause interference andThis device may not cause interference and
• This device must accept any interference, includingThis device must accept any interference, including
interference that may cause undesired operation of the
device.
IMPORTANT NOTE:
Radiation Exposure Statement
This equipment complies with IC radiation exposure limits set
forth for an uncontrolled environment.This equipment should beThis equipment should be
installed and operated with a minimum distance of 20cm
between the radiator and your body.

vi ASUS Internet Radio
Welcome
Congratulations on your purchase of the ASUS Internet Radio.
The following illustration displays the package contents of your
new ASUS Internet Radio.
Package contents
User Manual
Home
Sleep
Favorite +Favorite
Alarm
Enter
123
456
789
10
Language Backlight
Mute
Standby/On
Volume+
Volume-
1 2 3 4 5 HOME
Volume
Standby/On
ASUS Internet Radio
Remote control
Warranty card
AC power adapter
User manual

ASUS Internet Radio vii
Specications
Connectivity Wireless LAN 802.11b/g
Wired 10/100M Ethernet
Data rates 54 Mbits (WLAN)
10/100 Mbits (Ethernet)
Wireless LAN security 64/128-bit WEP
WPA/WPA2
Audio format decoder MP3/WMA
16Kbps–320Kbps
SNR >90dB earphone
Display 128 x 64 FSTN graphics display
Blue color with white LED
I/O ports Headphone jack (Φ3.5mm)
Line In (Φ 3.5mm)
Line Out (RCA jack)
Ethernet (RJ45)
DC power jack
Overview
The ASUS Internet Radio provides easy access to a wide selection
of radio stations on the Internet. Before enjoying your ASUS
Internet Radio, make sure that you have access to a wired/
wireless network.
Features
• Stand-alone device
• Wireless/cable connection
• Up-to-date list of more than 10,000 online stations
• 250 favorites
• Alarm clock
• Sleep timer
• Network Time Protocol (NTP)

viii ASUS Internet Radio
Speaker 5 Watt/4 Ohm
AC power adapter Input: AC 100-240V (50-60Hz)
Output: DC 6V/2A
Remote control 26 keys
Dimension 250 (L) x 128 (W) x 190 (H) mm
Weight 2 Kg
ADSL/Cable Modem
bandwidth
(recommended)
1M bps at least

ASUS Internet Radio 1
Getting started
Front view
1 2 3 4 5 HOME
Volume
Standby/On
1
1. IR sensor:IR sensor: Receives commands from the remote control.
2. Standby/On button:Standby/On button: Press to switch the device between
standby and on mode.
3. Home button:Home button: Press to return to the main menu.
4. Volume knob:Volume knob: Rotate to the right to increase the volume or
to the left to decrease the volume. Rotate to enter text or to
scroll up/down through menu options. Press to confirm your
selection of a menu option.
5. Headphone jack:Headphone jack: Connect headphones to this jack for
private listening.You can also connect additional speaker(s)
to this jack using an audio cable.
6. Enter button: Press to confirm your selection of a menu
option.
7. Up/down/left/right navigation button: Press to scroll up/
down/left/right through menu items.
8. Preset button 1–5: Press to recall a preset radio station.
9. Speaker: The built-in speaker.
10. Display: The LCD display with backlight.
2
3
4
5
10
9
8
7
6

2 ASUS Internet Radio
Rear view
1
2
3
ON OFF DC
LAN
R L
LINE OUT
LINE IN
Antenna
1. Power switch: Turn on/off the device.
2. DC power jack: Connect the supplied power cord to this
jack.
3. LAN port: Connect a network cable to this port.
4 Line In jack: If you intend to use the device solely as a
speaker, connect an audio cable to this jack.The device will
automatically switch to AUX mode.
5. Left/right Line Out jack: Connect audio cables to these
jacks to use an additional stereo.
6. Antenna: Set the antenna to a vertical position to ensure
best reception of wireless signal.
4
5
6
NOTE: The front panel functions are repeated on the remote control.
Refer to page 3 and 4 for more information.

ASUS Internet Radio 3
Using the remote control
Use the remote control to search for radio stations, make a list of
your favorite stations, and configure other settings.
Refer to the table below for the remote control buttons and their
functions.
Home
Sleep
Favorite +Favorite
Alarm
Enter
123
456
789
10
Language Backlight
Mute
Standby/On
Volume+
Volume-
Standby/On button Press to switch the device
between standby and on mode.
Home button Press to return to the main menu.
Volume- button Press to decrease the output
volume.
Mute button Press to mute the audio output.
Volume+ button Press to increase the output
volume.
Sleep button
Press to select a preset amount of
time after which the device shuts
off.
Alarm button Press to turn on/off the alarm
clock.
Language button Press to select a menu language.

4 ASUS Internet Radio
Backlight button Press to select a backlight mode.
Enter
Enter button Press to confirm your selection of
a menu option.
Up navigation
button
Press to scroll up through menu
items.
Press to select text.
Down navigation
button
Press to scroll down through
menu items.
Press to select text.
Left navigation
button
Press to go back to the previous
menu.
Right navigation
button
Press to confirm your selection of
an option and go to the submenu.
1
~
10
Preset button 1–10 Press to recall a preset radio
station.
Favorite button Press to display your favorites list.
+Favorite button Press to store the currently played
radio station to your favorites list.
Turning on the device
To turn on your ASUS Internet Radio for the first time:
1. Plug the supplied power adapter in a power outlet.
2. Connect the power adapter to the DC power jack on the rear
panel.
ON OFF DC
LAN
R L
LINE OUT
LINE IN
Antenna
3. Press the power switch
on the rear panel to
turn on the device.The
display lights up to show
the ASUS logo, and then
the following main menu
appears:
Power ON/OFF

ASUS Internet Radio 5
NOTE: Pressing the button on the front panel or on the remote
control does not turn the device on.
12:00PM
My Favorite
Radio Station/Music
Media Center
1/6 >
Time
Press
the right
navigation
button to
display the
submenu.
Menu
options
Network
status
The main menu contains six
options and the first option is
highlighted.
Language selection
The ASUS Internet Radio supports multiple languages for the
menu options.
To change the language:
Press the Language button on the
remote control to select the language
you use (the fastest way).
OR:
1. From the main menu, select
Configuration > Language.
2. Press the up/down navigation button to scroll through the
language options and press Enter to apply the selected
language.
NOTE: The language selected applies to the device menus and system
messages only.The station names shown vary according to station
locations.
Home
Sleep
Favorite +Favorite
Alarm
Enter
123
456
789
10
Language Backlight
Mute
Standby/On
Volume+
Volume-
Language button

6 ASUS Internet Radio
Text entry
When you add the address of an online radio station or use a
WEP/WPA key for wireless network security, you need to enter
text.
To enter upper/lower case letters, symbols, or numbers:
1. Press the up/down
navigation button
or rotate the volume
knob to select a
character from the
following:
NOTE: The characters appear in a circular order.What is next to “space”
is the uppercase A.
2. Press the right navigation button to proceed to the next.
Press Enter or the volume knob when done.
To enter your IP address and other IP parameters or set the time,
date and alarm, follow the steps described above.
Home
Sleep
Favorite +Favorite
Alarm
Enter
123
456
789
10
Language Backlight
Mute
Standby/On
Volume+
Volume-
1 2 3 4 5 HOME
Volume
Standby/On
Letters A a B b C c…Z z
Symbols $ % & # _ ^ ~ `“ ‘, . : ; ? ! * - + @ < = > { ¦ } [ \ ] ( / )
Numbers 0 1 2 3 4 5 6 7 8 9
Other
Delete ( ): Select and press the left/right
navigation button to delete text on the left.
Space: Select to add a space.

ASUS Internet Radio 7
Listening to the radio
Searching for a radio station
The ASUS Internet Radio has an up-to-date, well-classified list of
online radio stations worldwide. Not every Internet radio
station has a corresponding traditional radio station. Some of
them broadcast via the Internet only.You can search for a station
by music genre or location.You can also go through the stations
categorized in alphabetical order.
Searching by genre
1. From the main menu, select Radio Station/Music > Genre,
and a list of music genres displays in alphabetical order.
2. Press the up/down navigation button to highlight a genre.
For example, if you want to listen to jazz music:
3. Press the right navigation button to display all jazz stations
available. Highlight a station and press Enter to connect to
the station.
Searching by country/location
1. From the main menu, select Radio Station/Music >
Country/Location, and a list of geographical regions
displays in alphabetical order.
Press
the right
navigation
button to
display all
of the jazz
stations.
Jazz is the 23rd of all 53 genres.
Press
the left
navigation
button to
go back to
the
previous
menu.
12:00PM
Hard Rock
Hip Hop
Jazz
< 23/53 >

8 ASUS Internet Radio
The list includes: Africa, Asia, Europe, Latin America, Middle
East, North America, Oceania/Pacific, and Internet Only.
2. Select a geographical region and then select a country in the
region. A list of stations located in the country displays.
3. Highlight a station and press Enter to connect to the station.
NOTE:
• For countries that have a huge number of radio stations, the stations
are sub-classified by name initial alphabetically.
• If you select a language other than English, you will see the name of
a country where that language is spoken in the Radio Station/
Music menu. Highlight the country name and press Enter to display
the stations located in this country.
Searching by station name
1. From the main menu, select Service > Search Radio
Station.
2. The stations are divided into 10 categories by their name
initial: 0-9, A-C, D-F, G-I, J-L, M-O, P-R, S-U, V-Z, and Other.
Select a category and a list of stations displays.
NOTE: Station names formed by characters other than Roman alphabet
are in the Other group.
3. Select any of the stations again to display more stations.The
stations are listed alphabetically according to the first two
letters of their names.
4. Highlight a station and press Enter to connect to the station.
NOTE: When you highlight a station from the lists, vertical bars
appear at the bottom left corner of the display to indicate the
accessibility to the station.Three bars suggest the highest accessibility.
12:00PM
Africa
Asia
Europe
< 1/8 >

ASUS Internet Radio 9
Connecting to a station
If your ASUS Internet Radio is successfully connected to a station,
the display is as follows:
12:00PM
All That Jazz Radio
WMA 32 kbps/Jazz
Playing…
< 11/92
Data
information
Station
name
Connection
status*
Network
status
Buffer
length**
NOTE:
• *The connection status may change from“Connecting”to“Buffering”
to“Playing.”Press Enter to stop playing and go back to the previous
menu.
• **Refer to page 14 for details about setting the buffer.
• If you shift to the main menu while connecting to a station, a
countdown timer will appear at the bottom right corner of the
display. After a lapse of 10 seconds, the system automatically shifts
back to the station being played.
Adding a station to My Favorite
You can add a currently played radio station or one found on the
list to My Favorite.You can also manually enter the address of a
station and add it to your favorites list.The ASUS Internet Radio
has a memory of 250 stations.
Adding a currently played radio station
1. Press the +Favorite button on the remote control.
2. The following icons will appear next to the network status
icon to indicate favorites status:
The station is being added to My Favorite.
The station has already been in My Favorite.
Favorites exceeds the maximum of 250.

10 ASUS Internet Radio
Adding a radio station from the list
1. Search for a station using any of the methods mentioned in
the“Searching for a radio station” section.
2. Highlight a station and press the right navigation button to
display the submenu as the following:
3. • Add to My Favorite: Select to add the station to your
favorites list.
• Auto Scan (Down)/(Up): Select to connect to the
stations on the list consecutively up/down from the
highlighted station. Each station will be played for 30
seconds during which you can add it to My Favorite by
pressing the +Favorite button .
• Play: Select to connect to the station.
Refer to the table on page 9 for favorites status.
12:00PM
Add to My Favorite
Auto Scan (Down)
Auto Scan (Up)
< 1/4
Adding a manually entered station
1. From the main menu, select Service > Add New Radio
Station.
2. Enter the address of a station. Refer to the“Text entry”
section on page 6 for details about entering text.
3. When finished, press Enter to add it to your favorites list.
Refer to the table on page 9 for favorites status.

ASUS Internet Radio 11
Managing My Favorite
The ASUS Internet Radio saves up to 250 stations to My Favorite
so that you can have quick access to preset stations.
To manage your favorites list:
1. Press the Favorite button on the remote control or
select My Favorite from the main menu. A list of preset
stations displays.
2. Highlight a station on the list and press the right navigation
button to display the submenu as the following:
3. • Delete: Select to delete the station.
• Shift Up/Down: Select to change the order of the preset
stations. Move the stations played the most frequently to
the top 5 or 10 so that you can press the preset buttons
to switch to them.
• Rename: Select to rename the station.
• Play: Select to connect to the station.
You can also connect to a preset station by doing the following:
• From your favorites list, highlight a station and press Enter
to connect.
• From any menus, press the preset button 1–5 on the front
panel or the remote control to connect to your top 5 preset
stations.
• From any menus, press the preset button 6–10 on the
remote control to connect to the sixth to the tenth preset
stations.
12:00PM
Delete
Shift Up
Shift Down
< 1/5

12 ASUS Internet Radio
Other settings
Conguration
Selecting Configuration from the main menu allows you to
configure the ASUS Internet Radio setups including network,
clock, alarm, language, backlight, sleep timer, buffer, version
update, and reset.
Network
Refer to the Network Setup Guide for details.
Clock
The Configuration > Clock option allows you to set the time/
date and a format for displaying time.The first time you turn
on the device and connect it to the network, the display shows
Greenwich Mean Time (GMT). Set the hour according to your
time zone, and through Network Time Protocol (NTP), a clock
synchronization solution on the Internet, the device will
synchronize its clock with accuracy as long as it is connected to
the network.
• Set Date and Time: Select to set the time and date.Refer to
the“Text entry” section on page 6 for details about entering
numbers.
• Set Time Format: Select between the 12Hour and 24Hour
format.
NOTE:
• You can check Greenwich Mean Time (GMT) under the
Information Center menu.
• Reset the hour for the device once you are in a different time zone.
Alarm
This option allows you to turn on/off the alarm and program an
alarm. Pressing the Alarm button on the remote control also
activates/deactivates a programmed alarm.
This manual suits for next models
1
Table of contents
Other Asus Radio manuals
Popular Radio manuals by other brands

PVP Communications
PVP Communications Motor-One PV-HR-WW/XM Installation and operating instructions

Kompernass
Kompernass TRONIC KH 229 operating instructions

Uniden
Uniden PRO 520XL user manual

Tait
Tait TM8100 mobiles installation guide

Grundig
Grundig CLASSIC 960 Operation manual

Lince
Lince 1870BOBBY-UE Installation, Programming and Operating Instructions