Atag CSX46 D Series User manual

Instructions for use
Oven
CSX46xxD

EN Manual EN 3 - EN 44
Pictograms used
Important information
Tip

EN 3
YOUR OVEN
Your oven
Introduction 4
Control panel 5
Description 6
Guide rails/Telescopic guide rails 6
Accessories 7
Door 8
Cooling fan 8
Main functions 8
Keys 10
Navigation 11
Initial use
What to do first 13
Operation
Selecting your function 16
Function settings mode 16
Progress mode 18
Finish display 18
Changing settings during the progress 19
Use
Functions table 20
Using the microwave 26
Steam function 28
Programs and Favourites 30
Defrost 30
Settings menu 31
Plus menu 32
Stage cooking 36
Kitchen timer 37
Child lock 37
Cleaning
Cleaning the appliance 38
Steam clean 38
Cleaning the water tank filter 39
Descaling 39
Removing and cleaning the guide rails 40
Replacing the oven light bulb 41
Solving problems
General 42
Your oven and the environment
Disposal of the appliance and packaging 44

EN 4
Introduction
Congratulations on choosing this Atag oven. This product is designed
to offer simple operation and optimum user-friendliness. The oven has
a wide range of settings, enabling you to select the correct cooking
method every time.
This manual shows how you can best use this oven. In addition to
information about operating the oven, you will also find background
information that may be useful when using the appliance.
Please read the separate safety instructions
carefully before using the appliance!
Read this manual before using the appliance and keep it in a safe
place for future use.
Installation instructions are supplied separately.
YOUR OVEN

EN 5
Control panel
12 13 14 15 16 17 18 19
1 10 116 7 8 95432
1. Function knob (in ‘Off’ position)
2. Extra
3. Programs & Favourites
4. Fast preheat
5. Oven
6. Microwave
7. Combi microwave
8. Steam
9. Combi steam
10. Display
11. Selection knob
12. On/off key and stop key (cancel)
13. Lighting key
14. Timer key
15. Navigation key left*
16. Navigation key right*
17. Plus key
18. Water reservoir key
19. Confirm key
* touching 15+16 activates Child lock
Note:
The keys respond best if you touch them with a large area of your
fingertip. Every time you touch a key during use, a short audio signal
will sound.
YOUR OVEN

EN 6
YOUR OVEN
Description
1
2
4
5
Level 1
Level 2
Level 3
Level 4
3
1. Control panel
2. Water reservoir cover
3. Oven levels
4. Oven door
5. Door handle
Guide rails/Telescopic guide rails
• The oven has four or five guide rails (Level 1 to 4/5), depending on
the model. Level 1 is mainly used in combination with bottom heat.
The two upper levels are mainly used for the grill function.
• Place the oven rack, baking tray or steam dish in the gap between
the guide rail sliders.
• A number of shelf levels can have fully-retractable telescopic guide
rails, depending on the model.
▷Pull the telescopic guide rails out of the oven cavity completely
and place the oven rack / baking tray / steam dish on them.
Then slide the oven rack / baking tray / steam dish on the
telescopic guide rails, back into the oven cavity.
▷Only close the oven door when the telescopic guide rails have
been returned completely back into the oven cavity.

EN 7
Accessories
Your appliance is accompanied by a range of accessories, depending
on the model. Only use original accessories; they are specially suited
to your appliance. Be sure that all the accessories that are being used
are able to withstand the temperature settings of the chosen oven
function.
Note: not all accessories are suitable/available for every appliance
(it may also differ by country). When purchasing, always provide the
exact identification number of your appliance. Please see the sales
brochures or check online for more details about optional accessories.
Note: never place an accessory on the bottom of the oven!
Accessories that can be supplied with your appliance (depending on the model)
Enamelled baking tray; to be used for pastries and cakes.
• Do not use the enamelled baking tray for microwave functions!
• Suitable for pyrolysis cleaning.
Oven rack; mainly used for grilling. A steam dish or pan with food
can also be placed on the oven rack.
• The oven rack is equipped with a safety peg. Lift the rack slightly
at the front to slide it out of the oven.
• Do not use the oven rack for microwave functions!
Deep enamelled baking tray; to be used for roasting meat and
baking moist pastry.
• Do not place the deep baking tray on the lowest level during
a cooking process, except when using it as a drip tray during
grilling, roasting or roasting with a spit roast (when available).
• Do not use the deep enamelled baking tray for microwave
functions!
• Suitable for pyrolysis cleaning.
Glass baking tray; for microwave and oven use.
• NOT suitable for pyrolysis cleaning.
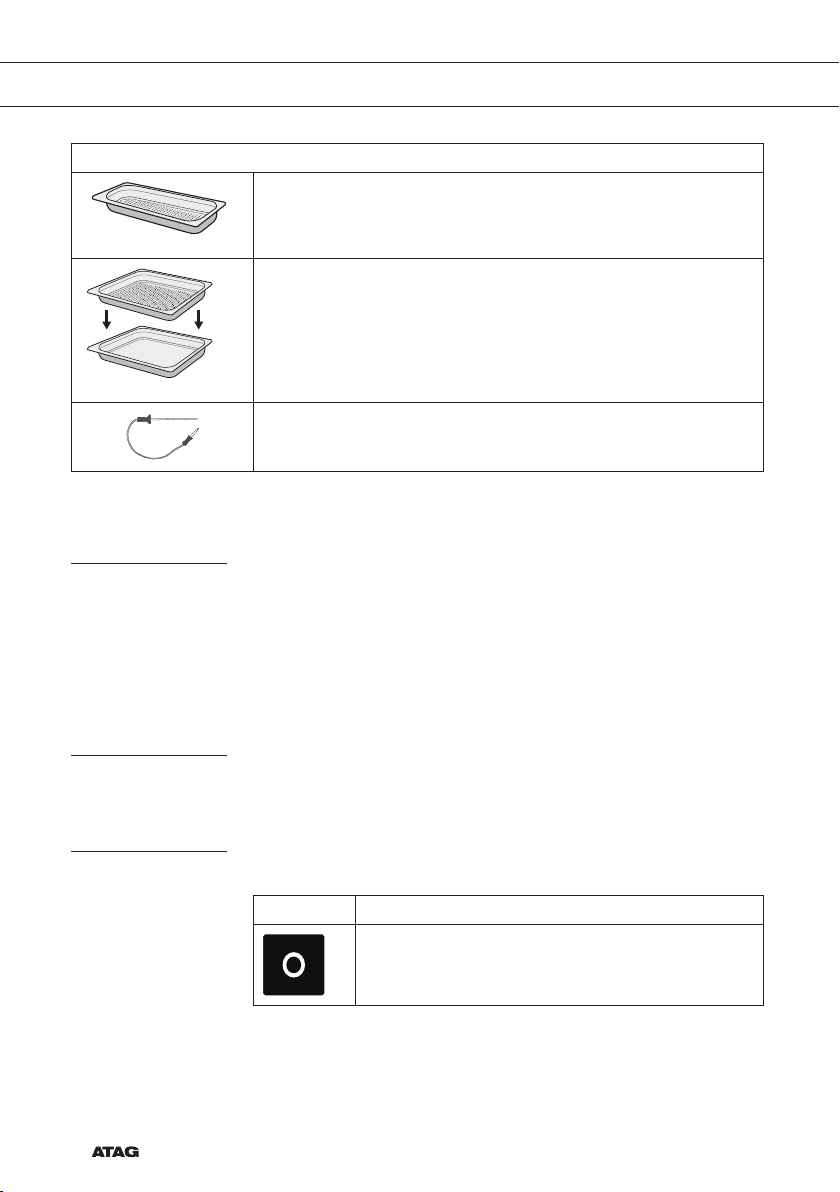
Non-perforated steam dish; 40 mm deep (useful for collecting
moisture during steaming).
• Note: discolouration may occur at temperatures above 180 °C!
This will not influence the proper function of the oven.
Perforated steam dish; 40 mm deep (useful for steam settings).
• Note: discolouration may occur at temperatures above 180 °C!
This will not influence the proper function of the oven.
YOUR OVEN

EN 8
YOUR OVEN
Accessories that can be supplied with your appliance (depending on the model)
Perforated steam dish; 1/3GN.
Perforated steam dish; 1/2GN.
• Note: discolouration may occur at temperatures above 180 °C!
This will not influence the proper function of the oven.
• The steam dishes can be used simultaneously on two levels.
Place the perforated steam dish in the middle of the oven and the
non perforated steam dish one level below the perforated steam
dish.
• For steaming you can place the perforated steam dish in the non-
perforated steam dish. They can only be used together on a level
with telescopic guide rails.
Culisensor; can be used to measure the core temperature of the
dish. When the desired temperature is reached, the cooking process
will be stopped automatically.
Door
• The door switches interrupt the operation of the steam oven when
the door is opened during use. The oven continues operating when
the door is closed.
• This oven has a ‘Soft close door system’. When closing the oven
door, this system dampens the movement, from a certain angle, and
silently closes the oven door.
Cooling fan
The appliance is equipped with a cooling fan that cools the casing and
control panel.
Main functions
With the function knob you can select the main functions of your oven.
Setting Description
Off/standby mode

EN 9
Oven
Hot air
Hot air + bottom heat
Bottom + top heat
Large grill
Grill
Large grill + fan
Upper heat
Bottom heat
Bottom heat + fan
Pro roasting
Eco hot air
Fast preheat
With this function, the oven space quickly reaches the
desired temperature. Do not use this setting when you
have a dish in the oven space.
Programs and favourites
Favourites
Programs
Extra
Defrost
Regenerate
Plate warming
Keep warm
Steam clean
Microwave
Microwave
Combi microwave
Hot air + microwave
Large grill + fan + microwave
Steam
Steam
Steam - Low temperature
Sous vide
Combi steam
Hot air + steam density 1
Hot air + steam density 2
Hot air + steam density 3
YOUR OVEN

EN 10
YOUR OVEN
Keys
In the table below you can find the discription of the different keys.
Keys Description of the keys
On/off key and stop key
- Touch: cancel operation or go one step back in the
menu.
- Touch and hold: turn the appliance off or on.
Lighting key
- Lighting comes on/goes off.
Kitchen timer
- The kitchen timer can be used independent of the
oven function.
- The longest possible timer setting is 23:59.
Navigation key left
- To move the active area to the left.
Navigation key right
- To move the active area to the right.
Plus key
- To open or exit the settings menu (in standby-
mode).
- To open or exit the plus menu with the extra options
possible at that moment (in on-mode).
Child lock
- Touch and hold the left navigation key and right
navigation key simultaniously to lock the appliance.
Water reservoir key
- To open the water reservoir hatch.
Confirm key
- To confirm all the white settings/elements in the
screen.

EN 11
Navigation
active area
stop key confirm keyfunction knob selection knobnavigation keys
By turning the function knob away from the 0-position, the icon of the
chosen main function is lit. The display will show the icon and name
of the activated function for about 1,5 seconds. Next you will see the
chosen main function and sub-function at the top of the display in the
feedback bar. Also the function settings mode will become active (grey
background). In this activated area you can select your settings using
the selection knob.
180 °C
OVEN l HOT AIR 14:30
Within every menu the navigation is as follows:
• Use the navigation keys or press the selection knob to move the
active area (grey background).
• The setting in the active area can be changed by turning the
selection knob (left = decrease, right = increase). The setting will be
saved automaticallly.
• When all elements in the screen are set, then confirm these settings
by touching the confirm key (this key will start blinking when it is
possible to start the program).
• Touch the stop key to go one step back in the menu.
YOUR OVEN

EN 12
At the top of the display is a feedback bar. This bar shows where you
are in the menu and what setting you are changing. Functions / settings
are separated with a vertical line.
SETTINGS l GENERAL l SOUND l KEY SOUND
YOUR OVEN

EN 13
INITIAL USE
What to do first
• Clean the oven interior and accessories with hot water and
washing-up liquid. Do not use aggressive cleaning agents, abrasive
sponges and similar.
• The oven will emit a particular odor when it is used for the first time;
this is normal. Make sure that there is good ventilation during initial
use.
When the appliance is plugged in for the first time or after the appliance
was disconnected from the mains for a longer period of time, you have
to set ‘Language’, ‘Date’, ‘Time’ and ‘Water hardness’.
Setting the language
English
Deutsch
LANGUAGE
In case you are not comfortable with the language on the display, you
can select another language. The default setting is ‘English’.
1. Turn the selection knob and select your preferred language from the
displayed list.
2. Confirm the setting by touching the confirm key.
The next screen will be displayed.
Setting the date
01 2015
01
02
DATE l DAY
1. Turn the selection knob and change the first setting (Day).
2. Confirm this setting by touching the right navigation key or by
pressing the selection knob.
3. Turn the selection knob and change the next setting (Month).
4. Confirm this setting by touching the right navigation key or by
pressing the selection knob.
5. Turn the selection knob and change the last setting (Year).
6. Confirm this setting by touching the confirm key.
The next screen will be displayed.

EN 14
Setting the time
: 00
11
12
13
TIME l HOUR
1. Turn the selection knob and change the hours.
2. Confirm this setting by touching the right navigation key or by
pressing the selection knob.
3. Turn the selection knob and change the minutes.
4. Confirm this setting by touching the confirm key.
Setting the water hardness
1 red Soft water
WATER HARDNESS
The water hardness must be set prior to initial use.
If the water is softer or harder than the default setting, you can alter the
set hardness level.
Checking the water hardness
You can measure water hardness using the ‘paper test strip’ supplied
with your appliance. For information about water hardness in your
region please contact your local water board.
Using the ‘paper test strip’
Dip the test strip in water for 1 second. Wait 1 minute and read the
number of bars on the paper strip. Check the table for the correct water
hardness setting.
Setting the water hardness
1. Compare the test strip with the image on the display.
2. Turn the selection knob until the bars on the screen correspond
with those on the test strip.
3. Touch the confirm key to save the set water hardness.
The equipment has now been programmed so that the descaling
notification will appear in accordance with the actual water hardness.
INITIAL USE

EN 15
Display
Test strip
number/colour
of the bars
Type PPM French
hardness (°df)
German
hardness (°dH)
1 4 green bars Very soft water 0 - 90 0 - 9 0 - 5
2 1 red bar Soft water 90 -178 9 - 18 5 - 10
3 2 red bars Rather hard water 178 - 267 18 - 26 10 - 15
4 3 red bars Hard water 267 - 356 26 - 35 15 - 20
5 4 red bars Very hard water > 356 > 35 > 20
All the start-up settings are now set and the display will show the
standby screen. The appliance is now ready for use.
The language, time, date and water hardness can be adjusted in the
settings menu (see ‘Settings menu’ chapter). The settings menu can be
opened from the start display via the ‘Plus’ menu.
Standby display
The standby display will show the time, date, cavity temperature (if
this is higher than 80 °C) and the timer (if set). The appliance goes to
standby mode after:
• Turning the function knob to 0 (‘off’ position).
• Touching the stop key multiple times (deeper in the menu).
12 : 00
03 •05 •2015
Off mode
• Default the appliance will shut down after no action for a set time of
30 minutes.
• Touch and hold the stop key to shut down the appliance manually.
Switching on the appliance
• Touch and hold the stop key to switch on the appliance.
• The appliance can also be switched on by turning the function knob
to a function.
INITIAL USE

EN 16
Selecting your function
Select a function appropriate for the meal you are cooking. Consult the
table in chapter ‘Functions table’ to see which functions are available.
• Go directly to the progress mode by touching the confirm key (this
key is blinking if it is possible to start the program).
After you have chosen a main function, the function settings mode is
active (grey background). In this activated area, it is now possible to
change the settings in this funtion.
Function settings mode
Example (Oven/Hot air + bottom heat/40 minutes)
1. Choose a main function by turning the function knob.
The first sub-function setting becomes active.
180 °C
OVEN l HOT AIR 14:30
Now the settings can be changed as desired. There is the possibility to
set:
• The function (consult the table in chapter ‘Functions table’).
• The temperature.
• The time.
2. Turn the selection knob and change the setting.
200 °C
OVEN l HOT AIR + BOTTOM HEAT 14:30
3. Confirm the setting by touching the right navigation key or by
pressing the selection knob.
The next sub-function setting becomes active.
200 °C
OVEN l TEMPERATURE 14:30
195
200 °C
205
4. Turn the selection knob and change the setting.
200 °C
OVEN l TEMPERATURE 14:30
205
210 °C
215
OPERATION

EN 17
5. Confirm the setting by touching the right navigation key or by
pressing the selection knob.
The next sub-function setting becomes active.
210 °C
OVEN l COOKING TIME 14:30
▷The timer icon shows that there is no timer necessary for this
function. Touch the confirm key to start the program directly with
the chosen settings (see step 7).
▷To set the timer, go to step 6.
▷If there is a timer necessary for a current function, the default
timer setting is displayed instead of the timer icon.
6. Turn the selection knob and change the setting.
210 °C
OVEN l COOKING TIME 14:30
0:39
0:40 H:M
0:41
▷H:M notation.
7. If preferred, select any additional setting using the plus menu (for
example fast preheat). See for more information chapter ‘Plus
menu’.
8. If the chosen function involves steam, then the tank must be filled
with clean water before starting the program.
9. Start the program: touch the confirm key to go to the progress
mode.
The program will start with the chosen settings; the oven will go to
the progress mode and the progress screen is shown.
210 °C
14:30
0:40
HOT AIR + BOTTOM
15:10
OPERATION

EN 18
Progress mode
• Left side on the screen, the temperature is displayed (if the set
temperature is not reached, the temperature will switch between
cavity temp (grey) and set temp (white)). If the set temperature is
reached a pop-up will appear ‘set temperature is reached’.
• Right side on the screen, the time (counting down) or the progress
time (counting up if no time was set) is displayed. Next to the
cooking time you can see the finishing time.
210 °C
14:30
0:40
HOT AIR + BOTTOM
15:10
• If preheating is chosen, the progress mode will first show the
preheating display (preheating in the feedback bar and the
preheating icon). All settings are displayed only the colours are
switched. The cavity temperature is white and the chosen settings
are grey. If the set temperature is reached, a pop-up will appear:
‘Set temperature is reached. Insert dish’.
210 °C
14:30
0:40
HOT AIR + BOTTOM
15:10
Finish display
When the timer is finished, the ‘finish display’ will appear. Now it is
possible to:
• Stop the progress.
• Add extra time.
• Gratin (if applicable).
• Save as favourite.
FINISH l ENJOY 14:30
Stop the progress
1. Touch the confirm key.
The finish display will be closed and the standby screen will be
shown.
▷If there is no action within 10 minutes, the display will switch to
standby mode.
OPERATION

EN 19
OPERATION
Add extra time
1. Touch the right navigation key to select ‘Add extra time’.
2. The time setting becomes active and can be changed directly by
rotating the selection knob.
3. Confirm by means of the confirm key.
The previous process is activated again.
Gratin
1. Touch the right navigation key to select ‘Gratin’.
Grill settings will be shown.
2. The temperature (default 200 °C) and time can be set or the
program can be started directly by touching the confirm key (time
will start counting up).
After confirmation with the confirm key the progress screen will be
shown.
Save as favourite
1. Touch the right navigation key to select ‘Save as favourite’.
The next screen will show 10 positions where the program can be
positioned.
2. Select a position for your recipe by rotating the selection knob and
touch the confirm key to save it.
3. Give the recipe a name. Rotate the selection knob to select the
appropriate character and press the selection knob to confirm and
go to the next character.
▷You can delete a character by means of the backspace function
in the character list (arrow).
4. Touch the confirm key to save the recipe.
Changing settings during the progress
• During progress, touching the navigation keys will show the active
area. The selected setting can now be changed, see chapter
‘Function settings mode’.
• After confirmation with the confirm key the progress screen will be
shown with the changed settings.
• After 5 seconds without actions the progress settings are cancelled
and the display will return to the progress screen.

EN 20
USE
Functions table
Consult the table to select the preferred function. Also consult the
instructions for preparation on the dish packaging.
• In ‘Microwave function’: do not use metal cookware or utensils
and do not preheat the oven.
Function Description
Oven functions
Hot Air
• Heating by means of hot air from the back of the
oven.
• This mode provides uniform heating and is ideal
for baking.
• Place the baking tray or oven rack in the middle
of the oven.
• Suggested temperature: 180 °C
• Preheating is recommended.
2
Hot Air + Bottom Heat
• Heating by means of hot air from the back of the
oven and the bottom heating element.
• This mode can be used to bake pizza, moist
pastry, fruitcakes, leavened dough and short
crust.
• Place the baking tray or oven rack in the middle
of the oven.
• Suggested temperature: 200 °C
• Preheating is recommended.
2
Top + Bottom Heat
• Heating by means of the upper and lower heating
elements.
• This mode can be used for traditional baking and
roasting.
• Place the baking tray or oven rack in the middle
of the oven.
• Suggested temperature: 200 °C
• Preheating is recommended.
2
This manual suits for next models
6
Table of contents
Languages:
Other Atag Oven manuals

Atag
Atag OX6411EL User manual

Atag
Atag CS4411B User manual

Atag
Atag ZX46 D Series User manual

Atag
Atag OX2111A User manual

Atag
Atag CS66 C Series User manual

Atag
Atag SX3292C User manual

Atag
Atag CX14411A User manual

Atag
Atag CS46 D Series User manual

Atag
Atag SX3211C User manual

Atag
Atag OX6211F User manual