Atag SQ4211B User manual

instructions for use
steam oven
SQ4211B
SQ4292B
SQ4311B
SQ4392B


3
Contents
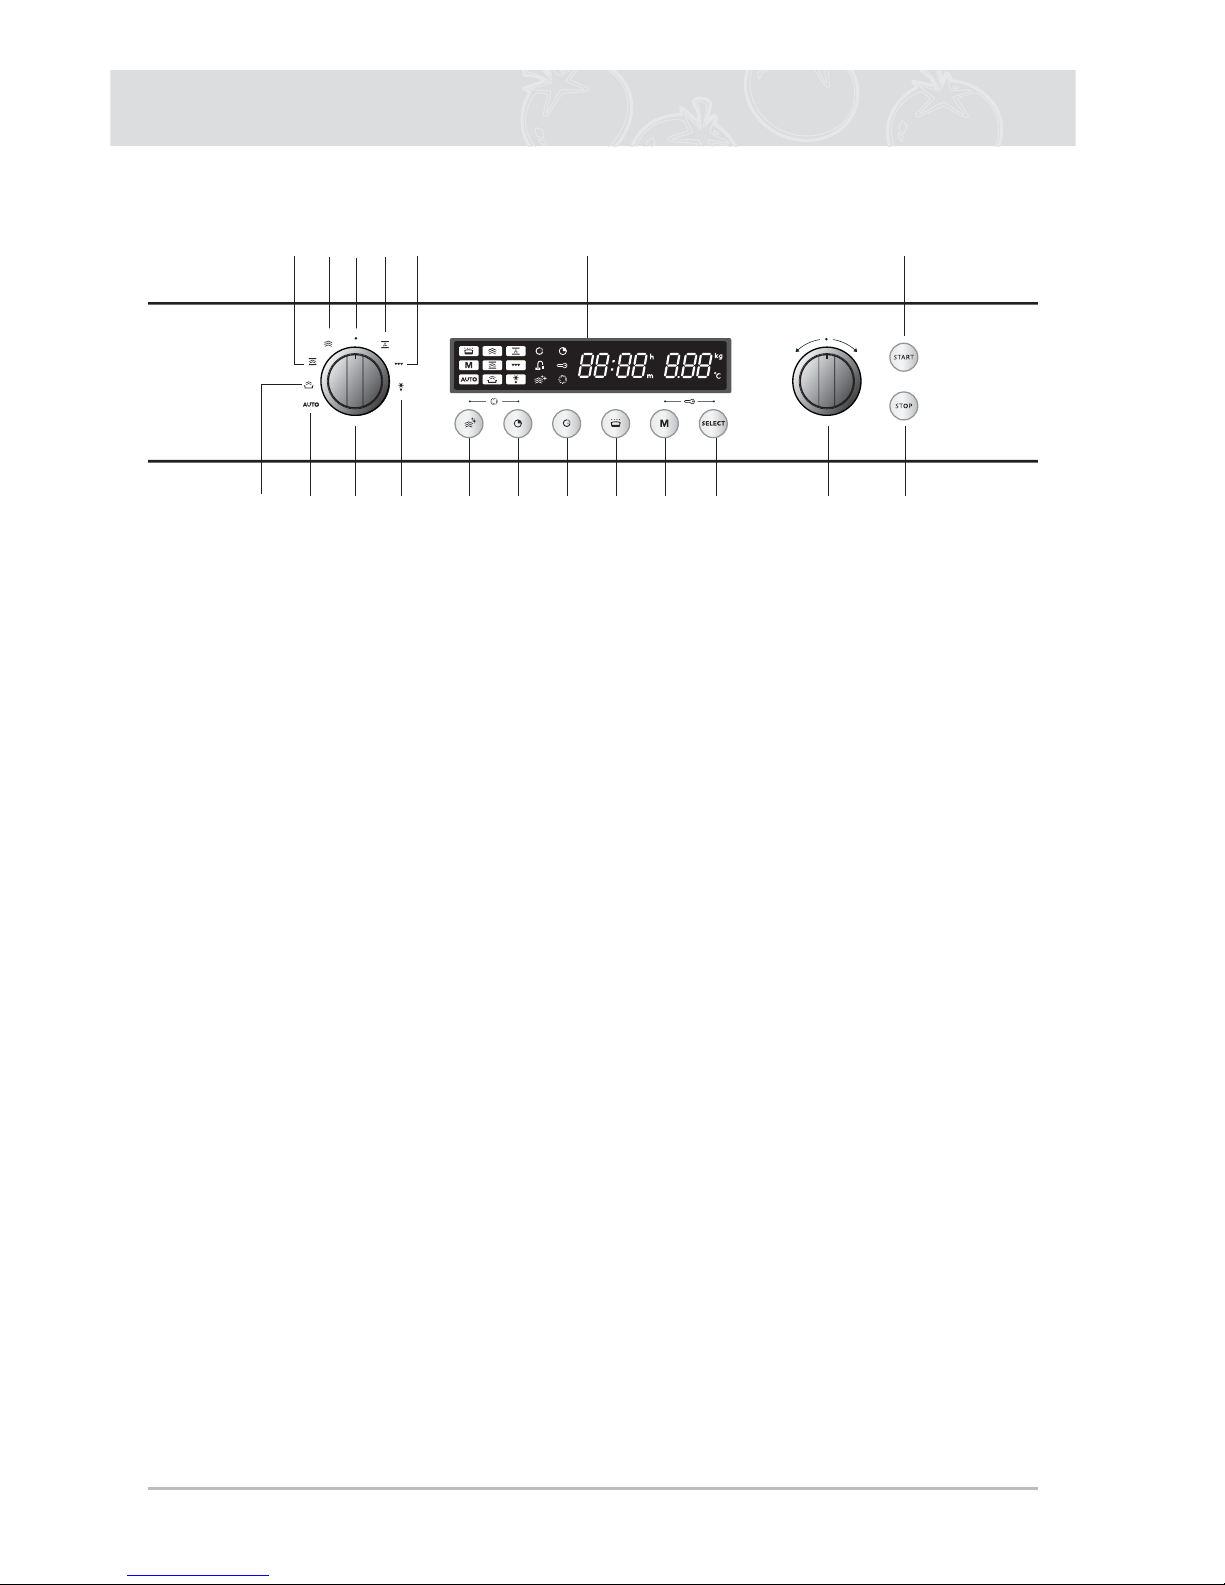
Control Panel . . . . . . . . . . . . . . . . . . . . . . . . . . . . . . . . . . . . . . . . . . . . . . . . . . . . . . . . . . . . . 4
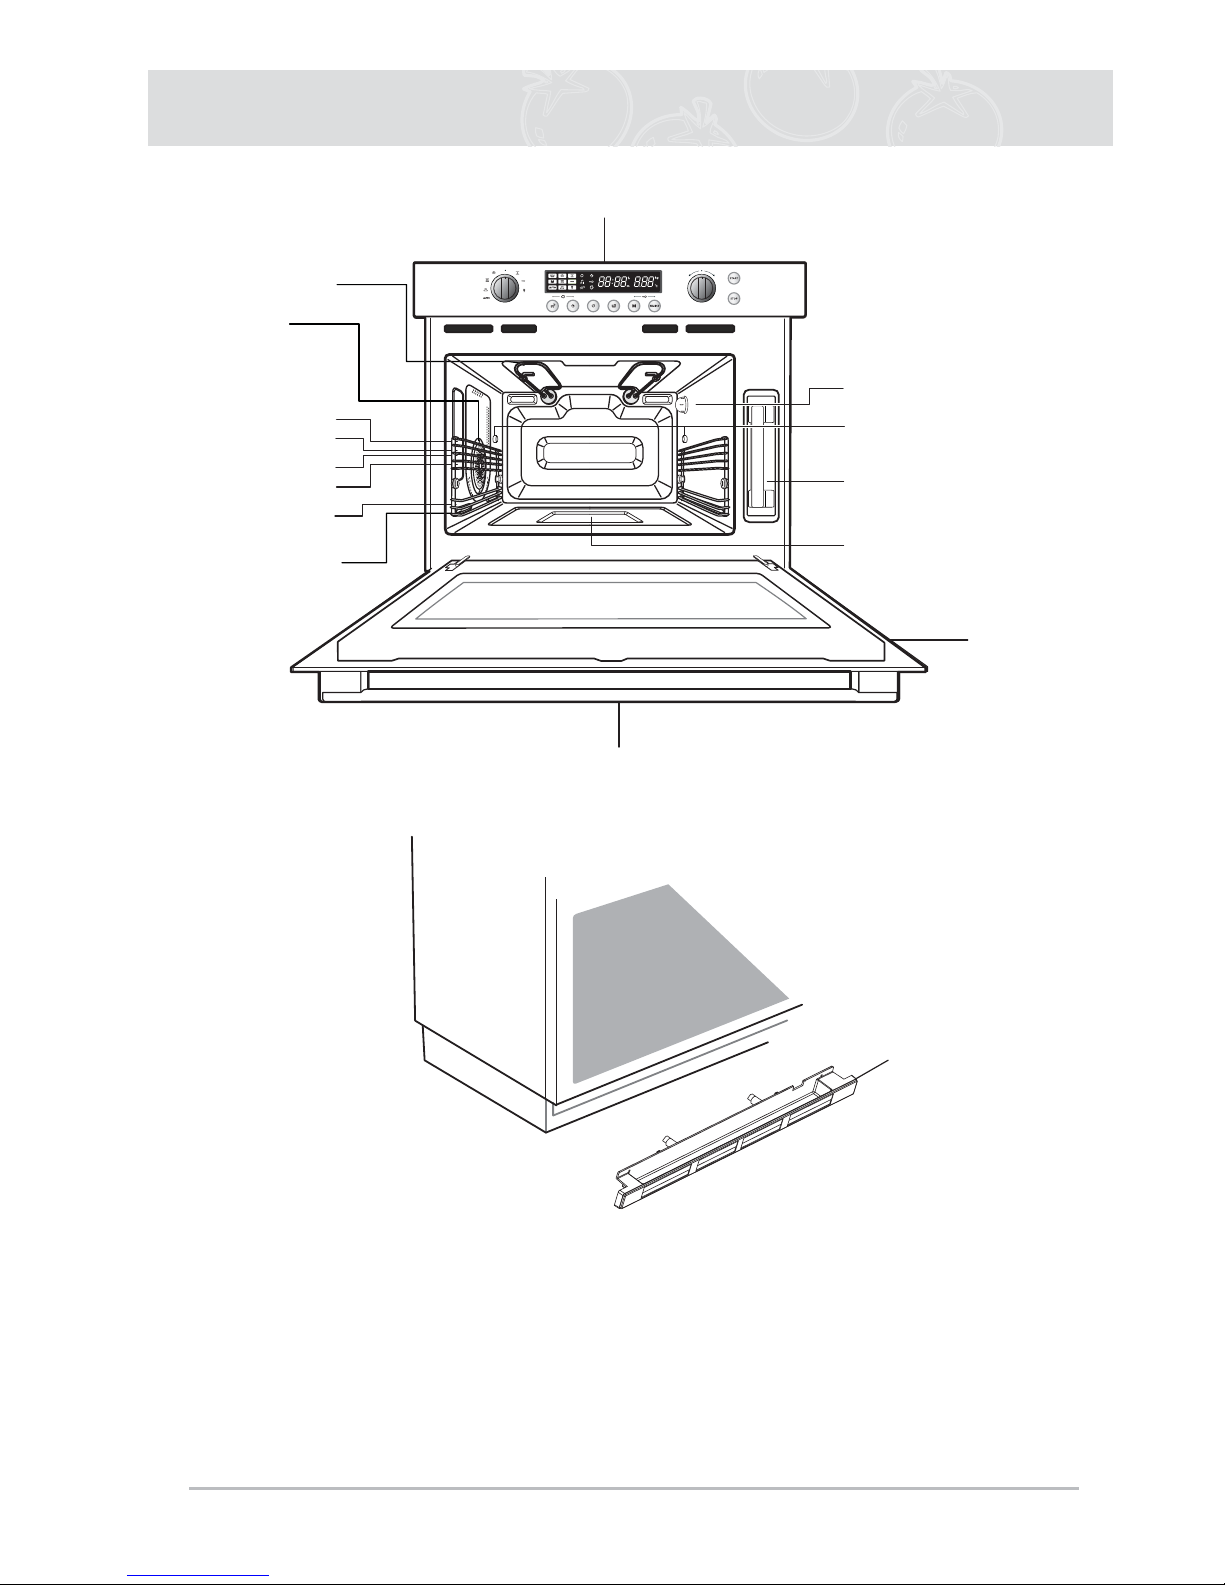
Oven Features. . . . . . . . . . . . . . . . . . . . . . . . . . . . . . . . . . . . . . . . . . . . . . . . . . . . . . . . . . . . . 5
Accessories . . . . . . . . . . . . . . . . . . . . . . . . . . . . . . . . . . . . . . . . . . . . . . . . . . . . . . . . . . . . . . . 6
Using This Manual. . . . . . . . . . . . . . . . . . . . . . . . . . . . . . . . . . . . . . . . . . . . . . . . . . . . . . . . . . 7
Before Installaton . . . . . . . . . . . . . . . . . . . . . . . . . . . . . . . . . . . . . . . . . . . . . . . . . . . . . . .7
Safety Precautions . . . . . . . . . . . . . . . . . . . . . . . . . . . . . . . . . . . . . . . . . . . . . . . . . . . . . . 8
Important Information about the Use of the Appliance . . . . . . . . . . . . . . . . . . . . . . . . . . . 9
Causes of Damage . . . . . . . . . . . . . . . . . . . . . . . . . . . . . . . . . . . . . . . . . . . . . . . . . . . . . 10
Important Information about Installing The Combi Steam Oven . . . . . . . . . . . . . . . . . . . 10
Filling The Water Tank . . . . . . . . . . . . . . . . . . . . . . . . . . . . . . . . . . . . . . . . . . . . . . . . . . . . . . 11
Setting The Clock . . . . . . . . . . . . . . . . . . . . . . . . . . . . . . . . . . . . . . . . . . . . . . . . . . . . . . . . . 12
Modes And Settings. . . . . . . . . . . . . . . . . . . . . . . . . . . . . . . . . . . . . . . . . . . . . . . . . . . . . . . .13
Default Settings . . . . . . . . . . . . . . . . . . . . . . . . . . . . . . . . . . . . . . . . . . . . . . . . . . . . . . . . . . . 15
Using The Steam Mode. . . . . . . . . . . . . . . . . . . . . . . . . . . . . . . . . . . . . . . . . . . . . . . . . . . . . 16
Using The Combi Steam Mode . . . . . . . . . . . . . . . . . . . . . . . . . . . . . . . . . . . . . . . . . . . . . . 20
Using The Reheat Mode . . . . . . . . . . . . . . . . . . . . . . . . . . . . . . . . . . . . . . . . . . . . . . . . . . . . 22
Using The Convection Mode . . . . . . . . . . . . . . . . . . . . . . . . . . . . . . . . . . . . . . . . . . . . . . . . . 23
Using The Grill Mode. . . . . . . . . . . . . . . . . . . . . . . . . . . . . . . . . . . . . . . . . . . . . . . . . . . . . . . 25
Cooking Time Reservation Function . . . . . . . . . . . . . . . . . . . . . . . . . . . . . . . . . . . . . . . . . . . 27
Using The Auto Cook Mode . . . . . . . . . . . . . . . . . . . . . . . . . . . . . . . . . . . . . . . . . . . . . . . . . 28
Using The Defrost Mode . . . . . . . . . . . . . . . . . . . . . . . . . . . . . . . . . . . . . . . . . . . . . . . . . . . . 33
Using The Keep Warm Mode . . . . . . . . . . . . . . . . . . . . . . . . . . . . . . . . . . . . . . . . . . . . . . . . 35
Using The Memory Mode . . . . . . . . . . . . . . . . . . . . . . . . . . . . . . . . . . . . . . . . . . . . . . . . . . . 36
Setting The Water Hardness . . . . . . . . . . . . . . . . . . . . . . . . . . . . . . . . . . . . . . . . . . . . . . . . . 38
Descaling. . . . . . . . . . . . . . . . . . . . . . . . . . . . . . . . . . . . . . . . . . . . . . . . . . . . . . . . . . . . . . . . 39
Using The Steam Clean Feature. . . . . . . . . . . . . . . . . . . . . . . . . . . . . . . . . . . . . . . . . . . . . . 41
Cleaning . . . . . . . . . . . . . . . . . . . . . . . . . . . . . . . . . . . . . . . . . . . . . . . . . . . . . . . . . . . . . . . . 42
Switching Off The Beeper / Reading Out The Temperature . . . . . . . . . . . . . . . . . . . . . . . . . 44
Child Safety Lock. . . . . . . . . . . . . . . . . . . . . . . . . . . . . . . . . . . . . . . . . . . . . . . . . . . . . . . . . . 45
Cleaning And Care . . . . . . . . . . . . . . . . . . . . . . . . . . . . . . . . . . . . . . . . . . . . . . . . . . . . . . . .46
Changing The Oven Lamp . . . . . . . . . . . . . . . . . . . . . . . . . . . . . . . . . . . . . . . . . . . . . . . . . . 47
Error Codes . . . . . . . . . . . . . . . . . . . . . . . . . . . . . . . . . . . . . . . . . . . . . . . . . . . . . . . . . . . . . . 48
Technical Specifications . . . . . . . . . . . . . . . . . . . . . . . . . . . . . . . . . . . . . . . . . . . . . . . . . . . . 49

4
3928
418
1
567 16
10 11 12 13 14 15 17 19
1. OFF
2. AUTO PROGRAMMES
3. REHEAT MODE
4. COMBI STEAM MODE
5. STEAM MODE
6. CONVECTION MODE
7. GRILL MODE
8. DEFROST MODE
9. FUNCTION KNOB
10. STEAM CLEAN MODE
11. TIMER
12. START TIME
13. KEEP WARM MODE
14. MEMORY
15. SELECT
16. DISPLAY
17. SELECTION KNOB
18. START
19. STOP / CANCEL
10+11. DESCALE
14+15. CHILD LOCK
Control Panel

5
Note
●Shelf levels are numbered from the bottom up.
●The levels 4, 5 and 6 are mainly used for the grill function.
●Levels 1 is mainly used for baking and roasting.
●Please refer to the Cooking Guides provided throughout this booklet to determine the
appropriate shelf level for your dishes.
Oven Features
Control Panel
Oven Light
Top Heating
Elements
Water Tank
Steam Outlet
Fan
Evaporator dish
Level 6
Level 5
Level 4
Level 3
Level 2
Level 1
Door Handle
Drip Tray
Door

6
Accessories
The following accessories are provided with your Combi Steam Oven:
1Multi pan (for level 1 or 6) 2Grill insert for multi pan or for
unperforated steam dish
3Wire rack (for all levels) 4Large steam dish, perforated, 40 mm
deep, GN 2/3 (useful for steam mode,
for level 2, 3, 4 and 5)
5Large steam dish, unperforated,
40 mm deep, GN 2/3 (useful during
steam mode for collecting condensa-
tion, for level 2, 3, 4 and 5)
For steaming, you can place the perfo-
rated steam dish or the grill insert into
the unperforated steam dish.
Accessories can be purchased from www.atag.nl.
Use only the accessories supplied with the product or available from the after-sales service.
They are specially designed for your appliance.
325 mm
265 mm 175 mm 175 mm
325 mm
GN 1/3GN 1/3
GN 1/2
350 mm
325 mm
GN 2/3

7
Using This Manual
Thank you for purchasing this ATAG Combi Steam Oven.
Your Owner’s Manual contains important safety instructions and essential infor-
mation on using and caring for your new Combi Steam Oven.
Before using your oven, please read all the information in this manual and keep
it for future reference.
Before installaton
Environmentally-friendly
disposal
Unpack the appliance and dispose of the packaging in an
environmentally-responsible manner.
This appliance is labelled in accordance with European
Directive 2002/96/EU on Waste Electrical and Electronic
Equipment - WEEE.
The directive gives a framework for the collection and
recycling of old appliances, which is valid across the EU.
After unpacking Do not open the cooking compartment door while the
appliance is on the floor. The cooking compartment
door could touch the floor and be damaged.
Check the appliance for damage after unpacking it.
Do not connect the appliance if it has been damaged
in transport.
Your appliance was thoroughly factory tested for
proper operation. It may therefore contain some
remaining water.
Installation and connection Please observe the special installation instructions.
Electrical connection If the power cable is damaged, it must be replaced by
customer service in order to prevent hazards.

8
Using This Manual (Continued)
Safety precautions
This appliance is intended only for domestic use. This
appliance must only be used for food preparation.
•This appliance is not intended for use by persons
(including children) with reduced physical, sensory or
mental capabilities, or lack of experience and knowledge,
unless they have been given supervision or instruction
concerning use of the appliance by a person responsible
for their safety.
• Children should be supervised to ensure that they do not
play with the appliance.
Hot cooking cavity There is a risk of burning!
• During use the appliance becomes hot. Care should be
taken to avoid touching heating elements.
• Open the cooking compartment door carefully. Hot steam
can escape.
WARNING
• Accessible parts may become hot during use. Young
children should be kept away.
Risk of fire!
• Never store combustible items in the cooking compart-
ment.
There is a risk of short-circuiting!
• Never trap cables of electrical appliances in the hot cook-
ing compartment door. The cable insulation could melt.
Hot accessories There is a risk of burning!
• Never take accessories out of the appliance without
using oven gloves.
Cleaning Risk of scalding!
• Do not clean the appliance immediately after switching it
off. The water in the evaporator dish is still hot. Wait until
the appliance has cooled down.
• A Steam cleaner is not to be used.
Repairs Danger of electric shock!
• Incorrect repairs are dangerous. Repairs may only
be carried out by one of our experienced after-sales
engineers. If the appliance is faulty, switch it off using the
fuse in the fuse box or disconnect the appliance at the
mains connection. Contact the after-sales service.
WARNING: Ensure that the appliance is switched off before
replacing the lamp to avoid the possibility of electric shock.

9
Using This Manual (Continued)
Important information about the use of the appliance
Do not use the cooking compartment door as a shelf.
Do not store any food in the appliance. This can lead to
corrosion.
Ovenware Use only the accessories provided. They are specially
designed for your appliance.
Ovenware must be heat and steam resistant. Silicone
baking tins are not suitable for combined operation with
hot air and steam.
Do not use ovenware that shows signs of rust. Even the
smallest spots of rust can lead to corrosion in the cooking
compartment.
Care and cleaning The cooking compartment in your appliance is made of steel
covered with enamel. Improper care can lead to corrosion
in the cooking compartment. Refer to the care and cleaning
instructions in the instruction manual.
Salts are very abrasive. If salt is deposited in the cooking
compartment, rust could develop in places.
Acidic sauces, such as ketchup and mustard, or salted foods,
e.g. cured roasts, contain chloride and acids. These affect the
stainless steel surface. Clean the cooking compartment after
each use.
DO NOT use harsh abrasive cleaners or sharp metal
scrapers to clean the oven door glass since they can scratch
the surface, which may result in shattering of the glass
(if provided).

10
Using This Manual (Continued)
Causes of damage
Very dirty seal If the seal on the outside of the cooking compartment is
very dirty, the cooking compartment door will no longer
close properly during operation. The fronts of adjacent
units could be damaged. Keep the seal clean.
Cooking compartment door
as a seat
Do not stand or sit on the cooking compartment door.
Transport Do not hold or carry the appliance by the door handle.
The door handle cannot hold the weight of the appliance
and may break off.
Important information about installing the combi steam
oven
• This appliance is NOT intended for use in a commercial environment.
• Please observe the installation instructions provided and note that this appliance should
only be installed by a qualified technician.
• The appliance is fitted with a plug and must only be connected to a properly installed
earthed socket. The fuse protection must be rated at 16 amps (L or B-type miniature
circuit breakers).
• In case a new socket is needed, installation and cable connection must only be done
by a qualified electrician. If the plug is no longer accessible following installation, a pole
disconnecting device must be present on the installation site with a contact gap of at
least 3 mm.
• Adapters, multiway strips and extension cords must not be used. Overloading can result
in fire.
• Plug in
When the appliance has been connected for the first time, all segments are lit for a
second. After 3 seconds, 12:00 flashes in the display prompting you to select the clock.
Do not forget to reset the clock when you switch to and from summer or winter (see the
instructions on page 12).

11
Filling The Water Tank
When you open the cooking compartment door, you will see the water tank on the right-hand
side. Only fill the tank with fresh tap water or with still bottled water. If your water is very hard,
we recommend that you use softened water (see also “Water hardness).
Caution Do not fill the water tank with distilled water or any other
liquids.
Fill the water tank before
each use
Lift the water tank over the interlock and pull the tank out of
the appliance. Fill the water tank with cold water up to the
“max.” mark. Close the lid until you feel it engage.
Slide the water tank back until it engages.
Empty the water tank after
each use
Pull the water tank out of the appliance slowly. Pulling it
out quickly may cause water to spill. Hold the water tank
horizontally, so that no remaining water can drip out of the
valve seat.
Empty out the water.
Thoroughly dry the water tank in the appliance and the seal
in the lid.
“Fill water tank” display If the water tank is empty, a signal sounds.
A symbol appears in the display. The operation is inter-
rupted.
1. Open the cooking compartment door carefully. Steam will
escape.
2. Take out the water tank, fill to the “max” mark and rein-
sert.
3. Press the START button.
Removing drip tray Empty drip tray at regular intervals. Push drip tray in until
you hear a click, and remove tray from locked position.
Drip tray
Push in and remove

12
When the appliance is first plugged in, the display lights up.
Setting the Clock (example 15:15)
1Turn the FUNCTION KNOB to the
“OFF” position. 2Press SELECT. The “12” starts
blinking.
3Turn the SELECTION KNOB to set
the hour. 4Press SELECT again. The “00” starts
blinking.
5Turn the SELECTION KNOB to set
the minutes. 6Press SELECT again. The clock sets
by itself within 5 seconds.
Setting The Clock

13
Modes And Settings
The following table represents the various oven modes and settings of your oven.
Use the cooking guide tables for those modes as guidelines for cooking.
Steam Mode
Food is cooked by steam provided by the steam generator and injected
into the cavity by two jet nozzles.
This mode is suitable for steaming food like vegetables, fish, eggs, fruits
and rice. When cooking by using this mode, always fill the water tank
with fresh water.
Temperature range: 40~100 °C
Steam Combi Mode
Food is cooked by convection mode and the help of steam. The steam
is provided by the steam generator and injected into the cavity by
interval.
This mode is suitable for baking pastries, such as puff pastry, brioches,
yeast buns, bread rolls, gratins and roasting meat. The superheated
steam will provide a nice crisp, shiny surface and fluffy structure. Meat
roasts and fish will keep a more juicy texture inside. When cooking with
this mode always fill the water tank with fresh water.
Temperature range: 100~230 °C
Reheat Mode
Food is reheated by convection mode and the help of steam. The
steam is provided by the steam generator and injected into the cavity by
interval.
This mode is suitable for plated meals. Dishes can be gently reheated
without drying out. When reheating with this mode always fill the water
tank with fresh water.
Temperature: 120 °C
Convection Mode
Food is heated by two heating elements on top of cavity and one bottom
heating element, while the fan from the side distributes the hot air evenly.
This setting is suitable for roasting meat, baking pizza and cake.
Temperature range: 40~230 °C
Grill Mode
Food is heated by the top heating elements. We recommend this mode
for grilling smaller pieces of meat, such as steaks and sausages, as well
for making toasts.

14
Modes And Settings (Continued)
Defrost Mode
Frozen food is defrosted by steam. The steam is provided by the steam
generator and injected into the cavity by interval.
This mode is suitable for frozen meat, poultry, fish and fruit. When
defrosting with this mode always fill the water tank with fresh water.
Temperature range: 40~70 °C
Keeping warm
This mode is suitable for keeping warm food.
(Do not keep food warm for longer than 2 hours. Warm food spoils more
quickly).
Temperature: 70 °C
Auto Cook Programmes
40 pre-programmed auto cook settings can be selected for your
convenience. Time and temperature will be set automatically. You
simply select the programme, the weight of your dish and start the
steam cooking process.
Steam Clean
By the help of hot steam the surface of the oven cavity will be soaked
and you can easily clean your oven. The steam clean programme takes
only 10 minutes time.

15
Default Settings
During blinking of the default cook time or default temperature (after you have
choosen a setting with the FUNCTION KNOB), you can change the time or
temperature by turning the SELECTION KNOB.
If the blinking has stopped, you can change the settings by following the steps as
described later in this manual.
During cooking, COOK TIME or TEMPERATURE can always be changed.
►Cooking time: press the TIMER button and then turn the SELECTION KNOB.
►Temperature: press the SELECT button and then turn the SELECTION KNOB.
1Turn the FUNCTION KNOB to choose
the function you want to use. 2The default time or default tempera-
ture starts to blink.
3While the default time/temperature is
blinking: turn the SELECTION KNOB
to set the desired time/temperature.

16
Using The Steam Mode
Steam Mode Setting
1Fill the water tank up to the maximum
line and place it back. Then place your
food into the cooking cavity. 2Turn the FUNCTION KNOB to Steam
mode position (default cook time
20 min. temperature 100 °C). The time
is blinking.
3During blinking, turn the SELECTION
KNOB and set the desired cooking
time. If the blinking has already stopped
before you have set the time, press
the TIMER button first and then turn
the SELECTION KNOB.
4Press SELECT. The temperature is
blinking. 5Turn the SELECTION KNOB and set
the temperature.
6Press the START button.
►The temperature indicator (°C)
on the display will blink. After the
temperature is reached, it stops
blinking.

17
If there is too little water while cooking, you will see the
symbol in the display along with a beep being played. Add
water into the tank and press START to continue with the
steaming.
•You can add water into the tank at any time while cooking.
Note
1) During cooking, COOK TIME and TEMPERATURE can be changed.
►Cooking time: press the TIMER button and then turn the SELECTION KNOB.
►Temperature: press SELECT and then turn the SELECTION KNOB.
2) In Steam mode settings, the top and bottom steam heating elements switch off and on
throughout cooking to regulate the temperature.
3) Be careful when removing the plate as it is hot. First leave the door a little open to allow
the hot steam to escape. Pay attention to the steam outlets as well.
4) When you have finished cooking, pour out the water in the drip tray and empty the tank.
5) Dry the cooking cavity with a dry cloth if there is any remaining water.
6) The cooling fan always works for 3 minutes after a steaming process. However, this is not
a malfunction and you do not need to worry about this.
Using The Steam Mode (Continued)

18
Using The Steam Mode (Continued)
Steam Mode Setting
Food is cooked by steam provided by the steam generators and injected into the
cavity by two jet nozzles.
Perforated steam dish, together with solid steam dish, is usually placed on level .
Cooking Guide
Use settings and times in this table as guide lines for steaming.
We recommend to always fill the water tank with fresh water to the maximum level.
Food Item Steam mode
(°C ) Accessory (shelf level) Time (min.)
Broccoli Florets 100 °C Perforated steam dish together with
solid steam dish (3) 12-16
Whole carrots 100 °C Perforated steam dish together with
solid steam dish (3) 25-30
Sliced Vegetables
(pepper, courgettes,
carrots, onions)
100 °C Perforated steam dish together with
solid steam dish (3) 9-14
Green Beans 100 °C Perforated steam dish together with
solid steam dish (3) 28-33
Asparagus 100 °C Perforated steam dish together with
solid steam dish (3) 15-20
Whole Vegetables
(artichokes,
whole cauliflower,
corn on the cob)
100 °C Perforated steam dish together with
solid steam dish (3) 30-45
Peeled Potatoes
(cut into quarters) 100 °C Perforated steam dish together with
solid steam dish (3) 30-35
Fish fillet
(2 cm thickness) 80 °C Perforated steam dish together with
solid steam dish (3) 13-18
Prawns
(raw/uncooked) 100 °C Perforated steam dish together with
solid steam dish (3) 11-14
Chicken Breast 100 °C Perforated steam dish together with
solid steam dish (3) 23-28

19
Using The Steam Mode (Continued)
Food Item Steam mode
(°C ) Accessory (shelf level) Time (min.)
Boiled Eggs
(hardboiled) 100 °C Perforated steam dish together with
solid steam dish (3) 15-20
Frozen Yeast
Dumplings 100 °C Perforated steam dish together with
solid steam dish (3) 23-28
White Rice (basmati or
pandan)
(use a pyrex bowl, add
rice, add double quantity
of water)
100 °C Wire rack (1) 30-35
Milk Rice
(use a flat pyrex dish,
add double or four times
quantity of milk)
100 °C Wire rack (1) 40-50
Fruit Compote
(use a flat round glass
pyrex, add 1 teaspoon
sugar and 2 tbsp. water)
100 °C Solid steam dish (4/5) 25-35
Flan/Crème (6 dessert
dishes, each 100 ml,
cover dishes with foil)
90 °C Wire rack (3) 35-40
Egg Custard (use a
large flat glass pyrex
dish, cover dish with foil)
90 °C Wire rack (3) 37-42
Two Level Steam Cooking
Use settings and times in this table as guide lines for steam cooking.
We recommend to always fill the water tank with fresh water to the maximum level. If you have
different food with a similar preparation time, you can put al the items in the oven at the same
time. Otherwise put in first the item with the longest preparation time.
Put one tray on level 1 and the other tray on level 5.
Food Item Steam mode
(°C ) Accessory (shelf level) Time (min.)
2-level cooking:
Dual Meals
(fish fillets/
sliced vegetables)
100 °C Solid steam dish (5)
/ grill insert with multi pan (1) 15-20
2-level cooking:
Dual Meals
(chickenbreasts/
whole vegetables)
100 °C Solid steam dish (5)
/ grill insert with multi pan (1) 25-30

20
Using The Combi Steam Mode
Combi Steam Mode Setting
1Fill the water tank up to the maximum
line and place it back. Then place your
food into the cooking cavity. 2Turn the FUNCTION KNOB to Combi
Steam mode position (default:
180 °C). The temperature is blinking.
3During blinking, turn the SELECTION
KNOB and set the desired tempera-
ture. If the blinking has already stopped
before you have set the temperature,
press the SELECT button first and
then turn the SELECTION KNOB.
4Press the TIMER button to set the
desired cooking time. The time is
blinking. 5Turn the SELECTION KNOB and set
the desired cooking time.
Note
1) During cooking, COOK TIME and TEMPERA-
TURE can be changed.
►Cooking time: press the TIMER button and
then turn the SELECTION KNOB.
►Temperature: press the SELECT button and
then turn the SELECTION KNOB.
2) In Combi Steam Mode settings, the top bottom
and steam heating elements switch off and on
throughout cooking to regulate the temperature.
Important
When using the Combi Steam mode, be sure that
the baking dishes are suitable for 100-230 °C
cooking temperatures.
6Press the START button.
►The temperature indicator (°C)
on the display will blink. After the
temperature is reached, it stops
blinking.
This manual suits for next models
3
Table of contents
Other Atag Oven manuals