AT&T 957 User manual

Telephone with
Caller ID 957
Please also read
Part 1 — Important
Product Information
USER’S MANUAL
Part 2
AT&T and the globe symbol are registered trademarks ofAT&T Corp.licensed toAdvancedAmericanTelephones.
957_book_2ATT ill at margins 11/16/00 1:39 PM Page i

© 2000AdvancedAmericanTelephones. All rights reserved.
Printed in China. 850003955 Issue 2AT&T 12/00
957_book_2ATT ill at margins 11/16/00 1:39 PM Page ii

1
CONTENTS
BEFORE YOU BEGIN
. . . . . . . . . 3
About Caller Identification
(Caller ID) . . . . . . . . . . . . . . . 3
About Call History . . . . . . . . . . . 3
About HomeArea Code and
LocalArea Codes . . . . . . . . . . 3
INSTALLATION
. . . . . . . . . . . . . 4
Table/Desk Installation . . . . . . . 4
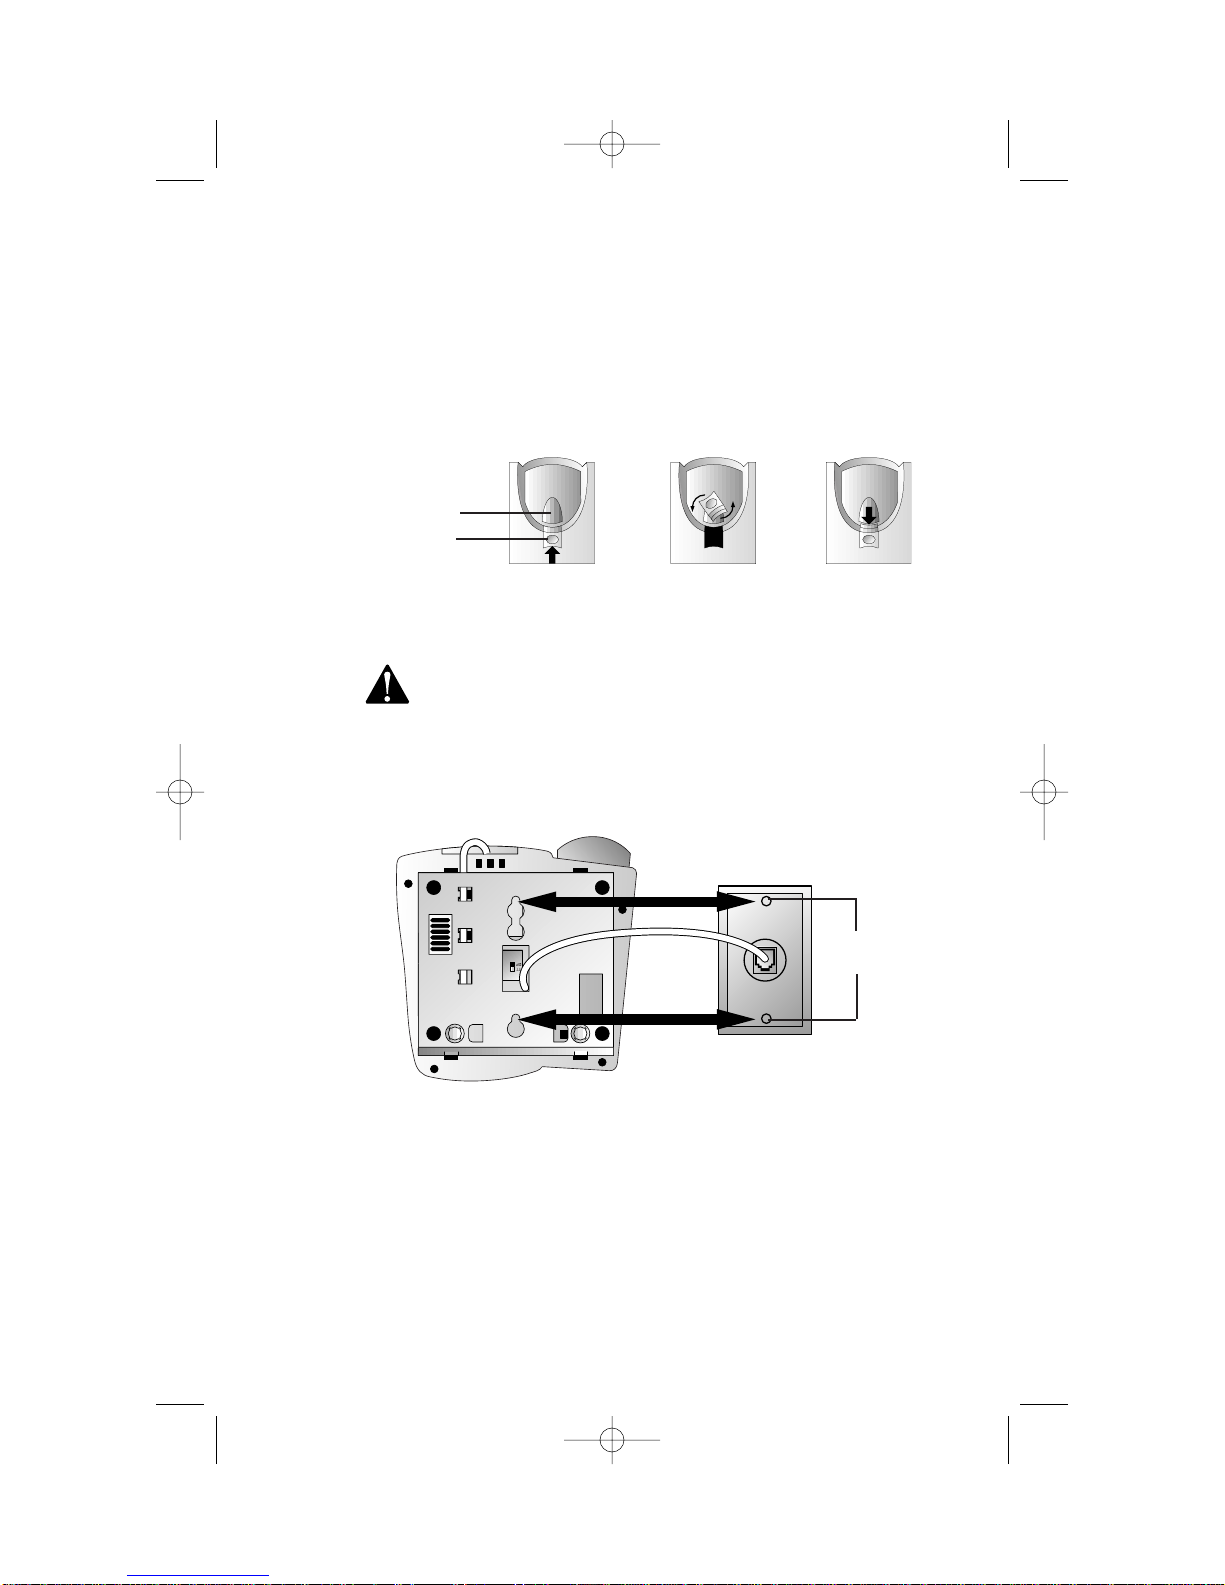
Wall Installation . . . . . . . . . . . . 6
FEATURE SETTINGS
. . . . . . . . . 8
Language Selection . . . . . . . . . . 8
Set HomeArea Code . . . . . . . . . 8
Set LocalArea Codes . . . . . . . . . 9
Set Contrast . . . . . . . . . . . . . . . 9
SetTime/Date . . . . . . . . . . . . . . 9
Set Remaining Features . . . . . . 10
Feature Summary . . . . . . . . . . 10
TELEPHONE OPERATION
. . . . 12
Flash/CallWaiting . . . . . . . . . . 12
Mute . . . . . . . . . . . . . . . . . . . . 12
Hold . . . . . . . . . . . . . . . . . . . . 12
RingerVolume . . . . . . . . . . . . . 13
Redial . . . . . . . . . . . . . . . . . . . 13
Adjust Handset or
SpeakerVolume . . . . . . . . . . 13
Using the Speakerphone . . . . . 13
TemporaryTone Dialing . . . . . 13
TELEPHONE DIRECTORY
. . . . . 14
Storing Directory Numbers
& Names . . . . . . . . . . . . . . . 14
Storing a Pause or Flash in a
Directory Number . . . . . . . . 15
Storing Call History Numbers
in Directory . . . . . . . . . . . . . 15
Viewing Directory Numbers . . 15
Dialing Directory Numbers . . . 15
Deleting Directory Numbers . . 15
CALLER ID OPERATION
. . . . . 16
MessageWaiting and
NEW CALL Light . . . . . . . . . 16
Removing Call Records . . . . . . 16
Call Display . . . . . . . . . . . . . . . 17
Reviewing Call History . . . . . . 17
Display Dial . . . . . . . . . . . . . . . 17
Display Dial Options . . . . . . . . 17
Setting Display Screen Options . 18
Display Screen Messages . . . . . 18
IN CASE OF DIFFICULTY
. . . . . 19
957_book_2ATT ill at margins 11/16/00 1:39 PM Page 1

About Caller Identification (Caller ID)
This product has a Caller ID with CallWaiting feature that works with
service from your local phone service provider.
Caller ID with CallWaiting lets you see who’s calling before you answer the
phone,even when you’re on another call.
You may need to change your phone service to use this feature. Contact
your phone service provider if:
• You have both Caller ID and Call Waiting,but as separate services
(you may need combined service)
• You have only Caller ID service,or only CallWaiting service
• You don’t subscribe to any Caller ID or CallWaiting services.
You can use this product with regular Caller ID service,and you can use
this product’s other features without subscribing to either Caller ID or
combined Caller ID with CallWaiting service.
There are fees for Caller ID services,and they may not be available in all
areas.
This product can provide information only if both you and the caller are in
areas offering Caller ID service,and if both telephone companies use
compatible equipment.
About Call History
This phone assigns each incoming call a number from 1 to 99. The most
recent call will have the highest number. When the memory is full,the
oldest call information is deleted to make room for new incoming call
information.
If you answer a call before call information appears on the screen,it will
not be in the call history.
About Home Area Code and Local Area Codes
Always program your home area code,and,if you need them,up to four
local area codes (see“Set HomeArea Code”and“Set LocalArea Codes”on
pages 8 and 9). Programming these area codes will change how numbers
are displayed in the call history,and will allow for correct operation of the
Display Dial feature.
3
BEFORE YOU BEGIN
957_book_2ATT ill at margins 11/16/00 1:39 PM Page 3

4
Table/Desk Installation
1(Optional) You can adjust how much the phone tilts by pushing
outward with your thumbs on the recessed“feet.” Push the feet
out from the inside of the base,until they snap into place. If a foot
comes out,align the arrow on the foot with the arrow on the base,
and squeeze the foot back in from the inside of the base.
4 Connect the line cord to the telephone.
5 Thread the power cord through the strain-relief tab,
then plug it into the jack labeled POWER.
(Make sure the plug is vertically oriented.)
Use only the power cord supplied with this product.
If you need a replacement,call 1 800 222-3111.
INSTALLATION
3 Attach the base to the
telephone.
Turn the base so that the
smaller end is toward the
bottom of the telephone,
then attach.
2Set the dial mode.
This phone comes set for
touch tone dialing (TT). If
you have dial pulse (rotary)
service,set the swich on the
underside of the phone to DP.
957_book_2ATT ill at margins 11/16/00 1:39 PM Page 4

5
INSTALLATION
6 Connect the line cord to a modular jack.
7 Connect the power cord to a standard electrical outlet
not controlled by a wall switch.
NOTE: When you first plug in the power cord, the screen
displays WHICH LANGUAGE?. Follow the programming steps on
page 8 after installation is complete.
8 Connect the handset to the telephone.
Plug the coiled cord into the handset jack on the side of the
phone. Plug the other end of the coiled cord into the handset,
then hang up.
9Check for dial tone.
Lift the handset and listen for a dial tone. If you cannot hear
a dial tone,pressVOLUME +. If you still do not hear a dial tone,see
the IN CASE OF DIFFICULTY section of this manual.
Your phone will work immediately after installation using the default
feature settings (see“Feature Summary”on page 10).
NOTE: If you subscribe to Caller ID services from your local telephone
service provider, you must follow the instructions in“Set Home Area
Code”for your phone to properly recognize and dial calls (see page 8) .
You may also need to“Set Local Area Codes”(see page 9).
Modular
telephone
wall jack
Standard
electrical
outlet
Power cord
Strain-relief
tab
Telephone
line cord
957_book_2ATT ill at margins 11/16/00 1:39 PM Page 5

6
Wall Installation
1Set the dial mode.
This phone comes set for tone dialing. If you have pulse dialing
service,you cannot dial numbers with the phone set to tone. Set
the switch on the underside of the base to TT (touch tone) or DP
(dial pulse/rotary),depending on your service.
2Connect the line cord to the telephone
Plug the short line cord into the jack labeled TEL LINE,then
thread it through the channel on the bottom of the set.
3Attach the base to the telephone.
Make sure the pull-out feet are not extended. Turn the base so that
the larger end is toward the bottom of the telephone. Attach the
base by inserting the tabs into the slots. Push down on the large
end of the base so the tabs are in the slots,and the base locks in
place. Pull the loose end of the line cord through the rectangular
opening on the bottom of the base.
INSTALLATION
3a 3b
Slot Slot
957_book_2ATT ill at margins 11/16/00 1:39 PM Page 6

4Reverse the handset tab.
This tab holds the handset when you hang up. Hold down the
switchhook,and slide the tab up and out of its slot. Turn the tab
so that the end with the“hook”is up. Then insert the tab back
into its slot.
5Plug the power cord into the jack labeled POWER.
(Make sure the plug is vertically oriented.)
Use only the power cord supplied with this product.
If you need a replacement,call 1 800 222-3111.
6Connect the line cord to a modular wall jack and mount
the phone on the wall jack.
Make sure the cord snaps firmly into place. Place the phone on
the wall jack mounting studs and pull down until it is held securely.
7
Switchhook
Handset tab
INSTALLATION
7Follow Steps 7–9 in “Table/Desk Installation.”
Mounting
studs
957_book_2ATT ill at margins 11/16/00 1:39 PM Page 7

FEATURE SETTINGS
8
NOTE: You can exit feature setup at any time by holding Nfor
about two seconds, or by lifting the handset when there is no
incoming call. The order features appear in the menu changes after
initial setup. For complete feature setup, see pages 10 and 11.
Language Selection
You can select ENGLISH or ESPANOL (Spanish) as the language in which
your Caller ID information is displayed. When you first plug in the power
cord,the screen displays:
1Press CALL LIST +until the screen displays your language
selection.
2Press N. You will see the HomeArea Code setup screen.
Set Home Area Code
You must program your area code,so your phone can properly recognize
and dial calls.
If for calls within You dial Enter in Step 2
your area code 7 digits Your home area code
(phone number, no area code)
10 digits 000
(area code + phone number)
— OR —
11 digits
(1+ area code + phone number)
1Press Nuntil the screen displays:
2Use the keypad to enter the three digits of your home area code.
3Press N.
HAC-___
HOME AREA CODE?
WHICH LANGUAGE?
957_book_2ATT ill at margins 11/16/00 1:39 PM Page 8

9
Set Local Area Codes
You can program up to four local area codes.
If for You dial Enter in Step 2
All calls outside 11 digits No local area codes
your area code (1+ area code + phone number)
Some calls outside 10 digits Area codes that do
your area code (area code + phone number) not require a “1”
If you dial 10 digits (area code plus phone number) for calls within your own area
code, include your area code as a local area code.
1Press and release Ountil the screen displays:
2Use the keypad to enter the three digits of the first local area code.
The screen prompts you for the next local area code (LAC2–,
LAC3–,LAC4–).
3Press Owhen you are finished.
Set Contrast
Adjust screen lighting to a comfortable level,from 1 (light) to 4 (dark).
1Press and release Nuntil the screen displays SET CONTRAST.
2Press CALL LIST +or CALL LIST -until the screen displays the
contrast level you prefer.
3Press N.
Set Time/Date
NOTE: The time/date are automatically reset each time new call
information is received. Incorrect time/date will be corrected with next
incoming call.
1Press and release O. The screen displays ENTER TIME?.
2Use the numbers on the keypad to enter the time. Press +to
select AM;press -to select PM (the screen may not display PM
until you have finished setting the time).
3Use the numbers on the keypad to enter the date. For example,
press 0605 to enter June 5. (Zeroes are not displayed.)
4Press Oto move to the next feature
— OR —
Wait 30 seconds for the phone to return to standby.
LAC1-___
LOCL AREA CODE?
FEATURE SETTINGS
957_book_2ATT ill at margins 11/16/00 1:39 PM Page 9

10
FEATURE SETTINGS
Set Remaining Features
You can customize how the features of this product work.
1Press and release Nuntil the screen displays the feature you
want to set.
2Press CALL LIST +or CALL LIST -until the screen displays your
selected setting. Refer to the“Feature Summary”for a full description
of the features and your choices.
3Press N.
This saves your selection and automatically moves you to the next option.
The phone returns to standby unless you make a selection within 30
seconds. When you finish setting options,wait 30 seconds for the phone
to return to standby.
NOTE: If you subscribe to telephone company Message Waiting service
(sometimes called voice mail), you must turn the VMW feature on each
time you change any feature setting. This feature is automatically
turned off each time you press Nto enter feature setup.
Feature Summary
Default settings indicated by *.
Feature/Options: Choice:
ENTER TIME Set the time and date.
SET VMW OFF/ON Set for whether you subscribe to telephone
company MessageWaiting service.
OFF *You do not subscribe.
ON You do subscribe.
VMW RESET Turn Stutter Detect ON. (It turns off with FSK
YES *reception.)
NO
VMW LOCK Check with your phone service provider for more
information about signal requirements.
NO *System turns off Stutter Detect for message waiting.
YES System receives both Stutter Detect and FSK signals.
957_book_2ATT ill at margins 11/16/00 1:39 PM Page 10

Feature/Options: Choice:
CALL HISTORY Choose which incoming calls are displayed.
ALL CALLS *The screen displays all calls received.
NO CALLS The screen displays no call history.
UNANS. CALLS The screen displays only those calls you (or an
answering system) did not answer.
REPEATED CALLS Choose how calls from the same number are displayed.
COMBINED *The display shows the most recent call from this
number,and REP is displayed.
SEPARATE Each call from this number is listed separately.
CALL LIST ORDER Choose in what order calls are displayed.
BY TIME *Reverse order. Last call received is displayed first.
NEW CALLS FIRST Unreviewed calls are displayed first,then calls by time.
CALL WAITING Set for the type of service to which you subscribe.
ON *ForType II service (screen displays information
about call waiting calls).
OFF ForType I service (screen does not display information
about call waiting calls). Also choose this setting if
you do not subscribe to any Caller ID services or if
you have data equipment connected in series with
the phone.
SET CONTRAST Adjust screen lighting to a comfortable level,from
1 2 *3 4 1 (light) to 4 (dark).
WHICH LANGUAGE Choose whether the display appears in English or
ENGLISH *Spanish.
ESPANOL
SET HOME AREA CODE Set phone to recognize calls from your area code.
HOME AREA CODE?
SET LOCAL AREA CODES Program up to four area codes that do not require
LOCL AREA CODE? dialing a“1”before them.
LAC1...4
VMW LIGHT RESET Reset the NEW CALL light to off if it flashes after
LIGHT ON you have reviewed all voice mail messages.
LIGHT OFF *
11
FEATURE SETTINGS
957_book_2ATT ill at margins 11/16/00 1:39 PM Page 11

12
TELEPHONE OPERATION
Flash/Call Waiting
Press to connect to the
new call when you
receive a call waiting
signal. Press again to
return to original call.
Also use to access other
phone company
subscriber services.
Mute
Press to prevent the other
person from hearing you
(you will still be able to
hear the other person).
The MUTE light turns on.
To return to two–way
conversation,press M
again.
Hold
Press to put a call on hold.
To return to the call,
press Hagain,
press K,or
lift the handset.
957_book_2ATT ill at margins 11/16/00 1:39 PM Page 12

13
TELEPHONE OPERATION
Ringer Volume
Adjust RINGER volume
(LO or HI) or turn
RINGER OFF.
Press to dial number
displayed on screen (see
CALLER ID OPERATION).
Temporary Tone Dialing
If you have dial pulse (rotary) service,you can change from dial pulse to touch
tone dialing during a call by pressing *. This is useful if you need to send
touch tone signals for access to telephone banking or long distance services.
1Dial the number.
2Press *. Buttons pressed after this send touch tone signals.
3After you hang up,the phone automatically returns to dial pulse service.
Flashes when a call is
coming in, flashes quickly
when a call is on hold,
remains steady when any
phone on this line is in use.
Indicates RINGER is off.
Using the Speakerphone
Press to make,answer,or end
a speakerphone call.
NOTE: To switch from speakerphone
to handset, lift handset. To switch
from handset to speakerphone, press
K, then replace the handset.
Adjust Handset or
Speaker Volume
Press to adjust volume.
Redial
Lift the handset or press
K,then press Rto
call the last number dialed.
957_book_2ATT ill at margins 11/16/00 1:39 PM Page 13

14
TELEPHONE DIRECTORY
This telephone can store up to 50 telephone numbers (and names) that
you can dial just by pressing d,a directory location,and D.
When entering a number or name,you can use CALL LIST -to backspace.
Storing Directory Numbers & Names
If you choose to store a name with a telephone number in the directory,
you must then store names with all directory entries.
1Press d,then O.
2Dial the telephone number you want to store (up to 24 digits)
— OR —
Press Rto store the last number dialed.
3Press d.
4Use the chart below to enter a name up to 15 characters (use
CALL LIST -to backspace and CALL LIST +to advance or add a
space);then press dto store the name and number.
Presses
Dial Key 1 2 3 4 5
11
2A B C 2
3D E F 3
4G H I 4
5J K L 5
6M N O 6
7P Q R S 7
8T U V 8
9W X Y Z 9
**
00
##
NOTE: Entries cannot be edited after screen displays STORED.
ENTER NUMBER
957_book_2ATT ill at margins 11/16/00 1:39 PM Page 14

15
TELEPHONE DIRECTORY
Storing a Pause or Flash in a Directory Number
Press +twice to store a pause in the dialing sequence (the screen displays P).
Press Fto store a press of the flash button (the screen displays F).
Storing Call History Numbers in Directory
1Press CALL LIST +or CALL LIST -to scroll through the call
history.
2Press dto store displayed call information in the
telephone directory. The screen displays STORED.
3Press dto exit.
Viewing Directory Numbers
1Press d.
2Press CALL LIST +or CALL LIST -to scroll through an
alphabetical list of numbers/names stored in the telephone
directory
— OR —
use the keypad and the chart on page 14 to enter the first
character of the name you want to view,then press CALL LIST +
if needed to move to the desired name.
3Press dto exit.
Dialing Directory Numbers
1Follow directions above to view a directory number.
2Press Dto make the call. The speakerphone is activated.
3Lift the handset to switch from speakerphone to handset.
Deleting Directory Numbers
1Follow directions above to view a directory number.
2Press r. The screen displays:
3Press ragain to confirm. The screen displays:
DELETED
CALL REMOVE?
957_book_2ATT ill at margins 11/16/00 1:40 PM Page 15

16
CALLER ID OPERATION
Message Waiting and
NEW CALL Light
Stays on when you have
received call information but
have not yet reviewed it.
If you subscribe to a voice
mail service,light flashes
when you have unretrieved
messages waiting.
Removing Call Records
Removing a Specific Record
1Press CALL LIST +or
CALL LIST -to display
call record you want to
remove.
2Press and release r.
Screen displays REMOVE
CALL?.
3Press ragain.
Removing All Calls
1Press CALL LIST +or
CALL LIST -to enter Call
History.
2Press and hold rfor
about two seconds. Screen
displays REMOVE ALL?.
3Press and hold rfor
about two seconds to
remove all calls.
NOTE: Once a call is
removed from Call
History, it cannot be
retrieved.
957_book_2ATT ill at margins 11/16/00 1:40 PM Page 16

CALLER ID OPERATION
Reviewing Call History
To review earlier calls,press
CALL LIST -.
To advance through call
history from an earlier call,
press CALL LIST +. When
you reach the end of call
history,the screen displays
END OF LIST, then begins
again.
Display Dial
• Press to call the displayed
number.
•The screen shows the
number being called,the
speakerphone is activated,
and the call is dialed.
• If the screen displays
ERROR PRESENT or NO
NUMBER,the present
number cannot be dialed.
• You cannot use this feature
to dial PRIVATE calls.
17
Display Dial Options
While number is displayed,press to
scroll through choices for dialing
(without area code,with area code,
with 1 plus area code).
Call Display
Between the first and second
rings,screen displays:
• Caller’s name (15 letters
are sent by your phone
company)
• Caller’s area code and
telephone number (area code
not displayed if programmed
as HomeArea Code)
• Time and date of the call
• Call’s position in call history.
Call information is displayed
for about 30 seconds.
957_book_2ATT ill at margins 11/16/00 1:40 PM Page 17

18
CALLER ID OPERATION
Setting Display Screen Options
You can customize how the Caller ID features of this product work.
See“Set Remaining Features”on page 10 for instructions. For options,see
Call History,Repeated Calls,and Call List Order in the“Feature Summary”
on pages 10 and 11.
Display Screen Messages
Screen Displays: When:
PRIVATE NAME The other party is blocking name information.
PPP The other party is blocking number information.
PRIVATE CALLER The other party is blocking name and number
information.
UNKNOWN NAME Your phone company is unable to receive
information about this caller’s name.
UUU Your phone company is unable to receive
information about this caller’s number.
UNKNOWN CALLER Your phone company is unable to receive
information about this caller’s name and number.
EXTENSION USED An extension phone on this line is being used,so
call information cannot be received.
Caller’s telephone
number
Caller’s name
Date call
was received
Position of call
in call history
Indicates you have
unreviewed voice mail
Indicates unreviewed
call information
Indicates error in
transmission from
phone company
Flashes when line is ringing,
remains steady when this
phone or another phone on
the same line is in use
Time call
was received
Indicates repeat call
957_book_2ATT ill at margins 11/16/00 1:40 PM Page 18

If you have difficulty operating this phone,try the suggestions below.
For Customer Service,visit our website at www.telephones.att.com or call
1 800 222–3111. Please retain your receipt as your proof of purchase.
No Dial Tone
• Make sure all plugs are connected properly. Inspect the line cord
connections at the modular jack and at the telephone. Also inspect the
coiled handset cord connections at both ends.
• Unplug the telephone and connect it to another modular jack. If it still
does not work,and other telephones in your home are working,the
problem is with this telephone.
Call Cannot Be Dialed or Is Dialed Slowly
• Make sure you choose the correct dial mode (see FEATURE
SETTINGS). If you have dial pulse service,you cannot dial numbers
with the phone set to touch tone dialing.
• If you have just used theTemporaryTone feature,leave the handset on
the base for a few seconds before making another call.
Telephone Does Not Ring
• Make sure the RINGER switch is not set to OFF.
• If there are several other telephones on the same line,try
disconnecting some of the other telephones. Having too many
telephones connected can also create problems such as low ringer
volume or impaired sound quality during calls.
Difficulty Storing Numbers in Memory
• Make sure you are pressing the correct sequence of buttons for storing
numbers.
• If you are interrupted by a recorded announcement telling you to hang
up or by a loud buzzing noise,hang up and try to enter the number
more quickly.
• Try calling the number you want to store in memory. When the call is
ended,press d,O,R.
• If someone lifts an extension phone while you are storing numbers in
memory,programming might be interrupted. Make sure all extensions
are on hook while storing numbers in memory.
19
IN CASE OF DIFFICULTY
957_book_2ATT ill at margins 11/16/00 1:40 PM Page 19
Table of contents
Other AT&T Telephone manuals

AT&T
AT&T CL82101 User manual

AT&T
AT&T CL80107 User manual

AT&T
AT&T MDC 9000 User manual

AT&T
AT&T TRIMLINE 210 User manual

AT&T
AT&T 905 User manual

AT&T
AT&T Trimline TR1909 User manual

AT&T
AT&T Merlin Legend 10BS User guide

AT&T
AT&T Merlin Legend 10BS User manual

AT&T
AT&T CL82100 User manual

AT&T
AT&T CL4940 User manual
Popular Telephone manuals by other brands

BellSouth
BellSouth Premium Systems BS-373 Owner's manual installation and operating instructions

Alcatel
Alcatel Premium Reflexes quick guide

Cisco
Cisco 8875 Documentation

SAGEMCOM
SAGEMCOM SIXTY quick start guide

Siemens
Siemens Gigaset C450 IP owner's manual

TransTel Communications
TransTel Communications DK7 series Quick reference manual