AT T U-verse TV
AT T U-verse High Speed Internet
How to resolve problems with your
AT T U-verse TV, Internet, or Voice.
2 How to switch your TV screen setting
from standard to widescreen.
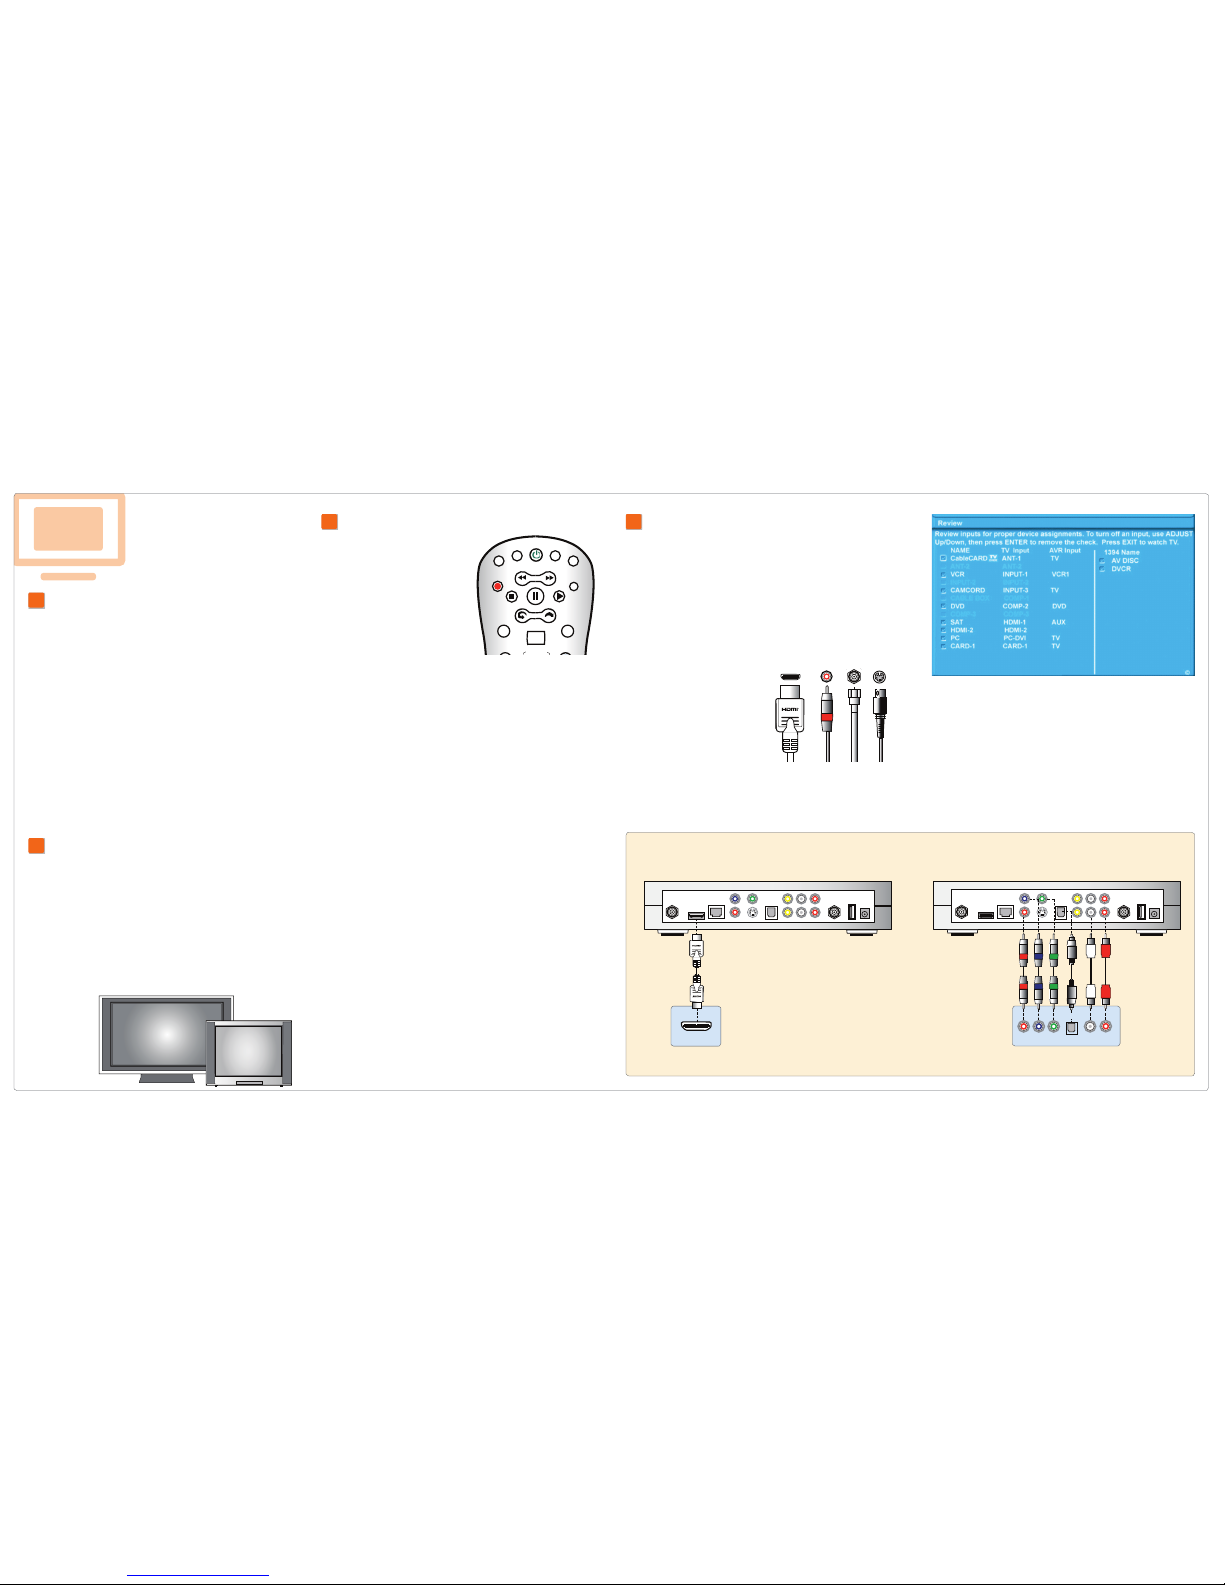
3 How to program your remote to
control up to four devices.
4 How to change your TV’s input
selection to match its video source.
5 How to assure maximum security
for your wireless home network.
6 How to connect more computers
to your wireless home network.
AT T U-verse VoiceSM
7 How to change a PIN (personal
identification number).
8 How to create sub account voice
mailboxes online.
9 How to link your wireless number
and your voice mailbox.
quick fix
your
guide
Quick solutions to common AT&T U-verseSM questions.
For additional tips and tricks, visit uverse.att.com/support.
7 How to change a PIN (personal
identification number).
1. Go to uversecentral.att.com.
2. Log in with your AT T U-verse email address (account ID)
and password.
3. Locate the AT&T U-verse Voice section.
4. Click Manage Message Settings.
5. Scroll to Voice Mailbox Preferences and click Change PIN.
8 How to create sub account
voice mailboxes online.
Create up to eight sub account mailboxes, one for everyone in the
family—each with a unique PIN, greeting, and notification options.
1. Go to uversecentral.att.com.
2. Log in with your AT T U-verse email address (account ID)
and password.
3. Click the Profile Management link.
4. Scroll down and click the Create Sub Accounts button.
5. Follow the instructions for setup.
9 How to link your wireless number
and your voice mailbox.
When you have Wireless from AT T, you can check your wireless
and home phone messages at the same time. To link up to two
wireless numbers:
1. Go to uversecentral.att.com.
2. Log in with your AT T U-verse email address (account ID)
and password.
3. Scroll down and locate the Setup Product section.
4. Click the Setup Wireless Voice Mail from AT&T link.
5. Follow the instructions for setup.
About linking wireless to your AT&T U-verse mailbox:
When you add a wireless number to your AT T U-verse MessagingSM voice mailbox,
it replaces your current wireless voice mailbox and any existing messages will be lost.
Prepaid service cannot be added to AT T U-verse Messaging. Landline and wireless
numbers must be within the same service area. The Social Security number or Tax ID
provided during setup must match the one on your wireless account. AT T U-verse
Messaging may not be fully compatible with all AT T wireless voice mail systems.
5 How to assure reliable security
for your wireless home network.
The 10-digit number printed inside brackets on the bottom of your
gateway is the encryption code (“pass key” or “Wireless Network
Key”) needed to connect your computers to the gateway. WPA (Wi-Fi
Protected Access) is the underlying security technology for the Wi-Fi
(802.11b/g) standard on the residential gateway.
AT T U-verse
High Speed Internet AT T U-verse Voice
My AT&T U-verse equipment
ƨƨ
remote control
ƨ
U-verse equipment
ƨƨƨBrowse channels
ƨƨƕƕƨƨInteractive TV services
ƨƨſƕƨſƓOther services
ƨƨƨƨƨOn Demand
ƨƨƨMake/view recordings
ƨƨƨƨprograms
ƨrecordings
ƨ
remote access
Customization
ƨƨƨchannels
ƨƨ Phone services
ƨſƕƨſƕ
Watch Help On Demand—tune to Channel 411.
Get more out of your AT T U-verse service: watch Help On Demand videos
about these topics on Channel 4 , the Help Channel.
NOTE: AT T U-verse online Help On Demand videos require Windows Media Player.
ATT91200639-2 (9/09)
NEW! Visit the User’s Corner for online help!
Click support.att.com/startuverse to access step-by-step guidance and
how-to tips at our online User’s Corner. Add it to your favorites by clicking on
Bookmark this Page in the upper right-hand corner of the Web page.
Sign up for free paperless billing! Conveniently store and retrieve up to 12
months of bills online while reducing your risk of identity theft. Log in now to
your online account or go to att.com/Ugreen and select Stop Paper Bills.
Call -800-ATT-2020 to reach your AT&T U-verse expert to get answers,
add new features, or ask for customer support.
©2009 AT T Intellectual Property. All rights reserved.
AT T and the AT T logo are trademarks of AT T Intellectual Property.
Mac and Macintosh are registered trademarks of Apple Inc.
Mac® OS X users: You may need to enter the “$” character on the
Wireless Network Key (for example, $4119627022). For directions on connecting Mac
Ɛsupport.att.com/startuverse and click Wireless
Connection under U-verse Internet
6 How to connect more computers
to your wireless home network.
You can connect more computers by Ethernet or wirelessly.
NOTE: You will need to use your 10-digit Wireless
Network Key code. (See illustration above.)
> Connect an Ethernet cable from any available
Ethernet port on the residential gateway to your
computer’s Ethernet port.
> Connect wirelessly with a wireless-enabled
notebook or a computer with an 802.11b/g
wireless network adapter installed.
If your PC does not have built-in wireless capability:
Install and configure your wireless adapter according to the manufacturer’s
instructions. Enter the network name—it’s the word “2WIRE” (in all capital letters),
followed by the last three digits of the gateway serial number (for example,
2WIRE079)—and the encryption code or Wireless Network Key. (See the illustration
above for the Wireless Network Key location.)
Ethernet cable