ATCOM IPPBX IP4G User manual

IPPBX IP4G User Manual
For Firmware Version: V3.0
2013-12-11

IPPBX IP4G User Manual
~ 1 ~ ATCOM TECHNOLOGY CO., LIMITED
Contents
Contents........................................................................................................................................................................... 1
1. Introduction.............................................................................................................................................................. 4
2. Connection and Change IP Address of IPPBX.................................................................................................. 5
2.1 Connection................................................................................................................................................... 5
2.2 WAN Settings............................................................................................................................................... 6
2.3 LAN Settings................................................................................................................................................ 7
2.4 DHCP Server............................................................................................................................................... 8
2.5 System Status.............................................................................................................................................. 9
3. Create local extensions and make interior calls .............................................................................................. 10
3.1 VOIP extensions........................................................................................................................................ 10
3.2.1 Add new extensions........................................................................................................................ 10
3.2.2 Modify extensions.......................................................................................................................... 14
3.2 Register onto IPPBX with your IP phone............................................................................................... 14
3.3 Extensions Status...................................................................................................................................... 15
3.4 Feature Codes........................................................................................................................................... 16
3.5 SMTP Settings........................................................................................................................................... 18
3.6 Conference................................................................................................................................................. 20
3.7 Paging / Intercom...................................................................................................................................... 20
3.8 Options........................................................................................................................................................ 21
4. Create VoIP trunk to communicate with VoIP provider .................................................................................. 22
4.1 Create VoIP trunks.................................................................................................................................... 22
4.2 Check VoIP Trunk Status......................................................................................................................... 24
4.3 Make outbound calls................................................................................................................................. 25
4.4 Make inbound calls................................................................................................................................... 26

IPPBX IP4G User Manual
~ 2 ~ ATCOM TECHNOLOGY CO., LIMITED
5. Create Service Provider to connect two IP PBXes.......................................................................................... 28
5.1 Create Service Provider........................................................................................................................... 28
5.2 Check Service Provider Status ............................................................................................................... 29
5.3 Make outbound calls................................................................................................................................. 29
5.4 Make inbound calls................................................................................................................................... 30
6. Make outbound/inbound calls to/from GSM network...................................................................................... 32
6.1 Make sure GSM modules are installed ................................................................................................... 32
6.2 Make outbound calls .................................................................................................................................. 33
6.3 Make inbound calls..................................................................................................................................... 34
7. Inbound Call Control............................................................................................................................................. 36
7.1 Time Interval................................................................................................................................................ 36
7.2 Hunt / Ring Group....................................................................................................................................... 37
7.3 Queue........................................................................................................................................................... 38
7.4 IVR................................................................................................................................................................ 40
7.5 DISA.............................................................................................................................................................. 42
7.6 Call Back...................................................................................................................................................... 43
7.7 Inbound to Outbound.................................................................................................................................. 45
7.7.1 GSM trunk to SIP trunk................................................................................................................... 45
7.7.2 SIP trunk to GSM trunk................................................................................................................... 46
7.8 Custom Dialplan............................................................................................................................................. 47
7.9 Blacklist ........................................................................................................................................................ 47
7.10 SIP Settings.................................................................................................................................................. 48
7.11 IAX Settings.................................................................................................................................................. 50
8. Audios..................................................................................................................................................................... 50
8.1 Music On Hold............................................................................................................................................. 50

IPPBX IP4G User Manual
~ 3 ~ ATCOM TECHNOLOGY CO., LIMITED
8.2 Custom Prompts......................................................................................................................................... 50
8.3 Language Setting........................................................................................................................................ 50
9. Network Settings................................................................................................................................................... 51
9.1 Web Access................................................................................................................................................. 51
9.2 Firewall......................................................................................................................................................... 51
9.3 Port Forwarding........................................................................................................................................... 54
9.4 DDNS............................................................................................................................................................ 54
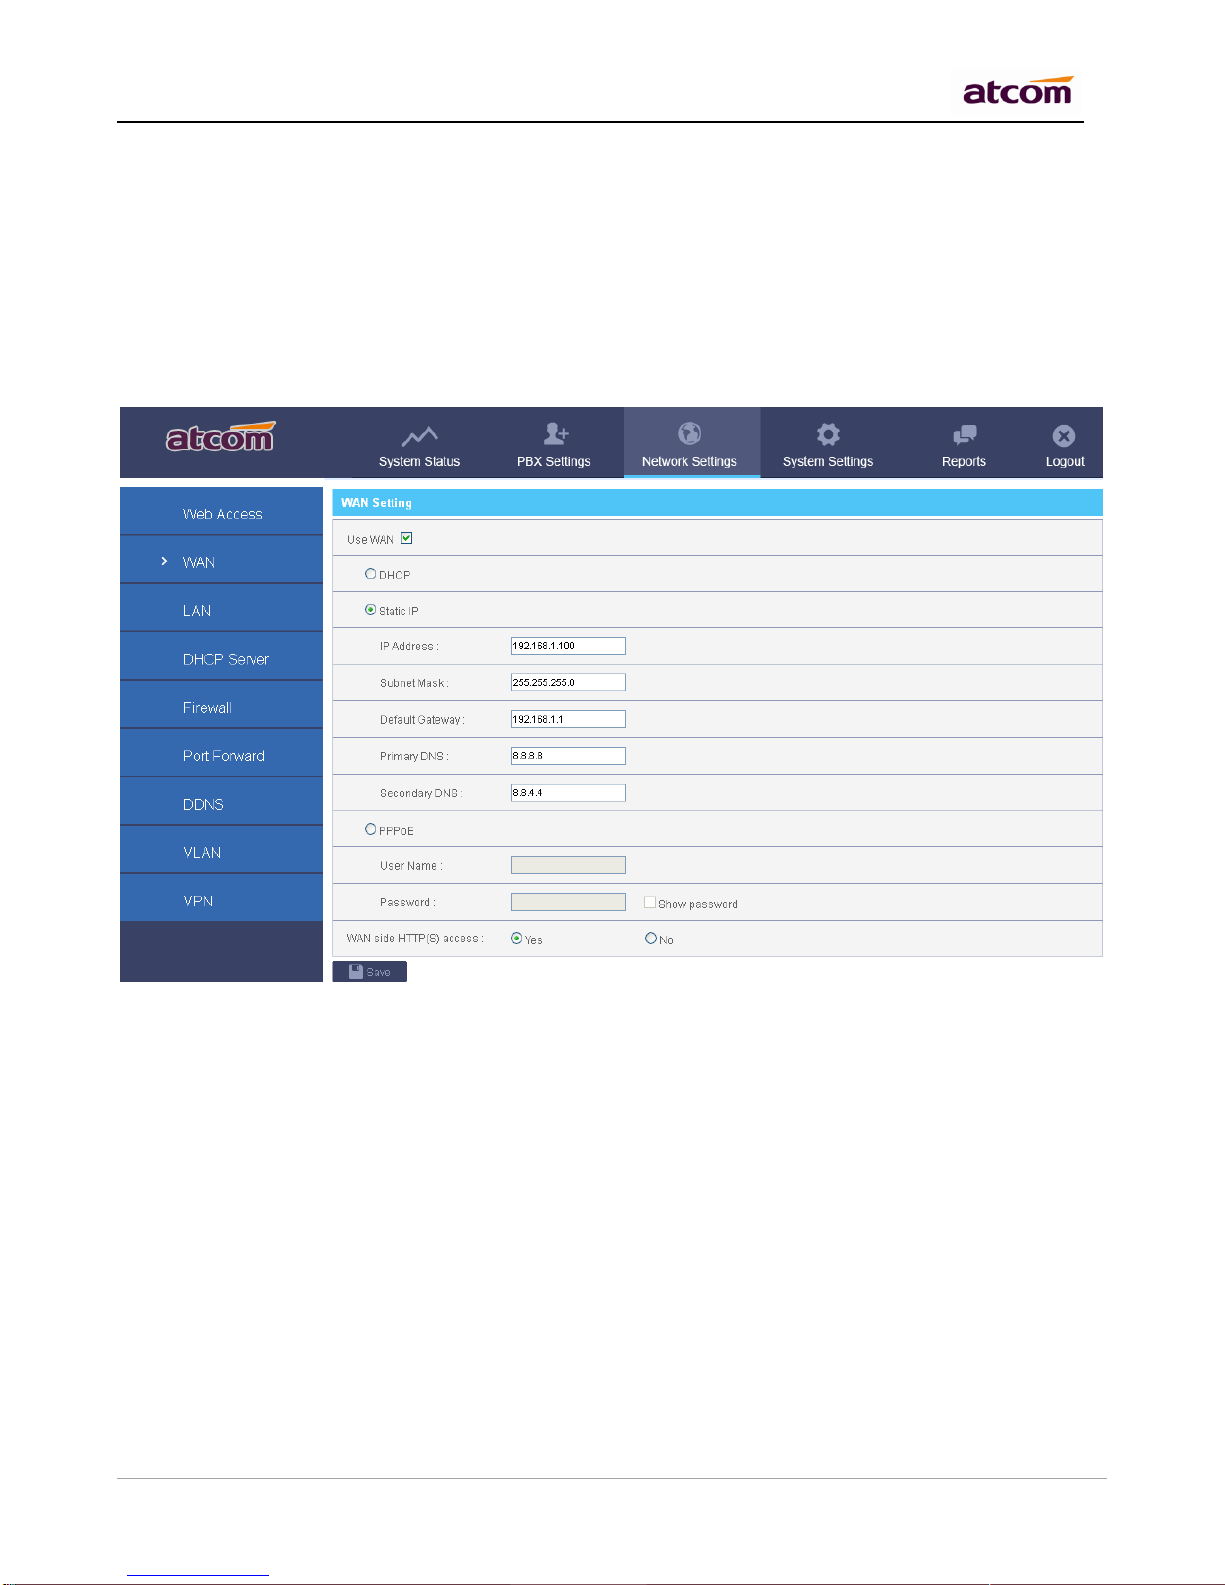
9.5 VLAN............................................................................................................................................................. 55
9.6 VPN............................................................................................................................................................... 55
10. System Settings ............................................................................................................................................ 56
10.1 Change Password.................................................................................................................................... 56
10.2 Auto Provisioning................................................................................................................................... 56
10.2.1 Auto Provisioning .......................................................................................................................... 56
10.2.2 Configured Phones....................................................................................................................... 57
10.2.3 Unconfigured Phones................................................................................................................... 59
10.2.4 Upload Phone Configure.............................................................................................................. 59
10.3 Date && Time............................................................................................................................................ 59
10.4 External Storage....................................................................................................................................... 60
10.5 Firmware Upgrade.................................................................................................................................... 62
10.6 Backup and Restore................................................................................................................................. 62
10.7 Reboot && Reset...................................................................................................................................... 63
11. Reports........................................................................................................................................................... 64
11.1 Call Detail Records................................................................................................................................... 64
11.2 Syslog...................................................................................................................................................... 65
12. Web Interface for extension......................................................................................................................... 65

IPPBX IP4G User Manual
~ 4 ~ ATCOM TECHNOLOGY CO., LIMITED
Introduction
Overview of the IPPBX
ATCOM IPPBX is a SIP-based IP voice switch with a small embedded OS and rich GUI (Graphical User
Interface), providing a powerful networking and corporate communication function. With it, users can quickly
deploy an internal communication system for enterprise, as well as configure conveniently applications and
value-added services on IP PBX via its GUI, to fit enterprise's own various demands.
Targeting for SOHO user and SMB market with an easy to use graphical interface, IP4G provides a cost-saving
solution on their telecommunication/data needs. With IP4G, company with branch offices in different countries
can be easily combined together to work like a virtual single office through internet.
Hardware Specifications
CPU
400MHz Blackfin 533 Chip
NAND Flash
256 M
SDRAM
128 M
GSM Port
4
Network Interface
WAN,LAN
Measurement and Weight
Inner box
225 * 120 * 30mm
G.W./unit
0.79KG
Carton MEAS
456 * 442 * 362 mm
Units per Carton
21 units/ CTN
G.W./CTN
18 KG/CTN
Function Features
Voicemail
Authentication before call outbound
Voicemail to Email
User WEB portal
Blind/Attended Transfer
Blacklist
Call Forward
Call Detail Records(CDR)
Call Parking
Conference
Do not Disturb (DND)
Ring Group
Group / Directed Pickup
Call Queue
Call Recording
Call Back
Call Waiting
IVR
Call Routing
Intercom/Paging
Caller ID
IP Restriction
BLF Support
Firewalls
Music on Hold
DDNS
Video Call
DHCP Server
PPPoE
VLAN

IPPBX IP4G User Manual
~ 5 ~ ATCOM TECHNOLOGY CO., LIMITED
Port Forward
VPN client
External Storage
Auto Provisioning
Storage Quota Privilege
IAX2
Fax to Email
Custom Dialplan
Auto call recording
Integrated built-in packet capture tools
1. Connection and Change IP Address of IPPBX
2.1 Connection
The default IP address of IPPBX is:
WAN: 192.168.1.100/255.255.255.0
LAN: 192.168.10.1/255.255.255.0
There are two network interfaces (WAM and LAN) in IP4G, it can be used as a router (WAN port connects
Internet and LAN port connects local network):
Internet
WAN
Ext:6001
192.168.10.3 Ext:6002
192.168.10.4
Ext:6003
192.168.10.5 Ext:6004
192.168.10.6
Ext:6005
192.168.10.7
Ext:6006
IVSP
LAN
192.168.10.1
WAN
tpcard.vicp.cc
If you do not want IPPBX to act as a router and put it behind a router, please connect WAN port to your local
network:
Internet
Ext:6001
192.168.1.3 Ext:6002
192.168.1.4
Ext:6003
192.168.1.5 Ext:6004
192.168.1.6
Ext:6005
192.168.1.7
WAN
192.168.1.100

IPPBX IP4G User Manual
~ 6 ~ ATCOM TECHNOLOGY CO., LIMITED
NOTE: It’s recommended to re-set IP address of IPPBX via WAN at the first time, Since DHCP server on LAN
port is enabled by default, Other DHCP client enabled devices in the network may obtain IP from IPPBX rather
than real DHCP server. And then access IPPBX via LAN after configuring LAN settings.
1) Connect IPPBX to your PC directly or through switch.
Make sure IP address of your PC is in network 192.168.1.0/255.255.255.0, if not, you need to appoint an IP
address for your PC, for example, 192.168.1.3
2) Login IPPBX as administrator via WEB GUI
User: admin
Password: atcom
NOTE: Language option will be accomplished in future versions, currently, only English is supported. So it’s not
selectable now.
3) Go to Network Settings ->WAN.
Re-set IP of WAN port.
4) Go to Network Settings -> LAN.
Re-set IP of LAN port.
2.2 WAN Settings
There are three ways to set an IP address to WAN port: DHCP, Static IP, PPPoE.
DHCP
IPPBX will obtain an IP address automatically from DHCP server when rebooting. It’s not recommended to
choose this option unless there is a reserved IP for IPPBX in DHCP server so that IPPBX can keep the same IP
all the time.

IPPBX IP4G User Manual
~ 7 ~ ATCOM TECHNOLOGY CO., LIMITED
Static IP
Set an IP address manually according to the real network environment. If IPPBX is behind a router, the gateway
is usually set to the IP of the router.
PPPoE
IPPBX will obtain an IP address automatically after establishing a connection to PPPoE server with username
and password.
2.3 LAN Settings
DHCP
Yes: IPPBX will get an IP address from DHCP server, Not recommended.
No: Configure IP address manually for LAN. Default is NO.
NAT
Yes: IPPBX will act as a router, all the devices connected to LAN can access the network connected to WAN.
Default is Yes.
No: Networks connected to LAN and WAN are independent.
NOTE: IP addresses of LAN and WAN can’t be in the same network.
For example: IP of WAN is 192.168.1.100/255.255.255.0, IP of LAN can’t be 192.168.1.xx/255.255.255.0
Hostname

IPPBX IP4G User Manual
~ 8 ~ ATCOM TECHNOLOGY CO., LIMITED
Set the host name for IPPBX.
IP Address / Subnet Mask
Set the IP address / subnet mask for LAN network interface.
Gateway
Set the Gateway for LAN network interface.
Primary DNS / Secondary DNS
Set the DNS server for LAN network interface.
IP Address 2 / Subnet Mask 2
Set the failover IP address for LAN network interface.
2.4 DHCP Server
The Dynamic Host Configuration Protocol (DHCP) is a network protocol used to configure devices that are
connected to a network (known as hosts) so they can communicate on that network using the Internet Protocol
(IP). It involves clients and a server operating in a client-server model.
Enable DHCP server
Check to enable DHCP server.
Default Gateway
Gateway information that will be used in DHCP client.
Subnet Mask
Subnet Mask that will be used in DHCP client.
Primary DNS / Secondary DNS
DNS information that will be used in DHCP client.
Start IP / End IP

IPPBX IP4G User Manual
~ 9 ~ ATCOM TECHNOLOGY CO., LIMITED
IP address pool, IP in which will be assigned to DHCP client.
Lease Time
The amount of time the address is leased for DHCP client, When the lease is up, it either renews or gets a new
address.
NOTE: All the network settings will take effect immediately when you save the change.
2.5 System Status
1) General
Product Model

IPPBX IP4G User Manual
~ 10 ~ ATCOM TECHNOLOGY CO., LIMITED
Show the model of this IPPBX
Firmware Version
Show the firmware version
System Uptime
Show the time how long the system has been running
System Current Time
Show the current time
2) Network
Show the network setting of IPPBX
3) Peripheral
Show what kinds of / how many modules are detected.
2. Create local extensions and make interior calls
There are two kinds of extensions in IPPBX: SIP extensions and IAX extensions.
3.1 VOIP extensions
A VOIP extension is a SIP/IAX Account that allows an IP Phone or an IP SoftPhone client to register on IPPBX. It
can be created / modified / deleted one by one or in batch.
3.2.1 Add new extensions
a. Add single extension
Click to add an extension
NOTE: VOIP extension number range is defined in PBX Settings -> Options -> Extension Preference,
changing it can create extensions in others number range.
1) General
Type
Extension type: SIP,IAX or SIP/IAX.
SIP –The extension sends and receives calls using the VoIP protocol SIP.
IAX -The extension sends and receives calls using the VoIP protocol IAX.
Name
A character-based name for this extension, i.e. ‘Bob Jones’
Extension
Extension number, i.e. 6000, it is associated with this particular user / phone.
Password

IPPBX IP4G User Manual
~ 11 ~ ATCOM TECHNOLOGY CO., LIMITED
Authentication for VOIP phone to register and make calls.
Caller ID
CID showed in the other’s phone during a call, default is Extension.
2) SIP Setting(Only for SIP extension)
NAT
Try this setting when IPPBX is on a public IP, communicating with devices hidden behind a NAT device
(broadband router). If you have one-way audio problems, you usually have problems with your NAT configuration
or your firewall’s support of SIP+RTP ports.
Can Reinvite
By default, IPPBX will route the media streams from SIP endpoints through itself. Enabling this option causes
IPPBX to attempt to negotiate the endpoints to route the media stream directly, bypassing IPPBX. It is not always
possible for IPPBX to negotiate endpoint-to-endpoint media routing.
DTMF Mode
Select DTMF sending mode, there are three modes: rfc2833, inband, info. The DTMF setting in here should be
as same as that in SIP phone, otherwise IPPBX will not detect the users’ input correctly during a call.
Auto means IPPBX will match anyone of them according to the setting of SIP phone.
Transport
The transplant protocol type for VoIP data package, default is UDP. Please make sure TCP is enabled in PBX
Settings -> SIP Settings before using TCP.
SIP Quality
Check this option to force keep alive.
3) Voice Mail
Enable Voice Mail
Check this option to enable voice mail account for the extension. Enabled by default.
Voice Mail Access PIN Code
Password for accessing this voice mail account, default is the extension number. It’s also the password for
extension to login his administration web page.
4) Mail Setting
Enable Sending Voice Mail
Check this option to enable PBX send new voicemail to Email address below as an attachment.
Email Address
The Email address that new voicemail will be send to when Enable Sending Voice Mail is enabled and PBX
settings -> SMTP settings is right set.
5) Follow Me
Follow me is a feature to let an incoming call to a called party to be redirected to a third party, the third party can
be a voicemail box, ring group, mobile telephone and so on.

IPPBX IP4G User Manual
~ 12 ~ ATCOM TECHNOLOGY CO., LIMITED
When callee is No Answer / Busy / Unreachable, incoming calls will go to voicemail by default, if voicemail is
disabled, call will be hung up.
6) Other Options
Pickup Group
Allows extension to answer someone else’s telephone call by dialing the group call pickup code (defined in PBX
Settings->Feature Codes->General), the two extensions must be in a same pickup group.
IPPBX supports 10 pickup groups: 0-10, None means the extension belongs to none pickup group, extensions in
group None can’t pick up others’ ring call and also can’t be picked up by others.
Call Waiting
Check this option to enable the Call Waiting capability for this extension. Then the extension can answer a new
call when it is already on the line. It also needs the call waiting support of IP phone. If this Option is checked, the
follow me option “When busy” will be unavailable.
Ring Out

IPPBX IP4G User Manual
~ 13 ~ ATCOM TECHNOLOGY CO., LIMITED
Set the ring timeout for this extension. IPPBX will stop ringing the extension if the time is up and there is still no
answer.
Use Web Interface
When checked, user can login the administration web page of this extension with extension number and voice
mail pin code as username and password.
Storage Quota Privilege
Set capacity of disk space for this extension to store voicemail.
Restricted: 1 M
Basic: 2 M
Regular: 3 M
Privileged: 4 M
Super: 5 M
NOTE: If you have set System Settings -> External Storage and set Move Files Created Before 0 days ago.
This storage limitation will be of no use.
DND
Do not disturb, once checked, the extension will be unavailable.
Call Recording
Check this option to record all interior calls made by this extension, user can check the recordings on the personal
web portal and with record account(password is the same with admin) too.
Advanced Configuration
Preferred Codec
Set the allowed codec and priority for SIP phone. The options are below:
Audio: A-law, U-law, GSM, SPEEX, G726, G722, ADPCM, G729
Video: H261, H263, H263P, H264

IPPBX IP4G User Manual
~ 14 ~ ATCOM TECHNOLOGY CO., LIMITED
NOTE: There must be at least one same audio/video codec chose in IPPBX extension settings and SIP phone
codec settings, otherwise, It’s impossible to make audio/video calls between IPPBX and SIP phone.
IP Restriction
Enable it to permit trusted IP/network register to this extension number. This is an useful way to improve the
security of IPPBX.
Set trusted IP: xx.xx.xx.xx/255.255.255.255, for example: 192.168.1.160/255.255.255.255
Set trusted network: xx.xx.xx.xx/subnet mask, for example: 192.168.1.0/255.255.255.0
b. Click to add multiple extensions.
3.2.2 Modify extensions
a. Click behind an extension to edit the extension.
b. Choose one or more extensions, click to modify them simultaneously.
3.2 Register onto IPPBX with your IP phone
Login the web administration page of IP phone and set the account information.
After successfully register with 6000, 6001 and 6002, you can make interior calls among 6000, 6001, 6002 now.

IPPBX IP4G User Manual
~ 15 ~ ATCOM TECHNOLOGY CO., LIMITED
3.3 Extensions Status
This page is used to check the extensions status.
Idle: The extension is registered and idle.
Busy: The extension is on the phone.
Ringing: The extension is ringing.
Hold: The extension is on hold
Unavailable: The extension is not registered and unreachable.
NOTE: If this page response slowly, please be patient to wait the output before check other pages. Otherwise,
other pages cannot be displayed correctly since IPPBX is accessing database while status checking, and
database is locked for other pages’ request.

IPPBX IP4G User Manual
~ 16 ~ ATCOM TECHNOLOGY CO., LIMITED
3.4 Feature Codes
1) General
Call Recording
Record a call while in the call.
Dial Call Recording Code to begin recording and dial it again to stop recording during a call.
Checking Voicemail
Users can check their Voicemail by dialing this code on their phone.
Attended Transfer
Routed a call to a third party only if the third party answers the call. The call flow should be like below:
1. Phone A call B, B answers the call.
2. B presses feature code(*3) and C’s number to transfer the call to C
3. If C answers B’s call, B can talk to C and A is on hold
4. If Phone B hangs up, A will talk to C, transfer is successful.
4’ If Phone C hangs up, B connects back to A, transfer is failed
Blind Transfer
Blind transfer is when a call is routed to a third party, the original call is ended, and no check is made to determine
whether the transferred call is answered or if the number is busy.
The call flow should be like below:
1. Phone A call B, B answers the call.
2. B presses feature code(*03) and C’s number to transfer the call to C

IPPBX IP4G User Manual
~ 17 ~ ATCOM TECHNOLOGY CO., LIMITED
Group Call Pickup
Pick up a ring call for other extensions in the same pickup group.
The call flow should be like below:
1. C calls A, phone A is ring, but A is not at his/her seat.
2. Extension A and B are in the same pick up group, B can dial Group Call Pickup code to pick up the ring call,
and talk to C.
Direct Call Pickup
Pick up a ring call for an appointed extension.The call flow should be like below:
1. C calls A, phone A is ring, but A is not at his/her seat.
2. B can dial Direct Call Pickup code + A’s extension number to pick up the ring call, and talk to C.
Intercom
Connect directly to a specified phone.
The call flow should be like below:
1. A dial Intercom code + B’s extension nubmer.
2. If Phone B supports page/intercom, it will answer the call automatically.
2) Call Park
It allows a person to park a call on IPPBX and continue the conversation from any other telephone set.
The call flow should be like below:
1. A and B are on the conversation.
2. A dial call park code (e.g. *6), PBX will tell A a park extension (e.g. 701) and then hang up the call. B is
parked on PBX.
3. C dial park extension: 701, PBX will bridge C and B.
3) Call Forward
Users can configure their follow me settings via their phones.
Reset to Defaults
Reset follow me settings by dialing *70 (default code, can be changed). After dialing in, PBX will prompt a “beep”,
then the setting is completed and the call will be hung up.
NOTE: Default Follow Me settings are as below:
Always: Disabled
When no answer: Enabled
When busy: Enabled
Forward to: Voice Mail

IPPBX IP4G User Manual
~ 18 ~ ATCOM TECHNOLOGY CO., LIMITED
Enable/Cancel Unconditional Call Forward
Enable/Disable call forward Always function.
Enable/Cancel Call Forward On Busy
Enable/Disable call forward When Busy function.
Enable/Cancel Call Forward On No-Answer
Enable/Disable call forward When No Answer function.
Call Forward to Number
Set the destination for call forward to number by dialing *74 (default code, can be changed), if the number is not
set yet, dial *74+number to set it.
Call Forward to Voice Mail
Set the destination for call forward to voicemail.
Enable/Cancel Do Not Disturb
Enable/Disable Do Not Disturb function
3.5 SMTP Settings
1) Voice Mail to Email Setting
Email Address
The Sender Email Address IPPBX used to send voicemail.
Password

IPPBX IP4G User Manual
~ 19 ~ ATCOM TECHNOLOGY CO., LIMITED
The password for above Email Address/Account.
SMTP Server
SMTP server that above email address/account is located in.
Port
Port for SMTP server, for example: Gmail server use port 465 to send / receive email.
Use SSL/TLS to send secure message to server
Some servers need to authenticate sender before sending email, then the box should be checked.
Test SMTP Settings
Check whether the SMTP setup is OK. PBX will send an email to the test email address using above SMTP
setting information. If the test failed, please check that information and network connection.
NOTE: After SMTP setting, please set Email address for each extension to achieve Voicemail to Email function.
2) Voice Mail Setting
Max Messages
This limits the number of messages in a voicemail folder. The maximum value is 9999 (hard coded) and the
default 100. When a mailbox has more than this number of messages in it, new messages can not be recorded
and “voice mail box is full” is played to the caller.
Max Messages Time
This defines the maximum amount of time in seconds of an incoming message. Use this when there are many
users and disk space is limited. The default value is 120 (2 minutes), 0 means there will be no maximum time limit
enforced.
Min Messages Time
This setting can be used to eliminate messages which are shorter than a given amount of time in seconds. The
default value for this setting is 5.
Say CID/Duration
Read back caller’s telephone number / message duration prior to playing the incoming message when checking
it.
Other manuals for IPPBX IP4G
1
Table of contents
Other ATCOM PBX manuals

ATCOM
ATCOM APBX IP4G User manual

ATCOM
ATCOM IPPBX IP01 User manual

ATCOM
ATCOM IPPBX IP01 User manual

ATCOM
ATCOM IPPBX IP04 User manual

ATCOM
ATCOM IP-01P User manual

ATCOM
ATCOM IPPBX IP08 User manual

ATCOM
ATCOM IPPBX IP04 User manual

ATCOM
ATCOM IPPBX IP-2G4A User manual

ATCOM
ATCOM IPPBX IP-2G4A User manual

ATCOM
ATCOM IPPBX IP02 User manual
Popular PBX manuals by other brands

JK Audio
JK Audio Innkeeper PBX user guide

Grandstream Networks
Grandstream Networks UCM6102 Buyer's guide

Panasonic
Panasonic KX-TA624 installation manual

Yeastar Technology
Yeastar Technology MyPBX user manual

ZyXEL Communications
ZyXEL Communications X6004 quick start guide

Epygi
Epygi Quadro Quadro 4x Specifications